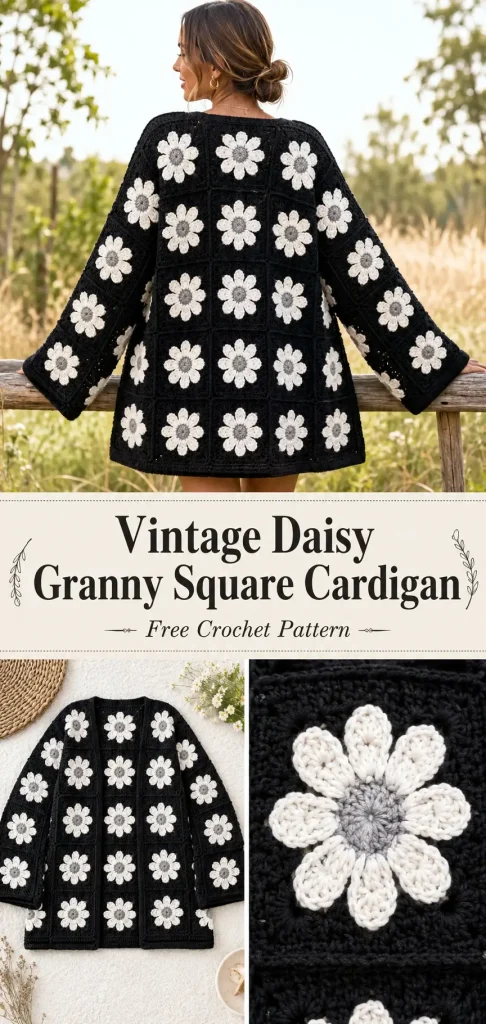
This vintage daisy crochet cardigan combines bold black granny squares with oversized white and soft-gray flowers for a dramatic handmade look. The relaxed drop-shoulder shape, open front, wide sleeves, and repeating floral motifs give it the oversized retro style visible in the inspiration.
This is an original motif-cardigan construction designed from the visible idea. Every section is built from the same square size so the back, front panels, sleeves, armholes, and seams fit together logically without complicated garment shaping.
Description
The finished cardigan is assembled from 27 large flower granny squares.
The construction uses:
- 9 squares for the back
- 3 squares for the left front
- 3 squares for the right front
- 6 squares for the left sleeve
- 6 squares for the right sleeve
The back is arranged in a 3 × 3 grid. Each front is one motif wide and three motifs long. Each oversized sleeve is a 2 × 3 motif rectangle that is folded into a tube and attached to a one-motif-deep armhole.
Each motif has a round flower with 8 long rounded petals, surrounded by several rounds of black crochet that convert the flower into a square.
The finished cardigan has:
- Open front
- Wide neckline
- Dropped shoulders
- Straight body
- Oversized sleeves
- Straight hem
- Black joining seams and edging
- No buttons
- No zipper
- No hood
- No pockets
Finished Size
The construction is based on the finished size of one granny square.
For the sample version, make each blocked square approximately 20 cm × 20 cm.
This gives approximately:
- Back width: 60 cm
- Body length: 60 cm before edging
- Approximate full body circumference: 100 cm
- Sleeve length from dropped shoulder: about 60 cm
- Sleeve circumference: about 40 cm
- Relaxed oversized fit
Easy Size Adjustment
Keep the same 27-square layout and change the finished motif size.
- XS/S: approximately 18 cm square
- M/L: approximately 20 cm square
- XL/2XL: approximately 22 cm square
- 3XL: approximately 24 cm square
The easiest way to enlarge a motif without changing the flower is to add extra black granny rounds around the square.
Materials
- Worsted-weight or aran-weight yarn
- Black yarn: approximately 800–1000 g
- White yarn: approximately 150–200 g
- Soft silver-gray yarn: approximately 100–150 g
- 5 mm crochet hook, or size needed for the required motif measurement
- Yarn needle
- Scissors
- Stitch markers
- Blocking mats
- Rustproof pins
A cotton-acrylic or soft acrylic blend works well because the cardigan needs enough structure to hold the squares while still draping comfortably.
Abbreviations
- ch – chain
- dc – double crochet
- hdc – half double crochet
- MR – magic ring
- sc – single crochet
- sl st – slip stitch
- sp – space
- st – stitch
- sts – stitches
Pattern Notes
- US crochet terminology is used.
- Make all motifs the same finished size.
- Block every square before joining.
- Each flower has exactly 8 petals.
- The visible sample uses black as the dominant background.
- White and soft-gray flowers can be alternated for the vintage mixed-flower appearance.
- Sleeves are intentionally roomy.
- Join motifs using black yarn.
- Keep all motif fronts facing the same direction during assembly.
- Do not sew the sleeve opening closed before checking its circumference against the armhole.
- The cardigan is designed to remain open at the front.
Color Layout
For a balanced vintage look, make two flower colorways.
Flower A
- Center: soft gray
- Petals: white
- Square background: black
Flower B
- Center: white
- Petals: soft gray
- Square background: black
Make:
- 14 Flower A motifs
- 13 Flower B motifs
Alternate them throughout the cardigan instead of grouping identical flowers together.
Step-by-Step Instructions
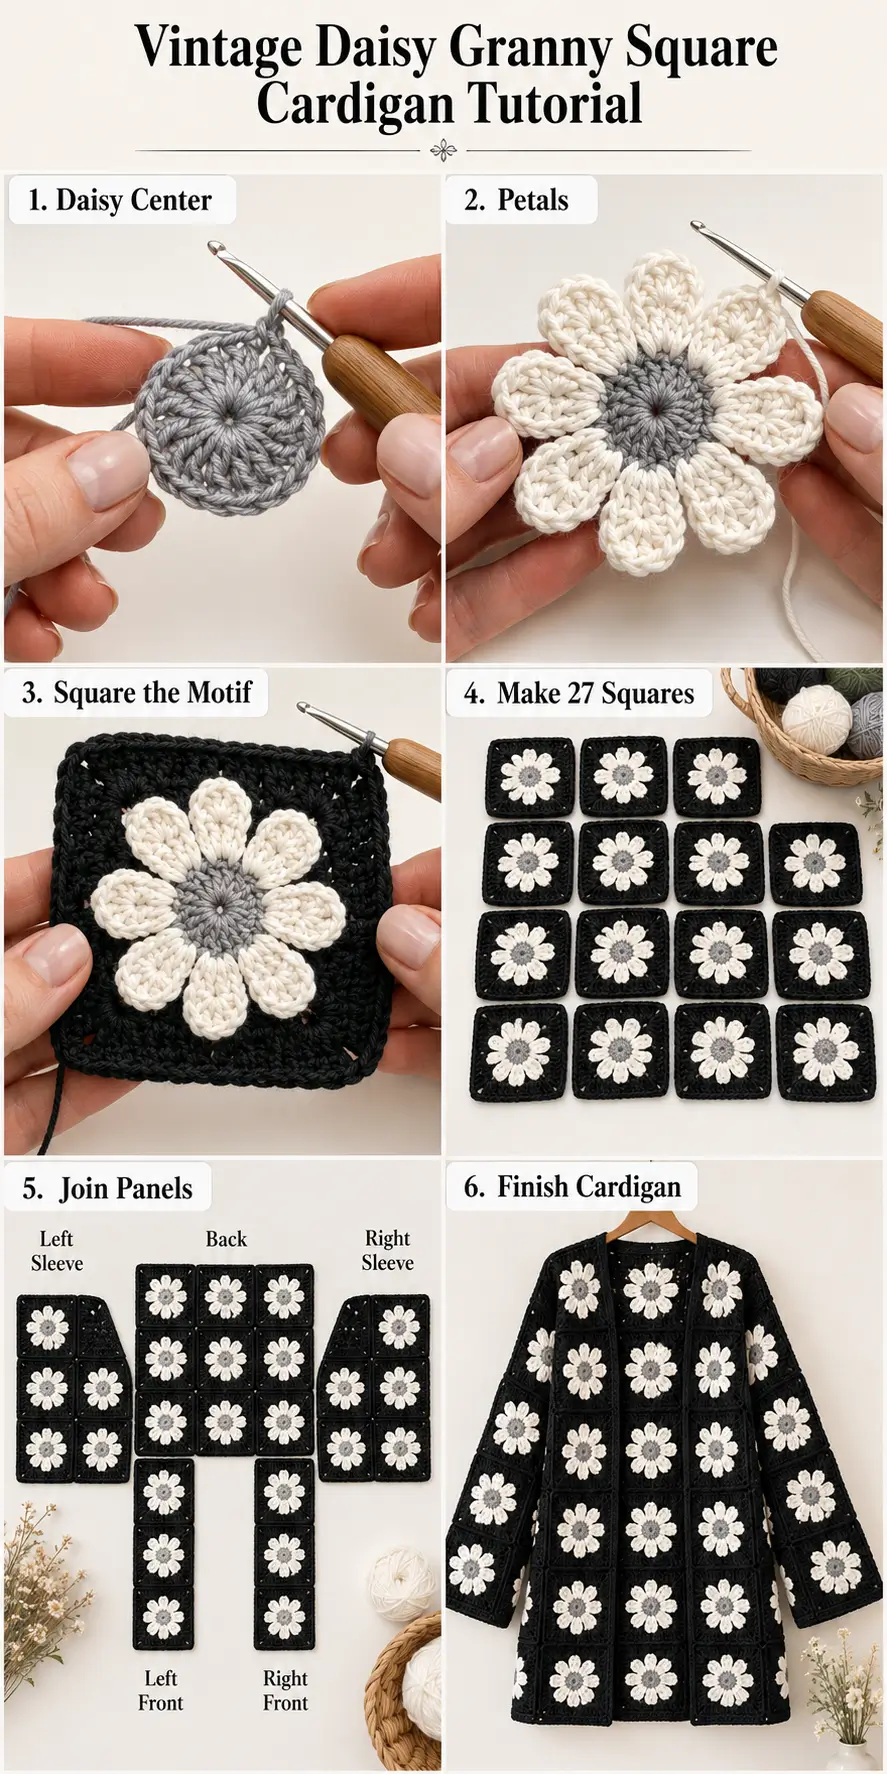
Part 1: Crochet the Daisy Center
Using the center color, make an MR.
Round 1
Ch 1.
Work 8 sc into the ring.
Pull the ring closed.
Join with a sl st in the first sc.
You should have 8 sts.
Fasten off the center color.
Part 2: Create the Eight Petal Foundations
Join the petal color in any center stitch.
Round 2
Ch 6.
Sl st in the next center st.
Repeat around:
Ch 6, sl st in next st.
At the end you should have exactly:
- 8 ch-6 loops
- 8 petal positions
Join neatly at the base of the first loop.
Do not fasten off.
Part 3: Crochet the Eight Daisy Petals
Round 3
Work the following into the first ch-6 loop:
- 1 sc
- 1 hdc
- 3 dc
- 1 hdc
- 1 sc
Ch 2.
Repeat the same sequence in every remaining ch-6 loop:
1 sc, 1 hdc, 3 dc, 1 hdc, 1 sc, ch 2
After the eighth petal, join with a sl st at the base of the first petal.
Fasten off the flower color.
You should now have:
- 8 rounded petals
- 8 ch-2 spaces between the petals
These eight spaces will be used to convert the flower into a square.
Part 4: Square the Flower
Join black yarn in any ch-2 space between petals.
Choose this space as the first corner.
Black Round 1
Ch 3. This counts as the first dc.
In the same ch-2 sp, work:
- 2 dc
- ch 2
- 3 dc
Ch 1.
In the next ch-2 petal space, work:
3 dc.
Ch 1.
In the next petal space work:
- 3 dc
- ch 2
- 3 dc
This is the next corner.
Continue around using:
Corner space:
3 dc, ch 2, 3 dc
Middle space between corners:
3 dc
Place ch 1 between neighboring groups.
Because there are eight petal spaces, every second petal space becomes a corner.
At the end you should have:
- 4 corners
- 1 side cluster between every pair of corners
Join with a sl st in the top of the beginning ch 3.
Part 5: Enlarge the Black Square
Black Round 2
Sl st across to the first corner ch-2 sp.
Ch 3.
Work:
- 2 dc
- ch 2
- 3 dc
in the same corner.
Ch 1.
Work 3 dc in each ch-1 sp across the side, placing ch 1 between groups.
In the next corner work:
3 dc, ch 2, 3 dc
Repeat around.
Join.
Black Round 3
Repeat Black Round 2.
Additional Size Rounds
Continue repeating the same granny-square round until the motif reaches your required measurement.
For the sample cardigan, aim for approximately:
20 cm × 20 cm after blocking.
Do not change the flower portion when resizing. Add or remove only black outer rounds.
Part 6: Final Motif Edging
When the motif is almost the required size, finish with a firm black edging.
Ch 1.
Sc in every dc and every ch-1 sp around.
At each corner ch-2 space work:
2 sc, ch 1, 2 sc
Continue around.
Join with a sl st.
Fasten off.
This final round creates a cleaner edge for joining.
Part 7: Make 27 Matching Squares
Make exactly 27 motifs.
Check every motif for:
- 8 petals
- 4 square corners
- Equal number of black rounds
- Equal finished measurements
Do not assemble squares with significantly different dimensions.
Part 8: Block the Squares
Lightly dampen each motif.
Pin every square to the same measurement.
For the sample:
20 cm × 20 cm
Keep every corner square and every side straight.
Allow the motifs to dry completely before assembly.
This step is important because 27 small differences can create a noticeably uneven cardigan.
Part 9: Arrange the Back
Lay out 9 motifs in a 3 × 3 grid.
Use this arrangement:
A – B – A
B – A – B
A – B – A
The back should form one large rectangle measuring approximately:
- 60 cm across
- 60 cm tall
for 20 cm motifs.
Part 10: Join the Back
Using black yarn and a yarn needle, join neighboring squares.
A mattress stitch or whip stitch works well.
For a flatter seam:
Place two motifs right sides together.
Sew through corresponding edge loops from one square and then the other.
Match:
- Corner to corner
- Stitch to stitch
- Granny space to corresponding granny space
Do not pull the seam so tightly that the squares gather.
First join the squares into horizontal rows.
Then join the three rows together.
Part 11: Make the Front Panels
Each front panel contains three motifs arranged vertically.
Left Front
B
A
B
Join the three squares together.
Right Front
B
A
B
Join the three squares together.
Each panel should be approximately:
- 20 cm wide
- 60 cm long
for the sample size.
Part 12: Join the Shoulders
Lay the back panel flat with the right side facing upward.
Place the left and right front panels over the back with right sides facing each other.
Position:
- Left front over the upper-left back square
- Right front over the upper-right back square
Leave the upper center back square uncovered.
This uncovered center section forms the back neckline.
Join the top edge of the upper left front square to the top edge of the upper left back square.
Repeat on the right.
Each shoulder seam is one motif wide.
Part 13: Join the Body Sides
Keep the cardigan wrong side outward.
Starting at the hem, join the left front panel to the left side of the back.
Join across the lower two motif heights only.
Stop when you reach the beginning of the upper back motif.
Do not sew the final motif-height section.
That remaining opening becomes the armhole.
Repeat on the opposite side.
Each armhole should therefore measure approximately one motif high.
With 20 cm motifs, one armhole opening measures approximately:
- 20 cm down the front
- 20 cm down the back
- approximately 40 cm around
This matches the sleeve circumference.
Part 14: Build the Left Sleeve
Use 6 motifs.
Arrange them in a rectangle:
A – B
B – A
A – B
The sleeve panel is:
- 2 motifs wide
- 3 motifs long
With 20 cm motifs, it measures approximately:
- 40 cm around before seaming
- 60 cm long
Join the motifs into the 2 × 3 rectangle.
Part 15: Turn the Sleeve into a Tube
Fold the sleeve rectangle lengthwise with right sides together.
The two long three-motif edges should meet.
Join these edges using black yarn.
You now have a tube that is:
- 3 motifs long
- 2 motifs around
Leave both short ends open.
One end becomes the armhole edge.
The opposite end becomes the cuff.
Part 16: Make the Right Sleeve
Repeat the same construction with another 6 motifs.
Use the same 2 × 3 arrangement.
Check that both finished sleeve tubes are identical in:
- Length
- Circumference
- Motif orientation
Part 17: Attach the Sleeves
Turn the cardigan body wrong side outward.
Keep the sleeve right side outward.
Insert the sleeve into the armhole so right sides are touching.
Match the sleeve seam with the underarm seam.
Pin four points first:
- Top shoulder point
- Underarm
- Front midpoint
- Back midpoint
The circumference of the sleeve should match the complete armhole opening.
Sew the sleeve around the armhole with black yarn.
Join corresponding edge stitches carefully.
Repeat with the second sleeve.
Turn the cardigan right side out.
Part 18: Front and Neckline Border
Using black yarn, join at the lower corner of the right front.
Ch 1.
Work sc evenly:
- Up the right front opening
- Around the back neckline
- Down the left front opening
At outer corners, work 2 or 3 sc in the corner as necessary to keep the edging flat.
Border Round 2
Ch 1 and turn.
Sc in every st along the complete front and neckline border.
Fasten off.
The border should remain narrow and black.
Do not add buttonholes because the visible cardigan is designed to hang open.
Part 19: Bottom Hem
Join black yarn at one lower front corner.
Work 1 sc evenly around the complete lower edge.
At every motif seam, keep the stitch spacing consistent.
For a slightly stronger hem, work a second round of sc.
Fasten off.
Part 20: Sleeve Cuffs
Join black yarn at the underarm seam of one sleeve.
Cuff Round 1
Ch 1.
Sc evenly around the sleeve opening.
Join with a sl st.
Cuff Round 2
Ch 1.
Sc in every st around.
Join.
Fasten off.
Repeat on the second sleeve.
Keep the cuffs relaxed. The visible design has roomy straight sleeves rather than tightly gathered wrists.
Part 21: Final Finishing
Weave in every remaining yarn tail.
Check all 27 motifs.
Secure any loose flower-color joins from the wrong side.
Inspect the shoulder seams carefully because they carry much of the garment weight.
Gently steam or wet block the completed cardigan.
Lay it flat and arrange:
- Front edges straight
- Hem level
- Sleeves equal
- Flower motifs square
- Shoulder seams flat
Allow it to dry completely.
Final Construction Check
The finished cardigan should have:
- 27 total flower squares
- 9-square 3 × 3 back
- 3-square left front
- 3-square right front
- 6-square left sleeve
- 6-square right sleeve
- 8-petal flowers
- Black square backgrounds
- White and soft-gray floral details
- Open front
- Wide neckline
- Dropped shoulders
- Oversized straight sleeves
- Black joining seams
- Narrow black front edging
- Narrow black hem
- No buttons
- No pockets
- No hood
Tips & Variations
For the most similar vintage look, keep the black yarn dominant and use bright white plus cool light gray for the flower details.
Make one sample motif before buying all your yarn. Block it and measure it carefully because the finished square size controls the entire cardigan fit.
If the cardigan is too small, do not add random extra motifs unless you also redesign the sleeve and armhole geometry. Instead, add another black granny round to every motif.
If the cardigan is too large, remove one outer black round from every square.
Keep the flower section unchanged when resizing. This preserves the large daisy-to-square proportion.
Use a slightly smaller hook for the final black sc edging if you want firmer seams.
For a softer drape, use a wool-acrylic or cotton-acrylic blend.
Avoid extremely heavy pure cotton unless you want a very weighty cardigan. Twenty-seven large motifs can become heavy once joined.
For an extra oversized fit, make each motif approximately 22–24 cm rather than changing the layout.
FAQ
How many granny squares do I need for this cardigan?
This construction uses exactly 27 large daisy granny squares: nine for the back, six for the fronts, and twelve for the sleeves.
Why are the sleeves two squares wide?
Two motifs around the sleeve create the roomy circumference visible in the design. With 20 cm squares, the sleeve circumference is approximately 40 cm.
How do the sleeves match the armholes?
The upper one-motif section of each body side is left unsewn. Its front and back edges together create an armhole circumference equal to two motif widths, matching the two-motif-wide sleeve tube.
Can I make the cardigan bigger without changing the motif layout?
Yes. Add more black outer rounds to all 27 squares until each motif reaches the size needed for your measurements.
Do I need buttons?
No. This vintage floral cardigan is designed as an open-front layer.
Can all the flowers be white?
Yes. Using white petals with light-gray centers on every motif creates a more uniform version. Alternating white and soft-gray flower details gives the cardigan more of the mixed vintage appearance seen in the inspiration.
Conclusion
This vintage daisy granny square cardigan turns 27 bold floral motifs into a relaxed statement layer with an oversized handmade feel. The 3 × 3 back, narrow open fronts, dropped shoulders, and wide 2 × 3 motif sleeves create a construction that is easy to understand once the squares are finished. Make it in dramatic black, white, and soft gray for the vintage look, or keep the same construction and choose your favorite contrasting flower colors.



Can I buy the pattern for the granny square cardigan? I’m leery of downloading software needed to print the PDF pattern. Too many viruses.