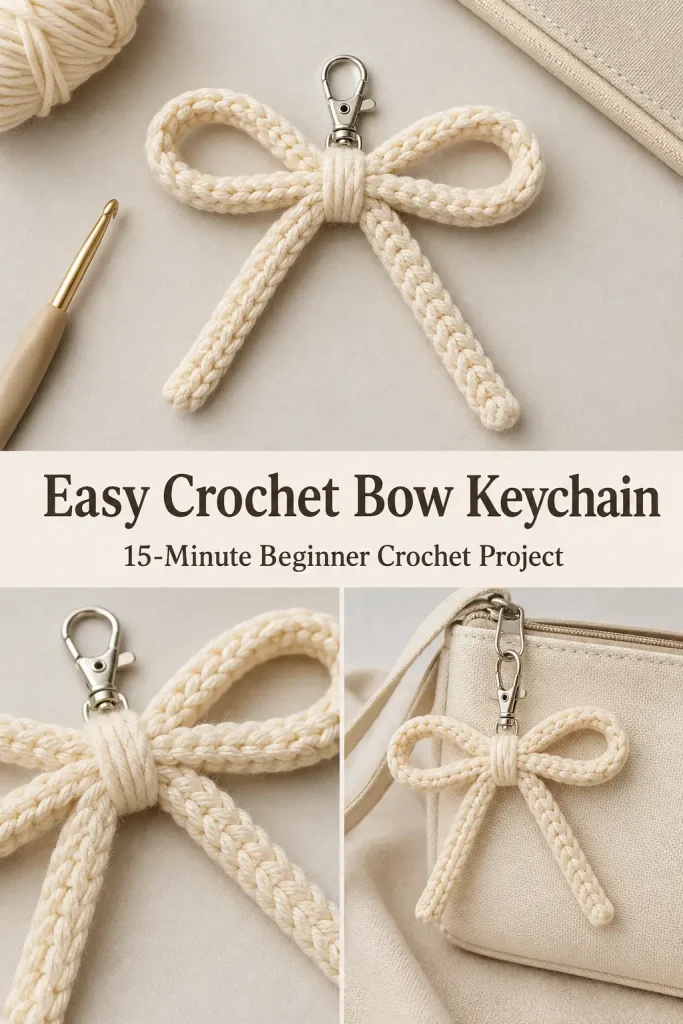
This easy crochet bow is one of those tiny projects that works up quickly but looks incredibly sweet when finished. It uses a single crocheted cord that is shaped into two loops and two tails, then secured at the center to create the classic bow shape.
You can leave the finished bow as a crochet appliqué or add a small lobster clasp to turn it into a cute crochet keychain or bag charm. With only chains and slip stitches, this is also a great beginner crochet project for practicing basic hook control.
Description
The finished crochet bow has two open rounded loops at the top and two narrow tails hanging below. Instead of crocheting several separate pieces, the entire bow begins as one long strip made from a 50-chain foundation and one row of slip stitches. The strip is folded into shape and tied securely at the center with a separate yarn strand. A metal keychain clasp can be secured at the upper center while the bow is being tied.
Using medium-weight yarn and a 4 mm hook creates a small, slightly structured bow suitable for handbags, backpacks, zipper pulls, keys, gifts, or decorative appliqués.
Materials
- Approximately 1 g medium-weight yarn
- 4 mm crochet hook
- Scissors
- Yarn needle
- Keychain lobster clasp, optional
Abbreviations
- ch – chain
- sl st – slip stitch
- st – stitch
Pattern Notes
- This pattern uses US crochet terminology.
- Medium-weight yarn creates the sample-size bow.
- A slightly smaller hook than the yarn normally recommends helps create a firmer bow.
- The sample begins with exactly 50 chains.
- Fewer chains create a smaller bow.
- More chains create a larger bow.
- Row 1 consists entirely of slip stitches.
- The finished strip is shaped manually into the bow.
- A separate approximately 10-inch yarn strand secures the center.
- The keychain clasp is optional.
- If you want a thicker crochet cord, additional slip-stitch rows may be added as described in the original construction.
Step-by-Step Instructions
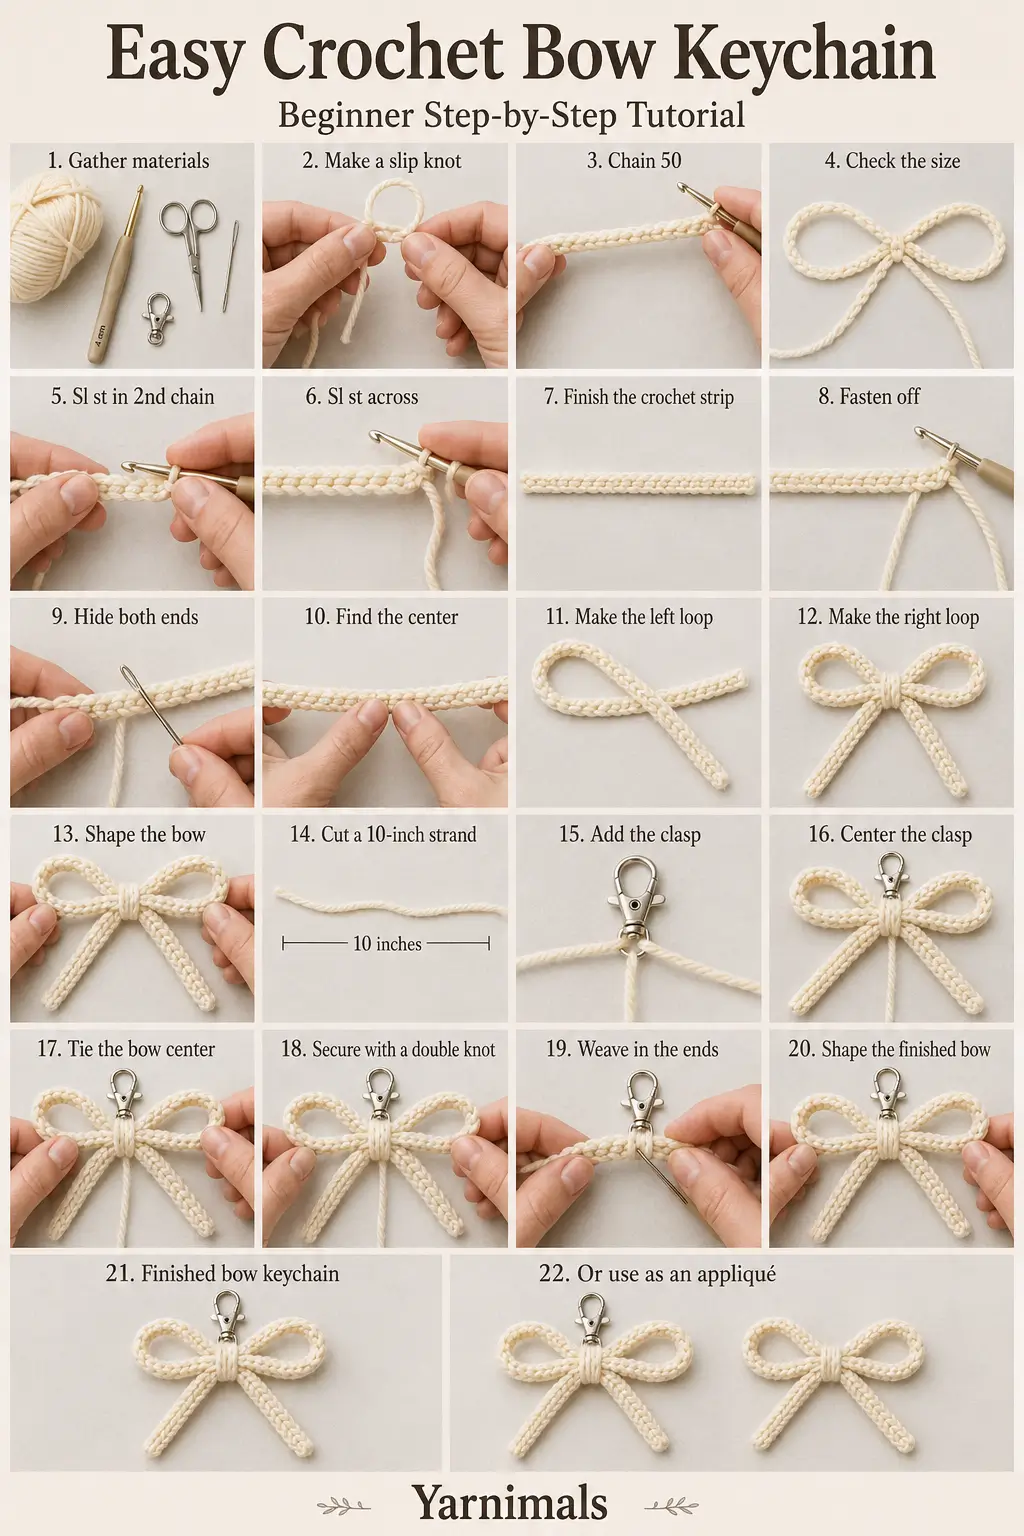
Make the Slip Knot
Leave approximately 4 inches of yarn for the beginning tail.
Make a slip knot and place it on the hook.
Do not tighten it excessively.
Foundation Chain
Ch 50.
Pause before continuing and gently lay the chain into a bow shape to check the approximate finished size.
If you want a smaller crochet bow, remove some chains.
If you want a larger bow, add more chains.
Keep the final chain count you choose consistent before beginning Row 1.
Row 1
Starting in the second ch from the hook, work 1 sl st.
Continue working:
1 sl st in every chain across.
Work all the way to the final foundation chain.
The project should now be one long, narrow crochet strip.
Optional Thicker Bow Strip
If you want the strip to be slightly thicker:
Ch 1 and turn.
Work 1 sl st in each stitch across.
Repeat additional rows if desired.
For the slim bow shown in the design, one main slip-stitch row creates the simple lightweight look.
Fasten Off
Ch 1.
Cut the yarn, leaving approximately a 4-inch tail.
Pull the cut yarn completely through the final loop.
Tighten gently.
Weave In the Beginning Tail
Thread one loose yarn end through a yarn needle.
Run the needle underneath nearby crochet loops.
Pull the tail through.
Continue weaving the yarn beneath several stitch loops.
The original construction weaves the yarn through approximately 3 inches of the strip before trimming.
Once the end is secure, trim the excess yarn.
Repeat with the loose tail at the opposite end.
After both ends are woven in, you should have one clean crochet strip with no loose working tails.
Form the Crochet Bow
Cut a separate piece of matching yarn approximately 10 inches long.
Set it aside.
Lay the crochet strip flat.
Find the approximate center of the strip and hold that point in place.
Form the Left Loop
Take the left end of the strip.
Curve it upward and around to form one open loop.
Bring the end diagonally across the center toward the lower right side.
Hold the crossing point firmly.
Form the Right Loop
Take the remaining end.
Curve it upward in the opposite direction to make the second loop.
Bring that end diagonally across the center toward the lower left side.
The strip should now form:
- One left loop
- One right loop
- One left-facing or diagonal tail
- One right-facing or diagonal tail
Adjust both loops before securing them.
Make sure the loops are similar in size and the tails hang naturally.
Secure the Center Without a Keychain Clasp
If you are making the bow as an appliqué:
Place the previously cut 10-inch yarn strand beneath the center of the bow.
Bring both ends of the strand around the center crossing point.
Tie firmly.
Tie a second knot to create a secure double knot.
Check the bow shape before fully tightening.
Add the Keychain Clasp
If you want a crochet bow keychain, add the clasp before securing the center knot.
Place the 10-inch yarn strand beneath the middle of the shaped bow.
Slide the keychain clasp onto this securing strand.
Position the clasp directly above the bow center.
Bring the two yarn ends around the center crossing point.
Adjust:
- Left bow loop
- Right bow loop
- Left tail
- Right tail
- Keychain clasp position
Once everything is centered, tie the securing strand firmly.
Pass the strand around again if necessary to help hold the metal clasp at the upper center of the bow.
Tie another knot on the opposite side.
Finish with a secure double knot.
The clasp should sit immediately above the bow rather than sliding down toward one loop.
Hide the Center Tails
Thread one securing tail through a yarn needle.
Weave it beneath nearby crochet stitches around the center section.
Change direction and weave beneath several additional loops.
Trim the remaining yarn once it is secure.
Repeat with the second securing tail.
Do not leave long loose strands around the keychain hardware.
Final Shaping
Lay the bow flat.
Adjust the two upper loops until they are approximately equal in size.
Straighten both lower tails.
Gently shape the center so the crossing strips remain visible but compact.
Check that:
- Both loops remain open.
- The tails hang separately.
- The center knot is secure.
- The clasp sits at the top center.
- No yarn ends are visible.
- The crochet strip has not twisted.
Your crochet bow keychain is finished.
Tips & Variations
Use medium-weight yarn with a 4 mm hook when you want proportions similar to the sample.
A smaller hook will create a firmer crochet cord, which can help the loops hold their shape.
Cotton yarn creates crisp bow loops, while acrylic creates a slightly softer result.
For a miniature bow, reduce the number of foundation chains.
For a larger bag charm, increase the foundation chain before working the slip-stitch row.
You can make several bows in coordinated colors for backpacks, purses, pencil cases, or handmade gift packaging.
Soft cream creates a simple neutral bow, while blush pink gives the same pattern a delicate feminine look.
Other pretty color ideas include:
- Baby blue
- Lavender
- Sage green
- Burgundy
- Black
- Soft gray
- Pastel yellow
For a thicker bow, use the optional extra slip-stitch row before shaping.
If using the bow as an appliqué, omit the metal clasp and use the center securing yarn tails to sew it directly onto another crochet project.
FAQ
Is this crochet bow suitable for absolute beginners?
Yes. The crochet portion uses only chains and slip stitches. The final shaping is done by folding the completed strip into the bow.
How many chains do I need?
The sample uses 50 chains. You can use fewer for a smaller bow or more for a larger one.
Why use a smaller crochet hook?
A slightly smaller hook creates tighter stitches and helps the bow hold a firmer shape.
Can I make the bow without a keychain clasp?
Yes. Simply secure the center with the separate yarn strand and use the bow as an appliqué, decoration, gift embellishment, or hair-accessory component.
Can I make the crochet strip thicker?
Yes. After completing Row 1, ch 1, turn, and work another row of slip stitches across.
Conclusion
This easy crochet bow is a quick beginner project that turns a simple chain and slip-stitch strip into a cute handmade accessory. Add a lobster clasp for a crochet bow keychain, leave it plain as an appliqué, or make several in different colors for small gifts and bag charms. Because the bow size is controlled by the starting chain, it is also easy to customize for whatever project you have in mind.