Intro
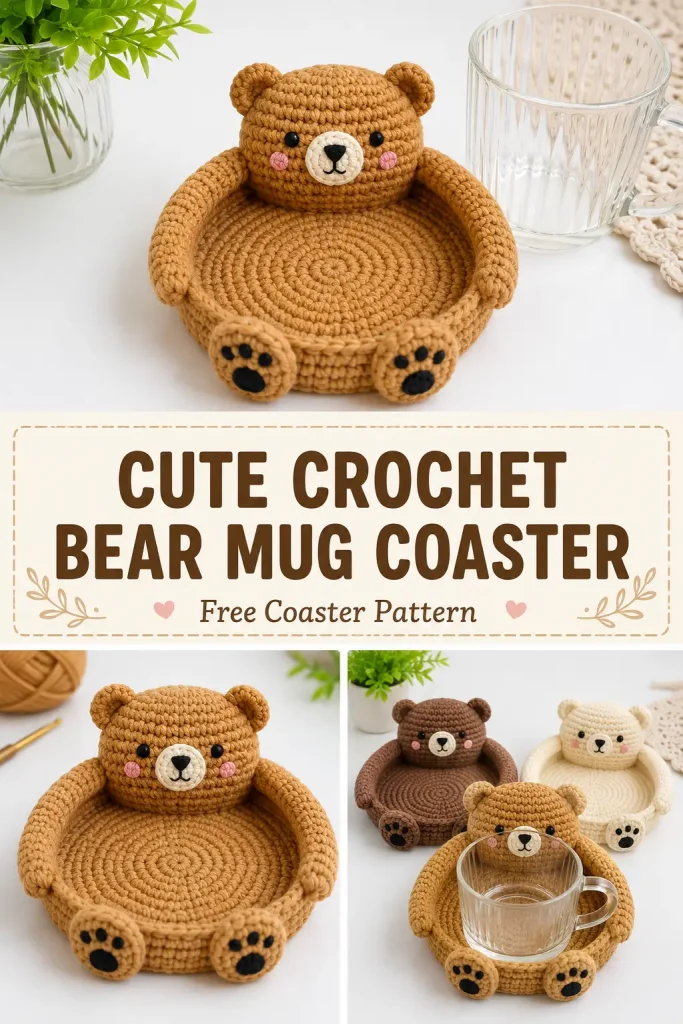
This little crochet bear coaster is part coaster, part tiny chair for your favorite mug. A round crochet base holds the cup securely while the bear’s head rises at the back, two long paws hug the sides, and two little feet decorate the front.
The linked inspiration describes a bear-shaped coaster made with basic crochet stitches, but it does not provide the detailed row-by-row construction needed to reproduce the visible three-dimensional design. The pattern below is an original construction based on the visible idea and includes the base, raised rim, head, ears, muzzle, face, arms, feet, paw details, assembly, and finishing.
This is a charming handmade crochet gift for coffee and tea lovers, and once you understand the construction, it is easy to make matching bears in brown, cream, caramel, or other soft colors.
Description
The finished crochet bear coaster has a round spiral base surrounded by a low raised wall, creating a shallow bowl that comfortably supports a mug. A stuffed teddy bear head is attached to the back wall, complete with two rounded ears, tiny dark eyes, a cream muzzle, embroidered nose and mouth, and optional pink cheeks.
Two long softly stuffed arms curve from the bear’s shoulders along the left and right sides of the coaster as though the bear is hugging the cup. At the front are two small oval feet with darker embroidered paw pads and toe marks.
For the closest result to the reference, use warm caramel brown for the entire bear, cream for the muzzle, dark brown or black for the face and paw details, and dusty pink for the cheeks.
Materials
- DK or light worsted weight cotton yarn in caramel or teddy-bear brown
- Small amount of cream yarn for the muzzle
- Small amount of dark brown or black yarn for eyes, nose, mouth, and paw markings
- Small amount of dusty pink yarn for cheeks
- 3 mm crochet hook
- Polyester fiberfill
- Yarn needle
- Scissors
- Stitch marker
- Pins for assembly
Recommended Yarn
Cotton or a cotton-rich yarn works especially well because it gives the coaster base good structure and clear stitch definition.
For a coaster that will regularly hold warm mugs, avoid very fluffy yarn that hides the stitches or makes the cup unstable.
Abbreviations
- MR – magic ring
- ch – chain
- sc – single crochet
- inc – 2 sc in the same stitch
- dec – single crochet decrease
- BLO – back loop only
- sl st – slip stitch
- st – stitch
- sts – stitches
Pattern Notes
- US crochet terminology is used.
- Work in continuous spirals unless instructed otherwise.
- Use a stitch marker to mark the beginning of each round.
- The base and raised wall are worked as one piece.
- The head, ears, arms, muzzle, and feet are made separately and sewn on.
- Keep the coaster base unstuffed and flat.
- Stuff the head moderately.
- Stuff the arms and feet only lightly so they stay soft and do not push the mug out of position.
- The sample is designed for a mug with a base approximately 8–9 cm wide.
- Finished coaster diameter is approximately 11–12 cm before adding the arms.
- Difficulty: adventurous beginner.
Step-by-Step Instructions
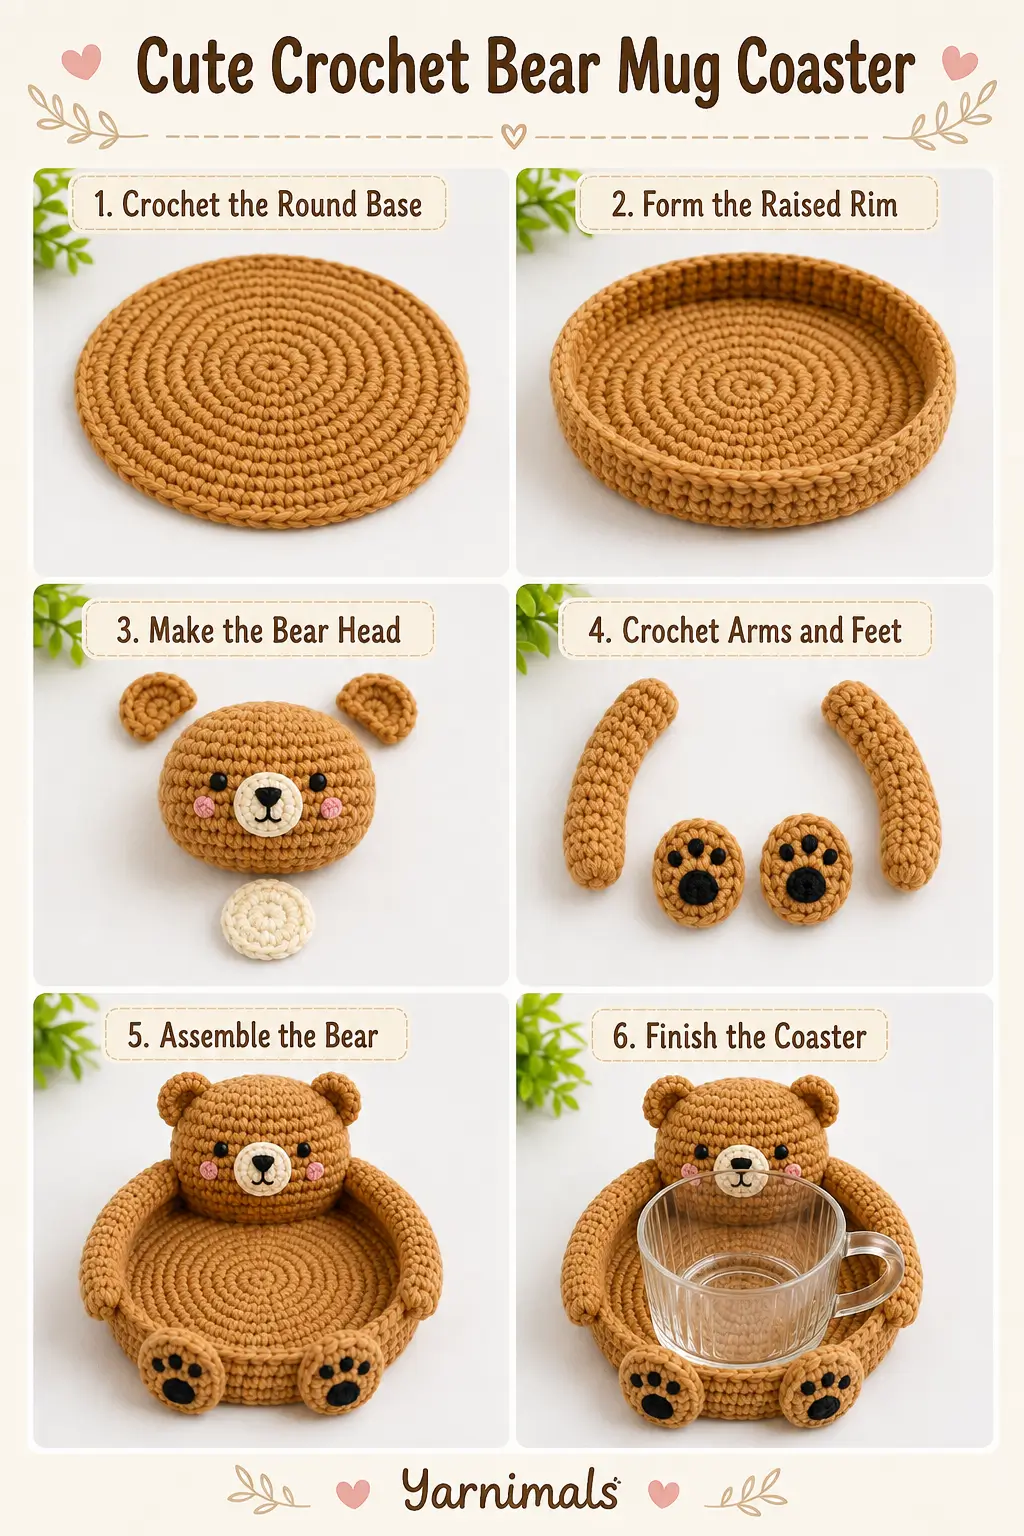
Part 1: Crochet the Round Coaster Base
Using caramel brown yarn:
Round 1
Make an MR.
Work:
6 sc in MR
6 sts
Round 2
Inc in every st around.
12 sts
Round 3
[sc in next st, inc] × 6
18 sts
Round 4
[sc in next 2 sts, inc] × 6
24 sts
Round 5
[sc in next 3 sts, inc] × 6
30 sts
Round 6
[sc in next 4 sts, inc] × 6
36 sts
Round 7
[sc in next 5 sts, inc] × 6
42 sts
Round 8
[sc in next 6 sts, inc] × 6
48 sts
Lay the circle flat.
It should measure approximately 10.5–11.5 cm across, depending on your yarn and tension.
If your mug has a wider base, add another increase round:
[sc in next 7 sts, inc] × 6 = 54 sts
The cup should sit comfortably inside the finished wall rather than balancing directly on it.
Part 2: Form the Raised Coaster Wall
The visible design has a shallow raised edge surrounding the circular base.
Round 9
Work:
1 sc BLO in every st around
48 sts
Working through the back loops creates a folding ridge and encourages the fabric to turn upward.
Round 10
Sc in every st around.
48 sts
Round 11
Sc around.
48 sts
Round 12
Sc around.
48 sts
Sl st into the next stitch.
Fasten off.
The side wall should stand approximately 2–2.5 cm high.
Do not stuff the wall.
Shape the bottom with your fingers so the circular center remains completely flat.
Part 3: Crochet the Bear Head
Using caramel yarn:
Round 1
MR, 6 sc.
6
Round 2
Inc around.
12
Round 3
[sc, inc] × 6
18
Round 4
[2 sc, inc] × 6
24
Round 5
[3 sc, inc] × 6
30
Rounds 6–10
Sc around.
30 sts for each round
The head should now resemble a rounded cylinder.
Round 11
[3 sc, dec] × 6
24
Round 12
[2 sc, dec] × 6
18
Begin stuffing.
Keep the front smoothly rounded.
Round 13
[sc, dec] × 6
12
Add enough stuffing to create a firm but not rock-hard head.
Round 14
Dec around.
6
Fasten off.
Thread the tail through the remaining stitches and pull closed.
The finished head should measure approximately 5–5.5 cm wide.
Part 4: Crochet Two Bear Ears
Make 2.
Using caramel yarn:
Round 1
MR, 6 sc.
6
Round 2
Inc around.
12
Round 3
Sc around.
12
Fasten off, leaving a sewing tail.
Do not stuff heavily.
Flatten each ear gently.
The ears should remain small and rounded.
Attach the Ears
Position the ears near the upper left and upper right sides of the head.
They should sit slightly behind the front face rather than directly on top.
Pin before sewing.
Sew the lower half of each ear securely to the head.
Leave the upper edge rounded and dimensional.
Part 5: Crochet the Cream Muzzle
Using cream yarn:
Round 1
MR.
Work:
6 sc
Round 2
Inc around.
12 sts
Sl st to the next stitch.
Fasten off, leaving a long sewing tail.
The muzzle should be a small flat circle.
Add the Nose and Mouth
Using dark brown or black yarn:
Embroider a small inverted triangle or rounded triangular nose near the center of the cream muzzle.
From the bottom of the nose, stitch one short vertical line downward.
Then create two tiny diagonal stitches extending left and right to form a simple teddy-bear mouth.
Sew the muzzle to the lower center of the bear’s face.
Part 6: Add the Eyes
Using dark brown or black yarn, embroider two small vertical or oval eyes.
Place them approximately:
- 5–6 stitches apart
- slightly above the muzzle
Keep them small.
The reference-style bear has a soft minimalist face rather than large cartoon eyes.
Part 7: Add Pink Cheeks
Using dusty pink yarn, embroider 2–3 tiny horizontal stitches on each side of the muzzle.
Place one cheek below each eye.
Keep the cheeks subtle.
Part 8: Crochet the Bear Arms
Make 2 identical arms.
Using caramel yarn:
Round 1
MR, 6 sc.
6
Round 2
[sc, inc] × 3
9
Rounds 3–15
Sc around.
9 sts
The arm should become a long narrow tube.
Add a very small amount of stuffing as you work.
Do not stuff firmly.
The arm must remain flexible enough to curve naturally around the side of the mug.
Round 16
Sc around.
Fasten off, leaving a long sewing tail.
Flatten the upper end slightly.
Each arm should measure approximately 8–9 cm long.
Part 9: Crochet the Bear Feet
Make 2.
The feet should be small oval paws rather than round balls.
Using caramel yarn:
Ch 5.
Round 1
Beginning in the second ch from hook:
- sc in next ch
- sc in next 2 ch
- 3 sc in final ch
Continue around the opposite side of the foundation chain:
- sc in next 2 ch
- 2 sc in final ch
10 sts
Round 2
Sc around.
10 sts
Round 3
Sc around.
10 sts
Add only a tiny amount of stuffing.
Flatten slightly.
Fasten off, leaving a long sewing tail.
Part 10: Add Paw Details
Using dark brown yarn, embroider one small oval or short horizontal pad near the lower center of each foot.
Above the pad, embroider 3 tiny toe marks.
Keep the marks neat and small.
Repeat on the second foot.
The two paw designs should face forward when attached to the coaster.
Part 11: Attach the Head to the Coaster
Choose one section of the coaster wall as the back.
Think of the coaster as a clock:
- head = 12 o’clock
- feet = approximately 5 and 7 o’clock
Position the head immediately behind the raised wall.
The lower third of the head should overlap the outside of the coaster wall.
The bear face should sit high enough that it remains visible when a mug is inside.
Pin securely.
Using caramel yarn, sew the lower portion of the head to the outside of the raised wall.
Make several passes through:
- head stitches
- upper wall stitches
Do not sew through the flat base unless additional reinforcement is required.
The head should stand upright without falling backward.
Part 12: Attach the Arms
Position one arm on each side of the head.
Left Arm
Sew the upper end of the arm to the lower left side of the head.
Curve the arm forward along the left side of the coaster.
Sew the lower half lightly to the top or outside edge of the raised wall.
Right Arm
Repeat on the opposite side.
When viewed from above, the arms should look as though the teddy bear is wrapping them around the mug.
Do not sew the arms across the flat center.
The mug needs an unobstructed circular space.
The lower ends of the arms should finish around approximately:
- 8–9 o’clock on the left
- 3–4 o’clock on the right
The front center should remain open for the two feet.
Part 13: Attach the Feet
Position the two feet on the outside front edge of the coaster.
Place them around:
- 5 o’clock
- 7 o’clock
The paw markings should face outward toward the viewer.
Allow each foot to project slightly beyond the circular coaster edge.
Sew the back of each foot firmly to the outside wall.
Do not sew the feet over the flat mug area.
Part 14: Check the Mug Space
Before weaving in the final assembly ends, place your intended mug inside the coaster.
Check that:
- the cup sits flat
- the arms do not push against the cup excessively
- the feet stay outside the cup area
- the head remains upright
- the raised wall surrounds the mug naturally
Adjust the arms before making the final stitches if necessary.
Final Assembly Check
The finished bear coaster should contain exactly:
- 1 round flat coaster base
- 1 low raised circular wall
- 1 stuffed bear head
- 2 rounded ears
- 1 cream muzzle
- 2 embroidered eyes
- 1 embroidered nose and mouth
- 2 optional pink cheeks
- 2 long curved arms
- 2 oval front feet
- dark paw details on both feet
Finishing
Weave in all remaining yarn ends.
Shape the circular base flat with your fingers.
Arrange both arms symmetrically.
Straighten the head so the face looks directly forward.
Shape the ears into small rounded curves.
Make sure the feet sit evenly at the front.
Lightly steam or wet block only the flat coaster section if your yarn permits it.
Avoid flattening the stuffed pieces.
Design Consistency Lock
For the closest result to the reference image, keep the following design unchanged:
Main Color
Warm caramel teddy-bear brown.
Base
Round spiral single crochet base with a low raised wall.
Bear Head
Rounded and slightly wider than tall.
Ears
Two small rounded caramel ears.
Face
- tiny dark eyes
- cream circular muzzle
- dark triangular nose
- tiny embroidered mouth
- subtle pink cheeks
Arms
Two long caramel arms hugging the left and right edges of the coaster.
Feet
Two small oval paws attached outside the front rim with dark embroidered pads.
Overall Shape
The center remains open and flat for a glass or mug while the bear pieces surround it like a tiny teddy chair.
Do not add:
- a tail
- separate legs underneath the coaster
- a body inside the mug area
- large safety eyes
- a hat
- bows
- clothing
- extra colors
- handles
Tips & Variations
Chocolate Bear
Use deep chocolate brown yarn with a cream muzzle.
Polar Bear
Use warm ivory yarn with a beige or light gray muzzle.
Pink Teddy
Use dusty rose yarn with a cream muzzle and dark brown facial embroidery.
Smaller Cup Version
Stop the coaster base after Round 7 at 42 stitches.
Then begin the BLO turning round.
Larger Mug Version
Continue one additional increase round after Round 8:
[7 sc, inc] × 6 = 54 sts
Then begin the raised wall.
Make the arms approximately 1–2 cm longer to match the larger circumference.
FAQ
Is this crochet bear coaster suitable for beginners?
Yes, if you are comfortable working single crochet in continuous rounds, increasing, decreasing, sewing pieces together, and doing simple embroidery. The individual pieces are small and use repetitive shaping.
Do I need to stuff the coaster?
No. Keep the circular base and raised wall completely unstuffed so your mug sits flat. Only the head is firmly stuffed, while the arms and feet receive a very small amount of stuffing.
Can I make a set in different colors?
Yes. A set of caramel, chocolate, cream, and gray bears would make a cute handmade crochet gift while using the exact same construction.
Conclusion
This cute crochet bear coaster turns an ordinary mug mat into a tiny teddy bear that looks as though it is hugging your drink. The spiral base keeps the cup supported, while the rounded head, little ears, long arms, front paws, cream muzzle, and embroidered face give the finished project its playful three-dimensional character. Save this free crochet pattern and make a matching set in your favorite teddy-bear colors for coffee corners, desks, or handmade gifts.



