Intro
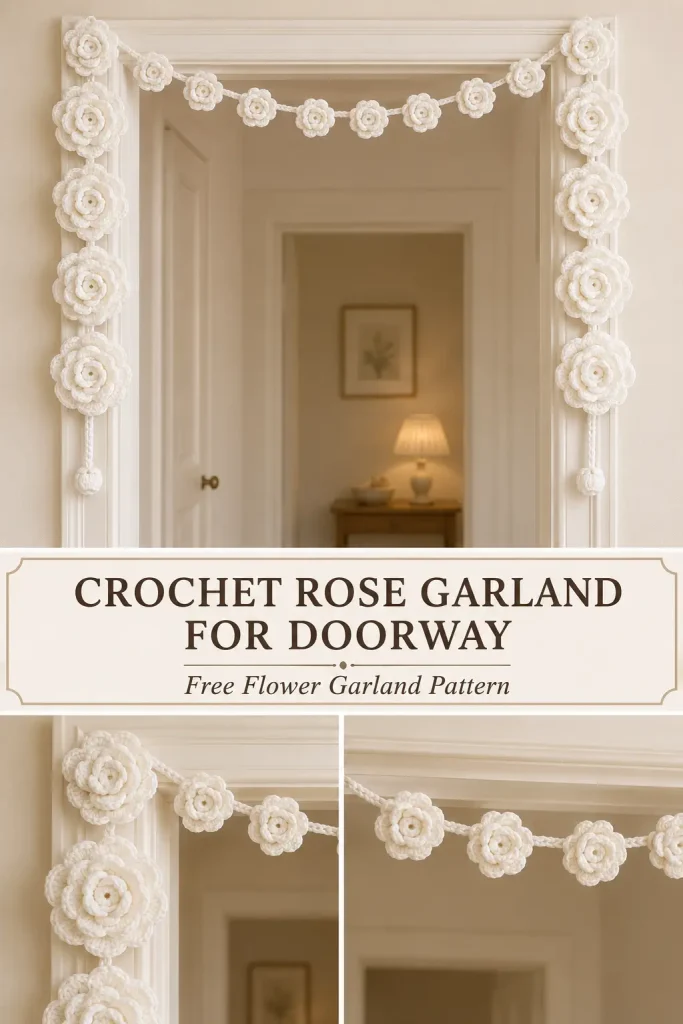
This crochet rose garland is a beautiful way to turn simple white yarn into soft, romantic home decor. Large dimensional roses travel down each side of the garland, while smaller crochet rosettes create a delicate floral swag across the top.
The entire design is made from separate crochet roses attached to one long matching cord, which makes the finished garland easy to resize for a doorway, mirror, window, headboard, mantel, or nursery wall.
This original crochet pattern is inspired by the visible design and recreates its most important details: layered white roses, two flower sizes, a long white hanging cord, fuller flowers along the vertical sections, smaller flowers across the top, and tiny decorative end buds.
Description
The finished crochet flower garland is approximately 250–280 cm long and designed to drape around a standard interior doorway. It uses only white yarn for a soft monochrome appearance.
The sample consists of:
- 10 large dimensional crochet roses
- 9 smaller crochet rosettes
- 2 tiny end buds
- 1 long reinforced crochet cord
Five large roses decorate each vertical side. Nine smaller rosettes are spaced across the upper section. The flowers are individually crocheted, rolled into dimensional roses, securely sewn at the base, and then attached to the cord.
The result is a flexible crochet floral garland with the lush layered texture visible in the inspiration image.
Materials
- Worsted weight #4 yarn in white or soft ivory
- Approximately 250–350 g yarn for a doorway-size garland
- 4 mm crochet hook
- Yarn needle
- Scissors
- Stitch markers or safety pins
- Measuring tape
- Small amount of polyester stuffing or yarn scraps for the optional end buds
- Removable wall hooks or other suitable hanging method
Abbreviations
- ch – chain
- sc – single crochet
- hdc – half double crochet
- dc – double crochet
- tr – treble crochet
- sl st – slip stitch
- st – stitch
- sts – stitches
- MR – magic ring
- dec – single crochet decrease
Pattern Notes
- US crochet terminology is used.
- Difficulty: confident beginner.
- All flowers are made separately and sewn onto the finished cord.
- The roses are crocheted as scalloped strips and then rolled into flowers.
- Begin rolling each rose from the smaller petals so the flower naturally becomes larger toward the outside.
- The sample uses one color throughout.
- Large roses measure approximately 8–9 cm across.
- Small rosettes measure approximately 5–6 cm across.
- The garland can easily be shortened or lengthened.
- Keep the rose bases fairly flat so they sit neatly against the cord.
- Do not glue the flowers. Sewing creates a stronger and more washable finish.
Step-by-Step Instructions
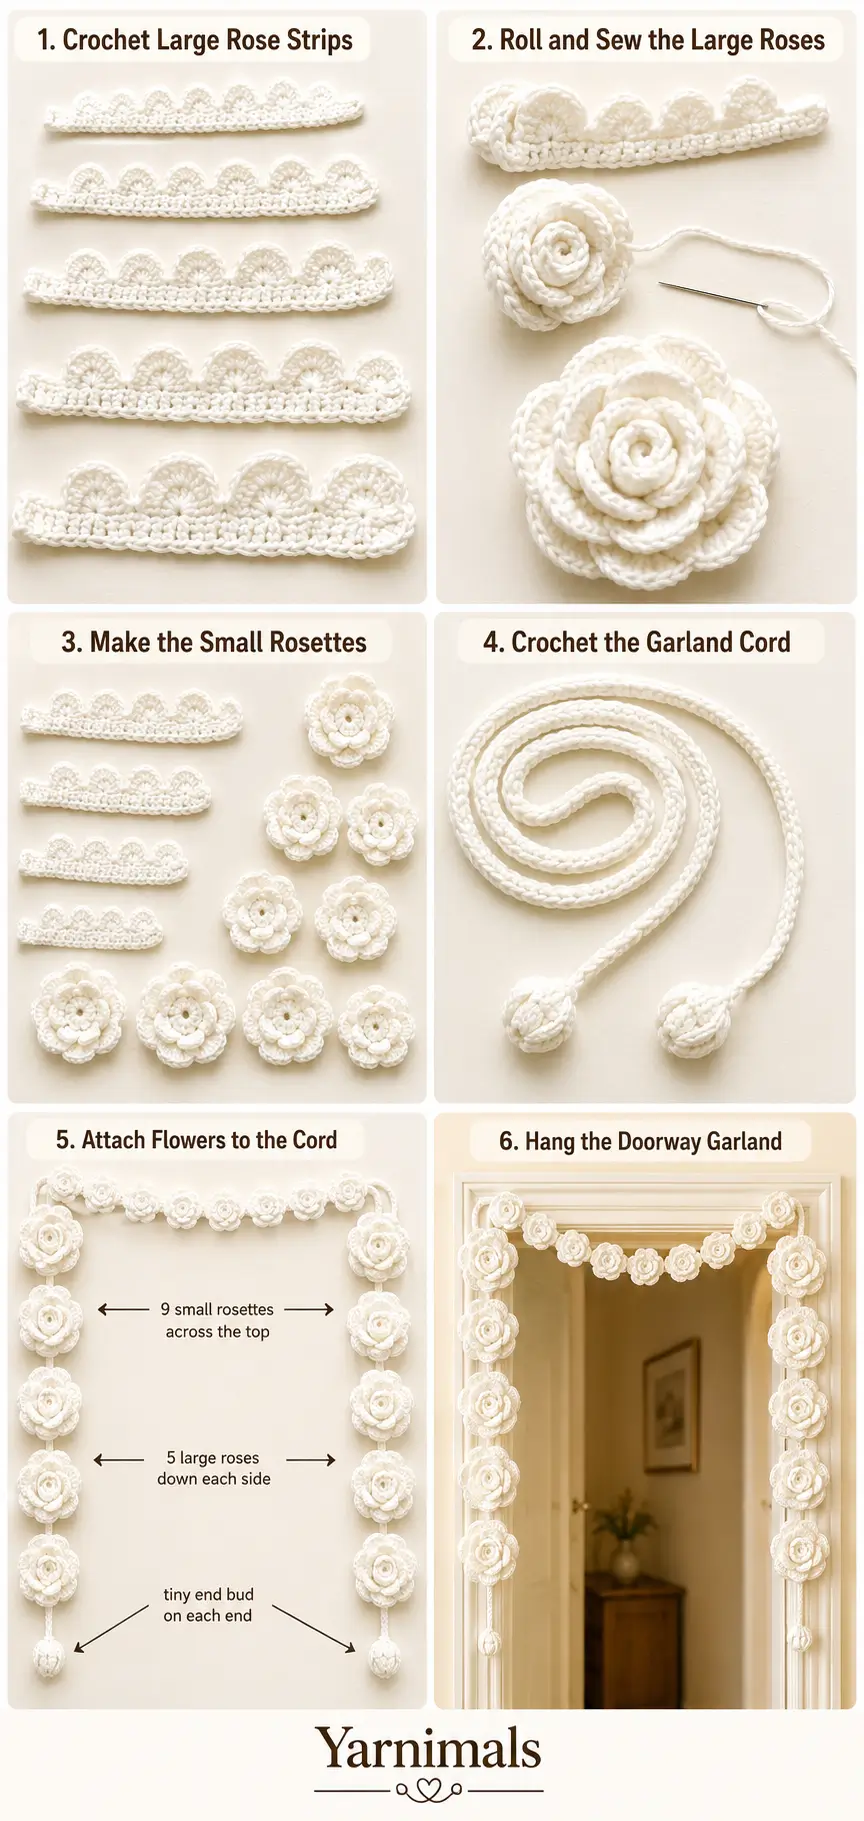
Part 1: Large Layered Crochet Rose
Make 10 large roses for the full doorway version.
Using white yarn:
Ch 37.
Row 1
Sc in the second ch from the hook.
Sc in every remaining chain.
36 sc
Ch 1 and turn.
Row 2 – Small Inner Petals
Across the first 12 stitches:
[sl st in next st, 3 hdc in next st] × 6
You now have 6 small petals.
Do not turn.
Medium Petals
Across the next 12 stitches:
[sl st in next st, 5 dc in next st] × 6
You now have another 6 larger petals.
Large Outer Petals
Across the final 12 stitches:
[sl st in next st, 7 tr in next st] × 6
You should have:
- 6 small inner petals
- 6 medium petals
- 6 large outer petals
- 18 petals total
Fasten off, leaving a 40–50 cm sewing tail.
Part 2: Roll the Large Rose
Lay the finished petal strip flat.
Begin at the end containing the small hdc petals.
Roll the strip tightly for the first two or three petals to form the center of the rose.
Continue rolling more loosely as you reach the medium petals.
Allow the final large petals to spread outward naturally.
Keep the straight foundation edge aligned along the bottom while rolling.
Thread the long yarn tail onto a yarn needle.
Pass the needle through several layers across the bottom of the flower.
Rotate the rose and sew across the base in the opposite direction.
Continue until every rolled layer is securely connected.
Do not sew through the visible tops of the petals.
Fasten securely and weave in the end.
Gently pull the larger petals outward with your fingers.
The finished rose should have:
- a tight spiral center
- smaller cupped inner petals
- fuller middle petals
- broad scalloped outer petals
Make 10.
Part 3: Small Crochet Rosette
Make 9 small rosettes for the section across the top of the doorway.
Using white yarn:
Ch 25.
Row 1
Sc in the second ch from hook.
Sc across.
24 sc
Ch 1 and turn.
Row 2 – Inner Petals
Across the first 12 stitches:
[sl st in next st, 3 hdc in next st] × 6
Outer Petals
Across the remaining 12 stitches:
[sl st in next st, 5 dc in next st] × 6
You now have 12 petals.
Fasten off, leaving approximately 30 cm for sewing.
Roll the Small Rosette
Begin at the small-petal end.
Roll the first few petals tightly to form the center.
Continue rolling the larger petals around the outside.
Sew back and forth through the foundation edge on the underside.
Secure firmly.
Shape the petals outward.
Make 9 small rosettes.
Part 4: Tiny End Buds
Make 2.
These small pieces finish the two lower ends of the garland.
Using white yarn:
Round 1
Make an MR.
Work:
6 sc in MR
6 sts
Round 2
Inc in every stitch.
12 sts
Round 3
Sc around.
12 sts
Round 4
Sc around.
12 sts
Add a tiny amount of stuffing or a few yarn scraps.
Round 5
Dec around.
6 sts
Fasten off, leaving a sewing tail.
Pull the remaining stitches closed.
Shape the piece into a tiny rounded flower bud.
Make a second identical bud.
Part 5: Crochet the Garland Cord
The flowers are attached to one long reinforced crochet cord.
Using white yarn:
Ch until the cord measures approximately:
250–280 cm
Do not stretch the chain while measuring.
For a shorter wall or mirror garland, simply work to your required measurement.
Reinforce the Cord
Beginning in the second chain from the hook:
Sl st in every chain back to the beginning.
Keep the slip stitches relaxed.
The result should be a narrow soft cord rather than a stiff strap.
Fasten off.
The finished cord should look:
- slim
- flexible
- slightly rounded
- strong enough to support the roses
Part 6: Plan the Doorway Layout
Lay the entire cord flat on a large surface.
Find the center.
For a standard doorway arrangement, divide the cord approximately into:
- 75–85 cm left drop
- 85–95 cm upper doorway section
- 75–85 cm right drop
Adjust these measurements to fit your doorway.
Mark the two points where the garland will turn over the upper corners of the doorway.
Part 7: Position the Small Top Flowers
Arrange the 9 small rosettes across the upper section.
Begin with one flower near the left upper corner.
Space the remaining flowers approximately:
8–11 cm apart
Continue toward the right corner.
The flowers should form a loose floral chain rather than touching tightly.
For the organic look visible in the inspiration, rotate some flowers slightly instead of positioning every flower at exactly the same angle.
Part 8: Attach the Small Flowers
Cut approximately 25–30 cm of white yarn for each flower.
Thread it through the back of the rosette.
Place the flower against the cord.
Pass the yarn:
- through the rose base
- around the cord
- back through the rose base
Repeat several times.
Tie securely behind the flower.
Weave the ends into the underside of the rose.
Do not pull so tightly that the cord disappears completely into the flower.
Attach all 9 small rosettes.
Part 9: Position the Large Side Roses
Place 5 large roses on each side.
On the left side, begin the first large rose close to the upper corner.
Position the remaining roses approximately:
12–15 cm apart
Continue down the vertical cord.
Repeat on the opposite side.
For a natural floral arrangement, slightly vary the rose angles:
- one facing directly forward
- one tilted slightly left
- one tilted slightly right
Do not twist the entire garland.
The rose bases should remain attached firmly to the cord.
Part 10: Create the Fuller Upper Corners
The inspiration has especially full floral areas close to the upper corners.
To create this effect, position the first large rose on each side close enough to the nearest small top rosette that the petals slightly overlap visually.
Do not sew the flowers together.
Each flower should remain independently attached to the cord.
This creates a fuller transition between:
large side roses → smaller top rosettes
without changing the construction.
Part 11: Attach the Large Roses
Use the same sewing method as for the small flowers.
Pass matching yarn several times through:
- the thick base of the large rose
- around the crochet cord
- back through the rose base
Large roses are heavier, so make at least 4–5 secure passes through each attachment point.
Tie securely at the back.
Weave in all ends.
Repeat for all 10 roses.
Part 12: Attach the End Buds
Attach one tiny bud to each lower end of the cord.
Pass the end of the cord slightly into the base of the bud.
Using the sewing tail, stitch firmly through both:
- bud
- cord
Make several passes.
Fasten securely.
The small bud creates a decorative finish instead of leaving a plain yarn end.
Part 13: Shape the Garland
Lay the finished garland flat.
Check that:
- the upper rosettes face forward
- the large side roses are evenly distributed
- no flower is hanging upside down
- the two ends are similar in length
- the flowers remain firmly attached
Open the large outer petals gently with your fingers.
Keep the flower centers tighter and more compact.
This creates the layered rose appearance.
Part 14: Hang the Garland
Place the garland around the doorway.
Allow the upper section to form a gentle shallow curve rather than pulling it perfectly straight.
Position the large roses down both sides.
For the same relaxed handmade look as the inspiration, let the final section of cord hang freely beneath the last flower on each side.
Secure the garland using a hanging method suitable for your wall and doorframe.
Do not hang it where it will interfere with a moving door or catch against hinges.
Design Consistency Lock
To create the same finished style throughout the project, keep these details consistent.
Color
Use only:
white or soft ivory
for:
- roses
- small rosettes
- garland cord
- end buds
Flowers
The design contains two clear sizes:
Large Roses
- approximately 8–9 cm
- 18 layered petals
- fuller dimensional shape
- used mainly down the vertical sides
Small Rosettes
- approximately 5–6 cm
- 12 petals
- flatter and lighter
- used across the upper doorway section
Garland Structure
Use:
- one continuous reinforced crochet cord
- 5 large roses on the left
- 5 large roses on the right
- 9 small flowers across the top
- 2 tiny terminal buds
Do not add:
- leaves
- colored flower centers
- beads
- tassels
- ribbons
- bows
- granny squares
- separate hanging chains
- multiple yarn colors
The visual focus should remain entirely on the dimensional white crochet flowers.
Tips & Variations
Make a Shorter Garland
For a mirror, headboard, or mantel, crochet a cord approximately 120–180 cm long.
Use fewer flowers while keeping the same spacing.
Make It Fuller
Add additional small rosettes between the large flowers.
Avoid packing them so closely that the individual rose shapes disappear.
Make Larger Roses
Use a 4.5 or 5 mm hook with the same instructions.
The flowers will become larger and softer.
Make Smaller Roses
Use DK yarn with a 3–3.5 mm hook.
Add a Little Sparkle
For a wedding or winter garland, choose white yarn with a very subtle metallic strand already incorporated into the fiber.
Keep the whole garland monochrome.
Blocking
The roses usually need only finger shaping.
If necessary, lightly mist cotton flowers and arrange the petals while drying.
For acrylic yarn, use heat very cautiously because excessive heat can permanently alter the fibers.
FAQ
How many crochet flowers do I need for a doorway garland?
This sample uses 19 flowers total: 10 large roses and 9 smaller rosettes. You can add or remove flowers depending on the width and height of your doorway.
Can I make the garland without sewing each flower separately?
Sewing is recommended because the large roses are dimensional and fairly heavy. Individually sewn flowers are easier to position and are much more secure than simply tying them onto the cord.
Can I use cotton yarn?
Yes. Cotton gives the roses crisp stitch definition and helps the petals hold their shape. Acrylic also works well and creates slightly softer flowers.
Conclusion
This crochet rose garland turns one simple yarn color into an impressive piece of handmade floral decor. The combination of large layered roses, smaller rosettes, a flexible crochet cord, and tiny finished end buds creates the lush doorway arrangement while keeping each individual piece straightforward to crochet.
Make the full doorway version in white for a soft romantic look, or resize the same free crochet flower garland pattern for a mirror, window, mantel, nursery, wedding backdrop, or bedroom wall.



