Intro
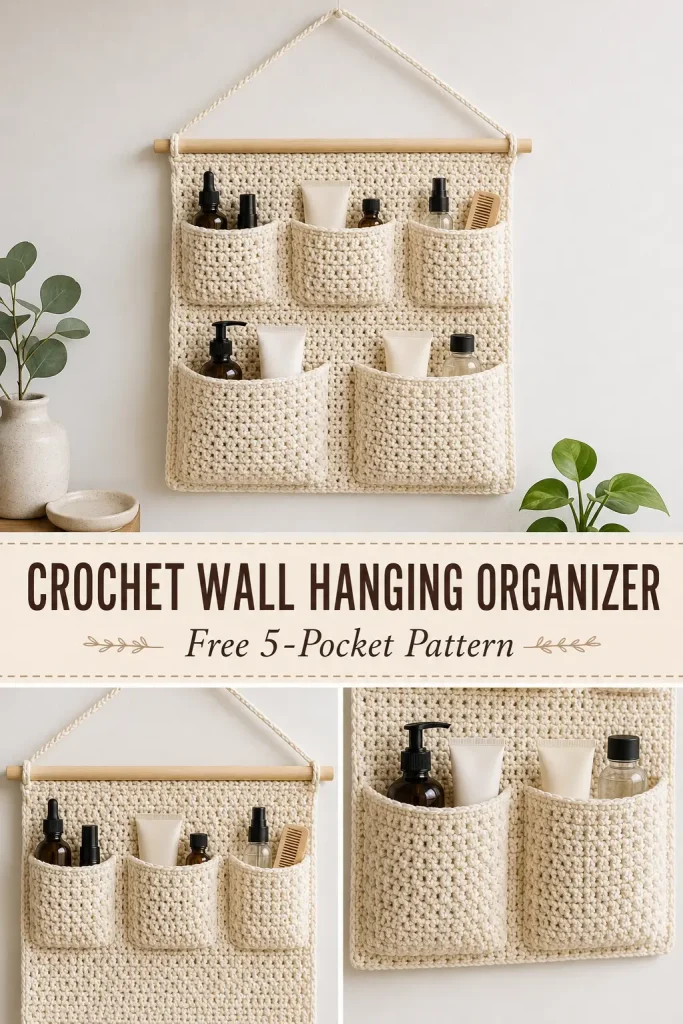
A crochet wall hanging organizer is a simple way to turn an empty wall into useful storage without losing that soft handmade look. This cream cotton version has a clean rectangular back, five roomy pockets, a natural wooden dowel, and a crocheted hanging cord.
The finished organizer works especially well in a bathroom for skincare and toiletries, but it can also hold craft supplies, nursery essentials, hair accessories, small toys, or everyday items near an entryway. The inspiration uses sturdy cotton yarn and a wooden dowel for a practical wall-storage design.
Description
This crochet wall organizer features a rectangular textured backing suspended from a natural wooden dowel. The upper storage row contains three smaller pockets, while the lower row contains two wider and deeper pockets. All five pockets are crocheted separately as two continuous pocket panels, then sewn to the background and divided with vertical seams. A simple crochet hanging cord connects both ends of the dowel.
For an airy handmade appearance similar to the reference, the entire project uses a lightly open textured cluster stitch in natural cream cotton.
Materials
- Worsted weight #4 cotton yarn
- Approximately 250–300 m in natural cream, ecru, or oatmeal
- 5 mm crochet hook
- Wooden dowel, approximately 30 cm / 12 inches long
- Yarn needle
- Scissors
- Measuring tape
- Stitch markers
Abbreviations
- ch – chain
- sc – single crochet
- dc – double crochet
- sl st – slip stitch
- sk – skip
- st – stitch
- sts – stitches
- sp – space
Pattern Notes
- US crochet terminology is used.
- Difficulty: confident beginner.
- Cotton yarn is recommended because it gives the wall organizer useful structure with less stretch than many softer fibers.
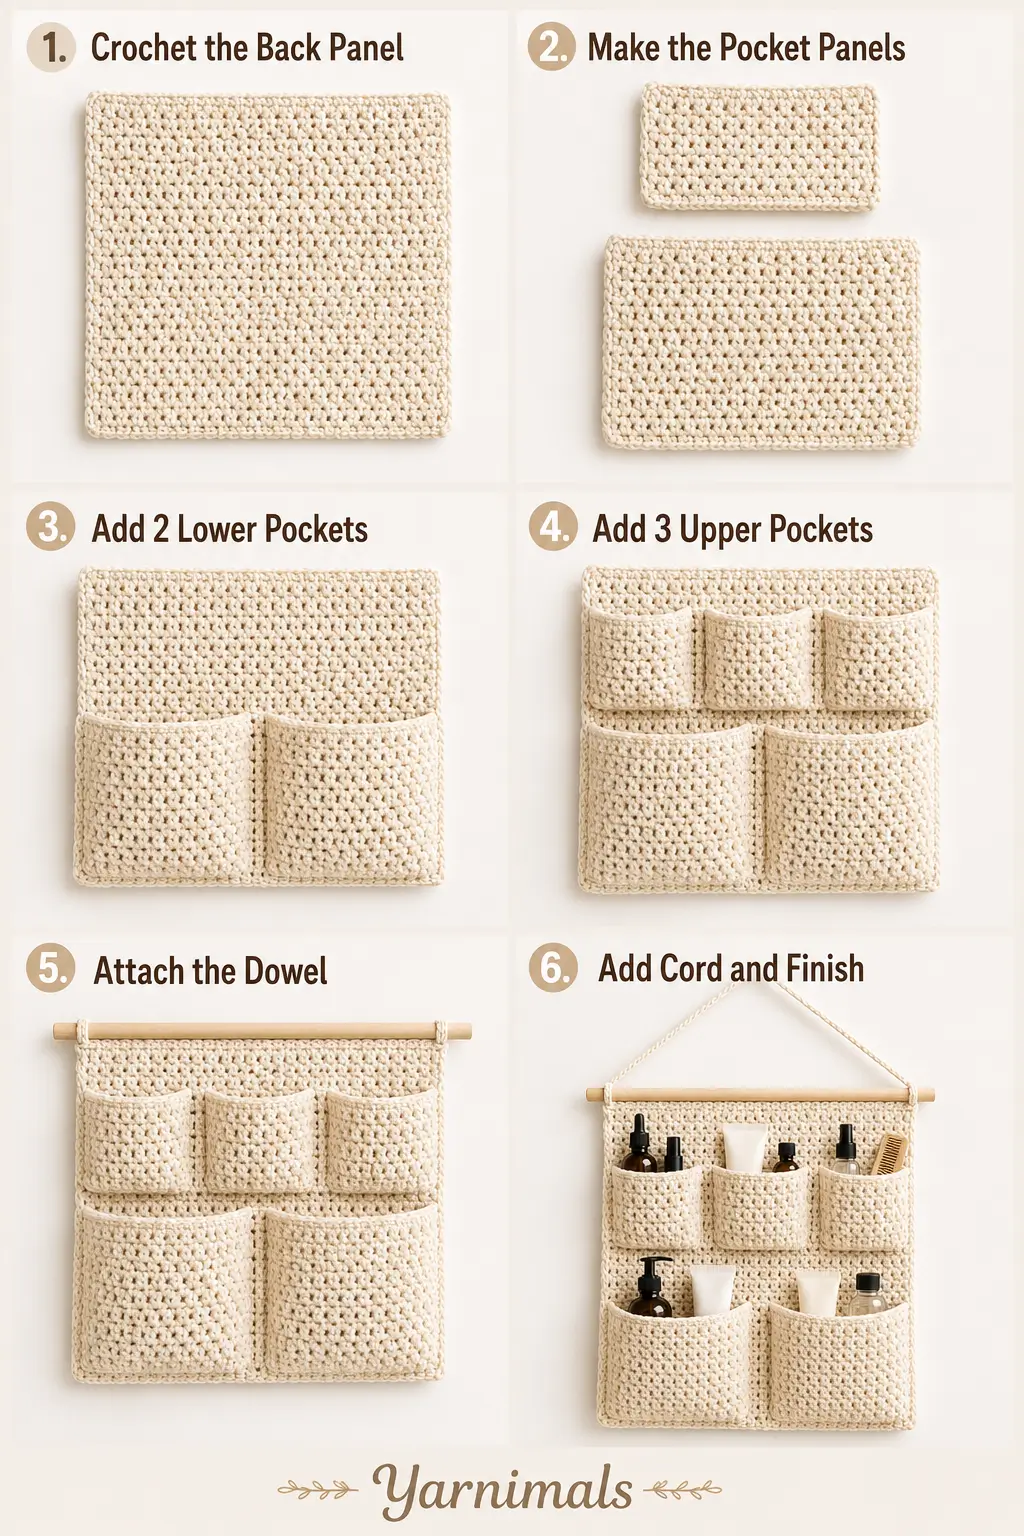
- The organizer is made from three main crochet pieces:
- one large back panel
- one upper pocket panel
- one lower pocket panel
- The upper panel is divided into 3 pockets.
- The lower panel is divided into 2 pockets.
- The top of the backing is attached directly around a wooden dowel.
- The hanging cord is added last.
- Ch 1 at the beginning of a row does not count as a stitch.
Approximate Finished Size
- Width: approximately 30 cm / 12 inches
- Organizer body height: approximately 30–33 cm / 12–13 inches
- Upper pockets: 3 smaller compartments
- Lower pockets: 2 larger compartments
The reference project is approximately 12 inches wide and 12 inches long when measured with its dowel and without the hanging cord.
Special Textured Stitch
To keep this pattern original while preserving the airy clustered look of the inspiration, use the following simple textured repeat.
Mini Cluster Texture
Work over an even number of stitches.
Row A: Sc in first st, ch 1, sk 1 st, sc in next st across.
Row B: Sc in first st, 2 dc in next ch-1 sp across, sc in final st.
Repeat Rows A and B.
This creates a firm but lightly open fabric that works well for the organizer body and pockets.
Step-by-Step Instructions
Part 1: Main Back Panel
Using cream cotton yarn:
Ch 39.
Row 1
Sc in second ch from hook and in each ch across.
38 sts
Ch 1 and turn.
Row 2
Sc in first st.
Ch 1, sk next st, sc in next st.
Repeat across.
Ch 1 and turn.
Row 3
Sc in first st.
Work 2 dc in each ch-1 sp across.
Sc in final st.
Ch 1 and turn.
Rows 4–33
Continue repeating Rows 2 and 3 until the panel measures approximately 30–32 cm high.
Finish after a Row 2 or another row that gives you a neat upper edge.
Do not fasten off yet.
Part 2: Strengthen the Top Edge
Work 1 row of sc evenly across the top.
This gives you a firm line for attaching the wooden dowel.
Fasten off, leaving a very long yarn tail approximately four to five times the dowel length.
Set the panel aside.
Part 3: Upper Pocket Panel
The upper panel will eventually be divided into three pockets.
Using the same yarn:
Ch 39.
Row 1
Sc in second ch from hook and across.
38 sts
Rows 2–10
Work the same Mini Cluster Texture used for the main panel.
Continue until the pocket panel measures approximately 9–10 cm high.
Finish with 1 row of sc across the upper edge.
Fasten off, leaving a long sewing tail.
The upper pocket panel should have the same width as the main backing.
Part 4: Lower Pocket Panel
The lower panel creates the two deeper storage pockets.
Ch 39.
Row 1
Sc in second ch from hook and across.
38 sts
Rows 2–14
Continue in the Mini Cluster Texture.
The lower panel should measure approximately 12–14 cm high.
Finish with 1 row of sc across the upper edge.
Fasten off, leaving a long sewing tail.
Part 5: Position the Lower Pocket Panel
Lay the main backing flat with the right side facing upward.
Place the larger pocket panel across the bottom of the backing.
Align:
- bottom edge with bottom edge
- left side with left side
- right side with right side
Use stitch markers to hold the pieces together.
The upper edge of the pocket must remain open.
Part 6: Sew the Lower Pocket
Using the long yarn tail, sew through both layers along:
- the left side
- the entire bottom edge
- the right side
Use a firm whipstitch or mattress-style seam.
Do not sew across the upper opening.
Part 7: Divide It into Two Pockets
Find the exact center of the lower pocket panel.
Mark the center from the upper opening all the way down to the bottom.
Using matching yarn and a yarn needle, sew vertically through:
- the pocket panel
- the main backing
Work from the bottom to the upper edge.
Reinforce the top of the divider seam with several extra stitches.
You now have:
2 large lower pockets
Each pocket should be wide enough for tubes, bottles, rolled cloths, or similar household items.
Part 8: Position the Upper Pocket Panel
Place the smaller pocket panel across the upper half of the backing.
Leave approximately 5–6 cm of exposed backing above it so the top section and dowel remain visible.
Align the side edges.
Marker the panel in place.
Sew:
- left side
- bottom edge
- right side
Keep the top edge open.
Part 9: Divide the Upper Panel into Three Pockets
Measure the upper pocket width.
Divide it visually into three equal sections.
Place stitch markers at the two divider positions.
Using matching yarn, sew a straight vertical seam from the bottom of the pocket panel to its top edge at the first marker.
Repeat at the second marker.
Reinforce each divider seam at the pocket opening.
You now have:
3 upper pockets
The completed organizer contains:
- 3 smaller upper pockets
- 2 larger lower pockets
- 5 pockets total
Part 10: Give the Pockets More Capacity
For slightly roomier pockets like those visible in the inspiration, do not pull the pocket panels completely flat while sewing.
Before securing each side seam, allow the middle of the pocket panel to bow forward slightly.
For the lower pockets, you can create additional depth by folding approximately 1 cm inward at each lower corner before stitching the bottom.
This produces a small gusset and makes bottles or tubes easier to store.
Part 11: Attach the Wooden Dowel
Center the 30 cm wooden dowel along the top edge of the main panel.
Thread the long yarn tail onto the yarn needle.
Wrap the yarn over the dowel and pass it through the top edge of the crochet fabric.
Repeat evenly across the full width.
Each stitch should form a neat vertical loop around the dowel.
Keep the loops close together but do not tighten them enough to bunch the fabric.
At the opposite end:
- secure firmly
- knot discreetly
- weave the end into the back of the panel
The wooden dowel should sit straight and remain centered.
Part 12: Crochet the Hanging Cord
For a stronger hanging cord, work with two strands of yarn held together.
Leave a long starting tail.
Ch 55–65, or continue until the cord gives you the hanging height you want.
For a slightly thicker finished cord:
Sl st in every chain back to the beginning.
Fasten off, leaving another long tail.
Part 13: Attach the Hanging Cord
Tie or sew one end securely around the left end of the wooden dowel.
Attach the opposite end to the right side.
The hanging cord should form a symmetrical triangle above the organizer.
Make sure both sides are equal before tightening the knots.
Weave in the yarn ends.
Part 14: Final Edging
If the exposed sides of the organizer need a cleaner finish, join yarn at one upper corner.
Sc evenly down the side.
Work 3 sc into the bottom corner.
Sc across any exposed lower edge.
Work 3 sc in the opposite corner and continue upward.
Fasten off before reaching the dowel.
This edging is optional but helps give the wall organizer a structured outline.
Finishing
Weave in every remaining yarn end.
Check all five pockets and reinforce any upper corner that will carry weight.
Gently block the organizer flat before mounting it on the dowel if necessary.
Straighten:
- the back panel
- both pocket rows
- vertical divider seams
- wooden dowel
- hanging cord
Allow the crochet to dry fully before adding items.
Design Consistency Lock
For the finished organizer to match the reference style, preserve these features:
- natural cream cotton yarn throughout
- rectangular 12-inch-style backing
- lightly open textured crochet
- natural wooden dowel across the entire top
- crochet hanging cord forming a triangle
- 3 upper pockets
- 2 deeper lower pockets
- 5 pockets total
- no tassels
- no fringe
- no buttons
- no wooden rings
- no multicolored sections
The upper pockets should be noticeably shallower than the two bottom pockets.
How to Use the Organizer
Bathroom Storage
Use the three upper pockets for:
- small skincare bottles
- brushes
- perfume
- dropper bottles
- hair products
Use the deeper lower pockets for:
- tubes
- lotions
- rolled washcloths
- larger toiletries
Craft Room
Use it for:
- crochet hooks
- scissors
- measuring tapes
- yarn scraps
- notions
Nursery
The pockets can hold lightweight items such as:
- socks
- bibs
- washcloths
- small accessories
Avoid overloading the organizer with heavy objects.
Tips & Variations
For the closest natural look, use unbleached cotton, warm cream, ivory, or oatmeal.
A sage green version would work beautifully in a botanical bathroom, while terracotta or muted clay gives the organizer a warmer boho feel.
If you need larger storage compartments, divide the upper row into only two pockets.
For smaller cosmetics and craft notions, divide one of the lower pockets again to create additional compartments.
Always reinforce divider seams at the upper pocket opening because this area receives the most pulling during everyday use.
If the organizer starts stretching after use, reduce the weight inside the pockets and lightly reshape the cotton fabric.
FAQ
How many pockets does this crochet wall organizer have?
This version has five pockets: three smaller compartments across the upper row and two larger pockets across the bottom.
What yarn works best for a hanging organizer?
A firm cotton yarn is a good choice because it provides structure and resists excessive stretching when items are placed inside the pockets.
Can I make the organizer wider?
Yes. Increase the foundation chain for the back panel and both pocket panels by the same amount. Keep the final width slightly shorter than your wooden dowel so there is room at both ends for the hanging cord.
Conclusion
This crochet wall hanging organizer combines useful storage with a clean handmade texture that works beautifully in bathrooms, bedrooms, craft spaces, and entryways. The natural cotton body, five practical pockets, wooden dowel, and simple hanging cord keep the design functional without making it complicated. Save the pattern and customize the pocket layout or yarn color to create an organizer that fits your own space.



