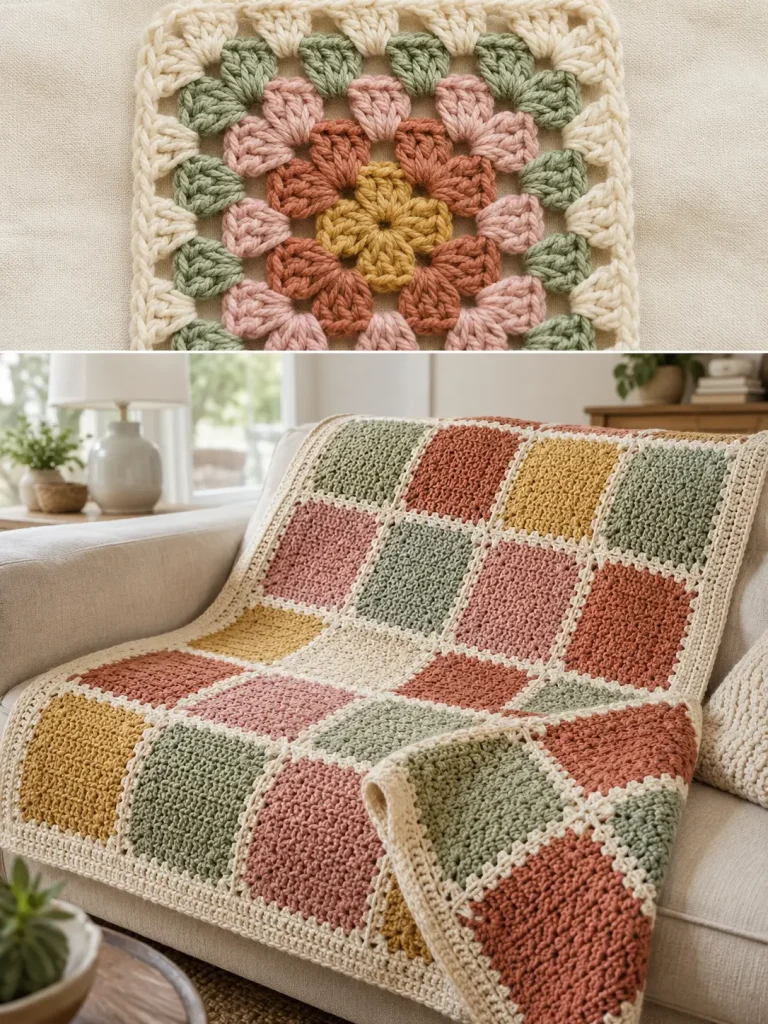
I love the look of a traditional granny square blanket.
The colors. The little blocks. The vintage crochet feeling. The fact that you can make a few squares at a time and slowly watch an entire blanket appear.
But there was one thing I wanted to change:
all those big open spaces.
Traditional granny squares are beautiful, but the chain spaces between clusters create an intentionally open fabric. That can be perfect for some projects, but sometimes I want a blanket that looks like a granny-square blanket while feeling a little more substantial and cozy.
That is where the solid granny square comes in.
Instead of groups of double crochet separated by chain spaces across every side, most of the square is worked in continuous double crochet stitches. The main openings are concentrated around the corners.
The result still has that familiar square-from-the-center construction, but the fabric is much more filled in.
And once I started putting the squares together, I knew this was the version I wanted for a cozy blanket.
Traditional Granny Square vs. Solid Granny Square
The easiest way to understand the difference is to look at how the stitches are arranged.
Traditional granny square
A classic granny square is generally made from groups of double crochet stitches separated by chain spaces.
Those spaces create the recognizable open, lacy appearance.
That construction is:
- lightweight
- flexible
- quick to work
- excellent for colorful scrap projects
- instantly recognizable
But it also creates plenty of openings throughout the fabric.
Solid granny square
A solid granny square fills the sides with continuous stitches.
Instead of repeating open clusters across the entire square, you work into the individual stitches from the previous round.
You still need increases at the four corners so the piece stays square.
The result is:
- denser
- less open
- warmer-looking
- excellent for blankets and pillows
- still easy to customize with color
It is important to say more solid, rather than claiming every version is completely hole-free.
The beginner-friendly version below uses small chain spaces at the corners, so there will still be tiny openings there.
Why I Like Solid Granny Squares for Blankets
This version solves several things I personally want from a granny-square blanket.
The pattern still looks unmistakably crochet
You don’t lose the handmade character that makes granny-square blankets so appealing.
There are fewer large openings
That gives the finished blanket a fuller appearance.
Color changes still look beautiful
You can make:
- one-color squares
- striped squares
- two-tone squares
- scrap-yarn squares
- coordinated multicolor squares
The squares are portable
Instead of carrying an entire blanket around, you can make one square at a time.
Joining them is part of the design
A contrasting join can emphasize every square, while a matching join can make the blanket look much more seamless.
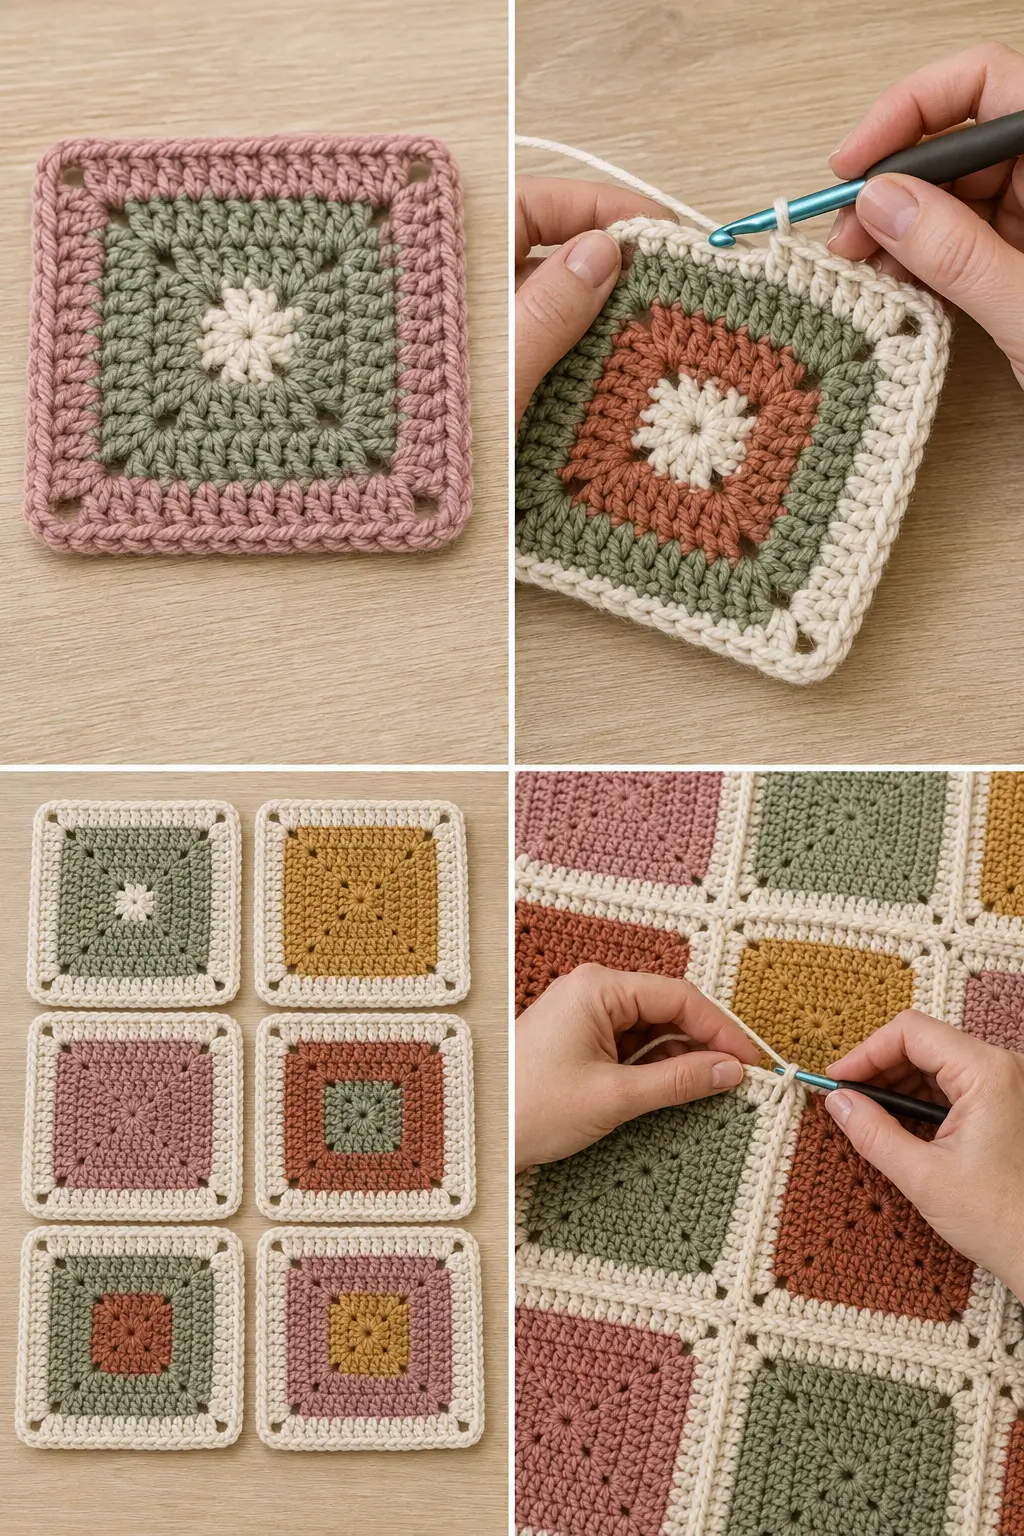
Materials
You can adapt this project to many yarn weights.
For a comfortable everyday blanket, I like the idea of using a smooth worsted-weight yarn, Category 4, because the stitches are easy to see and the finished fabric has good substance without becoming excessively heavy.
You’ll need:
- Worsted-weight yarn in your chosen colors
- Crochet hook suitable for your yarn
- Scissors
- Yarn needle
- Stitch markers, optional
- Measuring tape
- Blocking mats and pins, optional but useful
A 5 mm crochet hook is a common starting point with worsted-weight yarn, but don’t treat that as a rule.
Check your yarn label and, more importantly, crochet a test square.
If your fabric feels too stiff, try a slightly larger hook.
If the fabric feels looser than you want, try a smaller hook.
Choosing Colors for the Blanket
This project can look completely different depending on the palette.
For a soft modern blanket, try:
- cream
- sage green
- dusty rose
- muted terracotta
- soft mustard
For something more traditional:
- burgundy
- forest green
- navy
- mustard
- cream
Or make every square different and use leftover yarn from previous projects.
An easy trick for making lots of colors look intentional
Choose one color that appears in every square.
For example, make the outer round of every square cream.
The centers can all be different, but that repeated cream edge helps pull the whole blanket together when the squares are joined.
Before You Start: Make One Test Square
Don’t immediately crochet 50 squares.
Make one complete square first.
Then:
- Fasten off.
- Weave in the ends.
- Block it if you plan to block the finished squares.
- Measure its final width and height.
This one square will tell you roughly how many you need.
For example, if your finished square measures about 5 inches and you want a blanket around 40 × 50 inches, you could begin thinking in terms of approximately:
8 squares across × 10 squares down
That would require:
80 squares
But don’t blindly use that number.
Your square may be 4 inches, 6 inches, or another size entirely.
Seams and borders also affect the final measurements.
Use your actual finished square to plan your blanket.
How to Crochet a Solid Granny Square
The following instructions use US crochet terminology.
Abbreviations
- ch = chain
- dc = double crochet
- sl st = slip stitch
- st = stitch
- sp = space
The beginning chain 3 counts as one double crochet in this version.
Round 1
Make a magic ring.
If you don’t like magic rings, you can chain a few stitches and join them into a small ring instead.
Into the ring:
Ch 3, 2 dc, ch 2.
Then work:
(3 dc, ch 2) three more times.
You should now have four groups of 3 double crochet stitches and four corner chain-2 spaces.
Join with a slip stitch to the top of the beginning chain 3.
You now have:
12 double crochet stitches + 4 corner spaces
Pull the center closed if you used a magic ring.
Round 2
Slip stitch over to the first corner chain-2 space.
Into that corner work:
Ch 3, 1 dc, ch 2, 2 dc.
The beginning chain 3 counts as the first double crochet, so this creates the standard corner:
2 dc, ch 2, 2 dc
Now work:
1 dc in each stitch across the next side.
In the next corner space work:
2 dc, ch 2, 2 dc.
Continue around the square:
- dc in every stitch along each side
- work 2 dc, ch 2, 2 dc in every corner
Join with a slip stitch to the beginning chain 3.
Round 2 has 28 double crochet stitches plus four corner spaces.
Round 3 and Beyond
The pattern now becomes wonderfully repetitive.
Slip stitch into the next corner space.
Work:
Ch 3, 1 dc, ch 2, 2 dc
in that corner.
Then:
Dc in every stitch across the side.
At the next corner:
2 dc, ch 2, 2 dc
Repeat around.
Join with a slip stitch.
Each new round gives you four additional double crochet stitches along each side because each corner contributes two new stitches to each neighboring side.
Keep adding rounds until the square reaches the size you want.
Watch Those First Stitches After the Corner
This is one of the easiest places to accidentally lose stitches.
The first double crochet beside a corner can become partially hidden by the new stitches you’ve just made into the corner space.
If your square begins looking uneven or one side has fewer stitches than another, check that you haven’t accidentally skipped that first stitch.
Stitch markers can help while you’re learning.
What If My Granny Square Starts Twisting?
A slight spiral can sometimes appear when every round is worked continuously in the same direction.
One simple option is to turn the square after each completed round and work the next round in the opposite direction.
That can help balance the natural directional lean of the stitches.
You don’t absolutely have to turn unless your chosen pattern calls for it, but it is worth testing if your squares start looking noticeably twisted.
Make All Your Squares the Same Size
Consistency matters more than crocheting fast.
As you work, periodically compare new squares with your original test square.
Look for:
- the same number of rounds
- similar finished dimensions
- consistent tension
- the same yarn weight
- similar edge shape
A small difference can often be corrected during blocking.
A large difference usually means something else changed—perhaps the hook, yarn thickness, tension, or stitch count.
How Many Squares Do You Need?
There is no universal number because it depends on:
- square size
- blanket size
- joining method
- border width
Use this simple planning method.
First measure one finished square.
Then decide approximately how wide you want the blanket.
Example
If your square measures 5 inches and you want approximately 40 inches of squares across:
40 ÷ 5 = 8 squares
For a 50-inch length:
50 ÷ 5 = 10 squares
So your layout would begin around:
8 × 10 = 80 squares
The final dimensions may be slightly different after joining and adding a border.
An Easy Way to Estimate How Much Yarn You’ll Need
Instead of relying on someone else’s yardage—which can vary dramatically with yarn, tension, hook size, and square size—make one complete sample square.
Then weigh it with a kitchen scale that measures grams.
Suppose one finished square weighs 18 grams and you need 60 squares:
18 × 60 = 1,080 grams
Then add yarn for:
- joining
- border
- swatching
- normal variation
Buying some extra is especially important if you want every skein to come from the same color family or dye lot.
This method gives you an estimate based on your actual crochet, which is much more useful than guessing.
Should You Block Granny Squares?
For a blanket made from many separate squares, I usually recommend blocking before joining if the yarn can safely be blocked.
Blocking helps:
- straighten edges
- open and settle stitches
- make square dimensions more consistent
- simplify joining
Always use a blocking method appropriate for the yarn fiber.
For example, different fibers react differently to water, heat, and steam.
Check the yarn manufacturer’s care instructions before applying heat.
The Fastest Way to Block Lots of Squares
If all of your squares should be the same size, a blocking board or a simple pin layout can make the process much easier.
Set the measurements using one properly sized square.
Then block the remaining squares to those dimensions without aggressively stretching them.
You want to help the stitches settle.
You don’t want to force a 4-inch square into becoming a 6-inch square.
Arrange Everything Before Joining
This is the fun part.
Lay every square on the floor, a large table, or a clean bed.
Don’t start joining immediately.
Move the squares around.
If you are using multiple colors, check whether several identical squares have accidentally clustered together.
Take a photograph of the final layout before moving anything.
Trust me—once you pick up a stack of 60 squares, it is very easy to forget where everything went.
You can also stack the squares row by row and label each stack temporarily.
Ways to Join Solid Granny Squares
There isn’t one universally best joining method.
The right one depends on the look you want.
Whip Stitch Join
Use a yarn needle to sew the squares together.
This creates a simple hand-sewn join and gives you plenty of control.
Using matching yarn makes the seam less noticeable.
Slip Stitch Join
You can join the squares with your crochet hook using slip stitches.
This creates a defined crochet seam.
Depending on where you insert the hook and which side faces outward, the seam can become decorative.
Single Crochet Join
Joining with single crochet creates a more prominent ridge.
That can be beautiful when the seam itself is part of the design.
For example:
multicolored squares + cream single-crochet seams
can create a strong grid across the finished blanket.
A Flatter Sewn Join
If you want the squares to visually flow into one another, a flatter sewn seam using a yarn needle may be preferable to a raised crochet join.
There is no need to hide the fact that the blanket is constructed from squares, though.
Sometimes those joining lines are exactly what make the blanket look special.
My Favorite Look for This Blanket
If I were making the soft modern version, I would use:
- cream
- sage
- dusty rose
- muted terracotta
- soft mustard
I would vary the center colors but finish every square with a cream outer round.
Then I would join the squares with cream yarn.
This gives you plenty of color without making the finished blanket look chaotic.
The repeated cream edges visually frame every square.
Add a Border
Once all of the squares are connected, the blanket may already look finished.
But a border can make a huge difference.
It helps visually unite all of the individual squares.
Simple Border Option
Work one round of single crochet around the entire blanket.
At each outer corner, work enough stitches to turn the corner without pulling or ruffling—commonly several stitches worked into the same corner point.
Then add another round if desired.
A very simple border is often best when the squares already contain several colors.
You don’t need to add an elaborate lace edge unless that is the look you want.
How to Keep the Border From Ruffling
A border usually begins waving when too many stitches are being added around the edge.
If it starts pulling inward, you may have too few.
Don’t blindly force a fixed stitch count onto an uneven handmade edge.
Lay the blanket flat periodically while working the border.
The edge should remain relaxed and level.
If it starts waving noticeably, undo a section and reduce the number of stitches.
How This Blanket Feels Different From a Classic Granny Square Blanket
The most noticeable difference is the amount of solid fabric.
With a traditional granny square, the eye immediately notices:
cluster, space, cluster, space.
With a solid granny square, most of the surface consists of continuous double crochet.
That gives it:
- a fuller appearance
- smaller openings
- more uninterrupted color
- a more modern geometric look
But it still has the thing I love most about granny-square blankets:
you build something large from lots of satisfying little pieces.
Is a Solid Granny Square Blanket Actually Warmer?
Construction can affect how open or dense a crochet fabric feels, but warmth also depends on:
- fiber
- yarn thickness
- hook size
- stitch density
- finished blanket size
- surrounding conditions
So I would not claim that every solid granny-square blanket is automatically warmer than every traditional one.
What we can see is that this construction has fewer large open chain spaces across the main fabric.
If your goal is a cozier-looking, less open granny-square blanket, that makes it an excellent option.
Choosing the Right Yarn
For a blanket, think beyond color.
Ask yourself:
Is it washable?
If this will live on a family sofa, easy care can matter a lot.
Is it comfortable against skin?
A yarn can look gorgeous in the skein and still feel scratchy in a blanket.
Is it readily available?
Running out of a special color after making 43 squares is not fun.
Does it hold up well?
Blankets get folded, washed, pulled around, and actually used.
Is it too heavy?
Very thick yarn can produce a beautiful blanket, but a large project can become surprisingly heavy.
For a first solid granny-square blanket, a smooth medium-weight yarn is an easy place to begin.
Don’t Automatically Use the Hook Size on the Yarn Label
The recommended hook size on a yarn label is a starting point.
Your project may look better with a different size.
Make a sample.
Ask:
- Is the fabric too stiff?
- Are the stitches too loose?
- Do I like the drape?
- Are the corner openings larger than I want?
- Does the square lie flat?
Then adjust before making dozens of squares.
That one test can save a huge amount of frustration.
Common Problems
My square is curling
Your tension may be too tight, or the hook may be smaller than is comfortable for that yarn.
Check that you’re also making the correct number of corner increases.
My square is ruffling
There may be too many stitches or increases, or your tension may have changed.
Review your stitch count.
One side is shorter
Count the stitches on every side.
A stitch immediately beside the corner can be easy to overlook.
My squares aren’t the same size
Make sure you’re using:
- the same yarn weight
- the same hook
- the same number of rounds
- similar tension
Then block them consistently.
My corners have small holes
That is normal with the chain-2 corner construction used here.
This is a solid-style granny square, but the corner chain spaces still create small openings.
If you want an even more closed construction, there are solid-square variations that form the corners with taller stitches rather than chain spaces. That is a useful technique to explore after mastering this beginner-friendly version.
Can Beginners Make This Blanket?
Yes.
If you can:
- chain
- double crochet
- slip stitch
- work into stitches
- work into chain spaces
you have the main skills required.
The blanket may look ambitious because it is large, but each square is a small repeated project.
That is one reason granny-square blankets can be so satisfying for newer crocheters.
Instead of staring at 70 inches of unfinished blanket, you can finish one little square at a time.
How to Make It Less Overwhelming
Don’t think:
“I need to crochet 80 squares.”
Try:
“I’ll crochet three squares tonight.”
Keep a basket containing:
- your yarn
- hook
- scissors
- finished squares
Small batches add up surprisingly quickly.
You can also weave in your ends as you go.
Future-you will be extremely grateful.
What Else Can You Make With Solid Granny Squares?
Once you make a few of these, blankets aren’t your only option.
Try using them for:
- cushion covers
- tote bags
- baby blankets
- scarves
- cardigans
- table runners
- pet blankets
- wall hangings
- storage baskets
- seat cushions
Even four large squares can become the front of a beautiful crochet pillow.
Frequently Asked Questions
What is the difference between a granny square and a solid granny square?
Traditional granny squares commonly use groups of stitches separated by chain spaces, creating a more open fabric.
Solid granny squares use continuous stitches across most of each side, resulting in fewer large openings.
Does a solid granny square have no holes at all?
Not necessarily.
The beginner version in this tutorial uses chain-2 corner spaces, so it still has small openings at the four corners.
Other solid-square constructions can reduce those openings even further.
What stitch is used for solid granny squares?
This version primarily uses double crochet in US terminology.
The increases are made at each corner so the piece continues growing as a square.
Can I use different yarn weights?
Yes.
You can make solid granny squares with many yarn weights.
Change the hook appropriately and make a test square before calculating how many you’ll need.
How large should each granny square be?
There is no required size.
Small squares create more seams and more opportunities for color combinations.
Large squares require fewer joins and can make a blanket faster to assemble.
Choose whichever look you prefer.
Should I block the squares before joining?
It is often helpful, especially when the squares vary slightly in shape.
Blocking can make the edges easier to align, but use a method suitable for your yarn fiber.
Do all of my squares need to be identical?
No.
They need to be approximately the same finished size, but the colors can be completely different.
That is one of the best things about granny-square blankets.
Final Thoughts
I still love traditional granny squares.
Those open clusters are part of crochet history and part of what gives the classic square its recognizable character.
But sometimes I want the granny-square look without quite so much open space.
And for that, the solid granny square is such a satisfying alternative.
You still get:
- portable little squares
- endless color combinations
- that handmade patchwork look
- an easy repetitive rhythm
- a beautiful finished blanket
But the continuous double crochet gives the project a completely different feel.
If you’ve ever loved a granny-square blanket but wished the fabric looked a little fuller, try one solid square before starting your next blanket.
Put it beside a traditional granny square.
Feel the difference.
Look at the spaces.
Then decide which one you want covering your sofa.




Very comprehensive. Love it.