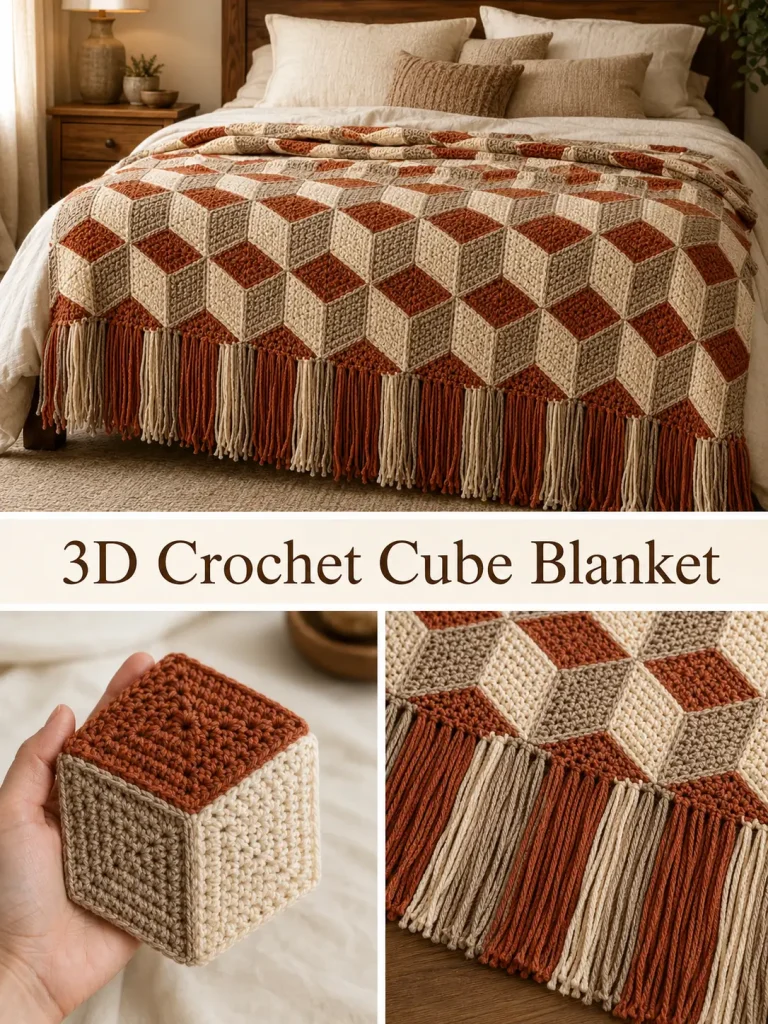
This crochet cube blanket creates an impressive three-dimensional illusion using one surprisingly simple idea: three diamond-shaped crochet motifs joined together in three different colors. When a rust, warm taupe, and creamy ivory diamond meet at the same center point, they visually become the top and two sides of a cube.
The finished blanket has the same warm geometric character as the reference design, with repeated crochet cubes arranged across the entire throw and long coordinating fringe along the lower edge. Although the blanket looks complicated, you only need to learn one diamond motif and repeat it.
Description
The finished crochet throw is made from individual textured rhombus or diamond motifs.
Each complete 3D cube consists of:
- 1 terracotta/rust diamond for the top face
- 1 warm taupe diamond for the left face
- 1 creamy ivory diamond for the right face
The three diamonds meet neatly at one central point. Changing the color of each face is what creates the optical 3D cube effect.
The motifs use raised horizontal ridges for extra texture, giving each cube the structured appearance visible in the design.
The finished throw is assembled as a repeating tessellated cube pattern and finished with alternating cream, taupe, and rust fringe along the lower edge.
Materials
- Worsted or aran-weight yarn in terracotta/rust
- Worsted or aran-weight yarn in warm taupe/beige
- Worsted or aran-weight yarn in creamy ivory
- 5 mm crochet hook
- Yarn needle
- Scissors
- Stitch markers
- Blocking mats and pins
- Measuring tape
- Piece of cardboard for cutting fringe evenly
For a medium throw approximately 50 x 60 in / 127 x 152 cm, allow roughly:
- 1,200–1,500 yards rust
- 1,200–1,500 yards taupe
- 1,200–1,500 yards cream
The exact amount depends on your yarn, motif size, and blanket dimensions.
Abbreviations
- ch – chain
- sc – single crochet
- hdc – half double crochet
- hdc2tog – half double crochet 2 together
- sl st – slip stitch
- st – stitch
- sts – stitches
- BLO – back loop only
- RS – right side
- WS – wrong side
Pattern Notes
US crochet terminology is used.
The complete blanket is built from one repeated diamond motif.
All diamonds should be made to exactly the same size.
The textured ridges are created by working the half double crochet rows through the back loop only.
Each cube is made from exactly three diamonds:
- rust = top
- taupe = left
- cream = right
Do not randomly change the face colors. Keeping the color orientation consistent across the entire blanket is what creates the repeating cube illusion.
Suggested Motif Size
With worsted/aran yarn and a 5 mm hook, one finished diamond should measure approximately:
6–6.5 in / 15–16.5 cm from point to point
A complete three-face cube will measure approximately:
10–11 in / 25–28 cm across
Gauge is less important than making every motif identical.
STEP-BY-STEP INSTRUCTIONS
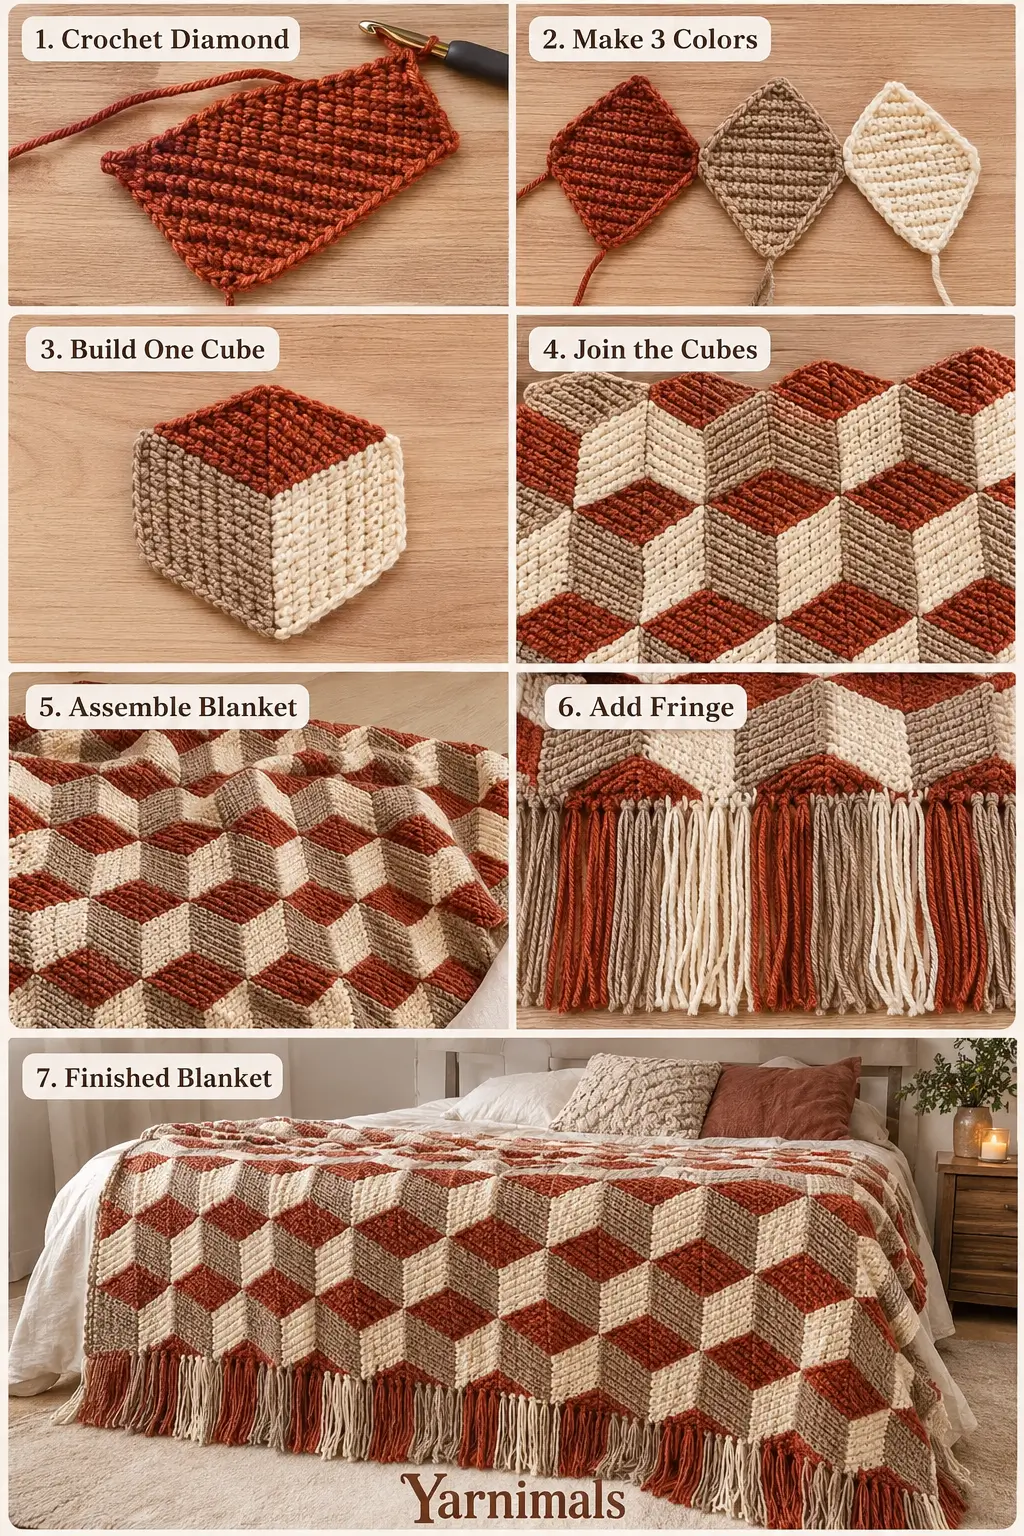
Part 1 – Textured Crochet Diamond
Make every diamond using these same instructions.
The motif begins at one point, gradually becomes wider, and then decreases back to the opposite point.
Row 1
Ch 2.
Work 2 hdc into the second ch from hook.
2 sts
Ch 1 and turn.
Row 2
Working BLO:
2 hdc in first st.
2 hdc in last st.
4 sts
Ch 1 and turn.
Row 3
Working BLO:
2 hdc in first st.
Hdc across until 1 st remains.
2 hdc in final st.
6 sts
Ch 1 and turn.
Continue Increasing
Repeat the same increase row:
- 2 hdc BLO in first st
- hdc BLO across
- 2 hdc BLO in final st
Each row increases by 2 stitches.
Continue until you have:
18 sts
This creates the first half of the diamond.
For a larger motif, continue until 20 or 22 sts.
For the blanket shown, approximately 18 sts gives a good proportion.
Center Row
Work one row without increasing:
Hdc BLO in every st across.
18 sts
Ch 1 and turn.
Begin Decreasing
Next Row
Hdc2tog BLO over the first 2 sts.
Hdc BLO across until 2 sts remain.
Hdc2tog BLO over the final 2 sts.
16 sts
Ch 1 and turn.
Continue Decreasing
Repeat:
- hdc2tog BLO
- hdc BLO across
- hdc2tog BLO
Each row decreases by 2 stitches.
Continue until only:
2 sts
remain.
Final Row
Hdc2tog.
Fasten off.
You now have one complete elongated crochet diamond.
Part 2 – Edge the Diamond
A clean edge makes joining much easier.
Join the same color yarn at one corner.
Ch 1.
Sc evenly around the entire diamond.
At each pointed corner work:
3 sc in the tip
Continue around.
Join with sl st.
Fasten off.
Do not add too many stitches along the sides or the motif will ripple.
Part 3 – Blocking
Blocking is especially important for geometric crochet.
Pin the diamond so:
- opposite sides are equal
- corners are sharp
- the motif lies completely flat
- every diamond has identical measurements
Allow to dry completely before assembly.
Part 4 – Make the Three Cube Faces
For every complete cube make:
Top Face
1 rust diamond
Left Face
1 warm taupe diamond
Right Face
1 creamy ivory diamond
All three must be exactly the same size.
Part 5 – Assemble One 3D Cube
Lay the three diamonds on a flat surface.
Place their points together in the center.
Correct Orientation
Position the:
Rust diamond at the top
Its lower point should meet the center.
Position the:
Taupe diamond at lower left
Its upper-right point should meet the same center.
Position the:
Cream diamond at lower right
Its upper-left point should meet the same center.
When arranged correctly, the three pieces should immediately look like a three-dimensional cube.
This color orientation must remain the same throughout the blanket.
Join the First Two Faces
Place the rust and taupe diamonds with edges aligned.
Using matching yarn or cream yarn, whip stitch through corresponding edge stitches.
Begin at the shared center point and work outward.
Fasten securely.
Add the Cream Face
Align the cream diamond with the other two motifs.
Join its first edge to the rust diamond.
Then join its second edge to the taupe diamond.
All three diamond tips should meet tightly at one center point.
You now have one complete crochet cube.
Part 6 – Number of Cubes
The final number depends on your preferred throw size.
For a medium throw, make approximately:
30–36 complete cubes
For example:
- 5 cubes across
- 6 cubes long
Because the cubes interlock, the actual layout will be staggered rather than a simple square grid.
For a larger bed throw, make additional cubes.
Part 7 – Arrange the Blanket
Lay the completed cubes flat before joining permanently.
Place the first cube normally.
Place the next cube so its outside diamond edge fits directly against the first cube.
Continue building a tessellated honeycomb-like cube layout.
Critical Color Rule
Every visible cube must retain:
- rust top
- taupe left
- cream right
Do not rotate individual cubes randomly.
If a cube is turned so the colors change positions, the 3D illusion will break.
Stagger the Rows
Arrange the second row slightly offset from the first so the diamonds interlock naturally.
The joins should create continuous diagonal lines across the blanket.
When arranged properly, there should be no large gaps between motifs.
Part 8 – Joining the Full Blanket
The neatest finish is a mattress stitch or whip stitch.
Use a neutral cream yarn if you want subtle visible joining.
Place neighboring motif edges together.
Insert the yarn needle under corresponding edge loops.
Work evenly from one point to the next.
Do not pull excessively tight.
Continue joining until the entire blanket is assembled.
Important Center Points
Where several motifs meet, pass the yarn through the center point more than once.
This prevents small holes from opening where the diamond corners meet.
The central points should look compact and clean.
Part 9 – Straightening the Side Edges
A tessellated cube blanket naturally creates angled or stepped edges.
The reference-style blanket keeps the geometric appearance rather than hiding it beneath a wide border.
For cleaner side edges, work a simple crochet edging.
Join cream yarn at one upper corner.
Sc evenly down the side.
Where the edge dips inward between motifs, work a slightly taller stitch such as hdc.
Where the edge points outward, work sc.
This visually smooths the side without changing the cube pattern.
Repeat on the opposite edge.
Part 10 – Top Edge
Using cream yarn:
Join at one upper corner.
Ch 1.
Sc evenly across the top.
At inward valleys, work:
sc, hdc, sc
as needed to fill the dip.
At outer points, work 1–2 sc.
Fasten off.
The goal is a neat edge without creating a heavy border.
Part 11 – Bottom Fringe
The visible design uses long fringe in the same three blanket colors.
Use:
- cream
- taupe
- rust
Cut the Fringe
Cut strands approximately:
12–14 in / 30–35 cm
long.
Each finished tassel fringe section will be approximately half this length after folding.
Use a cardboard template to make all strands equal.
Attach Fringe
For each fringe group, use approximately:
3–4 strands
Fold them in half.
Insert your crochet hook through a stitch or edge space.
Pull the folded center through.
Pass the loose ends through the loop.
Pull gently to secure.
Fringe Color Pattern
Alternate the colors following the blanket motifs.
For example:
Cream
Cream
Rust
Rust
Taupe
Taupe
or follow the diamond directly above each fringe section.
For the closest coordinated look, allow the fringe color to continue visually from the motif above it.
Trim Fringe
Once all fringe is attached, lay the blanket flat.
Comb the strands gently with your fingers.
Trim the fringe to an even finished length of approximately:
5–6 in / 12.5–15 cm
Optional Individual Diamond Method
Instead of assembling three diamonds into complete cubes first, you can join individual diamonds directly into the blanket.
This can reduce the number of seams.
However, assembling several complete cubes first is easier for beginners because you can immediately see whether your color placement is correct.
Finishing
Weave in all remaining yarn ends.
Lay the entire blanket flat.
Lightly block again if needed.
Pay particular attention to:
- cube center points
- outside edges
- diamond corners
- fringe alignment
Do not aggressively stretch the blanket because this can distort the cube illusion.
DESIGN CONSISTENCY LOCK
For this exact blanket keep:
- repeating 3D cube illusion
- every cube formed from exactly 3 diamonds
- rust top face
- taupe left face
- creamy ivory right face
- identical diamond sizes
- textured BLO crochet ridges
- no granny squares
- no floral motifs
- no random color placement
- no extra accent colors
- no thick outer border
- coordinating cream, taupe, and rust fringe
- long rectangular throw shape
The three colors must maintain the same orientation throughout the entire blanket.
That consistent light/dark placement is what makes the crochet look three-dimensional.
Tips & Variations
Cotton, cotton-acrylic, or a smooth anti-pilling acrylic works best because the geometric stitch definition remains visible.
Avoid fuzzy yarn. The sharp diamond edges are important to the illusion.
Make one complete three-color cube before committing to the full blanket. This allows you to confirm the motif dimensions and color placement.
Block every motif to the same template.
If one diamond is even 1/2 inch larger than the others, the joins can begin twisting.
Keep the joining yarn tension slightly relaxed.
For an even stronger 3D effect, keep the top face medium-dark, one side medium, and the other side very light.
The rust, taupe, and ivory combination works particularly well because it creates natural visual shading.
FAQ
Is this blanket made from crochet cubes?
The blanket looks like it contains cubes, but every cube is actually flat. Three crochet diamond motifs joined together create the optical illusion of a three-dimensional block.
Do I need different patterns for the three cube sides?
No. All three pieces use exactly the same diamond pattern. Only the yarn color and orientation change.
Can I make the blanket larger?
Yes. Simply make additional sets of three diamonds and continue the tessellated cube layout until the blanket reaches your preferred dimensions.
Conclusion
This 3D crochet cube blanket is a striking example of how simple crochet shapes can create a much more complex-looking finished design. Each block uses the same textured diamond motif in rust, warm taupe, and creamy ivory, but when the three colors meet at the center, they create the illusion of a dimensional cube. Repeat the cubes into a cozy geometric throw, add the long coordinating fringe, and you have a warm modern crochet blanket that looks far more complicated than it actually is.




can not download the pattern
Your pictures do not match the pattern. Can I trust that the rest of the pattern will work? I already know that a sc/hdc/sc will not fill the dips in the pattern when going around the edge. And the pictures on top: errors in block placement? I need to know if I can trust my eyes. I like your pattern the best of all I’ve seen around on the web.
Can you do a video tutorial?
Beautiful pattern