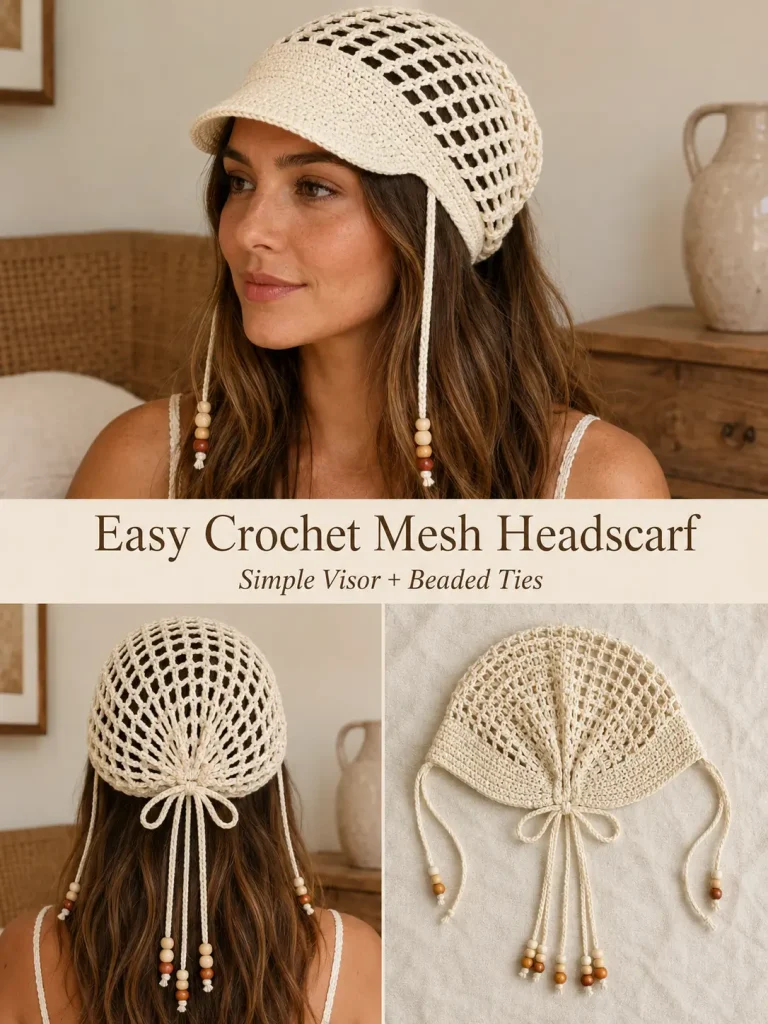
This easy crochet mesh headscarf is a light summer accessory with a relaxed boho look. It combines a simple open crochet mesh over the crown, a firm visor-style front band, and long crochet ties finished with wooden beads.
The design looks detailed, but the construction can stay very simple. Instead of using complicated lace motifs, this version uses an easy repeating chain-space mesh that gradually shapes around the head. The back is gathered with a drawstring-style tie, while two longer side cords hang down and hold the decorative beads.
Description
The finished crochet headscarf has a soft cream color and three main features:
- an open mesh crown
- a solid crochet visor at the front
- long decorative ties with natural wood beads
The mesh is airy enough for warm weather, while the denser front visor gives the accessory more structure. At the back, the mesh narrows into a gathered section tied with crochet cords.
This is an easy crochet accessory for summer outfits, festivals, beachwear, casual everyday style, or handmade gifts.
Materials
- DK cotton or cotton-blend yarn in warm cream
- 3.5 mm crochet hook
- 4 mm crochet hook, optional for looser mesh
- Yarn needle
- Scissors
- Stitch markers
- 12–18 wooden beads with holes large enough for the crochet cords
- Flexible measuring tape
Abbreviations
- ch – chain
- sl st – slip stitch
- sc – single crochet
- hdc – half double crochet
- dc – double crochet
- st – stitch
- sts – stitches
- sp – space
- rep – repeat
Pattern Notes
US crochet terminology is used.
This version keeps the construction intentionally simple.
The project is made from:
- one solid front band
- one easy mesh crown
- one visor
- one back gathering cord
- two long side ties
- wooden beads
The mesh repeat is:
dc, ch 3, skip stitches
The exact size can be adjusted while crocheting.
For an adult size, aim for approximately:
- head circumference: 21–23 in / 53–58 cm
- front band width: 2–2.5 in / 5–6.5 cm
- visor depth: about 2.5–3 in / 6.5–7.5 cm
Step-by-Step Instructions
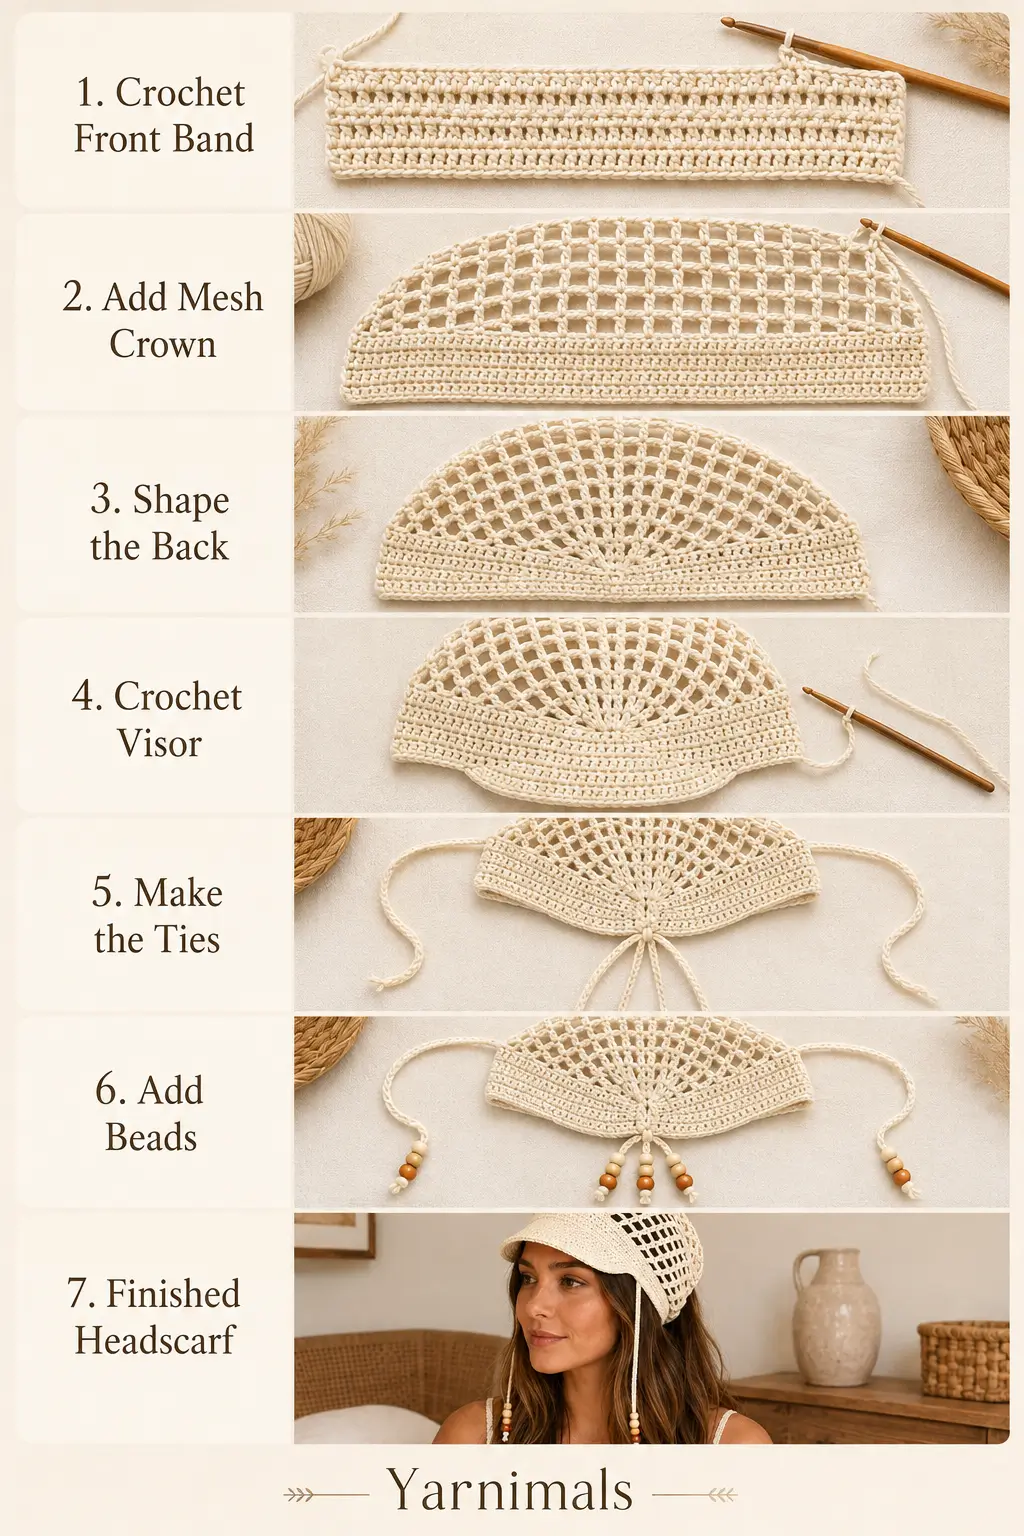
Part 1 – Front Headband
Using cream yarn.
Ch until the foundation measures approximately 11–12 in / 28–30 cm.
This band sits across the front of the head from temple to temple.
Row 1
Hdc in second ch from hook.
Hdc across.
Ch 1 and turn.
Rows 2–6
Hdc in every st across.
Ch 1 and turn.
Continue until the band measures approximately 2–2.5 in / 5–6.5 cm wide.
Do not fasten off.
Part 2 – Easy Mesh Crown
The mesh grows upward from the back edge of the solid band.
Mesh Row 1
Ch 4.
Skip 2 sts.
Dc in next st.
Repeat across:
ch 3, skip 2 sts, dc in next st
Turn.
Mesh Row 2
Ch 4.
Dc into the next dc.
Repeat:
ch 3, dc in next dc
across.
Turn.
Continue
Repeat Mesh Row 2 until the mesh measures approximately 7–8 in / 18–20 cm from the solid front band.
This creates the airy crown section.
Part 3 – Shape the Back
To make the mesh fit around the back of the head, gradually narrow the final rows.
Decrease Row 1
Ch 4.
Skip the first mesh section.
Dc in the next dc.
Continue the normal mesh repeat across.
Stop before the final mesh section.
Turn.
Decrease Rows 2–4
Repeat the same decrease method.
Each row becomes slightly narrower.
The back should now taper gently instead of ending as a wide rectangle.
Fasten off.
Part 4 – Back Gathering Edge
Join cream yarn along the tapered back edge.
Ch 1.
Work sc evenly across.
Fasten off.
This creates a firm edge through which the gathering cord will pass.
Part 5 – Back Gathering Cord
Using cream yarn:
Ch approximately 80–90.
Sl st back through every chain.
Fasten off.
Thread the cord through the sc stitches along the back edge.
Pull gently until the mesh gathers comfortably around the back of the head.
Tie into a small bow or knot.
Leave the ends hanging downward.
Part 6 – Crochet Visor
The visor is attached to the lower front edge of the solid band.
Find the center of the front band.
Mark approximately 24–28 stitches across the center.
Join cream yarn at the first marker.
Visor Row 1
Ch 1.
Hdc across the marked section.
Turn.
Row 2
Ch 1.
Hdc2tog over first 2 sts.
Hdc across until 2 sts remain.
Hdc2tog.
Turn.
Row 3
Repeat Row 2.
Row 4
Hdc across.
Row 5
Hdc2tog.
Hdc across.
Hdc2tog over final 2 sts.
Fasten off.
The visor should now have a softly curved shape.
Visor Edging
Join cream yarn at one side of the visor.
Sc evenly around the entire outer visor edge.
At the two outer corners, work 2 sc if needed to keep the edge smooth.
Fasten off.
Gently shape the visor with your fingers.
Part 7 – Side Ties
Make 2.
Join cream yarn at one side of the front band near the temple.
Ch approximately 70–80.
Sl st back through every chain.
Fasten off.
Repeat on the opposite side.
The two cords should hang below the shoulders.
Part 8 – Add Wooden Beads
Slide several wooden beads onto each long side cord.
For the same overall look, use approximately:
- 4–6 beads per side cord
Mix:
- natural light wood
- medium brown wood
- darker brown wood
Place the beads near the lower end of each cord rather than covering the entire tie.
Tie a secure knot below the beads.
Leave a short crochet tail beneath them.
Part 9 – Optional Beads on Back Ties
You can also add 1–3 beads to the ends of the back gathering cord.
Keep these smaller than the side-cord bead groups so the back does not feel heavy.
Finishing
Weave in all yarn ends.
Put the headscarf on and adjust the back gathering cord.
Check that:
- front band sits above the eyebrows
- visor curves slightly forward
- mesh covers the crown comfortably
- back gathers without pulling
- side ties hang evenly
- beads are secure
Design Consistency Lock
Keep this finished version as:
- warm cream crochet yarn
- solid front band
- short crochet visor
- open chain-space mesh crown
- gathered back
- two long side ties
- long back ties
- natural wooden beads
- no flowers
- no granny squares
- no complicated lace motifs
- no multiple yarn colors
The project should look light, simple, handmade, and boho rather than heavily decorated.
Tips & Variations
Cotton yarn is the best choice because it keeps the visor firm while allowing the mesh to remain breathable.
If the mesh feels too tight, use a 4 mm hook for the crown and switch back to 3.5 mm for the solid sections.
If you want more coverage, replace ch 3 with ch 2 in the mesh repeat.
If you want a lacier result, use ch 4 instead.
The visor does not need plastic reinforcement for a soft casual version. If you prefer a stiffer brim, you can crochet it more tightly or use a smaller hook.
Try the piece on before finishing the back cord. That is the easiest way to adjust the fit without complicated sizing math.
FAQ
Is this pattern beginner-friendly?
Yes. The main stitches are chains, single crochet, half double crochet, and double crochet. The mesh section uses a very easy repeating pattern.
Do I need to make complicated flower lace?
No. This simplified version uses basic chain-space mesh so it keeps the same airy appearance without complicated motifs.
Can I make it without beads?
Yes. The beads are decorative only. The headscarf works perfectly with plain crochet tie ends.
Conclusion
This easy crochet mesh headscarf gives you the airy boho look of the inspiration without requiring a complicated lace pattern. The simple cream mesh, solid front band, soft visor, gathered back, and long beaded ties create a distinctive summer accessory that is still practical to crochet. It is also easy to customize by adjusting the mesh length, visor size, and tie length to fit your own head comfortably.



