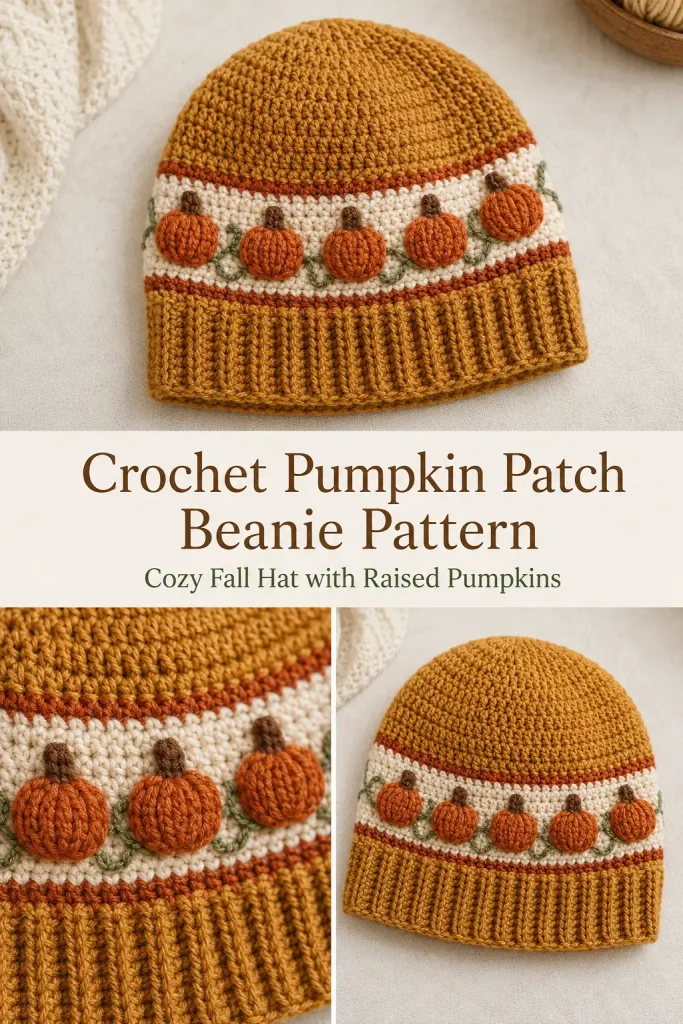
This cozy crochet pumpkin beanie brings all the best fall colors together in one warm, textured hat. A golden-caramel crown and ribbed brim frame a creamy decorative band filled with small three-dimensional burnt-orange pumpkins, sage-green leaves, and tiny brown stems.
The pumpkin details look intricate, but the construction stays manageable. The hat itself is worked top-down with a consistent stitch count, while the pumpkins are crocheted separately and attached to the finished cream band. This keeps the sizing reliable and avoids complicated colorwork or awkward stitch-count changes.
Description
The finished crochet beanie has a softly rounded fitted crown, a wide vertical ribbed brim, and one decorative pumpkin patch band around the middle.
The design includes:
- golden-caramel crown and lower hat
- matching golden-caramel ribbing
- two narrow burnt-orange accent stripes
- creamy ivory textured background band
- 12 raised burnt-orange pumpkins
- three rounded ridges on every pumpkin
- two tiny sage-green leaves on each pumpkin
- small brown stems
- no pom-pom
- no separate large leaves or hanging decorations
The finished adult hat measures approximately 20–21 inches around unstretched and fits an average 21–23 inch head.
Materials
- Worsted-weight yarn in golden caramel
- Worsted-weight yarn in burnt pumpkin orange
- Worsted-weight yarn in creamy ivory
- Small amount of sage green
- Small amount of medium brown
- 5 mm crochet hook
- 4.5 mm crochet hook for a firmer brim, optional
- Yarn needle
- Scissors
- Stitch marker
Approximate yarn amounts:
- Golden caramel: 180–220 yards
- Burnt orange: 40–50 yards
- Cream: 30–40 yards
- Sage green: 10–15 yards
- Brown: a few yards
Abbreviations
- mr – magic ring
- ch – chain
- sl st – slip stitch
- sc – single crochet
- hdc – half double crochet
- dc – double crochet
- FPdc – front post double crochet
- BLO – back loop only
- st – stitch
- sts – stitches
- inc – increase
- puff – puff stitch
Pattern Notes
US crochet terminology is used.
The hat is worked from the crown downward.
Beginning chains do not count as stitches.
Join each hat round with a slip stitch to the first stitch.
The adult version uses 72 stitches around the body. Keeping this count unchanged through the decorative section makes the hat much easier to reproduce accurately.
Twelve pumpkins are attached around the cream band, approximately one pumpkin every 6 stitches.
Finished Size
Adult / Teen:
- Circumference: approximately 20–21 in / 51–53 cm unstretched
- Fits: approximately 21–23 in / 53–58 cm head
- Finished height: approximately 9–9.5 in / 23–24 cm
Gauge
Approximately:
14 dc x 8 rows = 4 in / 10 cm
Check your gauge before continuing past the crown.
STEP-BY-STEP INSTRUCTIONS
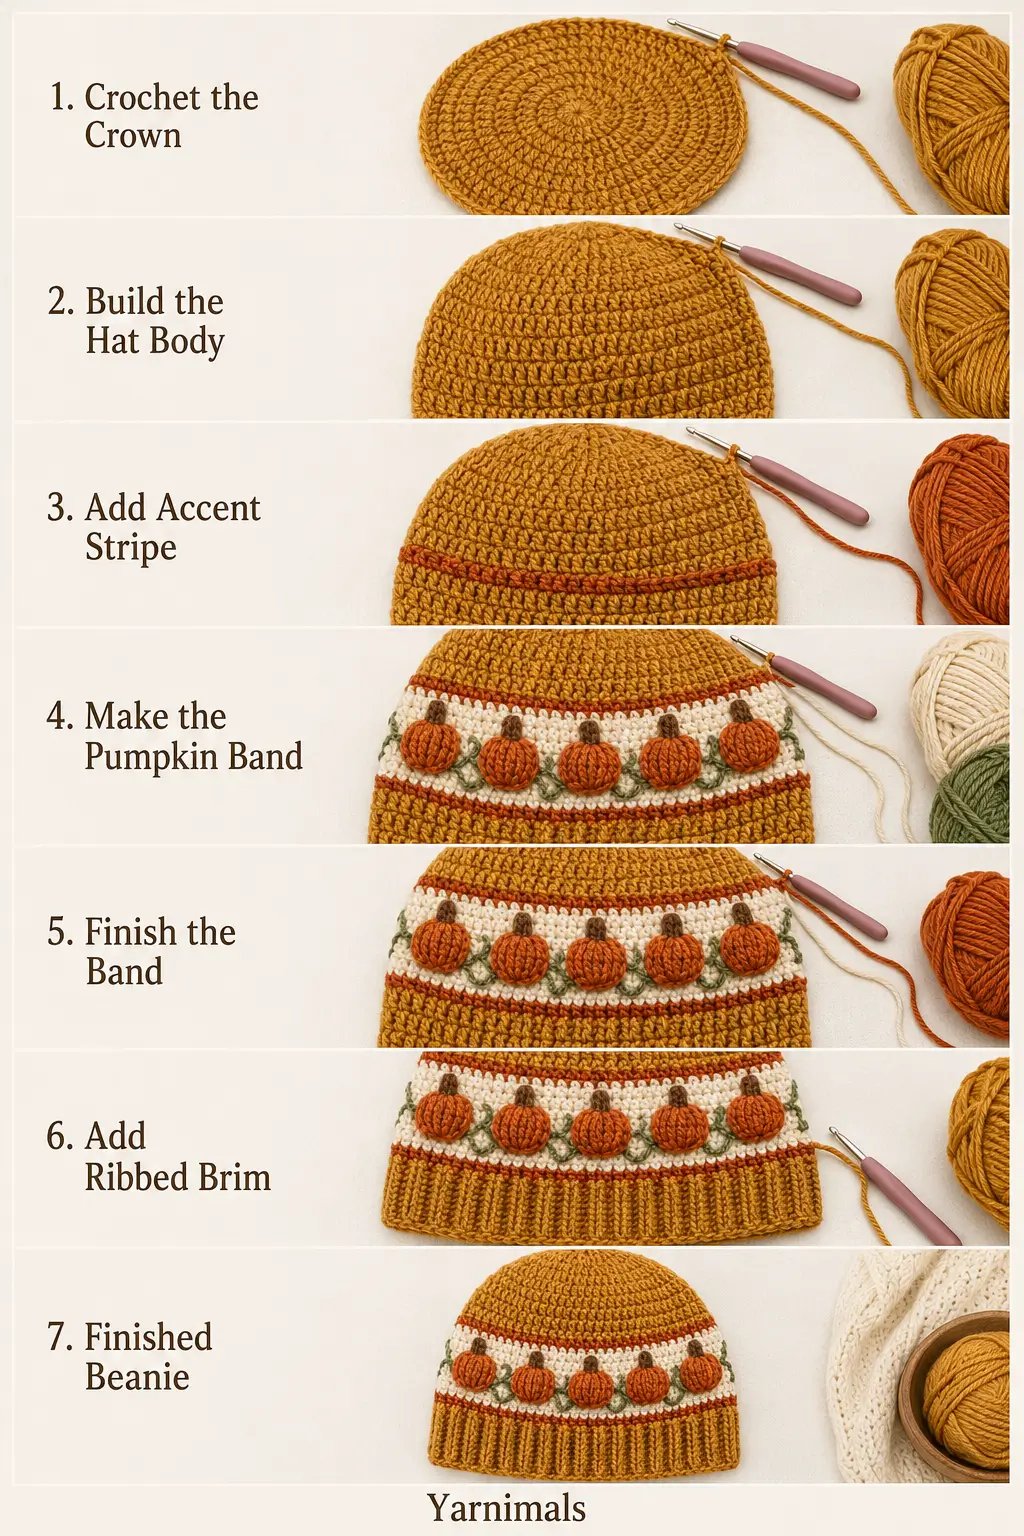
Part 1 – Crochet the Crown
Using golden-caramel yarn.
Round 1
Make a magic ring.
Ch 2.
Work 12 dc into the ring.
Join.
12 sts
Round 2
Ch 2.
Work 2 dc in every st around.
Join.
24 sts
Round 3
Ch 2.
Repeat:
dc in next st, 2 dc in next st
around.
Join.
36 sts
Round 4
Ch 2.
Repeat:
dc in next 2 sts, 2 dc in next st
around.
Join.
48 sts
Round 5
Ch 2.
Repeat:
dc in next 3 sts, 2 dc in next st
around.
Join.
60 sts
Round 6
Ch 2.
Repeat:
dc in next 4 sts, 2 dc in next st
around.
Join.
72 sts
Your crown should measure approximately 6.5–7 inches / 16.5–18 cm across.
Do not continue increasing.
Part 2 – Straight Crown Section
Rounds 7–8
Ch 2.
Dc in every st around.
Join.
72 sts
These rounds begin turning the flat crown into a beanie shape.
Part 3 – Upper Burnt-Orange Accent Stripe
Change to burnt-orange yarn.
Round 9
Ch 1.
Sc in every st around.
Join.
72 sts
Fasten off orange.
Part 4 – Cream Textured Pumpkin Band
Join creamy ivory yarn.
Round 10
Ch 1.
Hdc in every st around.
Join.
72 sts
Round 11 – Raised Texture
Ch 2.
Repeat around:
FPdc around next st, dc in next st
Join.
72 sts
This creates the raised vertical cream texture behind the pumpkins.
Round 12
Ch 1.
Hdc in every st around.
Join.
72 sts
Fasten off cream.
You now have a stable cream band wide enough to hold the pumpkin appliqués.
Part 5 – Make the Raised Pumpkins
Make 12.
Using burnt pumpkin-orange yarn.
Each pumpkin has three raised ridges.
Foundation
Ch 4.
Row 1
Sc in second ch from hook.
Sc in next 2 ch.
You have:
3 sc
Ch 1 and turn.
Row 2 – Three Pumpkin Ridges
Work one puff stitch into each of the 3 stitches.
You will have:
3 puffs
Fasten off, leaving a long tail for attaching.
Puff Stitch
Yarn over.
Insert hook into the indicated stitch.
Yarn over and pull up a loop to approximately hdc height.
Repeat this 3 more times in the same stitch.
Yarn over and pull through all loops on the hook.
Ch 1 to secure.
The puff should sit forward and look plump.
Make the other two puffs in the next two stitches.
After shaping, the three puffs together resemble the rounded vertical sections of a miniature pumpkin.
Part 6 – Add Sage-Green Leaves
Each pumpkin gets 2 tiny leaves.
Using sage-green yarn, join at the upper center of the pumpkin.
First Leaf
Ch 3.
Sl st in second ch from hook.
Sc in next ch.
Sl st back into the pumpkin top.
Second Leaf
Ch 3 again.
Sl st in second ch.
Sc in next ch.
Sl st into the pumpkin top.
Angle this leaf toward the opposite side.
Fasten off.
Gently spread the two leaves apart.
Repeat for all 12 pumpkins.
Part 7 – Add Brown Stems
Using medium-brown yarn and a yarn needle, embroider one tiny stem between the two green leaves.
Make 1–2 short vertical stitches.
Keep the stem small.
Repeat on all pumpkins.
Each finished pumpkin should now have:
- 3 orange raised ridges
- 2 sage-green leaves
- 1 small brown stem
Part 8 – Attach the Pumpkin Row
Lay the hat flat with the cream band facing you.
The pumpkins should sit centered across the cream textured band.
Because the hat has 72 stitches and there are 12 pumpkins:
72 ÷ 12 = 6 stitches per pumpkin placement
Position the first pumpkin.
Count approximately 6 stitches around the band and position the next.
Continue until all 12 pumpkins are evenly distributed around the hat.
Pin or loosely tack them in position before sewing permanently.
Sew the Pumpkins
Using each orange yarn tail, sew around the back base of the pumpkin.
Do not sew through the outer front of the puff stitches.
The three orange ridges should remain raised and dimensional.
Secure the green leaf bases if needed, but leave the leaf tips free.
Part 9 – Lower Burnt-Orange Accent Stripe
Join burnt-orange yarn below the cream pumpkin band.
Round 13
Ch 1.
Sc in every st around.
Join.
72 sts
Fasten off orange.
The decorative band is now complete.
From top to bottom it should show:
- thin rust-orange stripe
- cream textured section
- raised pumpkins with green leaves and brown stems
- second thin rust-orange stripe
Part 10 – Lower Golden Section
Join golden-caramel yarn.
Rounds 14–15
Ch 2.
Dc in every st around.
Join.
72 sts
Check the hat depth before beginning the brim.
The hat should reach to approximately the upper ear area.
If you need slightly more length, add one additional dc round.
Do not add several extra rounds unless you intentionally want a slouchier hat.
Part 11 – Ribbed Brim
Use golden-caramel yarn.
The brim is crocheted sideways and joined to the lower edge as you work.
Setup
Ch 9.
Rib Row 1
Beginning in second ch from hook:
Sc in each ch across.
8 sc
Sl st into the next 2 unused stitches of the hat edge.
Turn.
Rib Row 2
Skip the 2 sl sts.
Working BLO:
Sc in each of the 8 ribbing stitches.
Ch 1.
Turn.
Rib Row 3
Working BLO:
Sc in each of the 8 stitches.
Sl st into the next 2 unused hat stitches.
Turn.
Repeat Rows 2–3 around the entire hat.
Because there are 72 hat stitches and each attachment advances across 2 stitches:
72 ÷ 2 = 36 attachment repeats
The ribbing will therefore finish evenly.
Join the Ribbed Brim
When you return to the beginning, place the first and final ribbing rows together.
Sl st through corresponding stitches of both edges.
Fasten off.
Turn the joining seam toward the inside.
Part 12 – Final Shaping
Use your fingers to gently shape each pumpkin.
Pull the three puff ridges slightly forward.
Arrange the sage leaves so they point outward from the stem.
Make sure the pumpkins form an even row around the hat.
Straighten the ribbing.
Weave in every yarn end securely.
Size Adjustments
Smaller Adult / Child
Stop increasing after Round 5 at:
60 sts
Continue the body with 60 stitches.
Instead of 12 pumpkins, make:
10 pumpkins
Place one approximately every 6 stitches.
This preserves the same spacing and design.
Larger Adult
If your gauge is tighter and you need additional circumference, continue increasing evenly until the crown reaches your required diameter.
Keep the final stitch count divisible by 6 so the pumpkin spacing remains easy.
Design Consistency Lock
For this exact finished hat, keep:
- rounded fitted beanie shape
- golden-caramel crown
- matching golden-caramel ribbed brim
- one upper burnt-orange stripe
- cream textured pumpkin background
- one complete row of raised burnt-orange pumpkins
- exactly 3 raised ridges on every pumpkin
- 2 sage-green leaves per pumpkin
- 1 small brown stem per pumpkin
- one lower burnt-orange stripe
- no pom-pom
- no earflaps
- no flower appliqués
- no large hanging leaves
- no random extra colors
The pumpkins should remain small enough to form a tidy repeating border around the hat.
Tips & Variations
Use a smooth worsted yarn so the pumpkin ridges and textured cream stitches remain easy to see.
Keep your puff stitches slightly loose. Tight puffs can become hard and lose their rounded pumpkin appearance.
Make all 12 pumpkins before attaching any of them. This makes it easier to choose the most consistent motifs and distribute them evenly.
Pin the complete pumpkin row before sewing. Small spacing changes become much more noticeable once the hat is worn.
The appliqué construction also makes color changes easier because you do not need to carry several yarn colors around the hat.
If the brim feels loose, switch to a 4.5 mm hook for the ribbing only.
If the hat feels too tall before the brim, remove one golden-caramel lower-body round rather than making the brim narrower.
FAQ
Are the pumpkins crocheted separately?
Yes. Each pumpkin is a tiny three-puff appliqué attached to the cream band. This keeps the hat stitch count consistent and makes the decorative row much easier to reproduce.
How many pumpkins are used?
The adult 72-stitch version uses 12 pumpkins, spaced approximately every 6 stitches.
Can I make the pumpkins directly into the hat?
You can experiment with integrated puff stitches, but separate pumpkins give much more reliable sizing and prevent the decorative round from changing the hat circumference.
Conclusion
This crochet pumpkin patch beanie combines a reliable top-down hat construction with a dimensional autumn detail that looks much more complicated than it actually is. The golden-caramel hat, textured cream band, burnt-orange three-ridge pumpkins, tiny sage leaves, brown stems, and thick ribbed brim create a cozy fall accessory without difficult colorwork. Make the pumpkins separately, space them carefully around the finished band, and you will have a polished handmade beanie ready for pumpkin-patch days, cool-weather walks, and autumn gifts.



