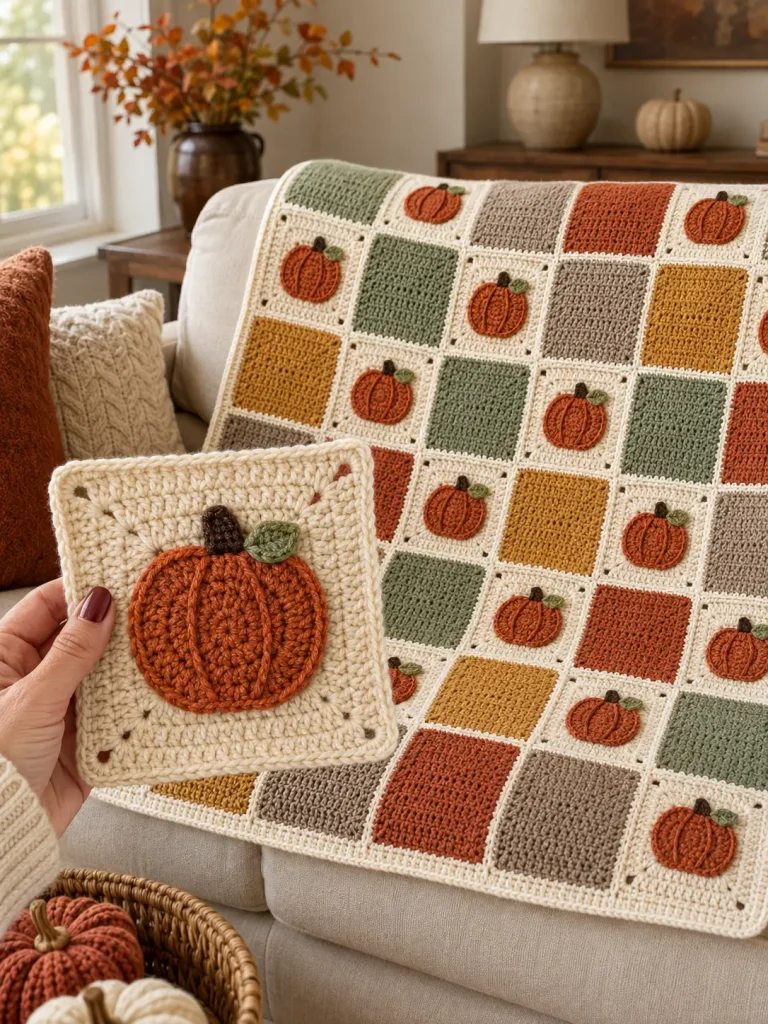
There is a point every year when I suddenly want everything in the house to feel like fall.
Not necessarily covered in giant Halloween decorations.
Just warmer.
Softer.
A little more orange.
And definitely more crochet.
That is exactly what inspired this pumpkin granny square blanket.
Instead of making another basket full of tiny crochet pumpkins, I wanted one project that could completely change the look of a sofa or reading chair for the season.
The result is a cozy patchwork-style blanket made from solid granny squares, with simple raised pumpkin appliqués scattered across the design.
The pumpkin squares are alternated with plain fall-colored squares, which keeps the blanket seasonal without making it feel overly busy.
And because everything is made one square at a time, you can easily adjust the blanket to whatever size you want.
Pumpkin Granny Square Blanket at a Glance
This blanket uses two types of squares:
Pumpkin Squares
A cream solid granny square with a flat burnt-orange crochet pumpkin sewn onto the center.
Plain Fall Squares
Solid granny squares made in coordinating fall colors.
For the sample layout, arrange them in a checkerboard pattern.
That gives you pumpkins across the entire blanket without needing to crochet a pumpkin for every single square.
Skill Level
Confident beginner / easy intermediate
You should be comfortable with:
- chain
- slip stitch
- single crochet
- double crochet
- increasing
- decreasing
- working in rounds
- sewing an appliqué onto crochet
- joining granny squares
Nothing here requires complicated colorwork.
Crochet Terminology
This pattern uses US crochet terms.
Abbreviations:
- ch = chain
- sc = single crochet
- dc = double crochet
- sl st = slip stitch
- inc = 2 stitches worked into the same stitch
- sc2tog = single crochet 2 stitches together
- st = stitch
- sts = stitches
- sp = space
- BLO = back loop only
Suggested Yarn
A smooth worsted-weight / Category 4 yarn works well for this blanket.
You can use acrylic, wool blend, cotton blend, or another blanket-friendly yarn you enjoy working with.
For something that will be used regularly on a sofa, I would pay attention to:
- softness
- washability
- durability
- whether all of your colors are approximately the same thickness
Suggested Fall Color Palette
For a warm modern look, try:
- Cream – pumpkin-square backgrounds and joining
- Burnt orange – pumpkins
- Sage green
- Warm taupe
- Muted mustard
- Terracotta
- Dark brown – pumpkin stems
You don’t need to use every color.
Even three or four coordinated shades can make a beautiful blanket.
Hook Size
Start with approximately a 5 mm crochet hook for worsted-weight yarn, then adjust if necessary.
The most important thing is that all of your squares come out approximately the same size.
If your fabric feels:
Too stiff
Try a slightly larger hook.
Too loose
Try a slightly smaller hook.
Gauge isn’t critical for a blanket, but consistent gauge is important when you’re joining dozens of squares.
Finished Blanket Size
You can make this blanket any size you want.
For the sample layout, aim for granny squares measuring approximately:
6 × 6 inches after blocking
Then arrange:
7 squares across × 9 squares down
That uses:
63 squares total
If every square measures exactly 6 inches, the joined square section will measure approximately:
42 × 54 inches before the border
Your finished measurements will vary depending on:
- yarn
- hook
- tension
- joining method
- border
How Many Pumpkin Squares?
For the 7 × 9 checkerboard layout:
- 32 pumpkin squares
- 31 plain squares
Alternate them like a checkerboard.
This is one of my favorite layouts because the pumpkins are obvious without completely covering the blanket in orange motifs.
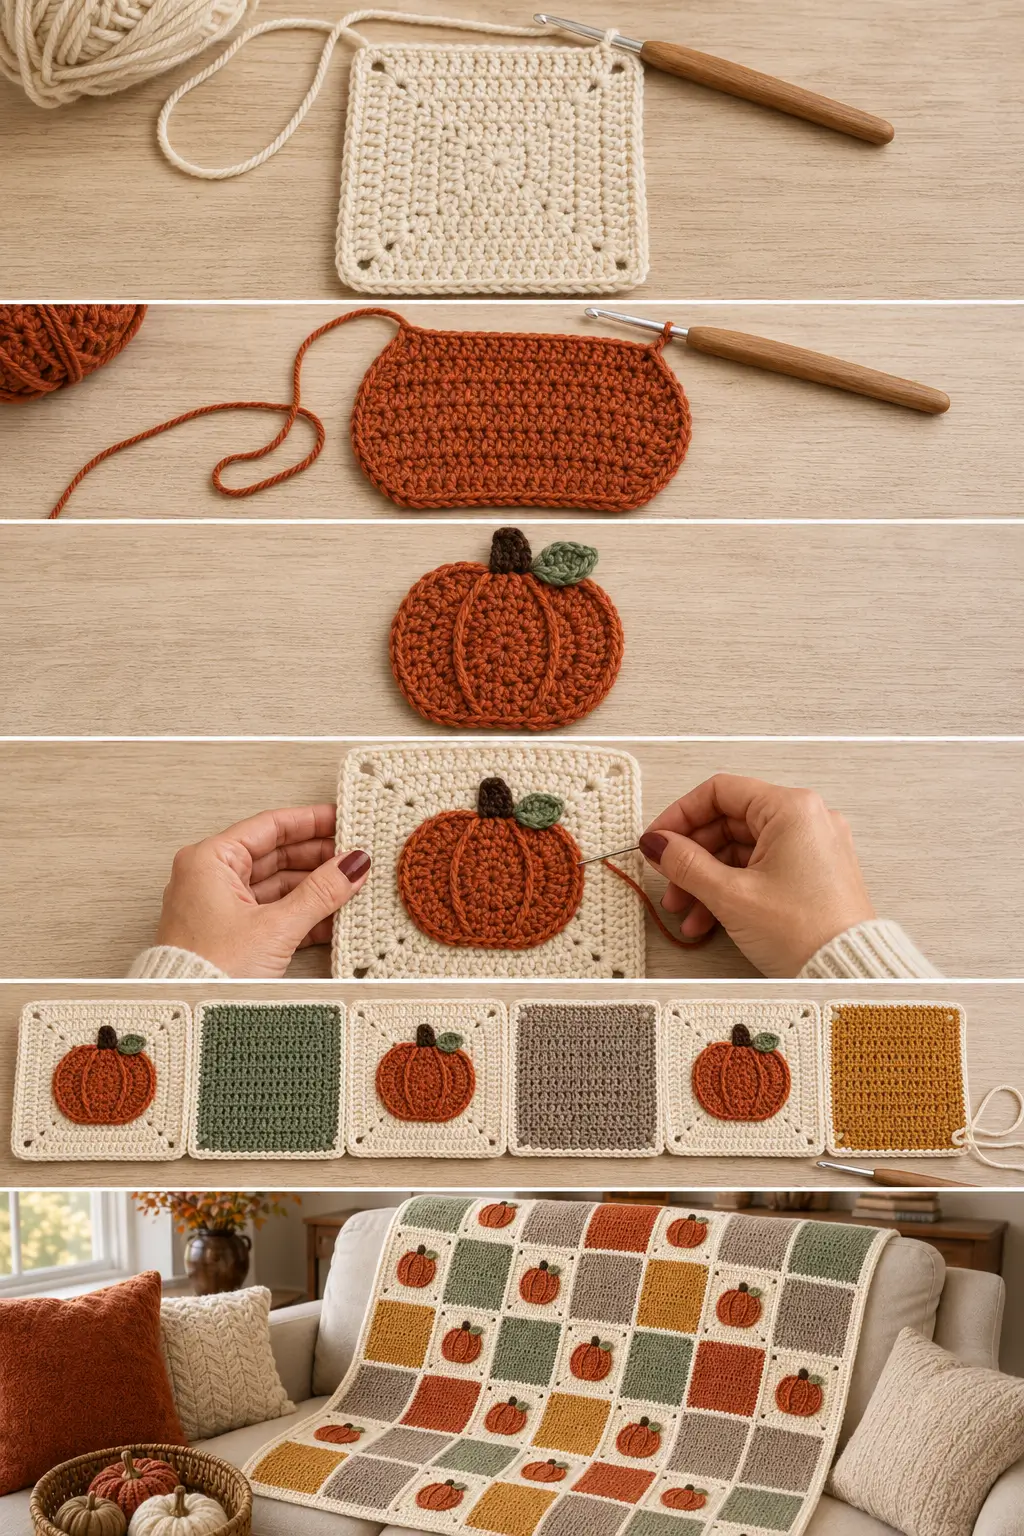
PART 1: MAKE THE SOLID GRANNY SQUARES
The pumpkin squares and plain squares use the same basic solid granny-square construction.
For pumpkin squares, use cream.
For plain squares, use your coordinating fall colors.
The beginning chain 3 counts as one double crochet.
Solid Granny Square – Round 1
Make a magic ring.
Alternatively, chain 4 and slip stitch into the first chain to form a small ring.
Into the center:
Ch 3, 2 dc, ch 2.
Then repeat:
3 dc, ch 2
three more times.
You should have:
- four groups of 3 double crochet
- four chain-2 corner spaces
Join with a slip stitch to the top of the beginning chain 3.
Round 2
Slip stitch across until you reach the first corner space.
In that corner work:
Ch 3, 1 dc, ch 2, 2 dc.
Then:
Dc in every stitch across the side.
In the next corner space:
2 dc, ch 2, 2 dc.
Repeat around the square:
- 1 dc in every stitch along each side
- 2 dc, ch 2, 2 dc in every corner
Join with a slip stitch to the beginning chain 3.
Round 3
Slip stitch to the next corner.
Work:
Ch 3, 1 dc, ch 2, 2 dc
in the corner.
Then:
Dc in every stitch across.
At every corner work:
2 dc, ch 2, 2 dc.
Continue around.
Join.
Continue the Square
Repeat the same construction for additional rounds:
Along each side:
Work 1 dc in every stitch.
In each corner:
Work:
2 dc, ch 2, 2 dc
Continue until your square reaches the size you want.
For approximately 6-inch squares using worsted-weight yarn, you may need around 5–6 rounds, but don’t rely on the round number alone.
Measure your actual square.
Yarn, hook size, and tension can change the finished dimensions considerably.
Important: Make One Complete Test Square First
Before crocheting 63 squares, finish one square.
Then:
- Fasten off.
- Weave in the ends.
- Block it using a method appropriate for your yarn.
- Let it dry completely.
- Measure it.
That finished square becomes your size reference for everything else.
PART 2: CROCHET THE PUMPKIN APPLIQUÉ
Now for the part that makes the blanket look like fall.
This pumpkin is intentionally simple.
It is crocheted flat in rows and then sewn onto the cream granny square.
Use burnt-orange yarn.
Pumpkin Body
Ch 8.
Row 1
Starting in the second chain from the hook:
Sc in each chain across.
You should have:
7 sc
Turn.
Row 2
Ch 1.
Work:
2 sc in first stitch, sc in next 5 stitches, 2 sc in final stitch.
You now have:
9 stitches
Turn.
Row 3
Ch 1.
Sc in all 9 stitches.
Turn.
Row 4
Ch 1.
Work:
2 sc in first stitch, sc in next 7 stitches, 2 sc in final stitch.
You now have:
11 stitches
Turn.
Row 5
Ch 1.
Sc across all 11 stitches.
Turn.
Row 6
Repeat Row 5.
Sc across all 11 stitches.
Turn.
Row 7
Ch 1.
Work:
Sc2tog, sc in next 7 stitches, sc2tog.
You now have:
9 stitches
Turn.
Row 8
Ch 1.
Work:
Sc2tog, sc in next 5 stitches, sc2tog.
You now have:
7 stitches
Fasten off, leaving a long tail for sewing.
You should now have a small rounded pumpkin-like shape that is narrower at the top and bottom and fuller through the middle.
Add the Pumpkin Ridges
A pumpkin looks much more recognizable when you add a couple of simple vertical lines.
Thread a yarn needle with either:
- the same orange yarn
- darker burnt orange
- rust
Starting near the top edge, make one vertical line down approximately one-third of the way from the left edge.
Repeat approximately one-third of the way from the right edge.
Use simple running stitches or backstitches.
Don’t pull tightly.
You want the lines to define the pumpkin sections without puckering the appliqué.
Crochet the Stem
Using brown yarn:
Ch 4.
Starting in the second chain from the hook:
Sc in each of the next 3 chains.
Fasten off, leaving a tail.
You now have a tiny rectangular stem.
Sew it behind the top center of the pumpkin so approximately 2–3 stitches remain visible above the orange body.
Optional Tiny Leaf
Using sage-green yarn:
Ch 4.
Starting in the second chain from the hook:
- sl st in first chain
- sc in next chain
- hdc in final chain
Fasten off.
This makes a tiny tapered leaf.
Sew it beside the stem.
The leaf is optional.
If you’re making more than 30 pumpkin squares, skipping it will save quite a bit of time.
PART 3: ASSEMBLE THE PUMPKIN SQUARE
Place one finished pumpkin in the center of a cream solid granny square.
Before sewing, make sure:
- the pumpkin is centered
- the stem points toward one edge of the square
- there is plenty of cream background visible around the pumpkin
Pin it temporarily with locking stitch markers if helpful.
Using the long orange yarn tail and a yarn needle, sew around the outside edge of the pumpkin.
Use small stitches.
Do not pull so tightly that the granny square puckers.
Sew the stem securely at the top.
Add the leaf if you’re using one.
Weave in all ends.
Make the Remaining Pumpkin Squares
For the sample blanket, make:
32 cream squares with pumpkin appliqués
The pumpkins can all be identical.
Or, for a slightly more handmade look, vary them subtly by using:
- burnt orange
- rust
- pumpkin orange
Keep the size and construction the same so the blanket stays visually balanced.
PART 4: MAKE THE PLAIN FALL SQUARES
Make:
31 plain solid granny squares
using your remaining colors.
For example:
- 8 sage
- 8 taupe
- 8 muted mustard
- 7 terracotta
You can distribute the colors however you like.
Just make sure every finished square is approximately the same size as your pumpkin squares.
Block All the Squares Before Joining
This step is worth doing.
Blocking helps make the squares:
- flatter
- more even
- easier to align
- more consistent in size
Use a blocking method appropriate for your yarn fiber.
Don’t aggressively stretch the squares.
The goal is to encourage them into the same dimensions—not force a badly undersized square to become much larger.
PART 5: ARRANGE THE BLANKET
Lay all 63 squares on a large clean surface.
Arrange them:
7 across × 9 down
Alternate pumpkin squares and plain squares.
A simple checkerboard layout might begin:
Pumpkin – Plain – Pumpkin – Plain – Pumpkin – Plain – Pumpkin
The next row begins:
Plain – Pumpkin – Plain – Pumpkin – Plain – Pumpkin – Plain
Continue alternating.
Because there are an odd number of squares in both directions, you will end up with:
32 pumpkin squares and 31 plain squares
Don’t Join Them Immediately
Once you’re happy with the layout, take a photograph.
This is surprisingly important.
The moment you stack your squares, it becomes very easy to forget where everything went.
You can also stack each row separately and label it temporarily.
PART 6: JOIN THE GRANNY SQUARES
For this blanket, I like using cream yarn for the join because it repeats the background color of the pumpkin squares.
You can use:
- whip stitch
- mattress stitch
- slip stitch join
- single crochet join
For a relatively flat, simple finish, use a whip-stitch seam.
Simple Whip-Stitch Join
Place two squares with their edges aligned.
Thread a yarn needle with cream yarn.
Working through corresponding loops along both square edges, sew from one end to the other.
Keep your tension even.
The seam should hold the squares securely without pulling them together.
Join the squares into rows first.
Then join the completed rows together.
Keep Checking the Blanket
After every few joins, lay the blanket flat.
Make sure:
- seams aren’t puckering
- squares remain aligned
- no square has accidentally rotated
- pumpkins are all facing the direction you intended
It is much easier to fix one seam now than after the entire blanket is assembled.
PART 7: ADD THE BORDER
Once all squares are joined, attach cream yarn at any outer edge.
Border Round 1
Ch 1.
Work single crochet evenly around the entire blanket.
Along the outer edges, work approximately one single crochet for each available stitch.
At each blanket corner, work:
Sc, ch 2, sc
into the corner.
Where two squares meet, make sure the join remains neat and doesn’t develop a large gap.
Join with a slip stitch.
Border Round 2
Ch 1.
Sc in every stitch around.
At each chain-2 corner space work:
Sc, ch 2, sc
Join.
Optional Border Round 3
Repeat Round 2 if you’d like a slightly wider border.
You can also switch to:
- burnt orange
- sage
- mustard
for the final round.
I prefer cream because the blanket already has plenty of color.
How to Prevent a Wavy Border
The border should lie flat.
If it starts ruffling, you may be adding too many stitches.
If the blanket begins pulling inward, you may have too few.
Crochet evenly around the edge and stop periodically to lay the blanket flat.
Don’t force a rigid stitch ratio onto an edge if your actual crochet needs something slightly different.
How Much Yarn Will You Need?
Yarn usage can vary enormously depending on:
- square size
- yarn
- hook
- tension
- pumpkin size
- joining method
- border
Instead of giving you a yardage number that may not match your crochet, use this much more reliable method.
Make and Weigh One Square
Finish one complete pumpkin square.
Weigh it on a kitchen scale in grams.
Do the same for one plain square.
Then calculate:
pumpkin-square weight × number of pumpkin squares
plus
plain-square weight × number of plain squares
Then add extra yarn for:
- joining
- border
- swatches
- normal variation
This gives you an estimate based on your yarn and your tension.
Want a Smaller Blanket?
Easy.
Try:
5 × 7 squares
Using 6-inch squares:
approximately 30 × 42 inches before the border
This can work nicely as a lap blanket or child-size throw.
Want a Larger Throw?
Try:
8 × 10 squares
Using 6-inch squares:
approximately 48 × 60 inches before the border
That requires:
80 squares
With an alternating layout, approximately half can be pumpkin squares and half plain squares.
Want Fewer Pumpkin Appliqués?
You don’t have to put a pumpkin on every other square.
Try:
One pumpkin every third square
or
Pumpkins only around the border
or
One large pumpkin section in the center of the blanket
This is especially helpful if you love the pumpkin look but don’t want to sew 32 appliqués.
Another Beautiful Layout Idea
Make all of the granny squares cream.
Then put pumpkins on only some of them.
Use different pumpkin shades:
- burnt orange
- terracotta
- mustard-orange
- rust
Join everything with cream.
The result will look softer and more neutral while still feeling unmistakably autumnal.
Can I Make the Pumpkins Puffy?
Yes.
For a slightly raised effect, you can place a very small amount of stuffing behind each pumpkin before closing the final section of stitching.
But use very little.
Too much stuffing can make the blanket bulky and uncomfortable.
For a sofa blanket that will actually be used, I prefer the flat appliqué version.
Can I Use Traditional Granny Squares Instead?
Absolutely.
If you love the open classic granny-square look, you can replace the solid square with a traditional granny square.
I chose solid granny squares here because:
- the pumpkin sits more cleanly on the background
- there are fewer large holes underneath the appliqué
- the finished blanket has a fuller fall-throw appearance
But either construction can work.
How Do I Make Every Pumpkin Face the Same Way?
Before joining, identify the side of each square with the pumpkin stem.
Make sure every stem points toward the top edge of the blanket.
Then photograph your layout.
This tiny step prevents discovering a sideways pumpkin after you’ve already joined three rows.
What If My Pumpkin Is Too Large for the Square?
The appliqué should leave visible background around all four sides.
If it fills almost the entire square:
- use a slightly smaller hook for the pumpkin
- use slightly thinner yarn
- reduce the pumpkin width by starting with a shorter chain
Another option is simply to make larger granny squares.
The important thing is maintaining pleasing proportions.
What If the Pumpkin Curls?
A small amount of curling can usually be corrected by:
- gently blocking the appliqué
- sewing it flat to the square
- avoiding overly tight edge stitches
If it curls dramatically, your tension may be too tight.
What If My Granny Squares Twist?
Solid granny squares can sometimes develop a slight spiral when every round is worked in the same direction.
If this becomes noticeable, try turning the square after each completed round and working the next round in the opposite direction.
Whatever method you choose, use it consistently across all squares.
Why This Makes Such a Good Fall Crochet Project
Tiny crochet pumpkins are adorable.
But this project gives you something much bigger:
an entire piece of fall home decor.
Throw it over:
- the sofa
- an armchair
- the end of the bed
- a reading nook
- a guest-room chair
And suddenly the whole room feels different.
That is what I love about blankets.
One handmade project can change an entire space.
Other Pumpkin Projects to Make With the Same Square
Don’t stop at a blanket.
These pumpkin granny squares can become:
- cushion covers
- tote bags
- table runners
- wall hangings
- chair pads
- small baby blankets
- fall placemats
Four squares could even make the front of a beautiful seasonal pillow.
Frequently Asked Questions
Is this a traditional granny square?
The base used here is a solid granny square, which has continuous double crochet along the sides instead of the repeated cluster-and-chain-space construction used in a classic granny square.
Does the pumpkin need to be crocheted into the square?
No.
For this version, the pumpkin is made separately as a flat appliqué and sewn onto the finished square.
This makes the project much easier to customize and avoids complicated tapestry colorwork.
Can beginners make this blanket?
A confident beginner can.
Make sure you’re comfortable with:
- single crochet
- double crochet
- increases
- decreases
- working in rounds
- simple sewing
Make one complete pumpkin square before committing to the entire blanket.
Do I have to use 63 squares?
No.
The blanket is completely adjustable.
Use your finished square measurement to decide how many squares you need.
Can I use scrap yarn?
Yes, especially for the plain squares and pumpkin appliqués.
Try to keep the yarns reasonably similar in thickness so the squares stay consistent.
Should I block before or after adding the pumpkins?
I recommend blocking the granny squares first.
You can also lightly block the pumpkin appliqués separately if necessary.
Then sew the pumpkins onto the finished squares.
Can I wash the finished blanket?
That depends on your yarn.
Check the care instructions for every yarn used in the blanket.
If you mix several yarns, follow the care instructions for the most delicate fiber in the project.
Final Thoughts
This is exactly the kind of seasonal crochet project I love.
It has pumpkins.
It has granny squares.
It has all the cozy fall colors.
But it is still something you’ll actually use.
And because the blanket is modular, you don’t have to sit down and crochet an enormous project all at once.
Make one square tonight.
Another tomorrow.
A few pumpkins over the weekend.
Then slowly watch the pile turn into something big enough to cover the sofa.
By the time the last border round is finished, your whole room is going to look like fall.




Hi, I do love the look of your blanket, however the written pattern for the pumpkin doesn’t seem to match the photos- the pumpkin in the photos is done in the round. I prefer the written pattern , but it’s not really pumpkin shaped. Please advise.
Thank you.
Agreed!! Makes me wonder….