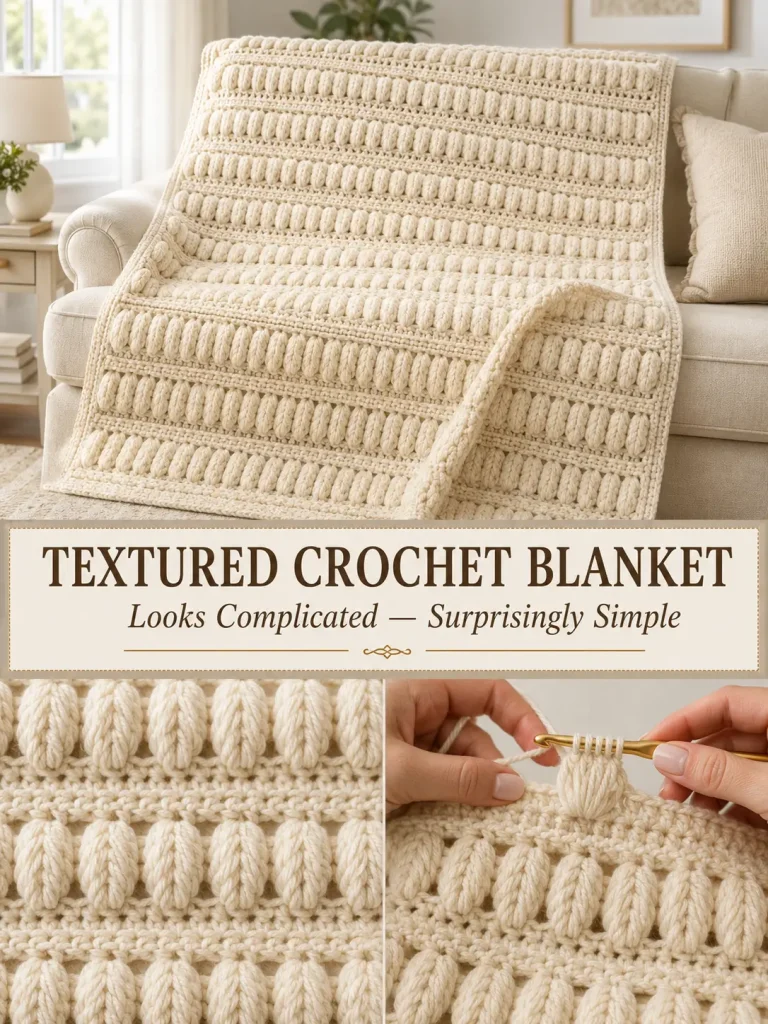
The first time I saw this kind of crochet texture, I thought there had to be something complicated happening.
Those big, soft raised blocks look almost woven into the fabric.
But once you break the construction down, the idea is surprisingly simple:
one row creates the spaces
the next row fills those spaces with big raised puffs
Then you repeat.
For this project, I turned that texture into something I think suits it perfectly: a warm ivory crochet throw blanket.
No color changes.
No motifs to join.
No complicated shaping.
Just one beautiful neutral yarn and rows of thick texture.
Ivory Raised-Puff Throw at a Glance
Skill level: Confident beginner / intermediate beginner
Terminology: US crochet terms
Construction: Worked flat in rows
Main texture: Large elongated puff stitches separated by single crochet stitches
Color: Warm ivory / natural cream
Suggested finished size: Approximately 40 × 50 inches, including border
The pattern is easy to resize.
Why I Would Use This Stitch for a Throw
This is a very textured stitch.
That means it:
- uses more yarn than plain crochet
- creates a thicker fabric
- looks especially beautiful in one solid color
- produces a strong front-side texture
For that reason, I prefer it for:
- sofa throws
- lap blankets
- cushion covers
- bed runners
rather than something where you need very light drape.
The large raised sections become the whole design.
The Color
To match the look that inspired this project, use a soft warm ivory.
Think:
- natural cream
- oatmeal ivory
- warm off-white
- undyed-wool cream
Avoid a stark blue-white.
The slightly warm neutral shade makes the raised stitches much easier to see because natural light creates soft shadows between the puffs.
Materials
You will need:
- Worsted-weight / Category 4 yarn in warm ivory
- 5 mm to 5.5 mm crochet hook
- Yarn needle
- Scissors
- Stitch markers
- Measuring tape
Choose a smooth yarn with good stitch definition.
Extremely fuzzy yarn will hide the structure of the puffs.
Because this stitch uses many loops in every puff, it is also more yarn-hungry than ordinary single or double crochet.
I recommend buying enough yarn from the same dye lot and keeping an extra skein available if possible.
Abbreviations
- ch = chain
- sc = single crochet
- st = stitch
- sts = stitches
- sp = space
- rep = repeat
- WP = wide puff stitch
Turning chains do not count as stitches.
Special Stitch: Wide Puff Stitch
This is the stitch that creates the large raised blocks.
Wide Puff Stitch — WP
Working into the indicated chain-1 space:
- Yarn over.
- Insert hook into the chain space.
- Yarn over and pull up a long loop, approximately the height of a half double crochet.
- Repeat Steps 1–3 four more times in the same space.
You should now have 11 loops on your hook.
Yarn over.
Pull through all 11 loops.
Chain 1 to close and secure the puff.
That entire puff counts as one stitch.
Important
When pulling up the loops, bring every loop to approximately the same height.
If some are short and some are tall, the puff will look uneven.
Do not yank the closing chain tightly.
You want a broad, pillowy puff rather than a tiny hard bobble.
Before Starting the Blanket
Make a small swatch first.
This is especially important with large puff stitches because different crocheters pull the loops to different heights.
Try:
Ch 22
Then follow the first four rows of the pattern below.
If your puffs look:
Too small
Pull the elongated loops slightly higher.
Too loose
Pull the loops a little shorter or try a smaller hook.
Very stiff
Try a slightly larger hook.
The goal is a substantial but flexible fabric.
Stitch Multiple
The body uses an odd number of stitches.
An easy way to begin is to chain an even number.
When you single crochet into the second chain from the hook, you will have the odd number of stitches required.
For the sample-size throw:
Ch 142
This creates:
141 single crochet stitches
Your actual width will depend on yarn, hook, tension, and puff size.
If you want a specific finished width, make a swatch and adjust the starting chain accordingly.
FOUNDATION ROW
Starting in the second chain from the hook:
Sc in each chain across.
You should have:
141 sc
Turn.
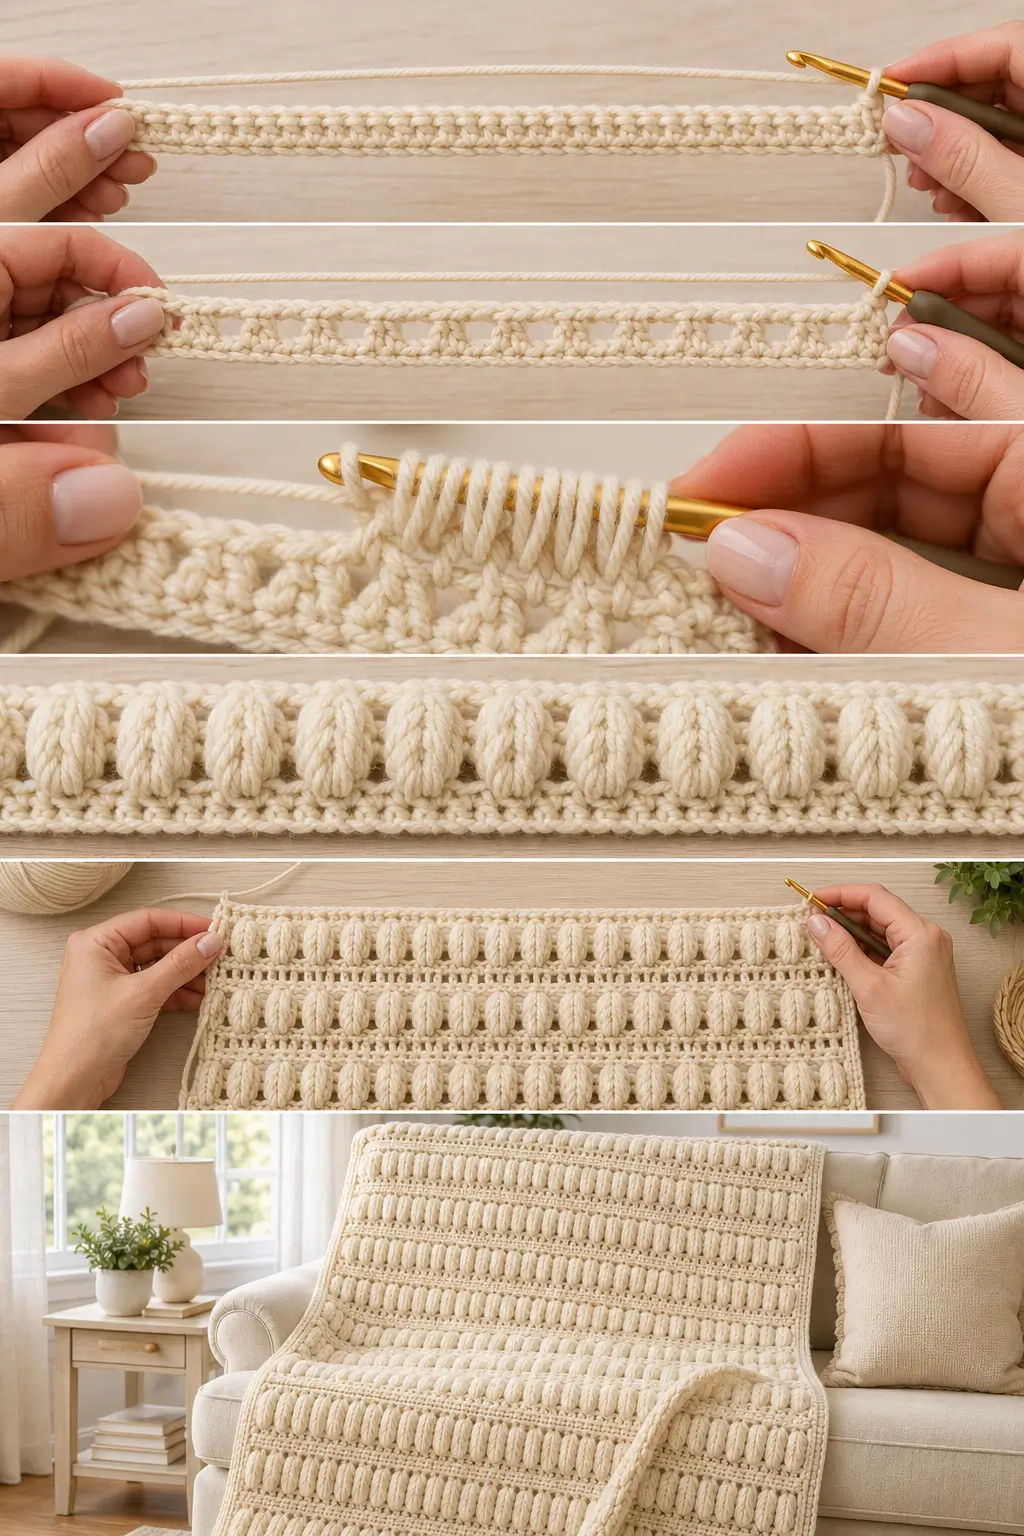
ROW 1 — CREATE THE PUFF SPACES
Ch 1.
Sc in the first stitch.
Then repeat:
Ch 1, skip the next stitch, sc in the next stitch
across the row.
You should finish with a single crochet in the final stitch.
Turn.
You now have:
- 71 single crochet stitches
- 70 chain-1 spaces
These chain spaces are where the large puffs will be made.
ROW 2 — PUFF ROW
Ch 1.
Sc in the first single crochet.
Now repeat across:
WP in the next ch-1 space, sc in the next sc
Continue to the end.
You should have:
- 70 wide puffs
- 71 single crochet separator stitches
Turn.
This is the row that creates the dramatic raised texture.
ROW 3 — CREATE THE NEXT PUFF SPACES
Ch 1.
Sc in the first single crochet.
Repeat:
Ch 1, skip the next puff, sc in the next sc
across.
Turn.
Notice what happens here.
Instead of crocheting into the top of every puff, the chain stretches across it.
That leaves a new chain space positioned above each previous puff.
Those spaces will hold the next row of raised stitches.
ROW 4 — NEXT PUFF ROW
Ch 1.
Sc in the first sc.
Repeat:
WP in next ch-1 space, sc in next sc
across.
Turn.
CONTINUE THE BLANKET
Repeat:
Rows 3 and 4
until the blanket reaches approximately 48 inches long, or your preferred length before the border.
That is the entire main pattern repeat.
Once you understand where the puffs and separator stitches go, the fabric becomes very repetitive.
WHAT THE FABRIC SHOULD LOOK LIKE
From the front, you should see:
- large ivory raised puffs
- puffs arranged in straight horizontal rows
- narrow vertical single-crochet separators
- slim chain ridges between textured rows
The puffs should appear full and closely spaced rather than tiny isolated bobbles.
From a distance, the fabric should have a repeating pillowy block texture.
THE MOST IMPORTANT STITCH TO WATCH
The single crochet stitches between the puffs are your anchors.
Every puff row is:
separator sc → puff → separator sc → puff
And every spacing row is:
separator sc → ch 1 over puff → separator sc
If you accidentally crochet into a puff during the spacing row, your pattern alignment can shift.
Use stitch markers on the first and last separator stitches if that helps.
KEEP THE EDGES STRAIGHT
Always:
- begin with one sc
- finish with one sc
Do not place an extra chain space at either edge.
Count occasionally.
For the sample blanket, every row maintains the same structural width:
141 stitch positions
The 70 puffs simply replace the 70 chain spaces on alternating rows.
WHY THE CHAIN ROW MATTERS
It may be tempting to remove the chain-space row and crochet one puff row directly after another.
Don’t.
That narrow row:
- gives the large puffs room to spread
- creates the horizontal definition
- stabilizes the fabric
- keeps the texture from becoming an extremely dense mass
It is part of what makes the raised rows stand out.
HOW TO KEEP THE PUFFS CONSISTENT
This makes a huge difference in the final blanket.
Every time you make a puff:
1. Pull every loop to the same height
Don’t make the first loop short and the last one long.
2. Don’t squeeze the base
Let the chain space remain open enough for all the loops.
3. Keep your closing chain relaxed
A tight closing chain can pinch the puff into a narrow teardrop.
4. Smooth the puff with your fingers
After completing it, gently push the loops forward.
This encourages that wide, rounded appearance.
WHAT IF PULLING THROUGH 11 LOOPS IS DIFFICULT?
That can happen, especially with grippy yarn.
Try this:
- rotate the hook slightly downward
- keep the loops loose
- hold the base of the puff with your non-hook hand
- pull the hook steadily through instead of jerking it
A smooth metal hook is especially nice for this texture.
If 11 loops feel unmanageable, practice several puffs on a swatch before beginning the full blanket.
WHAT IF MY PUFFS ARE TOO SMALL?
The most common reason is that the elongated loops aren’t being pulled high enough.
Remember:
the height of the pulled-up loops determines the fullness of the puff.
Pull each loop up deliberately before making the next yarn-over.
WHAT IF MY PUFFS LOOK LIKE HARD LITTLE BALLS?
Your tension is probably too tight.
Try:
- pulling the loops higher
- relaxing the final pull-through
- using a slightly larger hook
The texture should look soft and broad.
WHAT IF THE BLANKET STARTS GETTING NARROWER?
Count your separator single crochets.
It is easy to accidentally miss:
- the first sc
- the last sc
- a separator sc hidden beside a puff
If the width begins shrinking, stop and count before continuing.
WHAT IF THE EDGES WAVER?
Large puff stitches can subtly change your tension.
Lay the blanket flat every few repeats.
If one edge begins wandering inward, check whether you’re tightening the first or last stitch.
Using markers at both edges can help.
FINISH THE BODY
For the cleanest top edge, finish after completing a puff row.
Then work one final spacing-style row:
Ch 1.
Sc in first sc.
Repeat:
Ch 1, skip puff, sc in next sc
across.
Turn.
Then work:
1 sc in every sc and 1 sc in every ch-1 space across.
You will return to:
141 sc
Do not fasten off if you want to begin the border immediately.
SIMPLE BORDER
The texture is already the star, so I would keep the border very simple.
Border Round 1
Ch 1.
Work single crochet evenly around the entire blanket.
Across the top and bottom:
1 sc in each stitch
Along the side edges:
work single crochets evenly into the row ends.
Because the puff rows and chain rows have different heights, don’t force an exact universal number of stitches into every side.
Instead, watch the fabric.
At each corner work:
3 sc in the corner
Continue around.
Join with a slip stitch to the first sc.
Border Round 2
Ch 1.
Sc in every stitch around.
At each corner, work:
3 sc in the center corner stitch
Join.
Fasten off.
OPTIONAL THIRD BORDER ROUND
If you want a slightly more substantial frame, repeat Border Round 2 once more.
I would keep the entire border in the same warm ivory yarn.
A contrasting edge would take attention away from the texture.
HOW TO KNOW WHETHER YOU HAVE TOO MANY BORDER STITCHES
Lay the blanket flat.
If the border:
Ruffles outward
You have probably added too many stitches.
Pulls or cups inward
You may have too few.
Undo the problem area and redistribute the stitches more evenly.
A flat border is more important than following an arbitrary side-edge stitch count.
FINISHING
Weave in every yarn end securely.
If your yarn can be safely blocked according to its care instructions, lightly block the finished blanket.
Do not aggressively stretch the puffs flat.
The goal is to:
- straighten the edges
- settle the rows
- even the overall dimensions
while preserving the raised texture.
HOW MUCH YARN WILL I NEED?
Puff stitches use substantially more yarn than ordinary flat crochet because several long loops are pulled into every puff.
Rather than giving one yardage number that could be badly wrong for your personal puff height, use a swatch.
Reliable Yarn Estimate Method
Make a swatch containing several complete pattern repeats.
Measure its:
- width
- height
Then weigh it in grams.
Calculate how many swatch-sized sections approximately fit into your planned blanket.
Multiply that number by the swatch weight.
Then add extra yarn for:
- border
- swatching
- joining a new skein
- normal tension variation
This is much more reliable for a high-yarn-use texture than assuming everyone makes identical puffs.
HOW TO RESIZE THE BLANKET
This pattern is very easy to resize.
For a narrower blanket
Begin with a shorter even-numbered chain.
For a wider blanket
Begin with a longer even-numbered chain.
After Row 1, you need an odd number of single crochet stitches.
Then simply maintain:
sc, ch 1, skip 1, sc
across the spacing rows.
SMALL LAP BLANKET
Try a finished size around:
32 × 40 inches
This is a good option if you want to test the stitch without committing to a large throw.
STANDARD SOFA THROW
Aim for approximately:
40 × 50 inches
This is the version described here.
It gives enough area for the texture to look impressive without becoming extremely heavy.
LARGER THROW
You can increase to approximately:
45 × 60 inches
Just remember:
this stitch becomes heavier and uses considerably more yarn as the blanket grows.
Make sure you like the weight of your swatch before committing to a very large version.
CAN I USE BULKY YARN?
Yes, but I would make a swatch first.
Five pull-up repetitions in bulky yarn may create an enormous puff.
You may prefer to make the WP with:
3 or 4 pull-up repetitions
instead of 5.
The important thing is maintaining the broad raised-block appearance.
CAN I USE DK YARN?
Yes.
With lighter yarn, you may want:
- a smaller hook
- additional starting stitches
- possibly 5 or 6 pull-up repetitions per puff
Again, make a swatch first.
CAN I MAKE THIS IN ANOTHER COLOR?
Absolutely.
But if you want the same refined look as this version, I would stay with a single solid color.
Beautiful alternatives include:
- mushroom beige
- pale taupe
- warm gray
- dusty sage
- camel
- soft mocha
But warm ivory is especially good at showing the shadows around every raised puff.
WOULD THIS WORK FOR A BABY BLANKET?
The stitch can be adapted to smaller blankets, but for a baby item I would think carefully about:
- yarn softness
- washability
- fabric weight
- how prominent you want the raised texture
For this specific heavy, highly textured version, I prefer it as an adult lap or sofa throw.
WOULD THIS WORK FOR A PILLOW?
Yes.
In fact, this texture would make an excellent cushion cover.
Make one textured rectangle for the front and a simpler flat rectangle for the back.
That would give you the dramatic puff texture without using as much yarn as a full blanket.
WHY ONE COLOR WORKS SO WELL
This stitch doesn’t need stripes.
Every puff catches the light differently.
The raised stitches create their own shadows.
In a warm ivory yarn, the design changes depending on:
- window light
- folds in the blanket
- viewing angle
That gives a simple one-color project much more depth than you might expect.
Frequently Asked Questions
Is this a bobble stitch?
Not exactly.
This version uses a deliberately large elongated puff stitch, created by repeatedly pulling up loops in the same chain space before closing them together.
Does the closing chain count as another stitch?
No.
The chain used to close the puff is part of the puff construction.
The puff itself counts as one stitch position.
Why do I skip the puff on the next row?
The next row creates a chain-1 space directly above the puff.
That space becomes the location for the next puff row while the separator single crochets remain aligned.
Do I crochet into the top of the puff?
Not during the spacing row.
You chain over the puff and work into the single crochet separator after it.
Is this stitch reversible?
The back is still attractive and textured, but the dramatic raised puff effect is strongest on the intended front side.
Is it beginner-friendly?
If you already know:
- chain
- single crochet
- yarn over
- working into chain spaces
you can learn the puff.
I would practice the special stitch on a small swatch before starting the blanket.
Why does my blanket look different from the photo?
Large puff textures are very sensitive to:
- yarn thickness
- hook size
- tension
- loop height
- number of pull-up loops
That is why the swatch is an important part of this pattern.
The goal is a broad, soft raised block, not a tiny tight bobble.
Final Thoughts
This is exactly the kind of crochet project that looks far more complicated than it really is.
Once you understand the repeat, you’re essentially doing two things:
make the spaces
then
fill those spaces with big soft puffs
Over and over.
And because the entire blanket stays warm ivory, you don’t need color changes to make it interesting.
The yarn does the work.
The texture does the rest.
By the time several puff rows are stacked together, that simple repeat starts looking like a much more elaborate piece of crochet—which is exactly what makes this blanket so satisfying.




Beautiful blanket. I’ve never been able to read patterns. But would love to see a video tutorial.