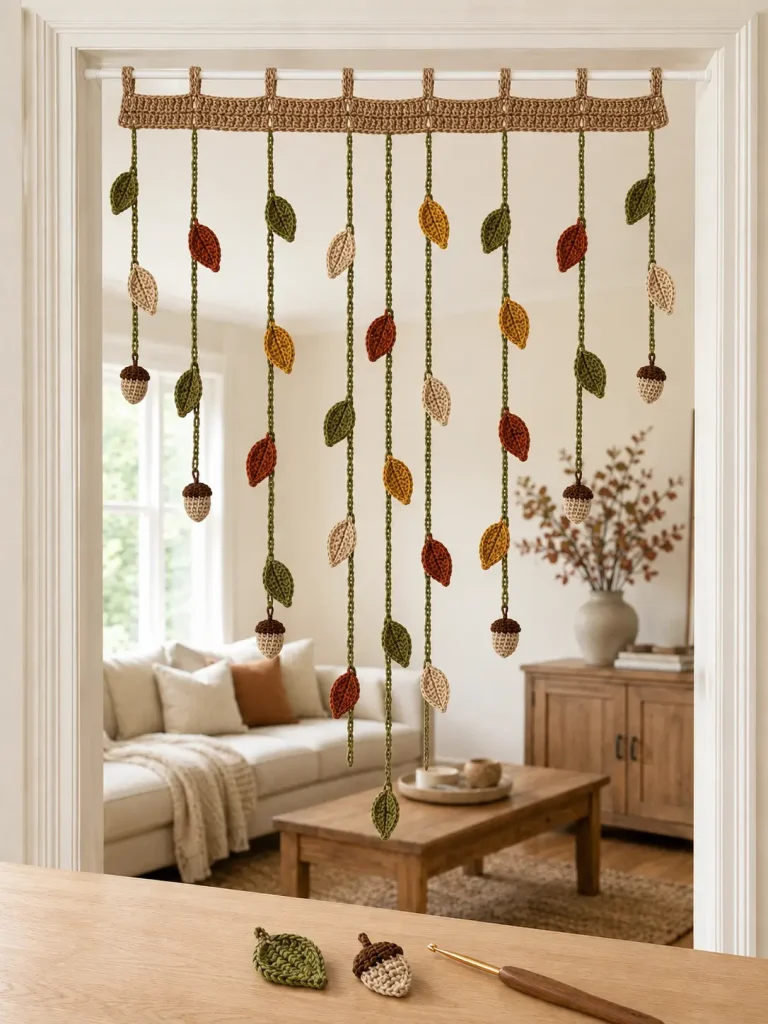
I love a big cozy fall crochet project.
But sometimes I want something that gives a lot of visual payoff without becoming a full blanket, pillow, or wall of pumpkins.
That is exactly why I made this crochet fall leaf doorway garland.
It hangs from a simple top band, drapes down in soft strands, and uses a mix of crochet leaves with a few optional mini acorns for extra fall detail.
The finished piece looks decorative and impressive, but the actual construction is very manageable:
- one simple top band
- several hanging chains
- repeated small leaves
- a few optional mini acorns
- straightforward assembly
And because everything is made in small pieces, it is also very easy to customize.
Fall Leaf Garland at a Glance
Skill level: Confident beginner
Construction:
- flat top band
- hanging chain strands
- separate crochet leaves
- optional mini acorns
- assembled onto the band
Style: Fall doorway or wall garland
Terminology: US crochet terms
Best use: doorway decor, wall decor, window decor, seasonal room accent
Why I Like This Project
This is one of those crochet projects that looks much more complicated than it really is.
The big visual impact comes from:
- different strand lengths
- repeated little motifs
- soft fall colors
- movement and drape
It gives you the same satisfying “wow, that’s crochet?” feeling as a more complex decor piece, but in a much easier format.
It is also a nice choice if you want something that feels seasonal and pretty, but not too Halloween-specific.
Suggested Fall Color Palette
To keep this soft and elegant, I would avoid a very orange-heavy palette here.
Instead, try:
- Warm taupe – top band
- Olive green – hanging strands
- Oatmeal – some leaves and acorn bottoms
- Dusty rust – some leaves
- Muted golden mustard – some leaves
- Walnut brown – acorn caps and accents
You do not need to use every color.
Even three or four of them together will still look lovely.
Materials
You will need:
- Lightweight worsted or DK yarn, Category 3 or light Category 4
- 4 mm or 4.5 mm crochet hook
- Yarn needle
- Scissors
- Stitch markers, optional
- Measuring tape
- Tension rod, dowel, or hooks for hanging
Suggested color use
- Top band: warm taupe
- Hanging strands: olive green
- Leaves: olive, oatmeal, dusty rust, muted mustard
- Mini acorns: oatmeal or taupe bottoms, walnut brown caps
Finished Size
The sample garland is designed to fit a doorway or wall space approximately:
- 28–32 inches wide
- with strands hanging approximately 12–24 inches below the band, depending on strand length
You can easily make it wider, narrower, longer, or shorter.
A Quick Note Before You Start
This is a decor project, so perfect gauge is not especially important.
What matters more is:
- consistent yarn weight
- consistent hook size
- leaves and acorns that look balanced together
- even spacing when assembling
If one leaf is a tiny bit smaller or one strand hangs slightly differently, that will not ruin the finished piece.
In fact, a little variation can make handmade decor look more natural.
Crochet Abbreviations
This pattern uses US crochet terms.
- ch = chain
- sc = single crochet
- hdc = half double crochet
- dc = double crochet
- sl st = slip stitch
- st = stitch
- sts = stitches
- inc = 2 stitches in the same stitch
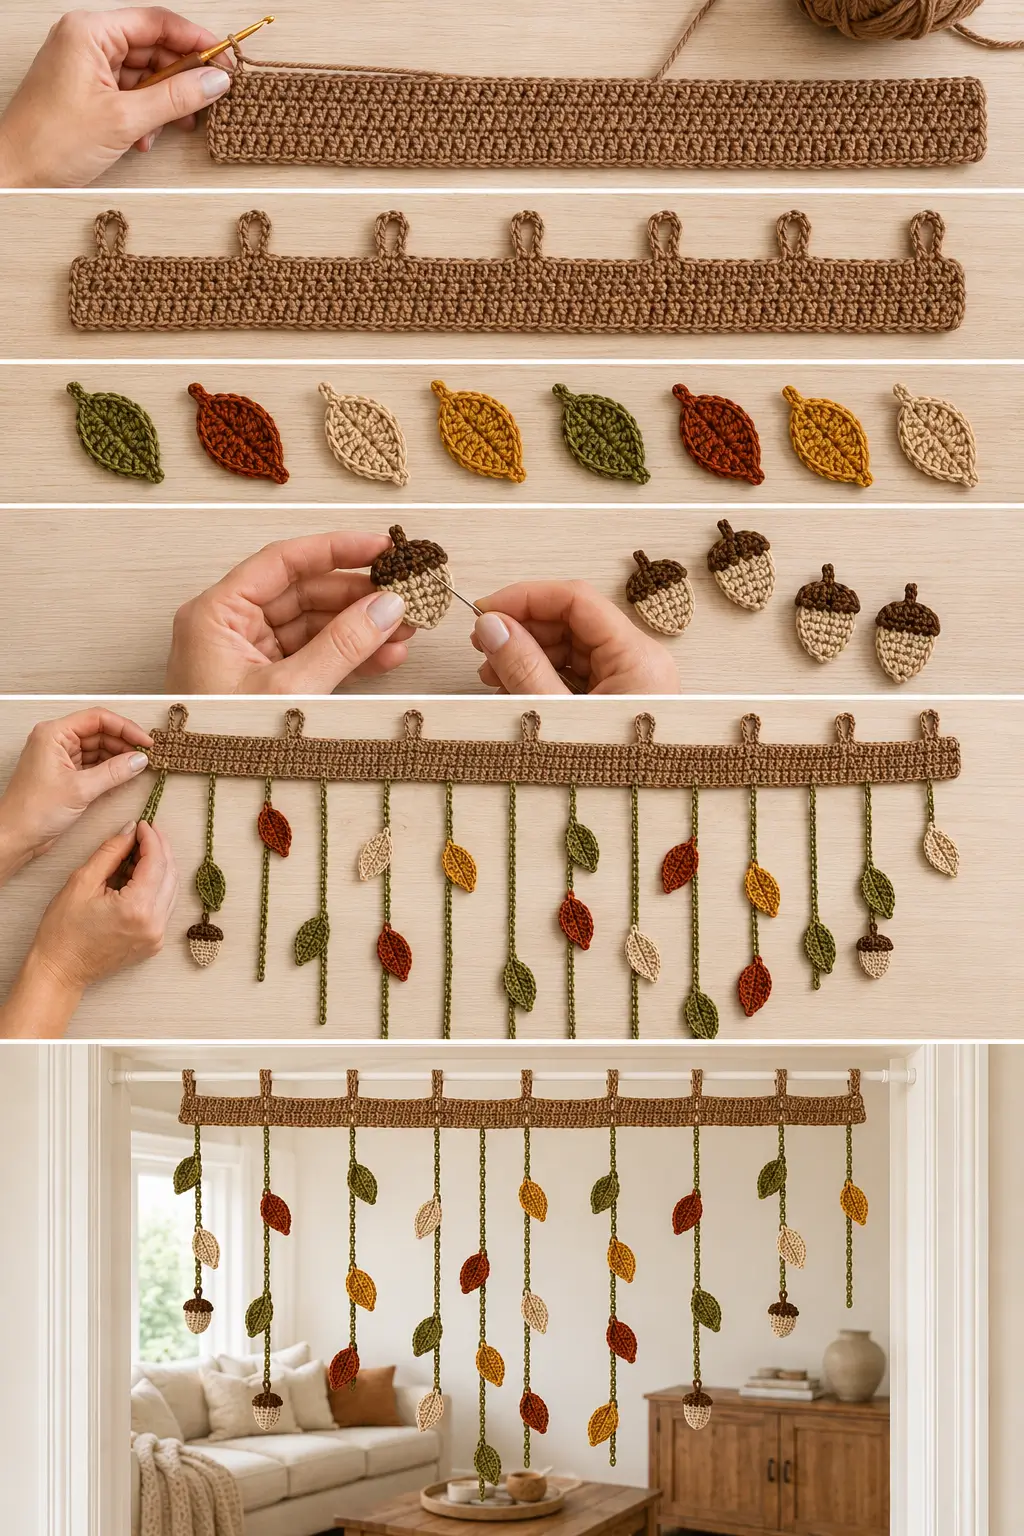
Construction Overview
You will make the garland in four parts:
Part 1
Crochet the top band with hanging loops.
Part 2
Crochet a batch of small leaves.
Part 3
Crochet a few optional mini acorns.
Part 4
Attach the hanging strands, then sew on the leaves and acorns.
PART 1: CROCHET THE TOP BAND
Use warm taupe yarn.
The sample band is simple on purpose so the hanging leaf strands remain the star of the design.
Foundation Chain
Ch 101
Row 1
Starting in the second chain from the hook:
Sc in each chain across.
You should have:
100 sc
Turn.
Rows 2–5
Ch 1.
Sc in each stitch across.
Turn.
Keep the stitch count at:
100 stitches
After Row 5, do not fasten off.
This creates a clean, sturdy top band.
Add the Hanging Loops
These loops allow the finished band to slide onto a rod or be hung from hooks.
Row 6
Ch 1.
Sc in the first 9 stitches.
Then repeat the following sequence across the row:
Ch 8, skip the next 4 stitches, sc in the next 9 stitches.
Repeat that sequence across the entire row.
When you finish the row, you will have a total of:
7 hanging loops
Fasten off.
Top Band Notes
The loops should be evenly spaced across the top band.
If you prefer, you can make the loops a little shorter or longer depending on how you plan to hang the garland.
For a slimmer dowel or rod, a slightly shorter loop may be enough.
PART 2: CROCHET THE SMALL LEAVES
The leaf pattern is intentionally simple so you can make a bunch of them without getting bored.
Use a mix of:
- olive green
- dusty rust
- muted mustard
- oatmeal
You can make all the leaves the same color if you want a more minimal look, but I like using at least 2–4 shades.
Small Leaf Pattern
Ch 6
Starting in the second chain from the hook, work:
- sl st in first chain
- sc in next chain
- hdc in next chain
- dc in next chain
- 5 dc in final chain
Now continue down the opposite side of the foundation chain:
- dc in next chain
- hdc in next chain
- sc in next chain
- sl st in final chain
Fasten off, leaving a long tail for sewing.
This creates one pointed leaf.
How Many Leaves to Make
For the sample garland, make approximately:
24 leaves total
A nice balanced mix would be something like:
- 8 olive leaves
- 6 dusty rust leaves
- 5 muted mustard leaves
- 5 oatmeal leaves
But this does not need to be exact.
PART 3: CROCHET THE OPTIONAL MINI ACORNS
These are optional, but they add a nice fall detail near the lower ends of some strands.
Use:
- oatmeal or taupe for the bottom
- walnut brown for the cap
Mini Acorn Body
With oatmeal yarn:
Ch 7
Row 1
Starting in the second chain from the hook:
Sc in next 2 chains, hdc in next 2 chains, sc in last 2 chains.
You should have:
6 stitches
Turn.
Row 2
Ch 1.
Work:
2 sc in the first stitch, sc in the next 4 stitches, 2 sc in the last stitch.
You now have:
8 stitches
Change to walnut brown in the final yarn-over of the last stitch if you want a cleaner color transition.
Turn.
Row 3
Using walnut brown:
Ch 1.
Work:
Sc2tog, sc in the next 4 stitches, sc2tog.
You now have:
6 stitches
Turn.
Row 4
Ch 1.
Sc in each stitch across.
Fasten off, leaving a long tail.
Add the Tiny Stem
Join walnut brown yarn at the center top of the acorn cap.
Ch 3
Starting in the second chain from the hook:
Sl st in the next 2 chains, then sl st back into the top of the acorn.
Fasten off and weave in the short tail from the stem.
This gives you a tiny top stem.
How Many Mini Acorns to Make
For the sample garland, make:
6 mini acorns
If you want a simpler version, skip the acorns entirely and use only leaves.
The garland will still look beautiful.
PART 4: ATTACH THE HANGING STRANDS
Use olive green yarn.
You will attach the strands to the lower long edge of the top band, opposite the hanging loops.
You can space them evenly by eye, or you can use stitch markers first.
For the sample version, attach:
10 strands total
A very simple way to space them is to place them roughly every 10 stitches across the bottom edge of the band.
Recommended Strand Lengths
For a balanced doorway-style drape, use the following strand lengths from left to right:
- Ch 45
- Ch 55
- Ch 70
- Ch 55
- Ch 80
- Ch 80
- Ch 55
- Ch 70
- Ch 55
- Ch 45
This gives the garland a fuller center and shorter outer edges.
How to Attach Each Strand
Join olive yarn to the chosen bottom-edge stitch of the band with a slip stitch.
Then:
Chain the required length for that strand.
Fasten off, leaving a tail only if needed.
Repeat for all 10 strands.
You now have the basic hanging framework.
PART 5: LEAF AND ACORN PLACEMENT
This is where the garland really comes to life.
You will sew leaves directly onto the hanging strands at staggered heights.
You can angle them slightly left or right so the strands do not look too rigid.
Sample Placement Plan
You do not have to follow this exactly, but this arrangement works well for the sample garland:
Strand 1 — Ch 45
Attach 2 leaves
Strand 2 — Ch 55
Attach 2 leaves + 1 mini acorn
Strand 3 — Ch 70
Attach 3 leaves
Strand 4 — Ch 55
Attach 2 leaves + 1 mini acorn
Strand 5 — Ch 80
Attach 3 leaves + 1 mini acorn
Strand 6 — Ch 80
Attach 3 leaves + 1 mini acorn
Strand 7 — Ch 55
Attach 2 leaves + 1 mini acorn
Strand 8 — Ch 70
Attach 3 leaves
Strand 9 — Ch 55
Attach 2 leaves + 1 mini acorn
Strand 10 — Ch 45
Attach 2 leaves
That uses:
- 24 leaves
- 6 mini acorns
How to Sew the Leaves Onto the Strands
Thread the long tail of a leaf onto a yarn needle.
Place the leaf against the strand.
Sew through the center base area of the leaf and around the strand a few times until secure.
A leaf looks especially nice when attached:
- slightly angled
- not perfectly identical in spacing
- with enough room around it to be seen clearly
Try placing the first leaf on each strand about 2–3 inches below the band, then add the remaining leaves every few inches lower down.
How to Sew the Mini Acorns
Attach mini acorns near the lower end of selected strands.
You can either:
- sew them directly to the final part of the chain strand
- or place them about 1 inch above the strand end
Both look nice.
Sew them securely so they hang neatly and do not twist too much.
A Good Rule for Placement
Before sewing everything permanently, lay the top band flat and drape the strands downward.
Arrange the leaves and acorns temporarily first.
That lets you check:
- color balance
- spacing
- overall fullness
- whether one side feels too heavy
Once you like the arrangement, sew everything in place.
This step is worth it.
Hanging the Finished Garland
You have a few options.
Option 1 — Tension Rod
Slide the top loops over a tension rod and place it inside a doorway or open wall pass-through.
Option 2 — Wooden Dowel
Slide the loops onto a thin dowel and hang it with cord or hooks.
Option 3 — Wall Hooks
Place small removable hooks and hang each top loop individually.
How to Adjust the Width
If you want a wider or narrower piece, adjust the initial chain of the top band.
Then simply:
- keep the band height the same
- space the top loops evenly
- space the hanging strands evenly
The project is forgiving.
The exact width is much less important than keeping the spacing balanced.
How to Make It Longer
There are two easy methods.
Method 1
Add more chain length to the hanging strands.
Method 2
Add more strands overall for a fuller “curtain” effect.
If making the whole piece much longer, I would also make a few extra leaves so the strands do not look too bare.
How to Make It Simpler
If you want an easier version:
- make fewer strands
- use only one leaf size
- skip the mini acorns
- use only 2–3 yarn colors
A very pretty simple version would be:
- taupe band
- olive strands
- mixed olive, oatmeal, and rust leaves
- no acorns
How to Make It Fuller
If you want more visual impact:
- add 2–4 more strands
- attach 1 extra leaf to the long center strands
- add a few more acorns
- use more color variation
Just avoid crowding the strands so much that the individual motifs disappear.
What If My Band Curls?
A little softness is fine, but strong curling usually means:
- tension is too tight
- the band needs to relax after handling
Lay it flat and gently shape it.
Because it will hang, a slight softness usually settles nicely once the strands are attached.
What If My Leaves Curl?
Small crochet leaves often curl a little while you work them.
That is normal.
You can:
- gently flatten them with your fingers
- lightly block them if your yarn is suitable for blocking
- flatten them naturally during sewing
Do not aggressively stretch them.
What If the Strands Twist?
That can happen with chain strands.
Usually, once the leaves and acorns are attached and the piece is hanging, the strands settle much better.
If a strand twists dramatically, let it hang overnight before deciding whether it needs adjustment.
Yarn Choice Tips
A smooth yarn shows the shapes more clearly than a fuzzy yarn.
For decor, I especially like yarn that is:
- reasonably smooth
- not too slippery
- light enough to drape
- sturdy enough that the leaves hold their shape
Cotton blends and smooth acrylic blends can work well.
Easy Color Variations
If you want a different mood, try one of these:
Soft Neutral Fall
Taupe, oatmeal, walnut, olive
Rich Woodland Fall
Olive, rust, mustard, brown
Dusty Autumn
Muted rose-brown, sage, beige, walnut
Minimal Natural
Cream, taupe, olive only
Can I Use Only Leaves?
Yes.
If you do not want the mini acorns, simply leave them out.
The hanging leaf strands alone are enough to create a beautiful fall effect.
That version is especially nice if you want a softer, more understated piece.
Can I Use This as a Window Garland?
Yes.
It can work beautifully across a wide window, especially if you make the band to match the window width.
For a window, you may prefer slightly shorter strands.
Can I Use It on a Wall Instead of a Doorway?
Absolutely.
It would look lovely:
- over a console table
- above a bench
- over a bed
- in a reading nook
- across a mantel area
Frequently Asked Questions
Is this a full crochet curtain?
No.
This project is better described as a doorway or wall garland with hanging strands rather than a functional privacy curtain.
Can beginners make this?
Yes, especially if you are comfortable with:
- chains
- single crochet
- half double crochet
- double crochet
- simple sewing assembly
The main work is repetition rather than difficult stitch technique.
Do I have to use mini acorns?
No.
They are optional.
The garland still works beautifully with leaves only.
Can I make the strands all the same length?
Yes.
The staggered lengths create a more dramatic look, but all-same-length strands can also look neat and pretty.
Can I wash it?
That depends on the yarn you choose.
Check the yarn manufacturer’s care instructions.
Because this is decor rather than a blanket or garment, many people simply store it carefully between seasons.
Final Thoughts
This is one of my favorite kinds of seasonal crochet.
It feels special.
It looks impressive.
And yet the actual project is made from very simple parts.
That is always a good combination.
A small band.
Some chain strands.
A pile of leaves.
A few tiny acorns.
Then suddenly the whole doorway looks different.
If you want a fall crochet project that feels decorative, cozy, and just a little unexpected, this is such a fun one to make.



