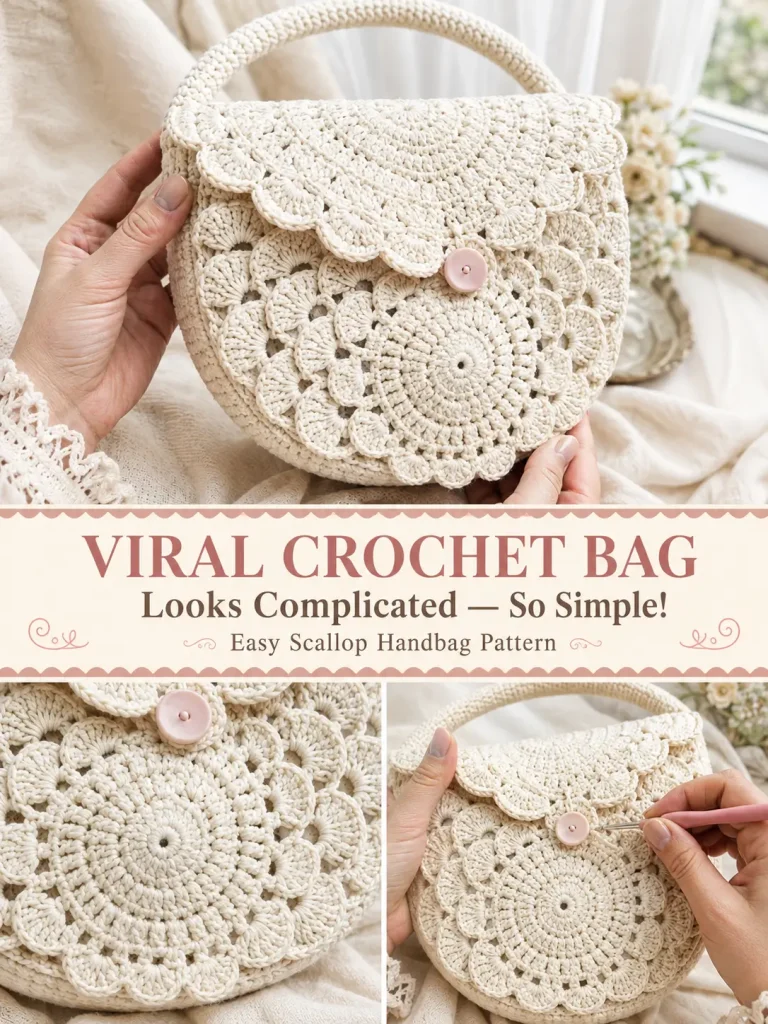
At first glance, this little crochet handbag looks much harder than it really is.
The overlapping scallops give it an almost lace-like appearance, the rounded flap looks beautifully detailed, and the soft tubular handle makes the whole bag feel polished.
But the construction begins with something surprisingly simple:
one expanding crochet circle.
That same basic circle is used to build the front, back, and decorative flap. After that, a few progressively larger shell rows create the beautiful layered edge.
The original version is made in soft white/ivory, and I would keep that color because it is a huge part of what makes the finished bag look elegant.
Crochet Scallop Handbag at a Glance
Skill level: Confident beginner / intermediate
Terms: US crochet terminology
Construction: Front panel + deeper back panel + circular scalloped flap + tubular crochet handle
Main color: Soft white / warm ivory
Closure: One button
Main stitches: Single crochet, double crochet, chains, shell clusters
The size will depend on your yarn and hook, so make the front panel first and use it as the size reference for the other pieces.
Materials
You will need:
- Fine crochet yarn in soft white or warm ivory
- Enough yarn to hold double if using a very fine yarn
- 2–2.5 mm crochet hook, or hook suitable for your chosen yarn
- Yarn needle
- Scissors
- Stitch markers
- One medium decorative button
- Optional sewing thread for reinforcing the button
The source tutorial uses a fine yarn with a small hook.
Abbreviations
- ch = chain
- sc = single crochet
- dc = double crochet
- sl st = slip stitch
- st = stitch
- sts = stitches
- sp = space
- BLO = back loop only
- rep = repeat
PART 1 — BASIC CIRCLE
You will use this foundation for:
- the front
- the back
- the flap
Round 1
Make a magic ring.
Ch 3 for height.
The source tutorial does not count this beginning chain as one of the 14 double crochets.
Work:
14 dc into the ring.
Pull the ring closed.
Join with a sl st to the top of the beginning ch 3.
14 dc
Round 2
Ch 3.
Work another dc into the same stitch.
Then work:
2 dc in every stitch around.
Join.
28 dc
Round 3 — Open Mesh Round
Ch 4.
The first 3 chains provide dc height and the fourth chain creates the first ch-1 space.
Work:
dc in next st, ch 1
around.
Do not skip stitches.
You should have:
28 dc + 28 ch-1 spaces
Join to the third chain of the beginning ch 4.
Round 4
Slip stitch into the first ch-1 space if necessary.
Ch 3.
Work one more dc in the same space.
Now work:
2 dc in every ch-1 space around.
Do not work into the dc stitches from Round 3.
Join.
56 dc
Round 5 — Increase to 84
The spoken tutorial works this round into the spaces between the previous double crochets.
Ch 1.
Work around, alternating:
1 sc in next gap
then
2 sc in next gap
Repeat around.
You should finish with:
84 sc
Join to the first sc.
The exact placement matters less than maintaining the even 1, 2, 1, 2 increase rhythm around all 56 positions.
Round 6 — Second Mesh Round
Ch 4.
Work a dc in the next available stitch.
Then repeat:
ch 1, skip 1 st, dc in next st
around.
Join.
You should have approximately:
42 dc + 42 ch-1 spaces
Round 7
Ch 1.
Work:
2 sc into every ch-1 space around.
Join.
You should return to:
84 sc
This completes the basic circular foundation.
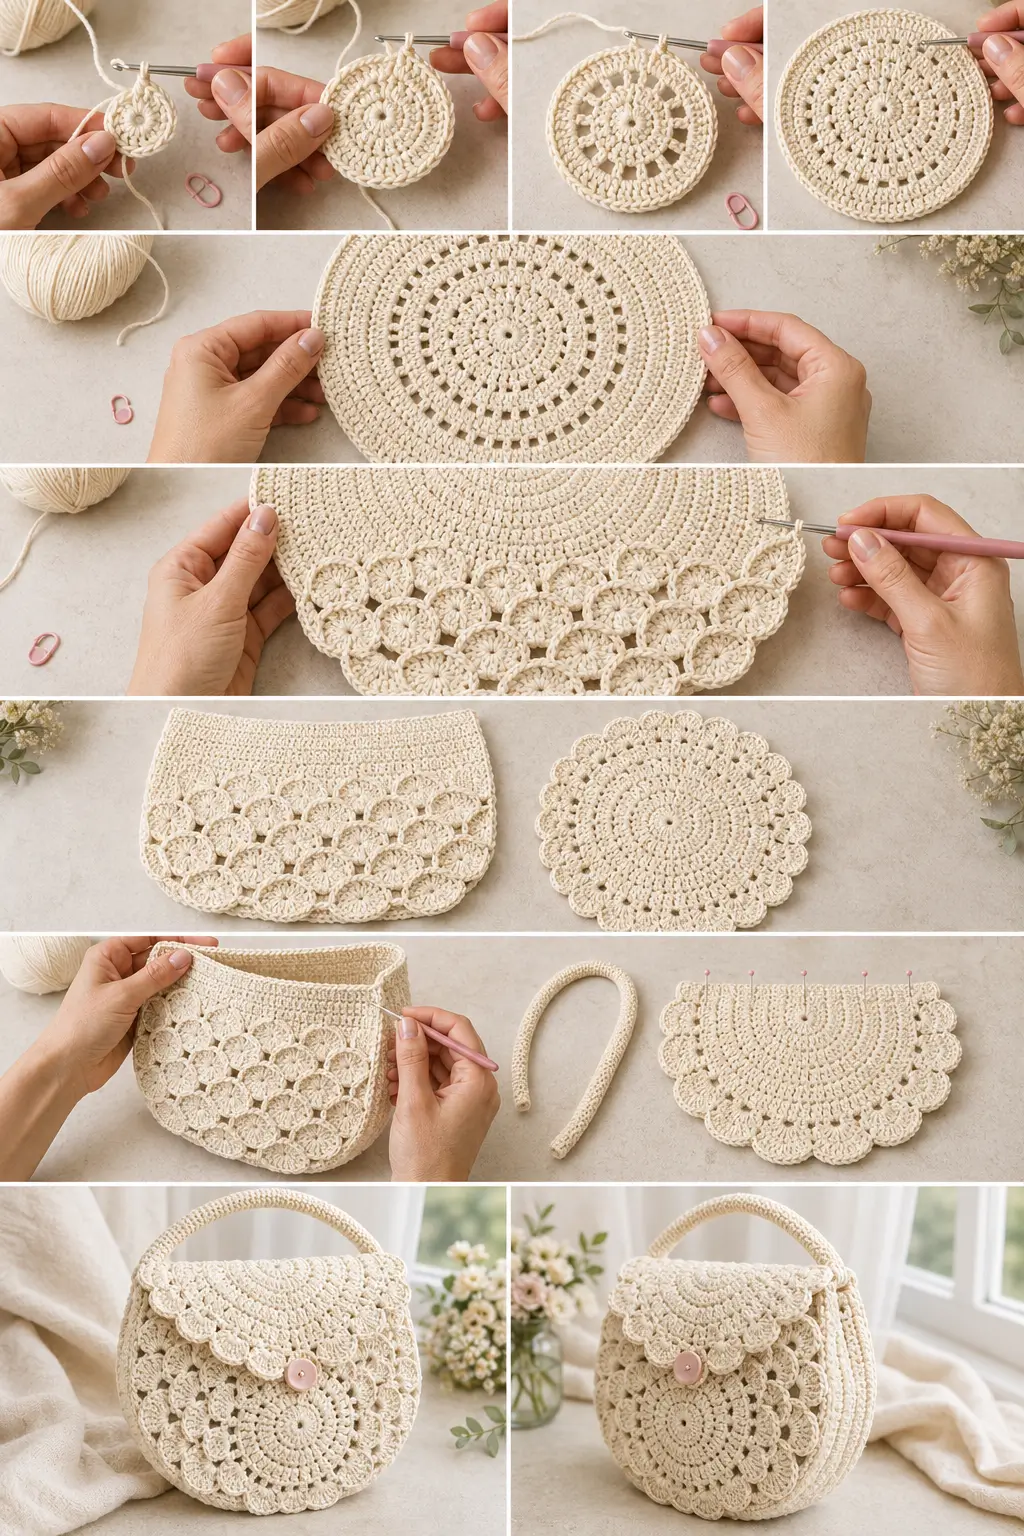
PART 2 — FRONT PANEL
The front uses only part of Round 7 for the decorative shells.
The unworked section becomes the top opening of the bag.
Shell Row 1
Ch 1.
Sc in the next stitch.
Now:
Skip 1 st.
In the next stitch work:
2 dc, ch 2, 2 dc
Skip the next stitch.
Sc in the following stitch.
That creates one small shell.
Repeat this sequence until you have:
15 shells
Do not continue around the entire circle.
Leave the remaining Round 7 stitches unworked.
That open section becomes the top of the bag.
Shell Row 2
Ch 1 and turn.
Sc in the first edge stitch.
Now work into the ch-2 space of the first shell:
3 dc, ch 2, 3 dc
Sc into the single crochet between the shells.
Repeat across:
3 dc, ch 2, 3 dc in each shell space
with
1 sc between shells
You should retain:
15 enlarged shells
Turn.
Shell Row 3
Ch 1.
Sc at the beginning.
In the ch-2 space of the first shell work:
5 dc, ch 1, 5 dc
Sc into the joining sc between shells.
Repeat across all 15 shells.
Fasten off.
You now have the finished front panel.
The shell structure grows:
2 dc → 3 dc → 5 dc
on each side of the shell opening, which is what creates the layered scalloped appearance.
PART 3 — BACK PANEL
Repeat the Basic Circle, Rounds 1–7.
Then repeat the exact same:
- Shell Row 1
- Shell Row 2
- Shell Row 3
used for the front panel.
The back panel then receives two additional rows to create extra depth.
This is the detail that prevents the finished bag from being completely flat.
Back Depth Row 1
With the right side facing you, join yarn at one upper side edge.
Work sc evenly down the exposed edge until you reach the decorative shell section.
When you reach the shell edge, ch 2 for height.
Now work:
1 dc in BLO of each available edge stitch across the decorative section.
Continue evenly across the entire lower shell edge.
Then work back up the opposite exposed side edge as needed to create one continuous spacer/depth row.
Important
The video does not provide a dependable universal stitch count here because the stitches are worked into the finished panel edge.
Do not invent increases.
Your goal is simply:
one evenly spaced stitch per available edge position
with the panel lying flat.
Back Depth Row 2
Ch 3 and turn.
Work:
1 dc in each stitch across
through both loops.
Do not increase.
Fasten off.
This second row creates the narrow gusset-like depth visible between the front and back of the finished bag.
PART 4 — CROCHET THE SCALLOPED FLAP
Make another complete Basic Circle through Round 7.
You should again have:
84 sc
This time you will work shells all the way around.
Flap Scallop Round
Ch 1.
Sc in the first stitch.
Then repeat:
skip 1 st
5 dc in next st
skip 1 st
sc in next st
around the entire circle.
Because 84 divides evenly into groups of four, you should create:
21 scallops
Join and fasten off, leaving a long tail for sewing.
The full circular flap may look larger than expected when lying flat.
Once part of it is sewn to the back panel and the remainder folds forward, it creates the layered semicircular look seen on the finished bag.
PART 5 — CROCHET THE TUBULAR HANDLE
The source uses a small continuous six-stitch tube rather than an ordinary flat strap.
For stability, hold the yarn double if that matches the yarn used for your bag.
Start
Ch 6.
Sl st into the first chain to form a small ring.
Be careful not to twist it.
Handle Round 1
Work:
1 sc in each chain around
You have:
6 sc
Continue the Handle
Do not join the rounds.
Continue spiraling:
1 sc in each stitch
keeping exactly:
6 stitches per round
Continue until the handle reaches the length you want.
The source tutorial works approximately:
50 rounds
for its sample handle.
Accuracy tip
The video mentions that a marker is not necessary, but I recommend placing a removable marker in the first stitch.
Accidentally changing from 6 to 5 or 7 stitches will make the tube visibly narrower or wider.
Fasten off, leaving long tails at both ends for attachment.
PART 6 — JOIN FRONT AND BACK
Lay the pieces together so that:
- decorative sides face outward
- top openings align
- the deeper back panel sits behind the front
Use stitch markers to hold everything in place before joining.
Where to Start the Join
Do not close the top opening.
The source leaves approximately the first couple of stitch positions near each upper corner free before beginning the seam.
This prevents the opening from becoming too tight.
Rather than relying on an exact count, line both panels up symmetrically.
Single Crochet Seam
Join white yarn near one upper side.
Insert your hook through one corresponding edge loop from:
- front panel
- back panel
Work:
1 sc through both layers
Continue around:
- first side
- bottom
- opposite side
Do not join across the top.
Fasten off.
The additional rows on the back now form the narrow depth/gusset between the two panels.
Check the Bag Shape
Turn or arrange the bag so the right sides are facing outward.
Check that:
- both shell patterns align
- the bottom is centered
- the side seams are even
- the opening is symmetrical
Fix any twisting before attaching the flap.
PART 7 — ATTACH THE FLAP
Place the circular scalloped flap against the upper back panel.
Center it carefully.
Use two or more stitch markers to prevent it from moving.
The flap should be positioned so that:
- one section lies against the upper back
- the remaining scalloped section folds over the front
- the central opening in the flap can reach the button position
Sew the Flap
Using the long yarn tail and a yarn needle, sew only the portion of the flap that rests against the back panel.
Do not sew through both bag layers or you will accidentally close the bag.
Take several secure stitches through:
- flap edge
- back panel only
Continue across the attachment area.
Knot securely and weave in the end.
Fold the free portion toward the front.
PART 8 — BUTTON CLOSURE
Fold the flap over the bag.
Find the central opening created naturally between the scallops.
This opening acts as the buttonhole.
Mark the corresponding point on the front panel.
Sew the button securely at that position.
Check before tightening completely:
the button should pass comfortably through the center opening without stretching the crochet excessively.
Use several passes of strong thread or yarn.
PART 9 — ATTACH THE HANDLE
Place one handle end near the upper left side of the bag.
Place the other near the upper right side.
Attach them behind strong shell sections rather than to delicate chain loops.
Use the long handle tails and sew through several neighboring stitches.
Repeat several times.
The handle attachment should distribute the load across a small area instead of pulling on one crochet stitch.
Weave in securely.
FINISHED CONSTRUCTION
Your finished bag should now have:
- rounded white front
- three graduated shell rows
- slightly deeper back panel
- open top
- large scalloped circular flap
- center button closure
- soft tubular crochet handle
- monochrome ivory/white finish
The texture—not color changes—is the decoration.
Why the Shells Look So Full
The shell sequence increases in three stages:
First row
2 dc, ch 2, 2 dc
Second row
3 dc, ch 2, 3 dc
Third row
5 dc, ch 1, 5 dc
Each layer adds more stitches into the central shell space.
That gradually forces the edge outward and creates the layered fan shape.
If the Shells Ruffle Too Much
Possible causes:
- hook too large
- yarn too soft
- very loose tension
Try:
- slightly smaller hook
- firmer tension
- more structured yarn
Do not remove stitches randomly from only one shell.
Keep all 15 shells consistent.
If the Bag Feels Too Floppy
This design is naturally soft because it is crochet.
For more structure you can:
- use firmer yarn
- use a smaller hook
- lightly line the finished bag with fabric
- add a thin fabric or plastic canvas base inside
A lining is especially useful if you plan to carry small objects that could poke through the open crochet sections.
Optional Fabric Lining
Cut two fabric pieces based on the finished interior dimensions.
Sew them together around the:
- sides
- bottom
Leave the top open.
Turn under the raw upper edge.
Insert the lining inside the bag.
Hand sew it to the inside near the top opening.
Do not sew through the decorative front surface if you can avoid it.
Button Placement Matters
Do not sew the button first and hope the flap reaches it.
Instead:
- Attach the flap.
- Fold it naturally.
- Locate the center opening.
- Mark the button position.
- Sew the button.
This creates a cleaner closure.
Handle Length
The source uses approximately 50 rounds for its handbag handle, but your finished length will vary with yarn and tension.
Before attaching:
hold both ends of the handle against the bag.
Check how it feels in the hand.
Add or remove rounds if necessary.
Can I Make It a Shoulder Bag?
Yes.
Continue the 6-stitch tubular handle until it reaches the desired shoulder length.
Keep in mind that a long crochet cord can stretch under weight.
For a long shoulder strap, you may want to:
- work tighter
- reinforce the inside with cord
- or make the strap slightly shorter to account for stretch
Can I Use Cotton?
Yes.
A firm cotton or cotton blend can work especially well because this bag benefits from defined stitches and some structure.
A softer acrylic will create a more relaxed bag.
Can I Make It in Another Color?
Absolutely.
But for this exact version, I would keep the beautiful:
soft warm ivory / creamy white
because the shadows created by the shell stitches become the visual design.
Other elegant options later could include:
- dusty rose
- warm mocha
- sage
- deep plum
- caramel
But I would publish the first version in white.
Common Mistakes
Losing the 84-Stitch Base
Count Round 7 before beginning any shell section.
You should have:
84 sc
The front/back shell placement and the flap’s 21-shell repeat depend on this number.
Crocheting Shells Around the Entire Front
Don’t.
The front and back need an open section at the top.
Only the flap receives shells around the whole 84-stitch circle.
Forgetting the Extra Back Rows
The front stops after the large shell row.
The back gets the additional depth rows.
Without them, the finished bag will be much flatter.
Joining the Top Shut
Join:
- side
- bottom
- side
Leave the top open.
Sewing the Flap Through Both Layers
When attaching the flap, sew it to:
back panel only
otherwise you can accidentally close the bag opening.
Making the Handle Stitch Count Uneven
Keep:
6 sc per round
all the way through the tubular cord.
Frequently Asked Questions
Is the bag made from granny squares?
No.
The main pieces begin as expanding crochet circles.
How many stitches are in the finished base circle?
Round 7 finishes with:
84 single crochet stitches.
How many decorative shells are on the front?
The source construction uses:
15 shells
leaving the remaining circular section open for the top of the bag.
How many shells are around the flap?
21 scallops.
This works cleanly around the 84-stitch circle.
Is the handle a normal chain strap?
No.
It is a narrow tubular cord made from:
6 single crochet stitches worked continuously in a spiral.
How many handle rounds do I need?
The source sample uses around:
50 rounds.
Adjust the length before attaching.
Does the back match the front?
Almost.
Both begin with the same circle and shell construction, but the back receives two extra depth rows before assembly.
Do I need a lining?
No, but it is useful if you want to carry small items or give the bag additional structure.
Final Thoughts
The finished handbag looks elaborate because there are so many soft scallops layered around the outside.
But once you understand the construction, the pattern becomes very logical.
First:
14 → 28 → 56 → 84
Then:
small shell → medium shell → large shell.
Make the front.
Repeat for the back and add depth.
Make another circle for the scalloped flap.
Crochet one little tubular handle.
Join everything.
Add one button.
And suddenly that simple white circle has become an elegant little crochet handbag.
That is exactly why this design works so well as social crochet content:
the finished result looks much harder than the actual techniques used to make it.
The reorganized pattern above is grounded in the transcript you supplied, including the main stitch counts, 15-shell body section, 21-shell flap, added back depth, tubular 6-stitch handle and assembly sequence



