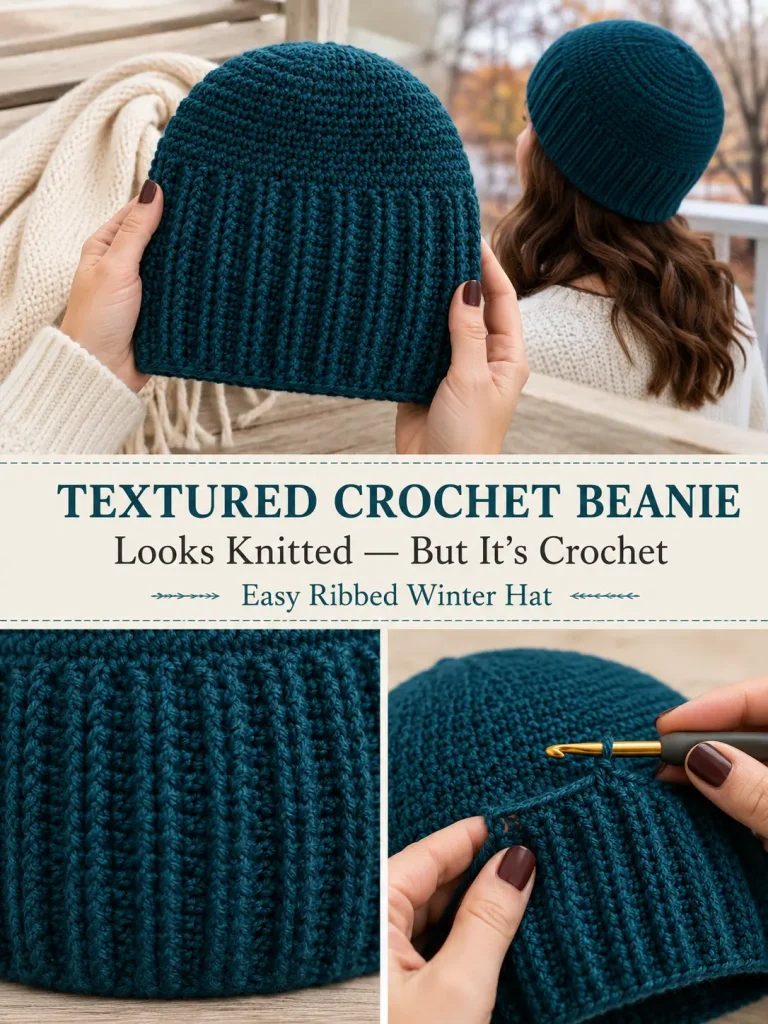
There is something about a deeply textured crochet beanie that makes it look much harder than it really is.
At first glance, the lower half of this hat almost looks knitted.
But there are no knitting needles involved.
The entire hat is crocheted from the top down, starting with a simple double-crochet crown. Once the crown reaches the right size, the increases stop and the hat grows straight downward.
Then comes the best part:
alternating front-post and back-post double crochet.
Those two stitches create the deep vertical ribs that give the beanie its stretchy, structured finish.
For this version, I used a rich deep lake teal instead of a basic neutral. It feels cozy enough for fall and winter, but still looks sophisticated enough for adults.
And because the hat is made from the top down, adjusting the size is much easier than it looks.
Textured Ribbed Crochet Beanie at a Glance
Skill level: Confident beginner
Terminology: US crochet terms
Construction: Top down in joined rounds
Main stitches: Double crochet, front-post double crochet, back-post double crochet
Suggested size: Adult Medium/Large
Finished circumference: Approximately 20–22 inches with stretch
Finished length: Approximately 8½–9 inches
Suggested yarn: Worsted-weight / Category 4
Hook: 5 mm crochet hook
Color used: Deep lake teal
The finished size will vary depending on yarn, hook, and tension.
Why This Beanie Works So Well
The hat uses two different textures.
The upper crown is smooth double crochet.
The lower section is deeply ribbed.
That combination gives you:
- a comfortable rounded crown
- stretch around the head
- strong vertical texture
- a clean adult look
- no separate brim to sew on
The ribbing is crocheted directly onto the body of the hat.
Materials
You will need:
- Worsted-weight / Category 4 yarn in deep lake teal
- 5 mm crochet hook
- Yarn needle
- Scissors
- Stitch marker
- Measuring tape
Optional:
- Faux-fur pom-pom
- Handmade tag
For a comfortable wearable hat, choose yarn that feels soft against the forehead.
Yarn Amount
For one adult beanie, approximately 180–220 yards of worsted-weight yarn is a reasonable amount to have available.
Actual usage depends on:
- yarn brand
- tension
- hat size
- number of ribbing rounds
- whether you add extra slouch
If you are using a partial skein, weigh it before starting so you can monitor how much yarn remains.
Abbreviations
- ch = chain
- dc = double crochet
- fpdc = front-post double crochet
- bpdc = back-post double crochet
- sl st = slip stitch
- st = stitch
- sts = stitches
- inc = 2 dc in the same stitch
Important Pattern Note
The beginning ch 2 does not count as a stitch in this version.
At the end of each round, join with a slip stitch to the first actual stitch, not the turning chain.
This helps keep the stitch count easier to follow.
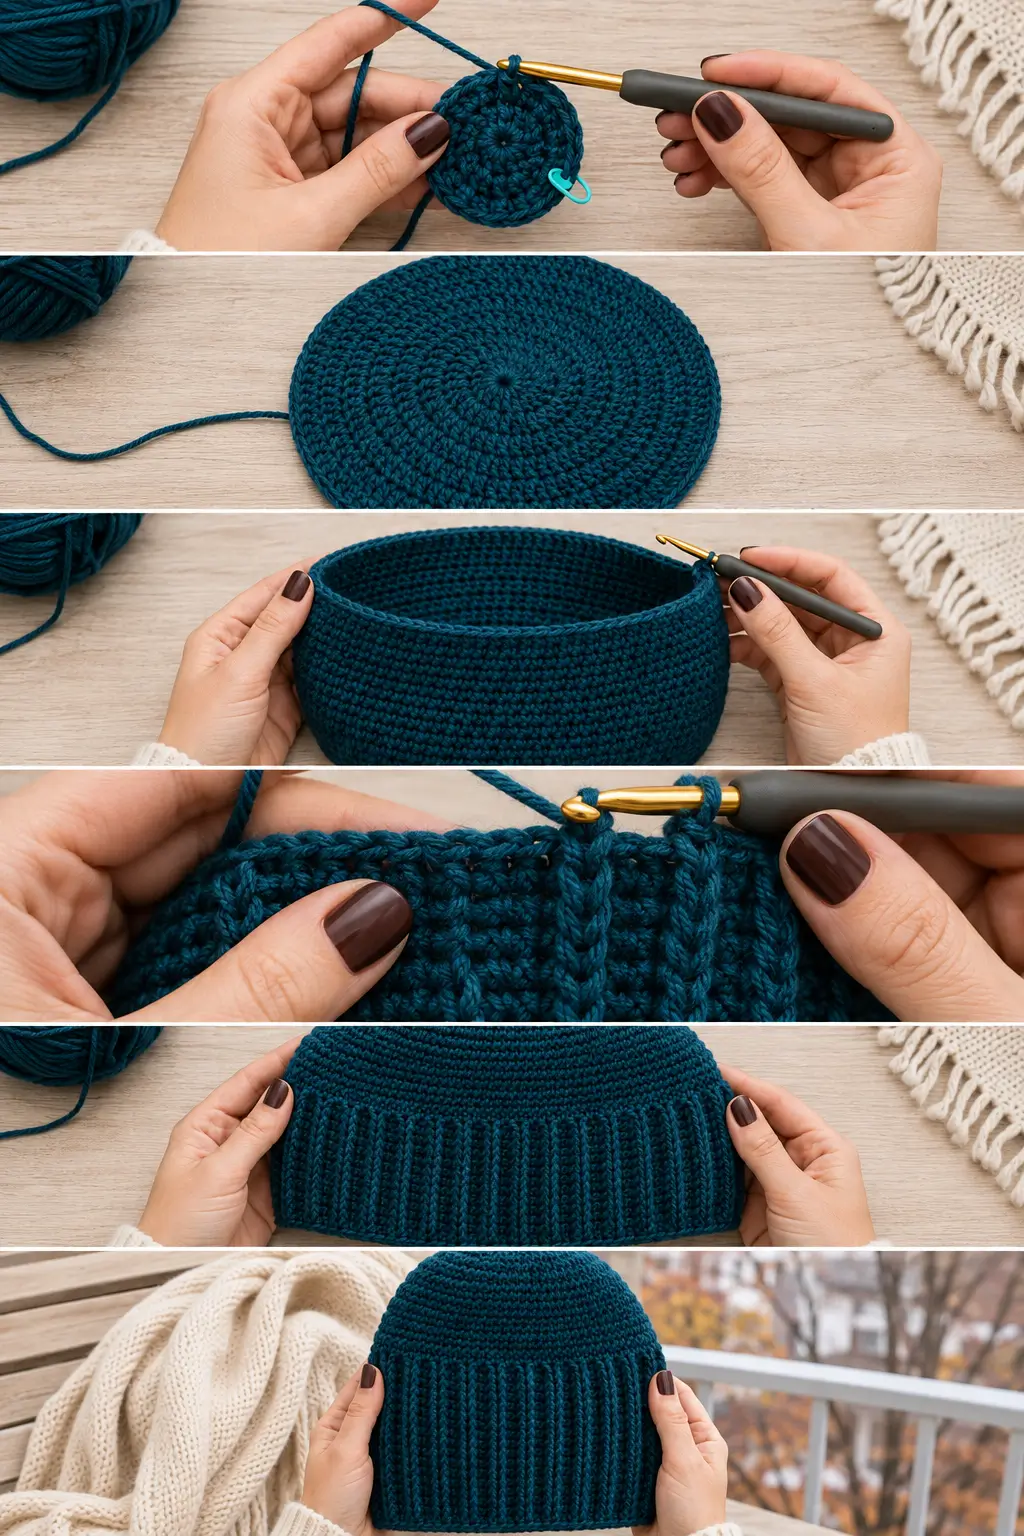
PART 1 — CROCHET THE CROWN
Using deep lake teal yarn, make a magic ring.
If you prefer not to use a magic ring, chain 4 and join with a slip stitch to form a small ring.
Round 1
Ch 2.
Work:
12 dc into the ring
Join with a sl st to the first dc.
12 sts
Round 2
Ch 2.
Work:
2 dc in every stitch around
Join.
24 sts
Round 3
Ch 2.
Repeat:
1 dc in next st, 2 dc in next st
around.
Join.
36 sts
Round 4
Ch 2.
Repeat:
1 dc in each of next 2 sts, 2 dc in next st
around.
Join.
48 sts
Round 5
Ch 2.
Repeat:
1 dc in each of next 3 sts, 2 dc in next st
around.
Join.
60 sts
Round 6
Ch 2.
Repeat:
1 dc in each of next 4 sts, 2 dc in next st
around.
Join.
72 sts
Check the Crown Diameter
Lay the crown completely flat.
For an average adult beanie, aim for approximately:
6¾–7 inches across
before stopping the increases.
This measurement is more useful than blindly following a stitch count because yarn and tension vary.
If Your Crown Is Already Large Enough at 60 Stitches
Stop increasing after Round 5.
Continue the body with:
60 stitches
This can work for:
- smaller adult heads
- stretchy yarn
- looser gauge
If You Need a Larger Crown
After Round 6, add another increase round.
Optional Round 7
Ch 2.
Repeat:
1 dc in each of next 5 sts, 2 dc in next st
around.
Join.
84 sts
Only use this round if your actual crown measurement needs it.
Do not automatically add more stitches just because you want a longer hat.
Hat width comes from crown diameter.
Hat length comes from additional straight rounds.
PART 2 — BUILD THE SMOOTH UPPER BODY
Once the crown reaches the correct diameter, stop increasing.
For the standard 72-stitch version:
Body Round 1
Ch 2.
Work:
1 dc in every stitch around
Join.
72 sts
Body Rounds 2–4
Repeat:
Ch 2, 1 dc in every stitch around, join
Keep:
72 sts
After these rounds, the crown should begin curving downward naturally into a hat shape.
Measure Before Starting the Ribbing
From the center top of the crown to the working edge, you should have approximately:
4½–5 inches
depending on your tension.
The remaining length will be created by the ribbed section.
PART 3 — START THE TEXTURED RIBBING
Now we switch from ordinary double crochet to alternating:
front-post double crochet
and
back-post double crochet
These stitches are worked around the posts of the stitches below rather than into the normal top loops.
How to Make a Front-Post Double Crochet
Yarn over.
Insert your hook:
from front to back, then back to front
around the post of the next stitch.
The post should sit in front of your hook.
Yarn over and pull up a loop.
You now have 3 loops on the hook.
Yarn over and pull through 2 loops.
Yarn over again and pull through the remaining 2 loops.
That is one:
fpdc
The stitch pushes forward toward you.
How to Make a Back-Post Double Crochet
Yarn over.
Insert your hook:
from back to front, then front to back
around the post of the next stitch.
The post should sit behind your hook.
Yarn over and pull up a loop.
Complete the double crochet normally.
That is one:
bpdc
The stitch recedes toward the back.
Why Alternating Them Creates Ribbing
When you alternate:
fpdc, bpdc, fpdc, bpdc
the front-post stitches project outward while the back-post stitches recede.
That creates strong vertical columns.
Continue placing the same stitch type over the same column on every new round and the ribs stack neatly upward.
Ribbing Round 1
Ch 2.
Work:
fpdc around the first stitch
Then:
bpdc around the next stitch
Repeat:
fpdc, bpdc
around the entire hat.
Join with sl st to the first fpdc.
Because the standard version has 72 stitches, the even stitch count allows the alternating repeat to work perfectly.
Ribbing Round 2
Ch 2.
Look carefully at the stitches below.
Work:
fpdc around every fpdc
and
bpdc around every bpdc
around.
Join.
Do not simply alternate based on where you think you are.
Follow the visible columns.
That is what keeps the ribs straight.
Ribbing Rounds 3–9
Repeat Ribbing Round 2.
For each round:
- fpdc around fpdc
- bpdc around bpdc
Join at the end.
After approximately 9 ribbing rounds, try on the hat.
Finished Length
For a standard fitted adult beanie, aim for approximately:
8½–9 inches
from the center of the crown to the bottom edge.
If the hat already reaches comfortably over the ears, you can stop.
Want a Slouchier Beanie?
Continue adding ribbing rounds.
For a subtle slouch:
Add approximately:
2–3 additional rounds
For a deeper slouch:
Add:
4–6 additional rounds
The construction does not change.
Just keep repeating:
fpdc around fpdc
and
bpdc around bpdc
Final Round
Once you are happy with the length, work one final ribbing round exactly as established.
Join.
Fasten off.
Leave a tail long enough to weave in securely.
Weave In the Ends
Thread the tail onto a yarn needle.
Weave it through several stitches on the inside of the hat.
Change direction at least once.
Trim the excess.
Do the same with the starting tail at the crown.
Finished Look
The completed beanie should have:
- smooth rounded top
- deep lake-teal color
- several straight double-crochet rounds below the crown
- long vertical ribbed lower section
- alternating raised and recessed columns
- stretchy fitted edge
- no separate sewn brim
The transition between smooth crochet and ribbing should be visible but clean.
Why I Chose Deep Lake Teal
A lot of winter beanies are made in:
- black
- gray
- cream
- brown
Those are useful colors, but this texture deserves something with a little more depth.
Deep teal gives the hat a rich fall-and-winter look without feeling overly bright.
Other beautiful options include:
- forest green
- deep plum
- cranberry
- charcoal blue
- warm camel
- burgundy
- midnight navy
- dusty rust
A solid color works especially well because the shadows created by the post stitches become part of the design.
How to Make a Smaller Adult Size
Stop the crown increases when the circle measures approximately:
6¼–6½ inches
For many crocheters, this may happen at around:
60 stitches
Continue straight downward using that stitch count.
Because 60 is even, the:
fpdc, bpdc
repeat still works perfectly.
How to Make the Hat Larger
Continue crown increases until the flat circle reaches the appropriate diameter.
For example, you may use:
84 stitches
for a larger size depending on your gauge.
Then stop increasing.
Do not add increases in the ribbing section unless you deliberately want the lower hat to flare.
A Simple Hat-Sizing Formula
Measure around the wearer’s head.
Because crochet stretches, the finished hat circumference is usually made slightly smaller than the actual head measurement.
A useful starting point is approximately:
1–2 inches of negative ease
depending on:
- yarn stretch
- stitch pattern
- personal preference
Then estimate crown diameter with:
desired finished circumference ÷ 3.14
For example:
If you want approximately a 21-inch finished circumference:
21 ÷ 3.14 ≈ 6.7 inches
So you would stop increasing when the crown is close to:
6¾ inches across
Why Measuring Is Better Than Guessing by Age
Head size varies a lot.
Two adults can need different hats even if they are similar in height and build.
If possible, measure the actual wearer.
If that is not possible, make the hat with a stretchy yarn and check your gauge carefully.
What If the Crown Starts Ruffling?
Ruffling usually means there are too many stitches for your current tension.
Possible fixes:
- stop increasing sooner
- use a smaller hook
- check whether you accidentally added extra increases
The crown should lie reasonably flat during the increase section.
What If the Crown Starts Cupping Too Soon?
Possible causes:
- missed increases
- hook too small
- very tight tension
Check your stitch count first.
If the count is correct but the crown still cups strongly, try a slightly larger hook.
What If the Hat Is Too Tight?
If you notice the problem early, undo the straight body rounds and add one additional crown increase round.
If the ribbing is significantly too tight, continuing to crochet longer will not fix the circumference.
Width must be corrected at the crown.
What If the Hat Is Too Loose?
If the crown is too large, undo the final increase round.
Stop at the previous stitch count.
A beanie should stretch gently around the head rather than simply resting loosely on it.
What If My Ribbing Leans?
Make sure you are working:
fpdc over fpdc
and
bpdc over bpdc
on every round.
Accidentally switching those placements can break the vertical columns.
Also check that you are not adding or losing stitches near the join.
What If I Can’t Tell FPDC From BPDC?
Look at the previous round from the outside.
The front-post stitch forms a raised vertical column toward you.
The back-post stitch sits recessed behind it.
After several rounds, the difference becomes much easier to see.
The Join Looks Noticeable — Is That Normal?
A joined-round seam can be visible.
To keep it neat:
- use the same joining point every round
- do not add extra stitches beside the join
- keep the beginning chain relaxed
- join to the first actual stitch
Positioning the seam toward the back of the hat also makes it less noticeable when worn.
Can I Work the Hat in Continuous Rounds?
I recommend joined rounds for this version.
The post-stitch ribbing is easier to keep aligned when you can clearly identify the beginning and end of each round.
Joined rounds also make the transition between the smooth section and ribbing easier to manage.
Can I Use Half Double Crochet Instead?
You could use half double crochet for the crown and smooth body, but the gauge and dimensions would change.
For the pattern written here, use:
double crochet
through the crown and upper body.
Can I Use Bulky Yarn?
Yes, but do not use the same stitch counts.
Bulky yarn will create a much larger hat.
Instead:
- Make a test swatch.
- Begin the crown.
- Increase until it reaches the required diameter.
- Stop increasing.
- Continue downward.
The sizing method stays the same even when the stitch counts change.
Can I Use a Smaller Hook?
Yes, but a smaller hook normally creates:
- denser fabric
- smaller circumference
- less stretch
That means you may need additional crown increases.
Always measure the actual crown rather than assuming one hook size can be substituted without changing the result.
The original Lakeside Beanie inspiration is also a top-down worsted-weight hat using double crochet followed by alternating front- and back-post double crochet, which is why I kept that broad visual idea while rebuilding the sizing, counts, length, and finishing for this version. (5 Knots North)
Optional Folded Brim Version
If you want an even warmer beanie, continue the ribbing for approximately:
4 additional inches
beyond your normal fitted length.
Then fold the lower ribbing upward.
The double layer around the ears creates extra warmth.
Because the ribbing is reversible-looking and highly textured, the folded cuff looks intentional.
Optional Pom-Pom
The hat works beautifully without a pom-pom.
But if you want one:
Attach a medium faux-fur or yarn pom-pom at the center top.
If using a removable pom-pom with ties:
thread the ties through the crown from outside to inside and secure them.
A removable version makes washing easier.
Keep the Pom-Pom Proportional
For an adult beanie, a pom-pom around:
3–4 inches
usually gives a balanced look.
An oversized pom can pull on a soft crochet crown.
Make It for Men or Women
This texture is very versatile.
For a more classic look, use:
- charcoal
- navy
- forest green
- espresso
- camel
For a softer color direction, try:
- dusty rose
- muted lavender
- sage
- oatmeal
- mauve
The pattern itself does not need to change.
Make a Two-Tone Version
For a subtle color-block effect:
Crown + smooth body
Deep lake teal
Ribbing
Warm oatmeal
or:
Crown
Charcoal
Ribbing
Deep rust
Change colors immediately before the first post-stitch round.
That makes the structural change look intentional.
Make a Tonal Version
For something more subtle, use two shades from the same color family.
For example:
Upper hat
Deep forest green
Ribbing
Dark moss
or:
Upper hat
Dusty blue
Ribbing
Deep navy
This keeps the sophisticated texture while adding a little visual contrast.
Best Yarn Characteristics for This Hat
Look for worsted yarn with:
- good stitch definition
- moderate stretch
- softness
- durability
Very fuzzy yarn can hide the post-stitch ribbing.
A smooth or lightly twisted yarn makes the vertical columns much easier to see.
Can Beginners Make This?
If you already know:
- chain
- double crochet
- working in rounds
- basic increases
then the only new techniques may be:
- front-post double crochet
- back-post double crochet
Practice a few post stitches on a small swatch first.
Once you understand where the hook goes, the ribbing is extremely repetitive.
Why This Is a Good Gift Project
Beanies are useful.
And this pattern is easy to customize without redesigning everything.
You can change:
- size
- color
- ribbing length
- pom-pom
- slouch
while keeping the same basic construction.
That makes it a good option for:
- holiday gifts
- winter birthdays
- craft fairs
- family sets
- matching parent-and-child hats
Make a Matching Scarf
The same alternating post-stitch texture can be used in a scarf.
Start with a normal foundation row of double crochet.
Then work alternating:
fpdc, bpdc
across.
On following rows, continue working the stitch columns as established.
Using the same deep teal yarn creates a coordinated winter set.
Frequently Asked Questions
Is the hat worked from the top down?
Yes.
You begin at the center of the crown and increase outward.
Once the crown reaches the correct diameter, you stop increasing and work downward.
What creates the ribbed texture?
Alternating:
front-post double crochet
and
back-post double crochet
creates the vertical raised and recessed columns.
Does the chain 2 count as a stitch?
Not in this version.
The ch 2 is used only to bring the hook to working height.
How many stitches are in the standard adult version?
The standard version stops increasing at:
72 stitches
Adjust according to your actual crown measurement and gauge.
How many ribbing rounds should I make?
Start with approximately:
9 rounds
Then measure or try on the hat.
Add more for additional length or slouch.
Can I make the ribbing longer?
Absolutely.
The ribbed section is the easiest place to customize the hat length.
Do I need a separate brim?
No.
The alternating post stitches form the lower hat and brim at the same time.
Can I leave off the smooth body rounds?
You could start the ribbing immediately after completing the crown.
That would create a hat with much more texture.
For this version, the short smooth section creates a cleaner transition and keeps the ribbing concentrated around the lower portion of the hat.
Final Thoughts
This is one of those crochet projects where one small stitch change completely transforms the finished result.
The crown begins with ordinary double crochet.
Nothing complicated.
Then the increases stop.
Still simple.
But once you start alternating those front-post and back-post stitches, the fabric suddenly becomes deeply textured.
A few rounds later, it barely looks like the same crochet.
That’s what I love about this beanie.
It has the appearance of a much more complicated winter hat, but once the crown is finished, almost everything comes down to one repeating rhythm:
front post
back post
front post
back post
until the hat is exactly as long as you want it.



