There are crochet blankets that look beautiful because of the yarn.
And then there are blankets that make you stop and wonder:
How did they crochet all of that into the fabric?
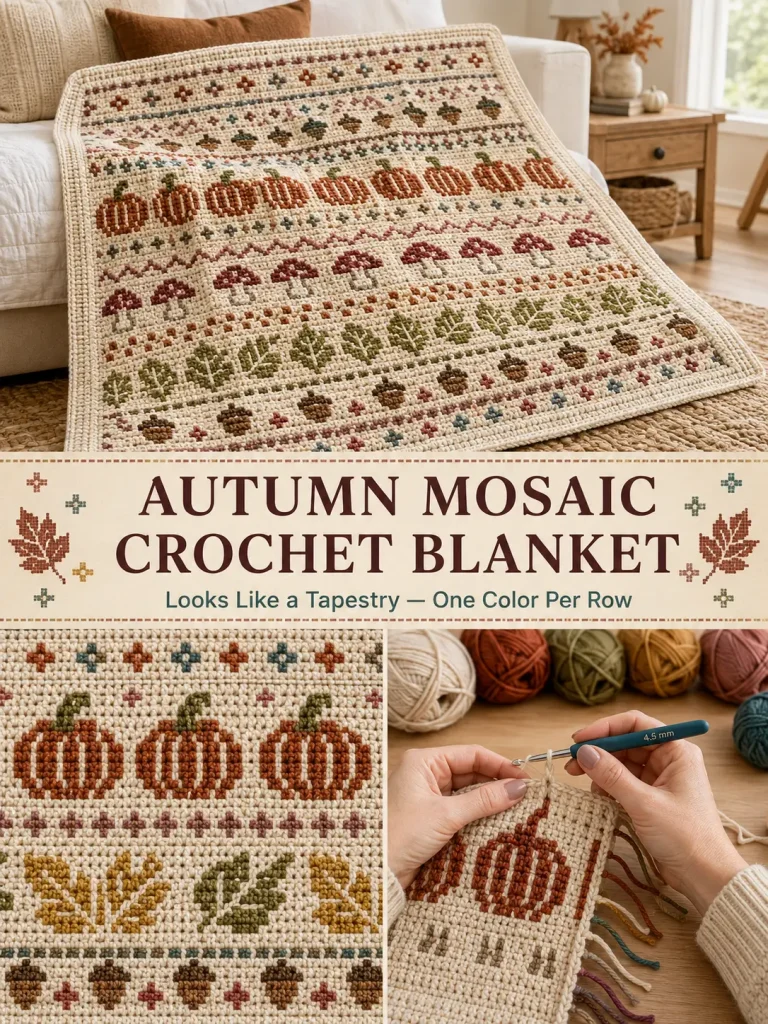
This autumn mosaic blanket is filled with little pumpkins, woodland mushrooms, acorns, leaves, diamonds, dots, crosses, and tiny geometric bands.
It looks almost like a woven fall tapestry.
But the technique behind it is much simpler than the finished blanket suggests.
Every row is worked with only one yarn color.
There is no carrying several strands across the row.
There are no bobbins hanging from the back.
You simply alternate a warm oatmeal background with different autumn colors and use a combination of:
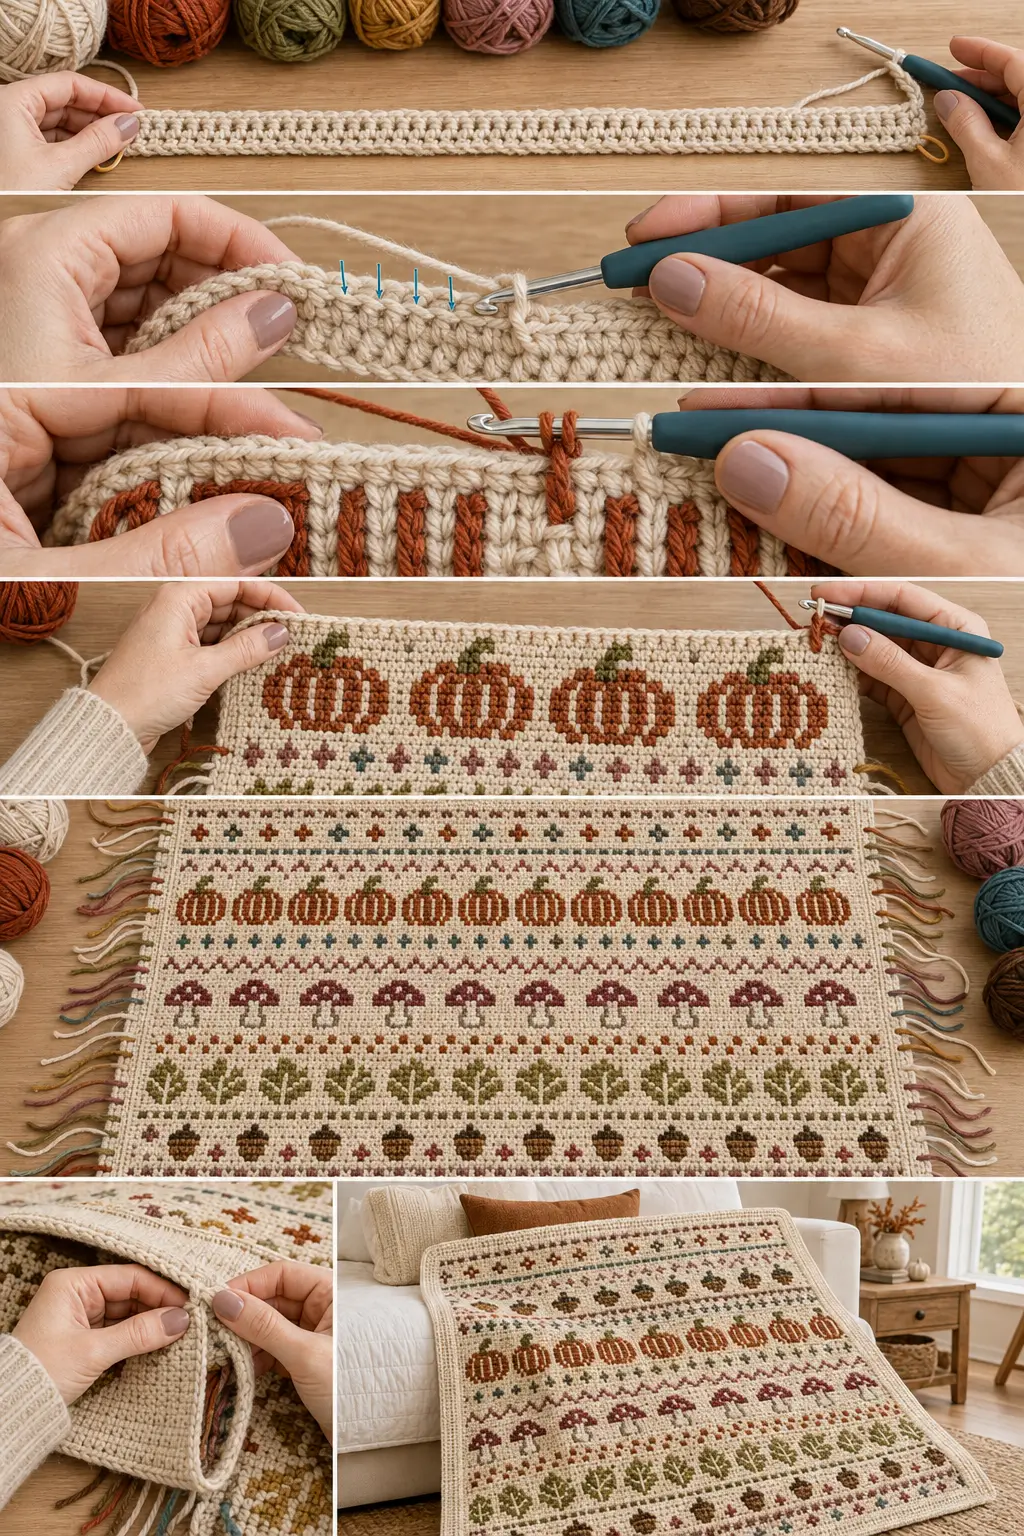
- back-loop single crochet
- drop-down mosaic double crochet
The mosaic stitches reach into the row below and visually cover sections of the previous color.
That is what creates the pictures.
For this original blanket, I used a softer, more unusual fall palette rather than copying a traditional orange-and-brown autumn blanket:
- warm oatmeal
- terracotta
- moss olive
- antique gold
- mulberry
- dusty teal
- cocoa
- muted berry
- soft sage
The result still feels unmistakably autumnal, but it has its own personality.
Autumn Mosaic Blanket at a Glance
Skill level: Intermediate
Terminology: US crochet terms
Technique: Overlay mosaic crochet
Construction: Bottom-up in rows
Finished size: Approximately 35 × 53–55 inches including border
Foundation: 147 stitches
Main color: Warm oatmeal
Motif structure: 16 horizontal mosaic bands
Border: Double-layer envelope border
Hook: 4.5 mm crochet hook
Suggested yarn: Category 3 / DK
What Makes This Pattern Different
This blanket uses eight original repeating chart sections:
Four larger autumn motifs
- Ribbed Pumpkin
- Woodland Leaf
- Little Mushroom
- Acorn
Four smaller filler motifs
- Diamond
- Confetti Dots
- Broken Chevron
- Little Cross
The eight sections are worked twice in different fall colors.
That means the blanket stays visually interesting without requiring sixteen completely different charts.
Finished Layout
The blanket is worked in this order from bottom to top:
- Terracotta Pumpkins
- Olive Diamonds
- Antique-Gold Leaves
- Berry Confetti Dots
- Mulberry Mushrooms
- Dusty-Teal Chevrons
- Cocoa Acorns
- Sage Crosses
- Rust Pumpkins
- Golden-Ochre Diamonds
- Moss Leaves
- Dusty-Rose Confetti Dots
- Cocoa Mushrooms
- Sage Chevrons
- Mustard Acorns
- Dusty-Teal Crosses
A warm oatmeal main color runs through the entire blanket and ties everything together.
Materials
You will need:
Main Color
Approximately 1,700–1,900 yards DK yarn in warm oatmeal or natural cream.
Contrast Colors
Have approximately 1,300–1,500 yards total divided among your autumn colors.
A useful starting amount is roughly 160–200 yards of each contrast color.
Suggested palette:
- Terracotta
- Deep rust
- Moss olive
- Soft sage
- Antique gold
- Dusty teal
- Mulberry
- Cocoa brown
- Muted berry or dusty rose
You do not need to use exactly these shades.
Other Supplies
- 4.5 mm crochet hook
- Yarn needle
- Scissors
- Stitch markers
- Measuring tape
- Blocking mats and pins, optional
Gauge
Approximately:
18 stitches × 14 rows = 4 inches
in the established overlay mosaic pattern.
Gauge is not critical for fit, but it affects:
- blanket size
- yarn usage
- motif proportions
Make a small swatch before committing to the entire blanket.
Abbreviations
- ch = chain
- sc = single crochet
- BLO = back loop only
- FLO = front loop only
- md = mosaic double crochet
- st = stitch
- sts = stitches
Special Stitch: Mosaic Double Crochet
The mosaic double crochet creates the colored vertical blocks.
Instead of working into the top of the next stitch:
- Yarn over.
- Look directly beneath the next stitch.
- Skip the row immediately below.
- Insert the hook into the unused front loop of the stitch two rows below.
- Yarn over and pull up a loop to the height of the current row.
- Finish the double crochet normally.
The long dc lies over the stitch directly behind it.
That one long stitch occupies one chart position.
Do not also work a single crochet into the current-row stitch behind the md.
Important Overlay Mosaic Rule
All mosaic rows are worked from the right side.
At the end of each row:
- cut the yarn
- leave approximately a 4–5 inch tail
Then return to the beginning edge and attach the next color.
Do not turn the work.
All those row-end tails will eventually disappear inside the envelope border.
The Two Edge Stitches
To stabilize the blanket, every row has:
2 regular sc at the beginning
and
2 regular sc at the end
These four edge stitches are not part of the mosaic chart.
The charted center contains:
143 stitches
which is:
11 repeats × 13 stitches
So:
2 + 143 + 2 = 147 stitches
How to Read the Written Charts
Every chart row below contains a 13-character repeat.
You will repeat that code:
11 times across
The symbols mean:
.
Work 1 BLO sc in the next stitch.
X
Work 1 mosaic dc into the FLO of the corresponding stitch two rows below.
Example:
…..XXX…..
means:
- 5 BLO sc
- 3 mosaic dc
- 5 BLO sc
That completes one 13-stitch repeat.
Work it 11 times.
Color Rule for Every Section
Every section begins with Main Color.
Then alternate:
Odd-numbered section rows
Warm oatmeal Main Color
Even-numbered section rows
That section’s Contrast Color
Because every section contains an even number of rows, every new section begins cleanly with Main Color again.
FOUNDATION
With warm oatmeal:
Ch 148.
Foundation Row
Starting in the second chain from the hook:
Sc in every chain across.
You should have:
147 sc
Cut yarn.
Do not turn.
Setup Row
Attach the first contrast color — terracotta — at the beginning edge.
Ch 1.
Work:
2 sc through both loops
Then work:
143 BLO sc
Finish with:
2 sc through both loops
You still have:
147 sts
Cut yarn.
Do not turn.
The blanket is now ready for the first mosaic section.
SECTION 1 — TERRACOTTA PUMPKINS
Use:
- Main Color: warm oatmeal
- Contrast: terracotta
Repeat each 13-stitch code 11 times between the two edge stitches.
Row 1
…..XXX…..
Row 2
….XXXXX….
Row 3
…XXXXXXX…
Row 4
..XXX…XXX..
Row 5
.XXX…..XXX.
Row 6
.XXX…..XXX.
Row 7
.XXX..X..XXX.
Row 8
.XXX…..XXX.
Row 9
.XXX…..XXX.
Row 10
..XXX…XXX..
Row 11
…XXXXXXX…
Row 12
….XXXXX….
Row 13
…..XXX…..
Row 14
………….
The last plain row gives the pumpkin band a little breathing room before the next design begins.
SECTION 2 — OLIVE DIAMONDS
Contrast color:
Moss olive
Row 1
……X……
Row 2
…..XXX…..
Row 3
….XXXXX….
Row 4
…XXXXXXX…
Row 5
….XXXXX….
Row 6
…..XXX…..
Row 7
……X……
Row 8
………….
SECTION 3 — ANTIQUE-GOLD WOODLAND LEAVES
Contrast:
Antique gold
This leaf is intentionally slightly angled rather than perfectly symmetrical.
Row 1
……X……
Row 2
…..XXX…..
Row 3
….XXXXX….
Row 4
…XXXXXX….
Row 5
..XXXXXXX….
Row 6
.XXXXXXX…..
Row 7
.XXXXXX……
Row 8
..XXXXX……
Row 9
…XXXXX…..
Row 10
….XXXX…..
Row 11
…..XXX…..
Row 12
……X……
Row 13
…..X…….
Row 14
………….
SECTION 4 — BERRY CONFETTI DOTS
Contrast:
Muted berry
Row 1
………….
Row 2
..XX…..XX..
Row 3
..XX…..XX..
Row 4
………….
Row 5
…..XXX…..
Row 6
…..XXX…..
Row 7
………….
Row 8
………….
This creates a lighter little patterned band between the larger motifs.
SECTION 5 — MULBERRY MUSHROOMS
Contrast:
Deep mulberry
Row 1
…..XXX…..
Row 2
….XXXXX….
Row 3
…XXXXXXX…
Row 4
..XXXXXXXXX..
Row 5
.XXXXXXXXXXX.
Row 6
.XXXXXXXXXXX.
Row 7
..XXXXXXXXX..
Row 8
….XXXXX….
Row 9
…..XXX…..
Row 10
…..XXX…..
Row 11
….XXXXX….
Row 12
….XXXXX….
Row 13
…XXXXXXX…
Row 14
………….
The broad upper section becomes the mushroom cap, while the narrower lower rows create the stem.
SECTION 6 — DUSTY-TEAL BROKEN CHEVRONS
Contrast:
Dusty teal
Row 1
.X………X.
Row 2
..X…….X..
Row 3
…X…..X…
Row 4
….X…X….
Row 5
…..X.X…..
Row 6
……X……
Row 7
…..X.X…..
Row 8
………….
SECTION 7 — COCOA ACORNS
Contrast:
Cocoa brown
Row 1
……X……
Row 2
…..XXX…..
Row 3
…XXXXXXX…
Row 4
..XXXXXXXXX..
Row 5
.XXX.XXX.XXX.
Row 6
..XXXXXXXXX..
Row 7
…XXXXXXX…
Row 8
….XXXXX….
Row 9
…XXXXXXX…
Row 10
..XXXXXXXXX..
Row 11
..XXXXXXXXX..
Row 12
…XXXXXXX…
Row 13
….XXXXX….
Row 14
………….
SECTION 8 — SAGE LITTLE CROSSES
Contrast:
Soft sage
Row 1
…..XXX…..
Row 2
…..XXX…..
Row 3
..XXXXXXXXX..
Row 4
..XXXXXXXXX..
Row 5
…..XXX…..
Row 6
…..XXX…..
Row 7
…..XXX…..
Row 8
………….
You have now completed the first half of the blanket.
SECOND HALF
Repeat the same eight section charts, but change the contrast colors.
This keeps the blanket cohesive while preventing the second half from looking like an exact color copy of the first.
SECTION 9 — RUST PUMPKINS
Repeat the Pumpkin chart from Section 1.
Contrast:
Deep rust
14 rows.
SECTION 10 — GOLDEN-OCHRE DIAMONDS
Repeat the Diamond chart from Section 2.
Contrast:
Golden ochre
8 rows.
SECTION 11 — MOSS LEAVES
Repeat the Leaf chart from Section 3.
Contrast:
Moss green
14 rows.
SECTION 12 — DUSTY-ROSE CONFETTI DOTS
Repeat the Confetti Dot chart from Section 4.
Contrast:
Dusty rose
8 rows.
SECTION 13 — COCOA MUSHROOMS
Repeat the Mushroom chart from Section 5.
Contrast:
Warm cocoa
14 rows.
SECTION 14 — SAGE CHEVRONS
Repeat the Chevron chart from Section 6.
Contrast:
Muted sage
8 rows.
SECTION 15 — MUSTARD ACORNS
Repeat the Acorn chart from Section 7.
Contrast:
Muted mustard
14 rows.
SECTION 16 — DUSTY-TEAL CROSSES
Repeat the Cross chart from Section 8.
Contrast:
Dusty teal
8 rows.
FINAL BODY ROW
Using Main Color:
Work one final row:
sc through both loops in every stitch across
147 sts
Cut yarn.
The main blanket body is complete.
What the Finished Body Should Look Like
You should now have a long rectangular mosaic panel with:
- oatmeal background
- repeating horizontal autumn bands
- approximately 11 motifs across each large section
- thin geometric sections separating the larger designs
- lots of loose yarn tails running down both side edges
Do not weave in those side tails.
The envelope border is designed to hide them.
Check the Blanket Before Adding the Border
Lay the piece flat.
Check:
- width
- row tension
- straight sides
- top and bottom edges
- whether any mosaic stitches were accidentally missed
A missed mosaic stitch is much easier to repair before the border is added.
How to Fix a Missed Mosaic Stitch
If you discover a missing md several rows later, you do not necessarily need to undo the entire blanket.
Use a yarn needle and matching yarn to embroider a vertical stitch over the missing area.
Follow the same path the mosaic dc would have taken.
Secure the yarn on the wrong side.
For a blanket with hundreds of pattern stitches, this little repair can save a lot of unnecessary unraveling.
PART 2 — ENVELOPE BORDER
The envelope border serves two purposes:
- It gives the blanket a substantial finished frame.
- It traps all the mosaic row-end yarn tails inside.
That means you do not need to weave in hundreds of little side ends individually.
Prepare the Tails
Trim very long tails to approximately:
3–4 inches
Do not cut them flush with the blanket.
Lay them inward toward the blanket edge.
They will eventually sit inside the double border.
FOUNDATION BORDER ROUND
With the right side facing, join Main Color in any corner.
Ch 1.
Across the top:
Sc in every stitch.
At the corner:
Ch 2
Down the side:
Work approximately:
1 sc into each row end
Continue to the next corner.
Ch 2.
Across the bottom:
Sc in every foundation stitch.
Ch 2 at the corner.
Work up the second side.
Ch 2.
Join with sl st to the first sc.
If the Side Border Ruffles
Different crochet tension can make one sc per row end too many.
If the side begins waving, use approximately:
3 sc across every 4 row ends
instead.
The exact number matters less than getting a flat edge.
Whatever spacing you use on the first side, use the same spacing on the second.
FRONT LAYER OF THE ENVELOPE BORDER
The front border is now worked into the front loops only of the Foundation Border Round.
Join Main Color in the FLO of any corner area.
Front Border Round 1
Sc in each available FLO.
At each corner ch-2 space work:
sc, ch 2, sc
Join.
Front Border Rounds 2–4
Sc in every stitch.
At every corner ch-2 space:
sc, ch 2, sc
Join each round.
After Round 4, fasten off.
You now have a narrow cream border extending outward on the front of the blanket.
BACK LAYER OF THE ENVELOPE BORDER
Turn the blanket so the back is facing you.
Return to the unused back loops of the Foundation Border Round.
Join Main Color.
Back Border Round 1
Work sc in every unused back loop.
At each corner:
sc, ch 2, sc
Back Border Rounds 2–4
Repeat:
sc in every stitch
At each corner:
sc, ch 2, sc
After the fourth round, do not fasten off yet.
Tuck the Mosaic Tails Inside
Lay the blanket flat.
You should now have:
- one border layer on the front
- one border layer on the back
The two layers form an open pocket around the edge.
Push all the mosaic row-end tails neatly between these two border layers.
Make sure no tails stick outside.
JOIN THE TWO BORDER LAYERS
Align the outer edge of the front border with the outer edge of the back border.
Using Main Color, insert the hook through the corresponding stitch of:
- front layer
- back layer
Work:
sl st through both layers
Continue around the entire blanket.
At the corners, work carefully through both corresponding corner spaces without pulling tightly.
Join.
Fasten off.
Weave in the final border tail.
All the side ends are now enclosed inside the border.
Optional Decorative Final Edge
If you want the blanket to look slightly more detailed, join dusty teal or sage around the finished envelope border.
Work:
reverse single crochet
loosely around the entire edge.
Or keep the border completely oatmeal for a softer, calmer finish.
I prefer the solid oatmeal border because the mosaic sections already provide plenty of color.
Blocking the Finished Blanket
Blocking helps the mosaic patterns open and the envelope border lie neatly.
Use a blocking method appropriate for your yarn.
Lay the blanket flat.
Straighten:
- top
- bottom
- both side edges
- four corners
Do not aggressively stretch the mosaic stitches.
Allow the blanket to dry completely.
How to Make the Blanket Wider
The chart repeat is:
13 stitches
To increase the width, add one or more complete 13-stitch motif repeats.
Remember that the blanket also contains:
4 edge stitches
So the formula is:
13 × number of motif repeats + 4
The sample uses:
13 × 11 + 4 = 147 stitches
Example Wider Version
For 13 motif repeats:
13 × 13 + 4 = 173 stitches
Make your foundation chain:
174 chains
Then work 173 sc in the foundation row.
How to Make It Narrower
For 9 motif repeats:
13 × 9 + 4 = 121 stitches
Foundation:
Ch 122
Then work:
121 sc
How to Make the Blanket Longer
The easiest method is to repeat complete sections.
Good options include:
- another Pumpkin section
- another Leaf section
- another Diamond filler
- another Mushroom section
Because each large motif section is 14 rows and each filler is 8 rows, you can control the final length quite easily.
Want More Pumpkins?
Repeat the Pumpkin chart several times using different colors.
For example:
- terracotta
- rust
- mustard
- muted sage
A pumpkin-heavy version would make a beautiful October blanket.
Want a More Woodland Look?
Use more:
- mushrooms
- leaves
- acorns
and fewer pumpkins.
Try:
Leaf → Diamond → Mushroom → Chevron → Acorn → Dots → Leaf
then repeat.
Want a Simpler Version?
Choose just:
- Pumpkin
- Diamond
- Leaf
- Dots
Repeat those four sections.
You will get the same mosaic effect with fewer charts to follow.
How Overlay Mosaic Crochet Works
The technique looks complicated because you can see several colors in the finished fabric.
But you are never actually crocheting with several colors at the same time.
Each row uses:
one color only
Most stitches are simple:
BLO single crochet
Whenever the chart says X, you replace that sc with one long mosaic double crochet.
That long stitch reaches down and covers the row underneath.
After enough rows, those vertical stitches begin connecting visually into:
- stems
- curves
- leaves
- pumpkin sections
- geometric shapes
That is where the pictures come from.
Why Work in the Back Loop?
Working the regular stitches in BLO leaves the front loops exposed.
Those exposed front loops are what the mosaic double crochets attach to two rows later.
Without them, the overlay technique would not work the same way.
Why Work Every Row From the Right Side?
Overlay mosaic crochet is designed so the long stitches remain on the decorative front surface.
Working every row from the same side keeps:
- the mosaic dc visible
- the texture consistent
- the chart easier to follow
Instead of turning, you cut the yarn and return to the starting side.
What If My Mosaic Double Crochet Is Too Tight?
A tight md can pull the fabric vertically.
When pulling up the long loop:
bring it all the way to the height of the current row.
Do not make a short, tight dc.
The stitch should lie smoothly over the row beneath without puckering the blanket.
What If the Motifs Look Distorted?
Check three things:
1. Gauge
Very loose or very tight tension changes the proportions.
2. Mosaic dc height
Each md needs to reach the current row comfortably.
3. Chart position
A single misplaced X can visibly change a pixel-style motif.
Mark off each completed row as you go.
Should I Carry Yarn Up the Side?
No.
For this version, cut the yarn after every row.
The envelope border is specifically designed to hide the resulting tails.
This also makes color changes between motif sections much easier.
Do I Have to Weave in Every Mosaic End?
No.
That is one of the biggest advantages of the envelope border.
Only weave in:
- starting foundation tail
- major color-join tails if necessary
- final border ends
The many normal row tails remain trapped safely inside the border.
Can I Use Worsted-Weight Yarn?
Yes.
The blanket will become substantially larger and heavier.
Use an appropriate hook and make a swatch.
You may want to reduce the number of 13-stitch repeats across.
The chart itself can remain the same.
Can I Use Cotton?
Yes, although a large cotton mosaic blanket can become heavy.
Acrylic or acrylic blends are often practical for a washable sofa blanket.
A wool blend can produce a warmer version.
Choose the fiber based on how you plan to use and wash the blanket.
Can I Change the Background Color?
Absolutely.
Beautiful alternatives include:
Mushroom beige
for an earthy look
Pale sage
for a woodland look
Charcoal
for a dramatic modern blanket
Deep navy
for jewel-toned fall motifs
Warm ivory
for the lightest classic look
If you use a dark background, choose lighter contrasts so the mosaic patterns remain easy to see.
Suggested Alternative Palette
For a moodier version:
Main Color: Deep charcoal-blue
Contrasts:
- copper
- mustard
- sage
- dusty rose
- pale teal
- oatmeal
- caramel
- muted plum
The exact same charts would look completely different.
Frequently Asked Questions
Is this tapestry crochet?
No.
This version uses overlay mosaic crochet.
You work one yarn color per row rather than carrying several colors through the same row.
How many stitches wide is the sample?
147 stitches
What is the motif repeat?
Each chart motif is:
13 stitches wide
and is repeated:
11 times
across the sample blanket.
How many different charts are included?
Eight:
- Pumpkin
- Leaf
- Mushroom
- Acorn
- Diamond
- Dots
- Chevron
- Cross
They are repeated in different colors to create sixteen blanket sections.
Is every motif section the same height?
No.
The four larger motifs contain:
14 rows
The smaller filler bands contain:
8 rows
Can I rearrange the sections?
Yes.
Because every section is the same width and uses an even number of rows, they can be reordered easily.
Can I repeat only my favorite motif?
Absolutely.
You could make an entire blanket using:
Pumpkin → small filler → Pumpkin → small filler
and simply change the pumpkin color each time.
Why does every section have a blank final row?
That row creates a little visual separation and also helps the next motif begin cleanly.
Does the envelope border really hide the ends?
Yes.
The front and back border layers create a pocket around the blanket.
The side tails sit inside that pocket before the outer edges are joined.
Final Thoughts
This is the kind of crochet blanket that becomes more satisfying the longer it grows.
At first you only see rows.
Then a few vertical mosaic stitches begin appearing.
A few rows later, they connect.
And suddenly you realize:
there is a pumpkin in the blanket.
Then comes a little diamond band.
Then a leaf.
Then dots.
Then mushrooms.
By the time the second half begins, the blanket looks far more complicated than the stitches you have actually been making.
And that is what makes overlay mosaic crochet so addictive.
Most of the time, you are simply repeating:
single crochet in the back loop
or:
one long double crochet down into the row below.
Two simple stitches.
One color at a time.
And somehow they turn into an entire autumn landscape.




Please could you tell me what make of yarn you used for tge mosaic autumn blanket.