I had a pile of leftover yarn that did not look like it belonged together.
Some was too thin.
Some was too scratchy for a wearable.
Some was left over from projects I barely remembered making.
And none of the colors seemed particularly exciting on their own.
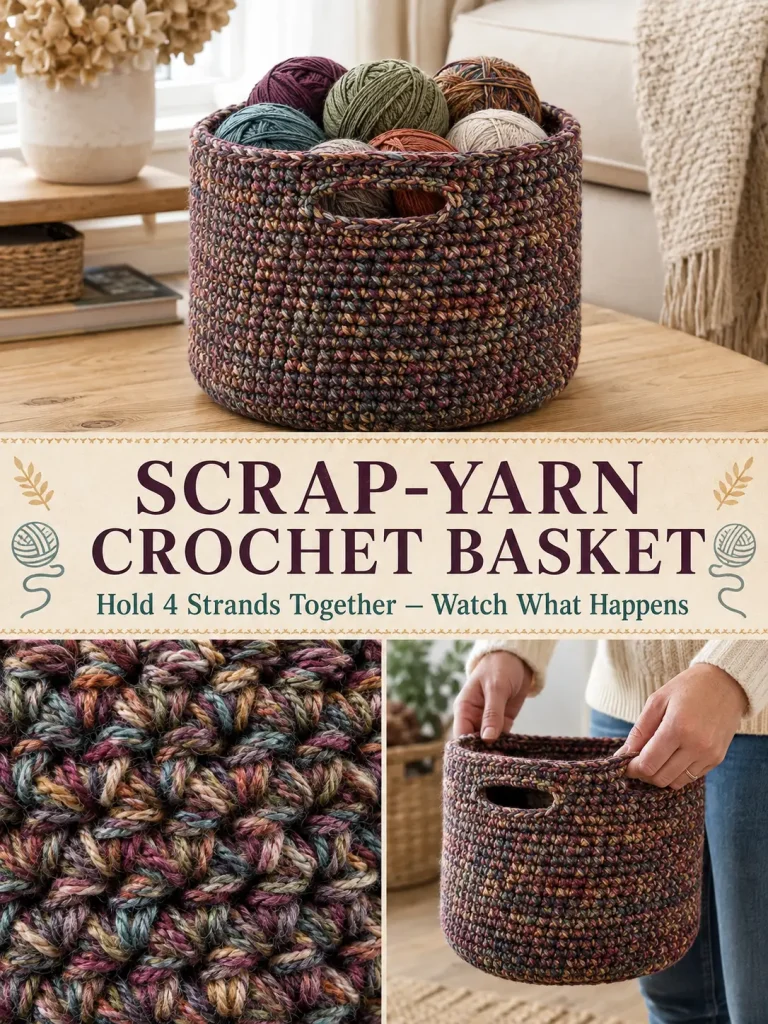
So instead of trying to find a separate project for every little ball, I held several strands together and treated them like one thick yarn.
That changed everything.
The colors blended into a beautiful marled fabric, the different yarn weights created subtle texture, and because the finished yarn bundle was so thick, it became perfect for something practical:
a large crochet storage basket.
This version uses a deliberately moody fall-inspired mix of deep plum, dusty teal, moss green, antique gold, rust, oatmeal, and charcoal instead of a random rainbow.
The result is sturdy enough for yarn, blankets, toys, craft supplies, or anything else that seems to collect around the house.
And once the base is finished, almost the entire basket is simply:
single crochet around and around.
Marled Scrap-Yarn Crochet Basket at a Glance
Skill level: Beginner-friendly
Terminology: US crochet terms
Construction: Bottom-up in continuous rounds
Finished size: Approximately 12–13 inches wide and 10–11 inches tall, excluding handles
Main stitch: Single crochet
Yarn technique: 4 strands held together as one
Hook: 8 mm crochet hook, adjusting if needed for a firm fabric
Handles: Crocheted directly into the top of the basket
The finished measurements will vary depending on the yarns you combine.
That is completely normal for a scrap-yarn project.
The Color Palette
Instead of mixing every color in the stash randomly, I wanted this basket to feel coordinated.
Use scraps in colors similar to:
- deep plum
- dusty teal
- moss green
- antique gold
- warm rust
- oatmeal
- charcoal
- muted rose
- deep indigo
You do not need every shade.
The important part is mixing several strands together so individual colors soften into a marled effect.
How the Marled Color Effect Works
Hold 4 strands of yarn together and crochet with all four as if they were one strand.
The strands do not have to be exactly the same weight.
For example:
Blend A
Charcoal + plum + oatmeal + moss
Blend B
Plum + dusty teal + oatmeal + rust
Blend C
Dusty teal + olive + antique gold + cream
Blend D
Rust + muted rose + plum + oatmeal
Blend E
Indigo + teal + moss + oatmeal
Blend F
Plum + charcoal + rust + cream
Changing only one or two strands at a time produces a gradual marled transition instead of obvious hard stripes.
How Much Scrap Yarn Do You Need?
Because yarn thickness varies, an exact yardage would not be very useful.
This project is designed specifically for using what you already have.
For a basket around 12–13 inches wide, expect it to use a substantial amount of leftover yarn because four strands are held together throughout.
A simple approach is to collect a large bag or basket of scraps before beginning.
If one strand runs out, replace only that strand with a similar or complementary color.
That means you do not need four enormous matching balls.
What Yarn Can You Mix?
You can combine many common yarn types for a storage basket.
For example:
- acrylic
- wool
- cotton
- blends
- fingering weight
- sport
- DK
- worsted
The goal is to create a combined strand that feels approximately like a very bulky yarn.
If your scraps are extremely thin, you may need:
5 strands together
If most of your scraps are already thick, use:
2–3 strands
The finished fabric should feel substantial and fairly stiff.
Materials
You will need:
- Large assortment of scrap yarn
- 8 mm crochet hook
- Stitch marker
- Scissors
- Large yarn needle
- Measuring tape
Optional:
- Smaller hook for weaving in thick ends
- Clips or extra stitch markers for marking handle positions
Abbreviations
- MR = magic ring
- ch = chain
- sc = single crochet
- inc = 2 sc in the same stitch
- sl st = slip stitch
- BLO = back loop only
- st = stitch
- sts = stitches
The basket is worked in continuous rounds unless otherwise stated.
Move the stitch marker into the first stitch of every new round.
Before You Start: Make a Small Test
Hold your chosen strands together.
Using the 8 mm hook, crochet a small square of single crochet.
The fabric should be:
- dense
- sturdy
- flexible enough to crochet comfortably
- not full of large gaps
If it feels loose and floppy, try:
- a smaller hook
- another yarn strand
If it feels painfully stiff, try:
- a slightly larger hook
- removing one strand
The finished basket needs some firmness so the sides stand reasonably well.
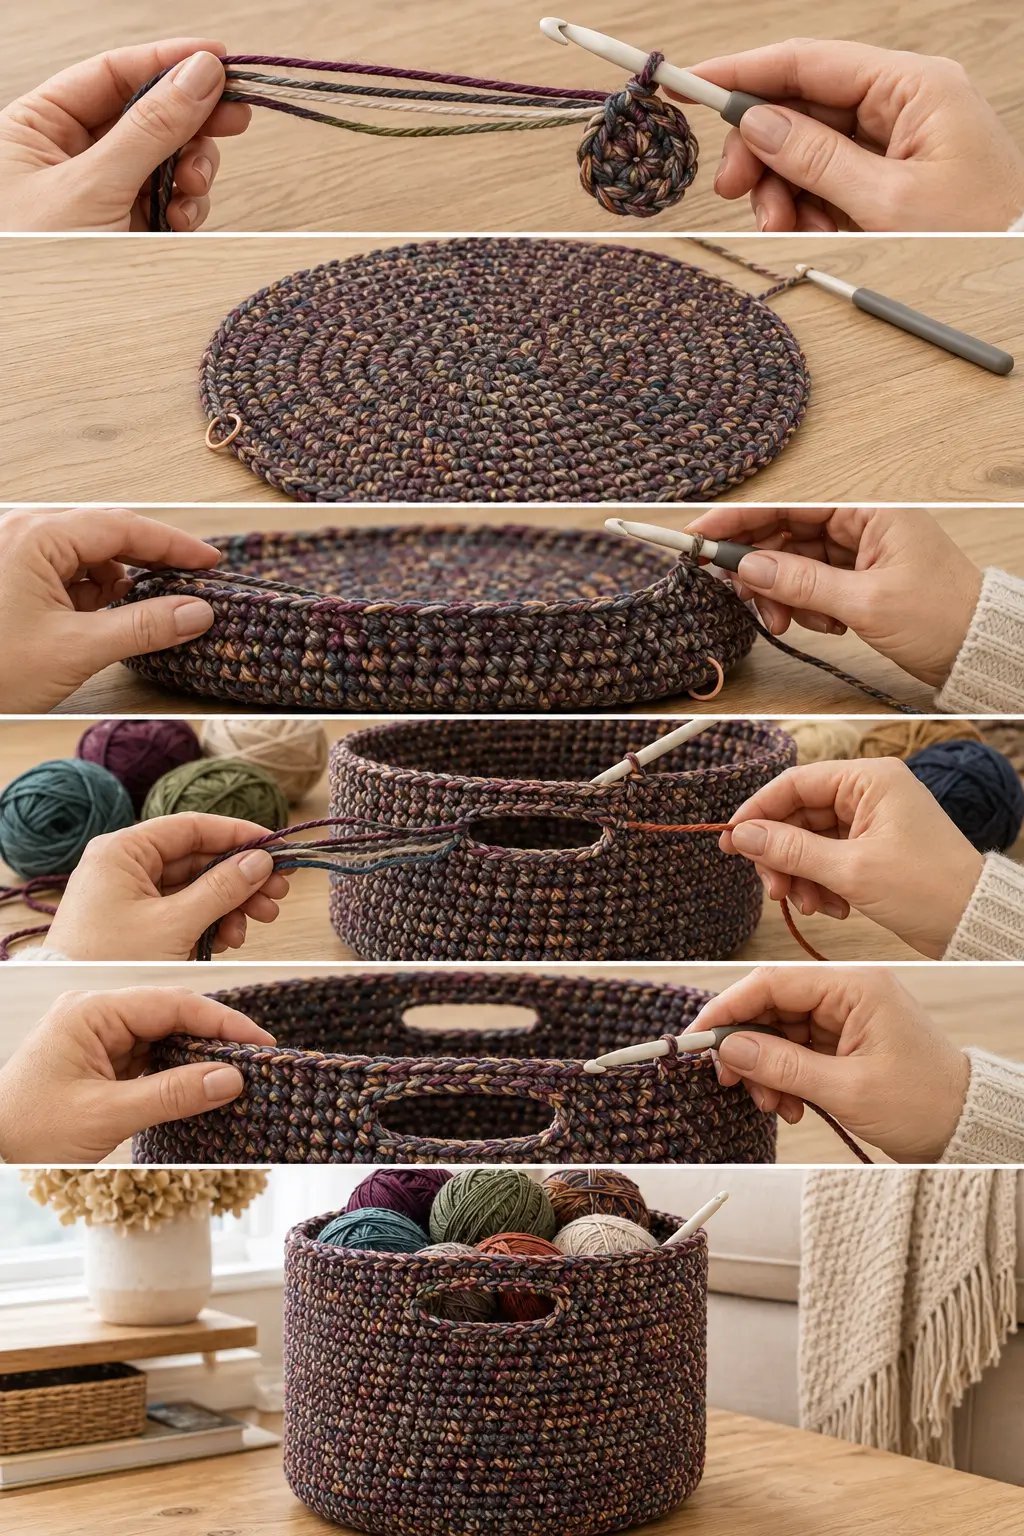
PART 1 — CROCHET THE BASKET BASE
Begin with Blend A:
charcoal + plum + oatmeal + moss
Hold all four strands together.
Make a magic ring.
Round 1
Work:
6 sc into MR
Do not join.
Place a marker.
6 sts
Round 2
Work:
2 sc in every stitch
12 sts
Round 3
Repeat:
1 sc, inc
around.
18 sts
Round 4
To help prevent the base from becoming too hexagonal, stagger the increases.
Repeat:
1 sc, inc, 1 sc
around.
24 sts
Round 5
Repeat:
3 sc, inc
around.
30 sts
Round 6
Repeat:
2 sc, inc, 2 sc
around.
36 sts
Round 7
Repeat:
5 sc, inc
around.
42 sts
Round 8
Repeat:
3 sc, inc, 3 sc
around.
48 sts
Round 9
Repeat:
7 sc, inc
around.
54 sts
Round 10
Repeat:
4 sc, inc, 4 sc
around.
60 sts
Round 11
Repeat:
9 sc, inc
around.
66 sts
Round 12
Repeat:
5 sc, inc, 5 sc
around.
72 sts
Your base is complete.
Check the Base
Lay the circle on a flat surface.
It should measure roughly:
11½–12½ inches across
depending on your yarn combination.
Do not worry if your measurement differs slightly.
More important is whether the circle lies flat.
What If the Base Ruffles?
You probably have too much fabric for your tension.
Before continuing, try one round of:
sc around with no increases
Then check again.
If the ruffling is severe, undo the last increase round.
What If the Base Curls Up Too Early?
Your fabric may be too tight or you may need another increase round.
You can add:
Optional Round 13
Repeat:
11 sc, inc
around.
78 sts
Only do this if your base genuinely needs more width.
For the standard version, stop at 72 stitches.
PART 2 — CREATE THE BOTTOM RIDGE
This small detail helps the walls turn upward more cleanly.
Using the same yarn bundle:
Work one round:
sc BLO in every stitch around
72 sts
Do not increase.
Working into the back loop only creates a subtle ridge around the bottom.
PART 3 — BEGIN THE BASKET WALLS
Now return to normal single crochet through both loops.
Work:
1 sc in each stitch around
Keep:
72 sts
From this point onward, there are no increases.
As you continue, the sides will naturally rise upward.
Color Band 1
Continue with Blend A for:
Rounds 1–4 of the side wall
Blend A:
- charcoal
- plum
- oatmeal
- moss
Color Band 2
For the next round, replace one or two strands.
Use:
Blend B
- plum
- dusty teal
- oatmeal
- rust
Work:
4 rounds
of sc.
Color Band 3
Switch gradually to:
Blend C
- dusty teal
- olive
- antique gold
- cream
Work:
4 rounds
Color Band 4
Switch to:
Blend D
- rust
- muted rose
- plum
- oatmeal
Work:
4 rounds
Color Band 5
Switch to:
Blend E
- deep indigo
- dusty teal
- moss
- oatmeal
Work:
4 rounds
Color Band 6
Switch to:
Blend F
- deep plum
- charcoal
- rust
- cream
Work:
4 rounds
You now have approximately:
24 wall rounds
above the bottom ridge.
Depending on your yarn, the basket should measure around:
8½–9½ inches tall
at this stage.
How to Change Scrap Yarns Without Making a Mess
You do not need to stop and change all four strands simultaneously.
That actually makes the basket look more striped.
Instead, replace one strand at a time.
For example:
You are holding:
plum + charcoal + cream + teal
When teal runs out, replace only teal with:
rust
A few rounds later, replace cream with:
oatmeal
Then replace charcoal with:
olive
The colors slowly blend into one another.
That creates the beautiful marled appearance.
Where Should the Knots Go?
If you need to knot two scraps together, position the knot toward the inside of the basket.
Leave enough tail to secure later.
Avoid large knots on the outside surface.
PART 4 — PREPARE THE HANDLE SECTION
Before making the handles, work:
2 additional rounds of sc
using Blend F.
Keep:
72 sts
Now lay the basket flat.
The sides should align naturally.
We will place one handle on the front and one directly opposite it on the back.
PART 5 — CROCHET THE HANDLES
The handle round uses:
- 13 sc
- handle opening
- 26 sc
- second handle opening
- 13 sc
This keeps both handles centered.
Handle Round
Sc in the next:
13 sts
Now:
Ch 12
Skip the next:
10 sts
Sc into the following stitch.
Continue working:
26 sc
Now make the second handle:
Ch 12
Skip:
10 sts
Then work:
13 sc
to return to the beginning of the round.
You now have two matching handle openings directly opposite one another.
Check the Handle Position
Lay the basket flat.
Both openings should sit near the center of their respective sides.
If one looks noticeably off-center, undo the handle round and reposition it before continuing.
It is much easier to correct now than after reinforcing the handles.
PART 6 — FIRST HANDLE REINFORCEMENT ROUND
Work sc around normally until you reach the first chain-12 handle.
Instead of crocheting into each chain stitch individually, work:
12 sc around the chain into the handle opening
This creates a smooth, sturdy handle edge.
Continue sc in each normal basket stitch.
At the second handle:
12 sc around the chain
Finish the round.
You should again have approximately:
72 stitch positions
around the top.
PART 7 — SECOND HANDLE REINFORCEMENT ROUND
Work:
1 sc in every stitch around
including all handle stitches.
No increases.
PART 8 — THIRD HANDLE REINFORCEMENT ROUND
Repeat:
1 sc in every stitch around
This gives the top edge and handles three layers of strength.
If your yarn bundle is especially bulky, two reinforcement rounds may be enough.
If the handles still feel soft, add one more.
PART 9 — OPTIONAL FINAL EDGE
For a tidy finished top, work one round of:
sl st loosely in every stitch
Do not pull the slip stitches tight.
A tight slip-stitch round can shrink the basket opening.
Fasten off.
Weave in the Ends
Because several strands were held together, you will probably have more ends than with a normal project.
Use a large yarn needle.
Weave each end securely through the thick crochet fabric.
Most ends can be hidden easily on the inside.
Trim only after you are confident they are secure.
Finished Basket
Your finished storage basket should measure approximately:
12–13 inches wide
10–11 inches tall
with two integrated handles.
It should have:
- sturdy circular base
- gently vertical sides
- thick marled fabric
- two centered hand openings
- dark, rich mixed colors
- no obvious single-color stripes
The Finished Color Look
Instead of a bright rainbow basket, this version should feel more sophisticated.
From a distance, you should notice broad areas of:
- deep plum
- dusty blue-green
- earthy olive
- rust
- oatmeal
- antique gold
But up close, each stitch contains several colors twisted together.
That marled effect is the part I love most.
What If the Basket Sides Flare Out?
Make sure you stopped increasing after the base.
Every wall round should remain:
72 sts
If the stitch count is correct but the sides still flare, your tension may have become looser.
Try a slightly smaller hook.
What If the Basket Collapses?
A crochet basket will never behave exactly like a rigid plastic bin, but it should hold its shape reasonably well.
If yours is too floppy:
- use more strands together
- use a smaller hook
- choose firmer yarns
- crochet more tightly
- add a fabric or plastic-canvas base
You can also fold the upper edge slightly outward for a softer basket look.
Optional Removable Bottom Insert
If you want the basket bottom to stay especially flat, cut a circle from:
- plastic canvas
- heavy interfacing
- thin flexible craft plastic
Cut it slightly smaller than the inside base.
Place it inside the basket.
Cover it with a fabric circle if desired.
This is completely optional.
What If My Circle Looks Like a Hexagon?
This often happens when all increases stack directly above one another.
That is why several increase rounds in this pattern are deliberately offset.
Blocking and the weight of the basket contents will also soften minor angular shaping.
What Can You Store in It?
This basket is useful for:
- yarn
- crochet works-in-progress
- blankets
- toys
- scarves
- hats
- craft supplies
- fabric
- towels
- extra pillows
It can also work as a decorative outer basket around a plant pot.
If using it for a plant, keep the actual plant inside a waterproof pot and saucer so moisture never reaches the crochet basket.
Use It as a Project Basket
This may be my favorite use.
Place inside:
- current yarn
- crochet hook case
- scissors
- stitch markers
- unfinished project
The handles make it easy to move everything from one room to another.
And since the basket itself is made from old scraps, it feels especially appropriate for holding new yarn.
Can You Use Only One Yarn Weight?
Absolutely.
If most of your scraps are worsted weight, try holding:
3–4 strands
together.
For DK:
4–5 strands
may work better.
For bulky yarn:
you may need only:
2 strands
Always judge the combined thickness by the fabric rather than the label.
Can You Use Just Two Colors?
Yes.
A beautiful simplified version could use:
deep plum + oatmeal
or:
dusty teal + cream
Hold several shades of each color together.
The basket will still look marled without becoming multicolored.
Want a Lighter Version?
Try:
- oatmeal
- dusty rose
- sage
- pale camel
- soft gray
This creates a softer neutral basket.
Want a Richer Fall Version?
Use:
- plum
- walnut
- rust
- olive
- antique gold
- deep teal
That is the palette used for this version.
Want a Smaller Basket?
Stop the base at:
48 stitches
after Round 8.
Work one BLO transition round.
Then crochet straight sides.
For the handles, divide your final stitch count evenly and center two smaller openings opposite each other.
This makes a good tabletop basket.
Want a Larger Basket?
Continue the base increases after 72 stitches.
For example:
Next round
Repeat:
11 sc, inc
around.
78 sts
Then continue adding six evenly spaced increases per round until you reach your preferred diameter.
Once the base is large enough:
stop increasing completely
and begin the BLO transition round.
For a very large basket, you may need additional strands or a firmer yarn blend so the sides remain stable.
Make the Handles Larger
The sample handle uses:
ch 12, skip 10 sts
If you want a wider hand opening:
ch 14, skip 12 sts
Use the same size on both sides.
On the next round, work the same number of sc around each handle chain as the number of chains you made.
Make the Handles Smaller
For compact handles:
ch 10, skip 8 sts
Again, position both handles symmetrically.
Why the Handles Need Reinforcement
The first chain creates only the basic opening.
The next rounds build fabric around it.
Without reinforcement, the handle can:
- stretch
- curl
- feel uncomfortable
- lose its shape
Two or three rounds of single crochet around the handle area make a noticeable difference.
Frequently Asked Questions
Is the basket worked from the bottom up?
Yes.
You crochet a flat circular base first.
Then you stop increasing and work straight rounds to create the sides.
Is there a separate handle piece?
No.
Both handles are created directly inside the basket’s top rounds.
How many stitches are in the standard basket?
The main body uses:
72 stitches around
after the base is complete.
Do the scraps have to match?
No.
But using a loose color family makes the finished basket feel more intentional.
Do all four strands have to be identical thickness?
No.
You can mix weights.
The combined yarn bundle simply needs to produce a sturdy, comfortable fabric with your chosen hook.
Can I mix different fibers?
For a decorative storage basket, you can generally combine different common craft fibers.
Just remember that mixed fibers may behave differently if washed, so treat the finished basket gently and follow the care requirements of the most delicate yarn included.
Is gauge important?
Not in the way it is for clothing.
What matters most is:
- sturdy fabric
- flat base
- useful finished size
Measure your actual basket as you crochet.
Why is the first side round worked in BLO?
It creates a visible ridge around the bottom and encourages the fabric to bend upward into the basket wall.
Can beginners make this?
Yes.
You need to know:
- magic ring
- single crochet
- increases
- chains
- slip stitches
- working continuously in the round
Once the base is finished, most of the project is simple single crochet.
Final Thoughts
There is something extremely satisfying about turning a pile of yarn you were almost ready to ignore into something you actually need.
And this basket hides the scraps beautifully.
One strange shade gets mixed with plum.
Another gets softened by oatmeal.
That tiny ball of teal becomes part of the next band.
The rust that didn’t match anything suddenly looks perfect beside olive.
By the time four strands are moving through the hook together, it becomes difficult to tell where one old project ended and another began.
You don’t see leftover yarn anymore.
You see one thick, richly marled fabric.
And when that fabric becomes a big storage basket that can hold your next crochet project?
That might be one of the most satisfying ways to use a yarn stash.