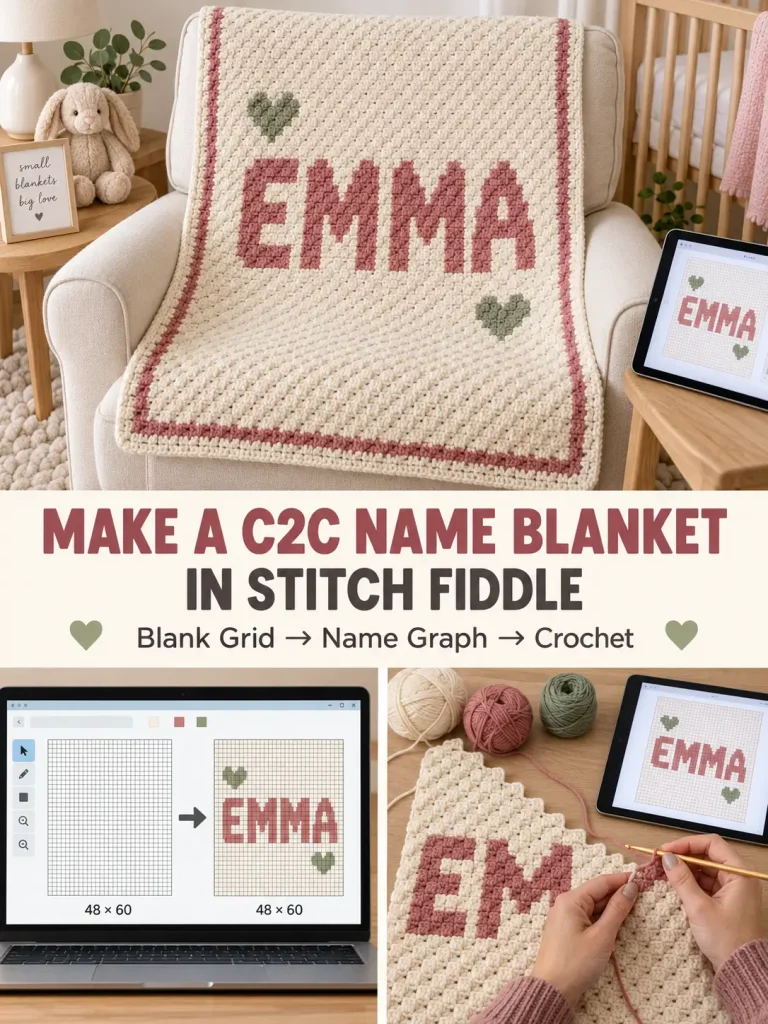
A personalized crochet blanket can look complicated, but the design itself can begin with something as simple as:
blank grid → block letters → centered name → C2C crochet blanket
Instead of converting a photograph, this project starts with an empty Stitch Fiddle grid and builds the design one square at a time.
It is a useful way to make personalized:
- baby blankets
- nursery throws
- wedding gifts
- name pillows
- children’s blankets
- initial blankets
- family-name throws
For this tutorial, we’ll create a simple EMMA baby blanket graph with a cream background, dusty-rose lettering, and small corner hearts.
Project at a Glance
Technique: Corner-to-corner crochet
Design tool: Stitch Fiddle
Example graph: 48 blocks wide × 60 blocks tall
Colors: 2 main colors
Design: Centered name + optional corner hearts
Skill level: Advanced beginner
Terminology: US crochet terms
Suggested yarn: DK or light worsted
Suggested hook: 5 mm
Border: Simple 3-round crochet border
The exact finished blanket size depends on the size of your individual C2C blocks, so make a gauge swatch before finalizing the chart dimensions.
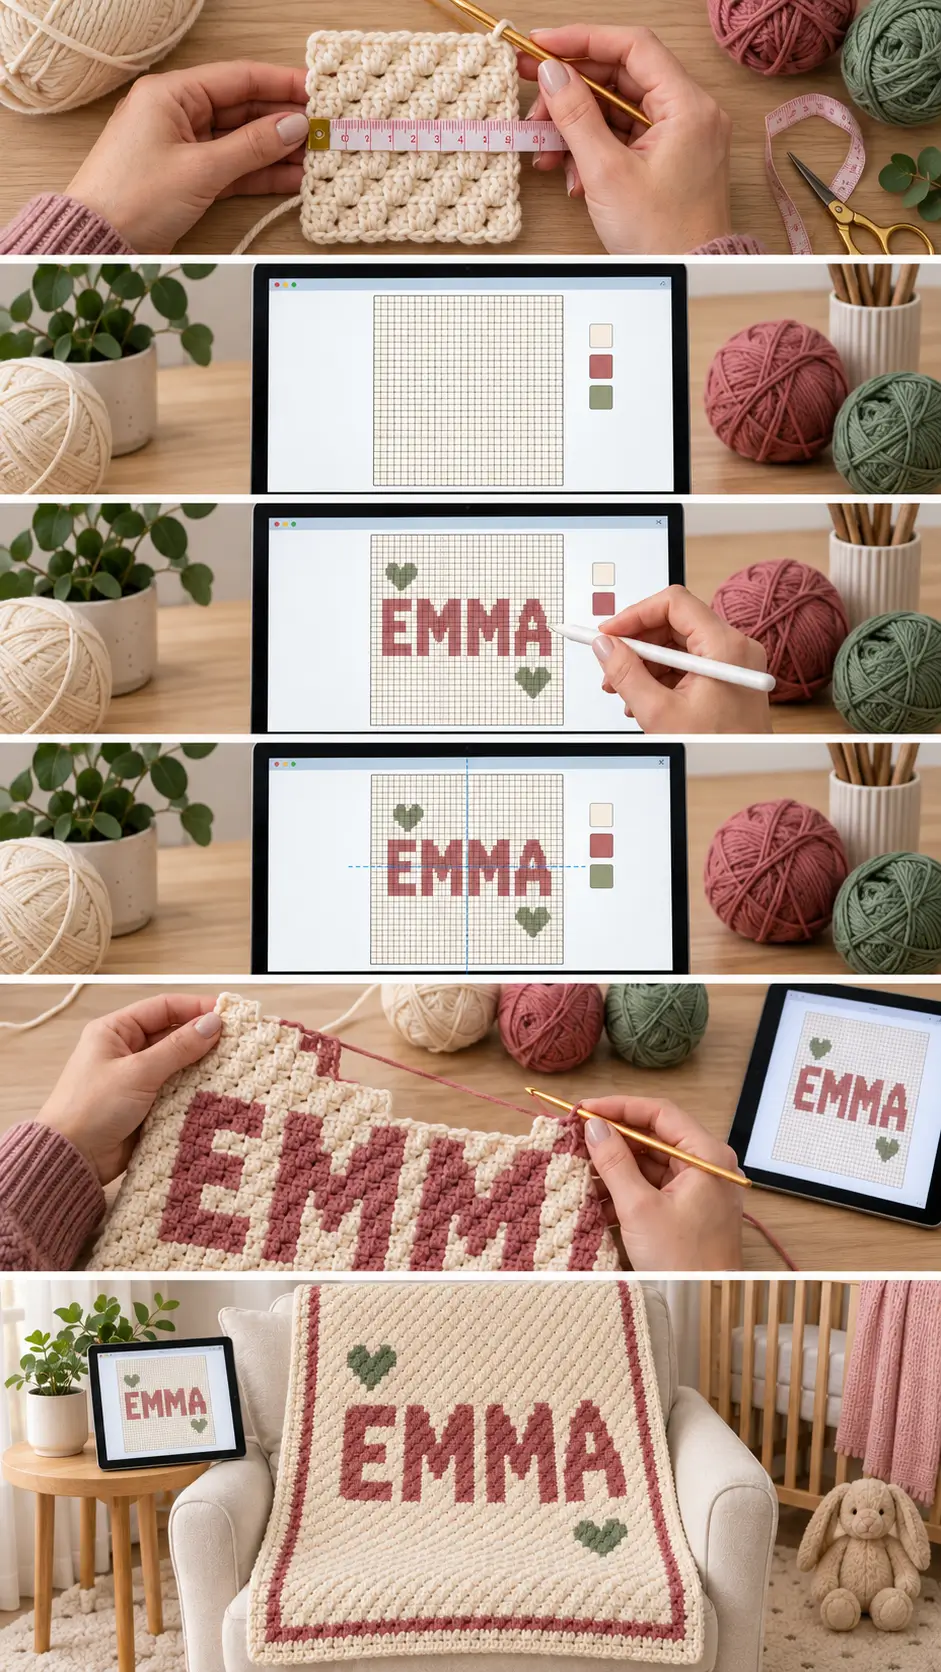
What Is a C2C Crochet Graph?
A C2C graph is a grid of colored squares.
For corner-to-corner crochet:
One graph square represents one C2C block.
That is different from ordinary tapestry crochet, where one square may represent one individual stitch.
Stitch Fiddle has a dedicated Corner 2 Corner Crochet (C2C) project type, and you can begin either with your own empty design or from a picture. (Stitch Fiddle)
For a personalized name blanket, starting with an empty grid gives you much more control.
Why Start With a Blank Grid?
A name does not need photo conversion.
Drawing the letters directly gives you:
- cleaner edges
- fewer unnecessary colors
- better spacing
- easier centering
- complete control over letter thickness
It also makes changing the name much easier later.
Once you’ve designed one good alphabet style, you can reuse the same idea for many personalized blankets.
Step 1 — Make a C2C Gauge Swatch First
Before deciding how many graph squares your blanket needs, crochet a small C2C sample.
Use the exact:
- yarn
- hook
- C2C stitch
- tension
you plan to use for the blanket.
Stitch Fiddle’s own C2C size calculator recommends making a sample using the same yarn, hook, and stitch as the final project; a larger swatch gives a more accurate estimate. (Stitch Fiddle)
Easy C2C Block for This Blanket
For a softer baby blanket, use an hdc C2C block rather than a full double-crochet block.
This makes each square slightly smaller and gives the lettering more definition.
Increasing C2C Block
Ch 5.
Hdc in the third chain from the hook and in the next 2 chains.
You have created:
1 block
For the next row:
Ch 5.
Hdc in third chain and next 2 chains.
Turn the previous block.
Sl st into the ch-2 space of the previous block.
Ch 2.
Work:
3 hdc in the same ch-2 space
You now have:
2 blocks
Continue increasing in this way.
Standard C2C Join
When joining one block to the next:
Sl st into the neighboring block’s ch-2 space.
Ch 2.
Work:
3 hdc
into that same space.
This creates the next block.
C2C Decrease
When you reach a corner and no longer want to increase:
Do not ch 5.
Turn.
Sl st across the 3 hdc of the last block and into its ch-2 space.
Ch 2.
Work:
3 hdc
in the next available ch-2 space.
Continue across.
This removes one block from that edge while keeping the diagonal construction intact.
Step 2 — Measure Your C2C Blocks
Make at least a:
6 × 6-block swatch
and preferably larger.
Measure the width.
For example, suppose:
6 blocks = 4 inches
Then one block is approximately:
0.67 inch
That measurement lets us estimate the finished graph.
Example Blanket Size
Our example chart will be:
48 blocks wide × 60 blocks tall
If one block measures approximately:
0.6 inch
the center panel would measure about:
28.8 × 36 inches
Add the border and the blanket may finish around:
31 × 38 inches
If your blocks are larger, the blanket will be larger.
Always calculate from your own swatch rather than relying on someone else’s gauge.
Step 3 — Open Stitch Fiddle
Create a new chart.
Choose:
Crochet
Then choose:
Corner 2 Corner Crochet (C2C)
Stitch Fiddle currently provides a dedicated C2C chart option for diagonal crochet colorwork. (Stitch Fiddle)
Step 4 — Choose Your Own Colors
For this project, choose:
My Own Colors
You only need two main shades.
Color A — Background
Warm Cream
Color B — Name
Dusty Rose
Optional:
Color C
Muted Sage for small decorative accents.
For a first graph, two colors are significantly easier to manage than five or six.
Step 5 — Choose Empty / Own Design
Rather than uploading a picture, choose:
Empty / Own Design
This gives you a blank graph where every square can be colored manually.
Stitch Fiddle currently offers both Empty (own design) and From picture as starting options for C2C charts. (Stitch Fiddle)
Step 6 — Set the Grid Size
For our baby blanket example, enter:
Width
48
Height
60
You now have:
2,880 possible C2C blocks
Most will be cream background blocks.
Only the name and optional decorations will use contrast colors.
Why 48 × 60?
This gives enough space for:
- wide readable letters
- generous margins
- top and bottom breathing room
- small decorative motifs
It also avoids making the lettering stretch from edge to edge.
A personalized blanket usually looks more polished when the name has plenty of background around it.
Step 7 — Find the Center of the Graph
Width:
48 blocks
Center lies between:
Columns 24 and 25
Height:
60 blocks
Center lies between:
Rows 30 and 31
Use these center points when positioning the name.
The exact letters do not have to sit mathematically on one central square.
What matters is that the complete word looks visually centered.
Step 8 — Design the Letters
For a bold baby blanket, use simple block lettering.
Avoid:
- script fonts
- thin one-pixel diagonals
- elaborate serifs
- extremely narrow spacing
Chunky letters survive crochet much better.
Easy Pixel Letter Style
A useful starting letter size is approximately:
7 blocks wide × 9 blocks tall
Leave:
2 blank columns
between letters.
This creates thick, readable lettering without taking over the entire blanket.
Example Letter E
A simple 7 × 9 letter E can be drawn like this:
XXXXXXX
XXXXXXX
XX
XX
XXXXXX
XXXXXX
XX
XX
XXXXXXX
Each X represents one dusty-rose C2C block.
Blank areas remain cream.
Example Letter M
XX   XX
XXX XXX
XXXXXXX
XX X XX
XX X XX
XX   XX
XX   XX
XX   XX
XX   XX
Example Letter A
  XXX
 XXXXX
XX   XX
XX   XX
XXXXXXX
XXXXXXX
XX   XX
XX   XX
XX   XX
You can simplify these further depending on the available grid space.
Step 9 — Build the Name EMMA
Draw:
E M M A
using dusty-rose cells.
Keep approximately:
2 blank columns
between each letter.
The complete word should occupy roughly:
34–38 columns
depending on your exact letter widths.
That leaves approximately:
5–7 cream blocks
on either side.
This generous margin prevents the name from looking squeezed against the blanket edges.
Step 10 — Check the Name From a Distance
Zoom out.
Do not stare only at individual pixels.
Ask:
Can I immediately read EMMA?
If one letter disappears when the chart is small, simplify it.
For example:
- make vertical strokes thicker
- remove tiny gaps
- widen the center of M
- simplify the diagonal section of A
The graph should work visually before you crochet a single block.
Step 11 — Center the Name Vertically
For a 60-row graph, position the 9-row name approximately around:
Rows 26–34
That places it close to the vertical center.
You can move it a few rows upward if you want to add a larger motif underneath.
Step 12 — Add Optional Hearts
Small hearts make a personalized baby blanket feel finished without adding complicated colorwork.
Place one heart:
- upper-left
- lower-right
or use four smaller hearts near the corners.
Simple 7 × 6 Heart Graph
 XX XX
XXXXXXX
XXXXXXX
 XXXXX
  XXX
   X
Use:
- dusty rose
- or muted sage
Do not place hearts too close to the actual blanket edges.
Keep at least:
4–5 background blocks
around each motif.
Step 13 — Keep the Design Simple
It can be tempting to add:
- stars
- hearts
- flowers
- dates
- initials
- borders
- animals
all to the same graph.
Don’t.
The personalized name should remain the visual focus.
A strong first design might contain only:
name + 2 hearts
That is enough.
Step 14 — Check the Total Color Changes
Zoom through the diagonals.
Look for places where you would need to work:
1 pink block → 1 cream → 1 pink → 1 cream
repeatedly.
That is possible, but excessive one-block changes can create lots of yarn management.
Where it doesn’t hurt the letter shape, simplify tiny isolated areas.
Step 15 — Decide Which Corner to Start From
C2C can begin from different corners.
This matters because the direction determines how the chart is read and when your color changes appear.
Stitch Fiddle’s written-instruction system allows C2C users to choose which of the four corners they want to start from. (Stitch Fiddle)
For this example, choose the lower-right or lower-left corner based on which feels more natural for your crochet direction.
The important thing is to use the same orientation for:
chart + written instructions + actual blanket
Step 16 — Generate Written Instructions
Once the graph is finished, go to:
File → Written Instructions
Stitch Fiddle can convert C2C charts into row-by-row color instructions. (Stitch Fiddle)
You can assign simple abbreviations such as:
C
Cream
R
Dusty Rose
S
Sage
Then a diagonal row might read conceptually like:
C 8, R 4, C 10
instead of requiring you to count every colored square manually.
What Does “Corner” Mean in C2C Instructions?
Stitch Fiddle uses the word:
Corner
to indicate where the C2C construction changes between increasing and decreasing. (Stitch Fiddle)
This matters especially with a rectangle.
A rectangular C2C blanket reaches one corner before the other, so one edge may begin decreasing while the other edge still increases.
Step 17 — Use the Progress Tracker
A 48 × 60 graph contains many diagonal rows.
Keeping your place can become harder once the letters begin.
Stitch Fiddle provides a progress tracker specifically to help follow charts while working. (Stitch Fiddle)
Use it to mark completed diagonals instead of repeatedly trying to remember:
Was I on Row 37 or 38?
Step 18 — Print or Save Your Chart
You can also download the finished chart.
Stitch Fiddle supports printable formats and can split large charts across multiple pages so the grid is easier to read. (Stitch Fiddle)
For a name blanket, I like having:
- one full-page overview
- written instructions
- digital tracker
Then you can switch between them when one method becomes easier than another.
PART 2 — CROCHET THE NAME BLANKET
Once your chart is complete, you can begin crocheting.
Use:
Color A
Warm Cream
Color B
Dusty Rose
Optional Color C
Muted Sage
Suggested Materials
For an approximately 31 × 38-inch baby blanket, start with:
- approximately 1,300–1,500 yards cream DK/light-worsted yarn
- approximately 250–350 yards dusty rose
- approximately 50–100 yards sage, optional
- 5 mm crochet hook
- yarn needle
- scissors
- stitch markers
- yarn bobbins, optional
Yardage varies significantly with:
- yarn
- block size
- tension
- number of contrast blocks
Having extra background yarn is recommended.
Begin at the First Corner
Using cream:
Ch 5.
Hdc in the third chain and next 2 chains.
You have:
1 C2C block
Turn according to your chosen chart orientation.
Increase According to the Graph
For each new diagonal:
Ch 5.
Hdc in third chain and next 2 chains.
Sl st into the next block’s ch-2 space.
Ch 2.
Work:
3 hdc
into that same space.
Continue until the diagonal contains the correct number of graph blocks.
How to Change Colors
When the next graph block changes from cream to dusty rose:
Begin the final hdc of the previous block normally.
When two loops remain on the hook:
Drop the old color.
Yarn over with the new color.
Pull the new color through the final two loops.
Now continue using the new yarn.
This creates a cleaner color transition.
Do Not Cut Yarn After Every Tiny Section
If the color will be needed again nearby, keep it attached.
For larger areas, use:
- separate yarn balls
- small bobbins
- butterfly bobbins
This is usually easier than carrying yarn over long distances.
When the First Pink Blocks Appear
Follow the graph exactly.
Remember:
One colored square = one complete C2C block.
Do not interpret one square as one hdc stitch.
Each block contains its entire little cluster.
Building the Lettering
At first, the dusty-rose blocks may look random.
That is normal.
Because C2C is worked diagonally, you don’t crochet one horizontal line of the letter at a time.
The letters gradually emerge as multiple diagonal rows intersect.
After several rows of contrast color, the word becomes much easier to recognize.
Managing Several Yarn Sections
A letter such as M may create multiple pink areas on the same diagonal.
Instead of dragging one yarn strand across a large cream section, use separate small rose yarn sources.
For example:
Rose Bobbin 1 → left stroke
Rose Bobbin 2 → middle section
Rose Bobbin 3 → right stroke
This keeps the back much cleaner.
Avoid Tangled Bobbins
After every completed diagonal:
Lay the project down.
Turn each bobbin back into position.
Do not continually rotate the entire blanket in the same direction.
That is how several color strands become twisted together.
Reaching the First Corner
Because the sample graph is rectangular:
48 blocks wide × 60 blocks tall
one dimension will stop increasing before the other.
Follow your Stitch Fiddle instructions carefully.
At the indicated corner, begin decreasing on that edge while continuing to increase on the opposite edge until the second dimension reaches its full size.
Finishing the Second Half
Eventually both sides begin decreasing.
Continue following the chart until only:
1 final block
remains.
Fasten off.
Check the Name Before Adding the Border
Lay the blanket flat.
Look at it from several feet away.
The name should be:
- centered
- readable
- proportional
- surrounded by generous cream background
If you used hearts, check that they visually balance rather than compete with the lettering.
PART 3 — SIMPLE BABY BLANKET BORDER
A simple border keeps the personalized graph as the focus.
Use warm cream.
Border Round 1
Join cream at any corner.
Ch 1.
Work sc evenly around the entire blanket.
Along the C2C edges, aim for approximately:
2 sc per C2C block
Adjust slightly if necessary so the border lies flat.
At each corner work:
3 sc
Join with sl st.
Border Round 2
Ch 1.
Hdc in every stitch around.
At each corner:
3 hdc
Join.
Border Round 3
Switch to dusty rose.
Ch 1.
Sc in every stitch around.
At each corner:
3 sc
Join.
Fasten off.
Optional Fourth Round
Switch back to cream.
Work one relaxed round of:
sc in BLO
around the blanket.
Work:
3 sc
at each corner.
This adds a subtle raised finish without distracting from the name.
Finished Size
Your actual measurement depends on your C2C block gauge.
With blocks around:
0.6 inch
a:
48 × 60
graph produces approximately:
29 × 36 inches
before border.
With a wider border, expect approximately:
31 × 38 inches
Your blanket may be larger or smaller.
How to Make a Larger Baby Blanket
Keep the name the same size but increase the graph to:
54 × 66 blocks
Add the extra blocks as background around the design.
This is better than simply enlarging every letter because it preserves comfortable margins.
How to Make a Toddler Blanket
Try approximately:
60 × 75 blocks
using your gauge to determine actual finished size.
You can make the lettering:
- slightly larger
- or leave it unchanged and create more background space
How to Design a Longer Name
Names like:
CHARLOTTE
need much more horizontal room than EMMA.
You have three choices.
Option 1
Make narrower letters.
Option 2
Use a wider graph.
Option 3
Make letters slightly shorter and place them on two lines.
Avoid squeezing letters together until they become difficult to read.
Two-Line Name Design
For a longer name, you can also use:
FIRST
and:
MIDDLE
on separate lines.
Keep at least:
4–6 rows of background
between the two lines.
This prevents them from visually merging.
Initial Blanket
For an even simpler project, use one giant letter.
For example:
E
in the center.
Make the initial approximately:
18–24 blocks tall
depending on graph size.
Then add:
- small hearts
- stars
- simple geometric corner motifs
This is easier to crochet than a full name and makes a strong personalized gift.
Wedding Name Blanket
Use the same method for:
THE SMITHS
or:
A + J
with a date underneath.
Keep the color palette elegant:
- ivory + taupe
- cream + sage
- oatmeal + charcoal
- ivory + dusty blue
For dates, use a smaller block font beneath the main lettering.
Christmas Name Blanket
Use:
- cream background
- deep red name
- small dark-green trees or stars
The same blank-grid workflow works without needing to create an entirely new technique.
Best Letter Shapes for C2C
The easiest letters contain:
- strong vertical lines
- strong horizontal lines
- thick diagonals
Easy examples include:
- E
- F
- H
- I
- L
- T
Letters such as:
- M
- N
- R
- S
- W
may require more pixel cleanup to remain readable.
Always zoom out before finalizing them.
Should the Letters Be One Block Thick?
Usually not for a blanket.
A one-block-wide line can look delicate on-screen but may disappear visually once the blanket is viewed from across a room.
For a medium-size C2C name blanket, use strokes approximately:
2 blocks thick
where space allows.
This creates stronger lettering.
Why Margins Matter
Imagine the word touches the edge of the blanket.
Even if the lettering is technically centered, it can feel cramped.
Try to leave at least:
5–8 background blocks
between the name and each side.
More space often makes the personalized design look more professional.
What If the Name Looks Backward?
This is usually an orientation problem.
Before crocheting, check:
- chart orientation
- chosen starting corner
- letter direction
- written-instruction direction
Stitch Fiddle allows different C2C starting corners, so choose yours before starting and keep it consistent. (Stitch Fiddle)
What If My Blanket Is Much Larger Than Expected?
Your C2C blocks are larger than the size used in your calculation.
This is why the gauge swatch must come first.
Do not simply assume:
50 graph squares = 50 inches
or any other fixed conversion.
The project size depends on your block gauge.
What If the Name Looks Too Tall?
Your block proportions or design proportions may be making the letters visually narrow.
Try:
- widening the letters
- reducing their height
- increasing horizontal spacing inside curved letters
- making a test swatch containing one letter first
What If My Color Changes Look Messy?
Change colors on the last yarn-over of the previous stitch.
Also consider using separate bobbins rather than carrying yarn behind large areas.
Weave in tails toward areas of the same color whenever possible.
What If I Have Too Many Ends?
A personalized graph naturally creates more ends than a one-color blanket.
Reduce them by:
- keeping colors attached when reused nearby
- using bobbins
- avoiding unnecessary one-block details
- simplifying the graph before crocheting
Do not sacrifice readability just to eliminate every yarn tail.
Should I Add a Name and Date?
You can, but make the name dominant.
A good hierarchy is:
NAME — large
DATE — small
For example:
EMMA
then a much smaller date beneath it.
If the date makes the graph crowded, place it on a small separate crochet label instead.
Can I Sell Personalized Blankets Made From My Own Graph?
If you designed the lettering and motifs yourself, the resulting chart is your own design work.
Be careful when using:
- copyrighted characters
- company logos
- sports logos
- trademarked designs
- artwork created by someone else
Simple names, initials, geometric motifs, and original decorations are much safer foundations for personalized crochet.
Baby Blanket Finishing
For baby projects, avoid attaching:
- buttons
- beads
- bells
- long fringe
- loose tassels
- detachable decorations
Weave every yarn end securely.
Wash the blanket according to the yarn label before gifting.
Handmade blankets are best used for supervised cuddling, tummy time, stroller use, or decoration rather than as loose bedding during unattended infant sleep.
My Favorite Simple Layout
For a first personalized C2C blanket, keep it this simple:
Graph
48 × 60
Background
Warm cream
Name
Dusty rose
Decoration
2 small dusty-rose hearts
Border
Cream → cream → dusty rose
That’s enough.
The name remains the visual focus, and the crochet doesn’t turn into a battle with ten different yarn colors.
Frequently Asked Questions
Do I need to upload a picture?
No.
For a name graph, begin with an empty C2C chart and draw the letters directly.
Does one Stitch Fiddle square equal one C2C block?
For a C2C graph, yes—the grid squares represent the C2C blocks you follow in the project. (Stitch Fiddle)
Can Stitch Fiddle generate the C2C rows?
Yes. C2C charts can be converted into written instructions, and you can choose the starting corner. (Stitch Fiddle)
Should I use C2C double crochet or half double crochet?
Either can work.
For a baby name blanket, I like hdc C2C because the smaller blocks can make pixel lettering look more compact.
Make a swatch before committing.
How many colors should I use?
Two is enough:
background + lettering
Add a third only if it improves the design.
How large should the letters be?
For the 48 × 60 example, approximately:
9–12 blocks tall
works well for a centered name.
Longer names may need narrower letters or a larger graph.
Do I need Stitch Fiddle Premium?
A personalized 48 × 60 C2C chart is far below Stitch Fiddle’s current free grid limit, so you can begin without needing a huge chart. Stitch Fiddle currently lists a free maximum of 300 × 300 for picture/grid work. (Stitch Fiddle)
Check the current plan features if you want additional tools beyond the basic graph workflow.
Final Thoughts
A personalized C2C blanket doesn’t need an elaborate photograph or a complicated premade pattern.
Start with a blank grid.
Choose a name.
Draw strong block letters.
Center them.
Add one or two simple decorations.
Then let the C2C construction turn those little colored squares into a real blanket.
The useful part is that once you’ve created one layout you like, the idea becomes endlessly reusable:
EMMA → OLIVIA → NOAH → initials → wedding names → family names → holiday gifts
You are no longer searching for the exact personalized blanket pattern you want.
You can build the graph yourself.



