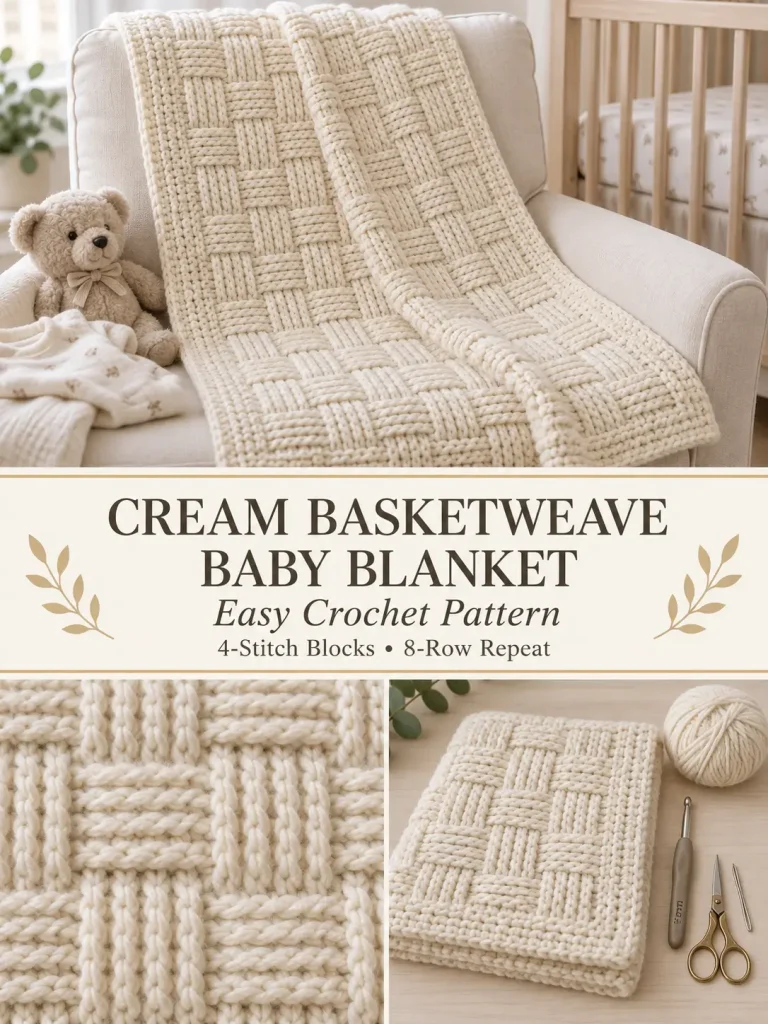
This cream crochet baby blanket uses raised post stitches to create a deep woven basket texture that looks much more complicated than the actual repeat.
The blanket is worked as one large rectangle using alternating groups of front-post and back-post double crochet. Every four rows, the stitch groups switch direction, creating the illusion that thick crochet bands are weaving over and under each other.
This version uses a simple original 8-stitch, 8-row basketweave repeat, so once the first few rows are established, the blanket becomes wonderfully rhythmic to crochet.
Pattern at a Glance
Skill level: Advanced beginner / intermediate
Terminology: US crochet terms
Finished size: Approximately 35 × 41 inches
Yarn weight: Worsted / Category 4
Hook: 5 mm
Construction: Worked flat in rows
Main stitch repeat: 8 stitches
Main row repeat: 8 rows
Foundation: 114 stitches
Border: 4 simple rounds
Color: Warm cream / ivory
Materials
You will need:
- approximately 1,500–1,700 yards worsted-weight yarn
- 5 mm crochet hook
- yarn needle
- scissors
- stitch markers
- measuring tape
- blocking mats, optional
Choose a soft washable yarn suitable for baby items.
Good fibers include:
- soft acrylic
- washable wool blend
- cotton/acrylic blend
- smooth anti-pilling yarn
A smooth yarn is best because it keeps the raised basketweave texture visible.
Suggested Color
For the classic version:
Warm Cream / Soft Ivory
The texture also looks beautiful in:
- oatmeal
- pale beige
- dusty sage
- light gray
- powder blue
- muted peach
- dusty rose
- soft lavender
A solid color lets the stitch pattern do all the visual work.
Gauge
In the basketweave pattern:
14 stitches × approximately 10 rows = 4 inches
Gauge does not have to be absolutely exact for a blanket, but it will change the finished size and yarn usage.
Finished Measurements
Approximately:
35 inches wide × 41 inches long
including the border.
The main body measures approximately:
33 × 39 inches
before the border.
Abbreviations
- ch = chain
- dc = double crochet
- sc = single crochet
- hdc = half double crochet
- FPdc = front post double crochet
- BPdc = back post double crochet
- sl st = slip stitch
- st = stitch
- sts = stitches
- rep = repeat
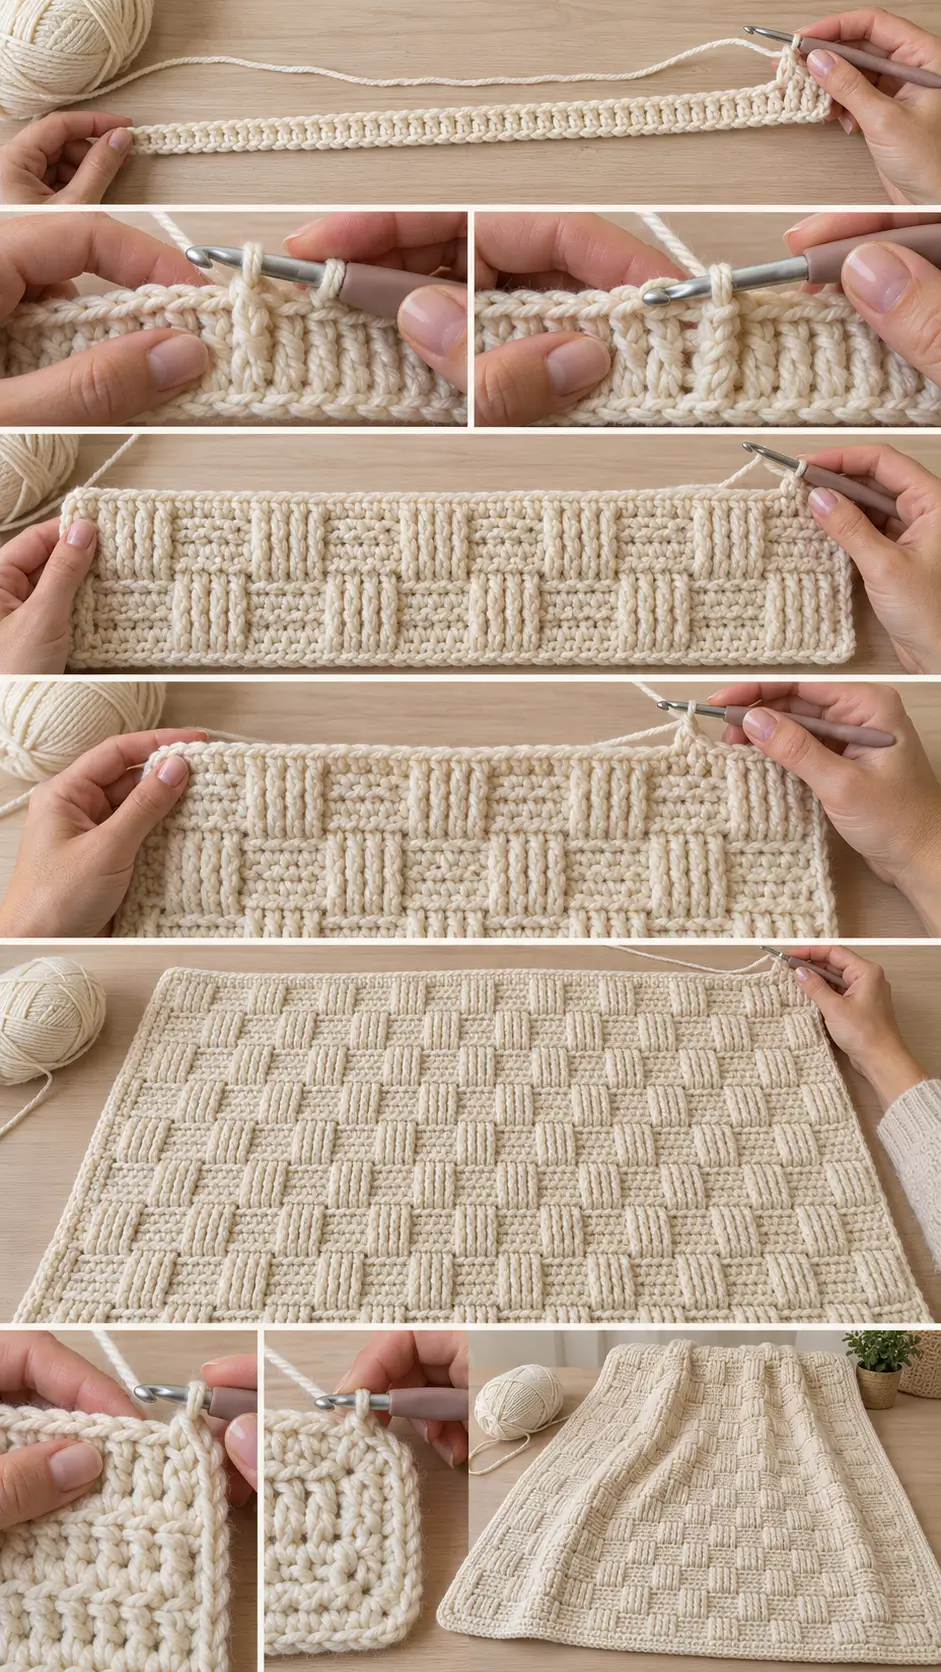
Important Turning Chain Rule
At the beginning of every row:
Ch 2 and turn.
The ch-2 does not count as a stitch.
Work the first actual stitch into the first stitch of the row.
This keeps the edges straighter and makes counting easier.
Front Post Double Crochet — FPdc
Yarn over.
Insert the hook from front to back to front around the post of the next stitch.
The body of the stitch should sit in front of your hook.
Yarn over and pull up a loop.
Complete a normal double crochet:
- yarn over, pull through 2 loops
- yarn over, pull through 2 loops
The finished stitch pushes forward toward you.
Back Post Double Crochet — BPdc
Yarn over.
Insert the hook from back to front to back around the post of the next stitch.
The body of the stitch should sit behind your hook.
Yarn over and pull up a loop.
Complete a normal double crochet.
The finished stitch recedes toward the back.
How the Basketweave Works
The center of the blanket contains:
112 basketweave stitches
That divides into:
14 repeats of 8 stitches
Each repeat contains:
4 stitches raised forward + 4 stitches pushed backward
After four rows, those positions reverse.
That creates the woven illusion.
Two ordinary double crochets—one at each edge—help keep the blanket straight.
Total stitch count:
114 stitches
throughout.
FOUNDATION
Using cream yarn:
Ch 116.
Row 1 — Base Row
Dc in the third chain from the hook.
The two skipped chains do not count as a stitch.
Dc in every remaining chain across.
You should have:
114 dc
Ch 2.
Turn.
ROWS 2–5 — FIRST BASKET BLOCK
Dc in the first stitch.
Across the center repeat:
FPdc around each of next 4 sts
then:
BPdc around each of next 4 sts
Repeat this 8-stitch sequence:
14 times
Dc in the final stitch.
114 sts
Ch 2.
Turn.
Repeat the Same Arrangement
Work Rows:
2, 3, 4 and 5
with the exact same post placement.
That means whenever you see the established raised group, continue working FPdc around those same four posts.
Continue BPdc around the same four recessed posts.
After four rows, you should clearly see rectangular raised basket sections.
ROWS 6–9 — REVERSE THE WEAVE
Now reverse the stitch groups.
Dc in first stitch.
Across the center repeat:
BPdc around each of next 4 sts
then:
FPdc around each of next 4 sts
Repeat:
14 times
Dc in final stitch.
114 sts
Ch 2.
Turn.
Work this same reversed arrangement for:
Rows 6, 7, 8 and 9.
First Complete Basketweave Repeat
You have now completed:
8 pattern rows
The fabric should show alternating raised rectangular blocks.
The visual pattern should resemble:
forward block → recessed block → forward block → recessed block
for four rows,
then:
recessed block → forward block → recessed block → forward block
for the next four rows.
This creates the woven appearance.
ROWS 10–97
Repeat:
Rows 2–9
until you have completed:
97 total rows including Row 1
For the written sample, this gives approximately 39 inches of body length before adding the border.
If your row gauge differs, simply continue until the blanket reaches your preferred length.
For the cleanest finish, stop after completing a full 8-row basketweave repeat.
Important Stitch Count
Every row must contain:
114 stitches
Count periodically.
The post stitches do not increase or decrease the fabric.
Each FPdc or BPdc replaces one ordinary stitch position.
What the Finished Texture Should Look Like
The blanket should have:
- thick raised vertical sections
- recessed neighboring sections
- alternating rectangular blocks
- strong woven appearance
- dense, warm fabric
- no open holes
- straight sides
The texture is reversible in the sense that both sides are attractive, although the raised pattern appears inverted on the back.
PART 2 — PREPARE FOR THE BORDER
After completing the final body row:
Do not fasten off if you are already positioned conveniently for the border.
Otherwise fasten off and rejoin yarn at any corner.
Switching to a slightly larger hook is optional if your border tends to pull inward.
BORDER ROUND 1
Using the 5 mm hook:
Ch 1.
Sc evenly around the entire blanket.
Across the top:
1 sc in each stitch
At the first corner:
3 sc
Along the side:
Work approximately:
2 sc around every 3 row ends
Adjust slightly as necessary so the edge lies flat.
At the bottom corner:
3 sc
Across the foundation edge:
Work 1 sc into each foundation stitch.
Continue around the remaining side.
At every corner:
3 sc
Join with sl st to first sc.
Check the Border
Lay the blanket flat.
If the border pulls inward:
Add slightly more stitches along the long sides.
If the border ripples:
Use fewer side stitches.
The first border round determines whether the finished edge will lie flat, so adjust now if necessary.
BORDER ROUND 2
Ch 1.
Sc in every stitch around.
At each corner, work:
3 sc in the center corner stitch
Join with sl st.
BORDER ROUND 3
Ch 2.
Hdc in every stitch around.
At each corner:
3 hdc
Join with sl st.
BORDER ROUND 4
Ch 1.
Sc loosely in every stitch around.
At each corner:
3 sc
Join.
Fasten off.
Optional Ribbed Final Border
If you want the border to echo the raised blanket texture, work Round 4 through the:
back loop only
This creates a subtle raised ridge around the edge.
Weaving in Ends
Thread each yarn tail onto a yarn needle.
Weave:
- several stitches in one direction
- then back in another direction
Trim only after the tail is secure.
Because a baby blanket will likely be washed frequently, make sure every end is woven in thoroughly.
Blocking
Light blocking helps straighten the edges and even out the basketweave blocks.
Follow the care instructions for your yarn.
For washable yarn:
- Lightly dampen the blanket.
- Lay it flat.
- Shape it to approximately 35 × 41 inches.
- Straighten each edge.
- Allow it to dry completely.
Do not aggressively stretch the raised texture.
How to Resize the Blanket
The center basket pattern uses:
a multiple of 8 stitches
plus:
2 edge stitches
So your total stitch count should follow:
8 × number of repeats + 2
Then add 2 extra chains for the beginning turning chains when using this foundation method.
Smaller Stroller Blanket
Use:
12 repeats
12 × 8 = 96
Add 2 edge stitches:
98 stitches
Foundation chain:
100
At gauge, this produces a body approximately:
28 inches wide
Add the border for a finished width around:
30 inches
Written Baby Blanket
Use:
14 repeats
14 × 8 = 112
Add 2:
114 stitches
Foundation:
116 chains
Finished width approximately:
35 inches
with border.
Larger Crib / Toddler Blanket
Use:
16 repeats
16 × 8 = 128
Add 2:
130 stitches
Foundation:
132 chains
Finished width approximately:
39 inches
after adding the border.
Larger Throw
Use:
20 repeats
20 × 8 = 160
Add 2:
162 stitches
Foundation:
164 chains
Continue the blanket until approximately:
52–58 inches long
depending on your preferred throw size.
Changing the Basket Block Size
The written pattern uses:
4 FPdc + 4 BPdc
and changes direction every:
4 rows
This creates medium-sized woven blocks.
You can change the look by changing the block size.
Smaller Basket Texture
Use:
3 FPdc + 3 BPdc
and reverse after:
3 rows
Your center stitch count must then be divisible by:
6
Larger Basket Texture
Use:
6 FPdc + 6 BPdc
and reverse after:
6 rows
Your center stitch count must then be divisible by:
12
Larger blocks create a chunkier architectural look.
Why the Texture Looks Woven
FPdc stitches sit forward.
BPdc stitches sit backward.
When several identical post stitches are grouped together, they create a raised strip.
After several rows, switching their positions creates another raised strip running visually across the first.
The eye interprets these alternating raised sections as:
over → under → over → under
which produces the basketweave illusion.
What If My Blanket Curls?
Minor curling can happen during the first few rows.
Usually it settles once the fabric grows.
If the blanket continues curling strongly:
- loosen your post stitches
- use a 5.5 mm hook
- block the finished blanket
- make sure the foundation chain is not too tight
What If the Bottom Edge Is Too Tight?
A tight starting chain can pull the entire bottom edge inward.
If your chains are naturally tight:
Make the foundation chain using a:
5.5 or 6 mm hook
Then switch back to the:
5 mm hook
for Row 1.
What If My Basket Blocks Lean?
Make sure you are always working around the correct post.
FPdc and BPdc should go around the post of the stitch directly below.
Do not accidentally skip one post and work around the next one.
Count each group:
1, 2, 3, 4
before switching stitch type.
What If I Lose Track of the Repeat?
Remember this simple rule:
Rows 2–5
4 FPdc, 4 BPdc
Rows 6–9
4 BPdc, 4 FPdc
Then repeat.
If the raised blocks suddenly continue for more than four rows, you probably forgot to reverse the groups.
What If My Edge Stitches Disappear?
The first and last stitch are always:
ordinary double crochet
They are not post stitches.
Using a stitch marker in the first and last stitch can make the edges much easier to track.
What If My Blanket Gets Wider?
The most common cause is accidentally working:
- the post stitch
- and then another stitch into the top of the same stitch
Do not do both.
A post stitch replaces the ordinary stitch.
If you work FPdc around one post, move directly to the next stitch position afterward.
What If the Raised Texture Is Not Strong Enough?
Try one of these:
- use a smooth yarn
- tighten the post stitches slightly
- choose a light solid color
- use wool or acrylic with good stitch memory
Very fuzzy yarn can hide the woven definition.
Can I Use DK Yarn?
Yes.
Try approximately:
4–4.5 mm hook
Your blanket will be lighter and the basket blocks will appear smaller.
Increase the number of repeats across if you want to maintain the same finished width.
Can I Use Bulky Yarn?
Yes.
Try approximately:
6–6.5 mm hook
The texture becomes very pronounced.
Because bulky yarn increases the blanket dimensions quickly, use fewer repeats across.
Make a swatch before choosing the starting chain.
Can I Make This With Cotton?
Yes.
Cotton gives very crisp stitch definition.
A cotton/acrylic blend is often a good compromise because it provides:
- definition
- softness
- easier washing
- slightly less weight
Pure cotton can make a large basketweave blanket quite heavy.
Can I Add Stripes?
Yes, although a solid color shows the texture most clearly.
One simple stripe arrangement is:
- 16 rows cream
- 8 rows dusty sage
- 16 rows cream
- 8 rows dusty sage
Always change colors at the beginning of a complete basketweave section when possible.
This keeps the color changes aligned with the texture.
Can I Use This Stitch for Other Projects?
Absolutely.
The same basketweave repeat works beautifully for:
- pillows
- scarves
- lap blankets
- throws
- stroller blankets
- tote panels
- cushion covers
- pet blankets
For smaller projects, simply reduce the number of 8-stitch repeats.
How Much Yarn Will I Need?
Approximate amounts:
Stroller Blanket
1,050–1,250 yards
Written Baby Blanket
1,500–1,700 yards
Toddler Blanket
1,900–2,200 yards
Throw
2,800–3,300 yards
Basketweave crochet uses more yarn than a flat double-crochet fabric because the post stitches travel around the stitch bodies and create substantial texture.
Baby Blanket Safety and Finishing
Keep the finished blanket free from:
- buttons
- beads
- long fringe
- loose tassels
- detachable embellishments
Check that all ends are securely woven in.
For infants, handmade blankets are best used for supervised cuddling, stroller time, tummy time, or decoration rather than as loose bedding during unattended sleep.
Frequently Asked Questions
Is basketweave crochet difficult?
The individual stitches are straightforward once you understand FPdc and BPdc.
The main challenge is remembering when to reverse the stitch groups.
After a few repeats, the pattern becomes very repetitive.
Do I crochet into the tops of the stitches?
For the main basketweave area, no.
You work around the posts of the stitches.
Only the first and last edge stitches are worked as ordinary dc.
Is the blanket reversible?
Both sides are attractive.
The raised and recessed sections simply appear opposite on the reverse side.
Do I have to block it?
No, but blocking helps:
- straighten the edges
- even out the woven blocks
- relax small tension differences
- give the border a polished finish
Why use cream yarn?
Light solid colors create natural shadows around the post stitches.
Those shadows make the woven effect especially easy to see.
Final Thoughts
The best part of this blanket is that the texture looks considerably more complicated than the repeat actually is.
For four rows you work:
4 front post stitches → 4 back post stitches
Then for the next four rows you reverse them:
4 back post stitches → 4 front post stitches
That simple switch creates the illusion of broad crochet bands weaving over and under one another.
Once the first basket blocks appear, the pattern becomes easy to recognize without constantly checking the instructions.
The result is a warm, substantial cream baby blanket with enough texture to feel special while still using a repeat you can settle into and enjoy.




This looks beautiful. I’m only a very basic crocherer, but could understand the pattern. I can’t wait to try it.