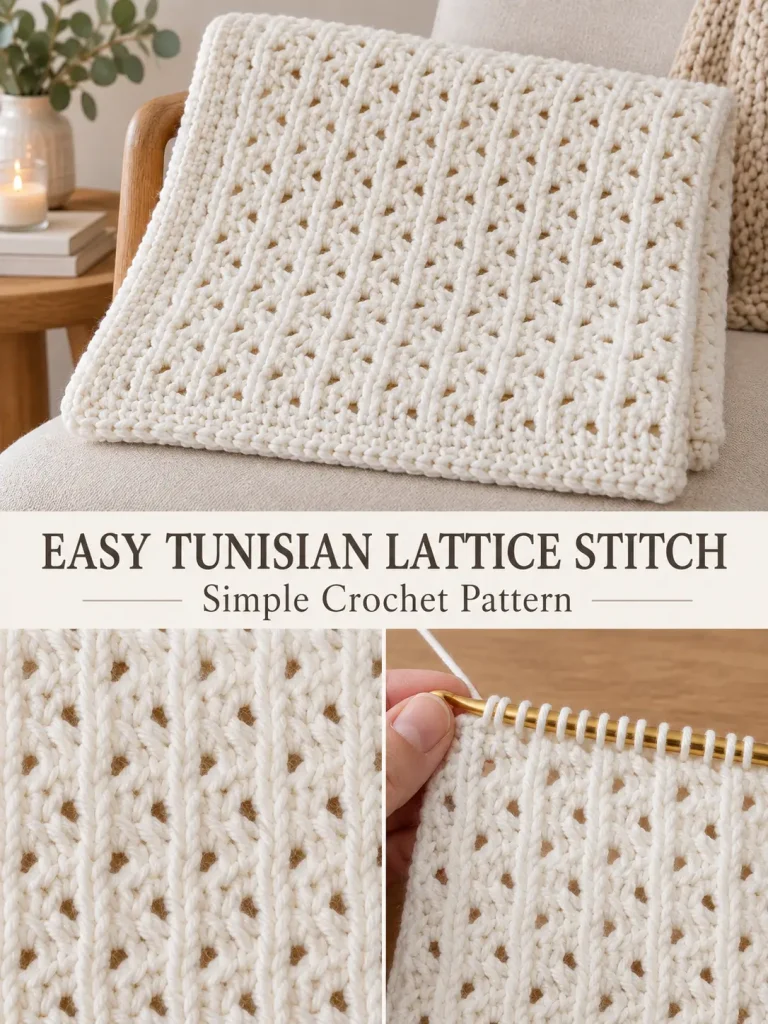
This airy Tunisian crochet stitch creates long vertical columns broken by small diagonal openings, giving the fabric a beautiful woven-lace appearance.
The texture looks intricate, but the pattern is built from only a few Tunisian crochet techniques: Tunisian simple stitch, yarn overs, and working two Tunisian stitches together.
The alternating lace rows shift the openings from side to side, while plain Tunisian simple stitch rows keep the fabric stable and create the long vertical lines.
This stitch works especially well for:
- baby blankets
- lightweight throws
- scarves
- wraps
- cushion covers
- summer tops
- decorative panels
- table runners
Skill Level
Confident Beginner / Intermediate Tunisian Crochet
The pattern is repetitive once established, but you should already understand how to work a Tunisian forward pass and return pass.
Materials
For a practice swatch:
- Medium weight #4 yarn
- 6.5 mm Tunisian crochet hook
- Tunisian hook with cable for wider projects
- Yarn needle
- Scissors
- Stitch markers, optional
- Measuring tape
Using a Tunisian hook larger than a standard crochet hook for the same yarn helps the fabric stay softer and reduces curling.
Abbreviations — US Terms
ch – chain
yo – yarn over
Tss – Tunisian simple stitch
Tss2tog – Tunisian simple stitch 2 together
st(s) – stitch(es)
RetP – return pass
Tunisian Crochet Basics
Unlike ordinary crochet, each Tunisian row has two stages:
- Forward pass: loops are collected on the hook.
- Return pass: those loops are worked back off the hook.
Do not turn the work after each row.
The right side normally remains facing you throughout the project.
Special Stitches
Tunisian Simple Stitch — Tss
Insert the hook from right to left under the front vertical bar of the next stitch.
Yarn over and pull up one loop.
Leave that loop on the hook.
Tunisian Simple Stitch 2 Together — Tss2tog
Insert the hook from right to left under the front vertical bars of the next two stitches at the same time.
Yarn over and pull one loop through both vertical bars.
Leave the new loop on the hook.
Two existing stitches are therefore worked together into one loop.
The yarn over used beside this decrease replaces the lost loop so the stitch count stays unchanged.
Tunisian Yarn Over
Bring the yarn over the hook once and leave it there as a new loop.
Do not insert the hook into a stitch.
The yarn-over loop is treated like every other loop during the return pass.
This creates the small lace opening.
Standard Return Pass
Unless specifically stated otherwise, use this return pass after every forward pass.
Yarn over and pull through 1 loop only.
Then repeat:
yo, pull through 2 loops
until only one loop remains on the hook.
That remaining loop becomes the first loop of the next row.
Stitch Multiple
The pattern uses a foundation chain of:
multiple of 2 + 2 stitches
For example:
- 22 chains
- 30 chains
- 42 chains
- 62 chains
- 102 chains
- 126 chains
The extra stitches allow us to maintain clean side edges while repeating the lace pattern across the center.
Practice Swatch
For the tutorial sample:
Chain 30.
This gives enough width to clearly see the repeating lattice pattern.
Foundation Row
Foundation Forward Pass
Chain 30.
Starting in the second chain from the hook, insert the hook into the back bump of the next chain.
Yarn over and pull up a loop.
Continue pulling up one loop from the back bump of every remaining chain.
At the end you should have:
30 loops on the hook.
Using the back bumps produces a cleaner lower edge.
Foundation Return Pass
Yo and pull through 1 loop.
Then:
yo and pull through 2 loops
repeatedly until one loop remains.
Do not turn.
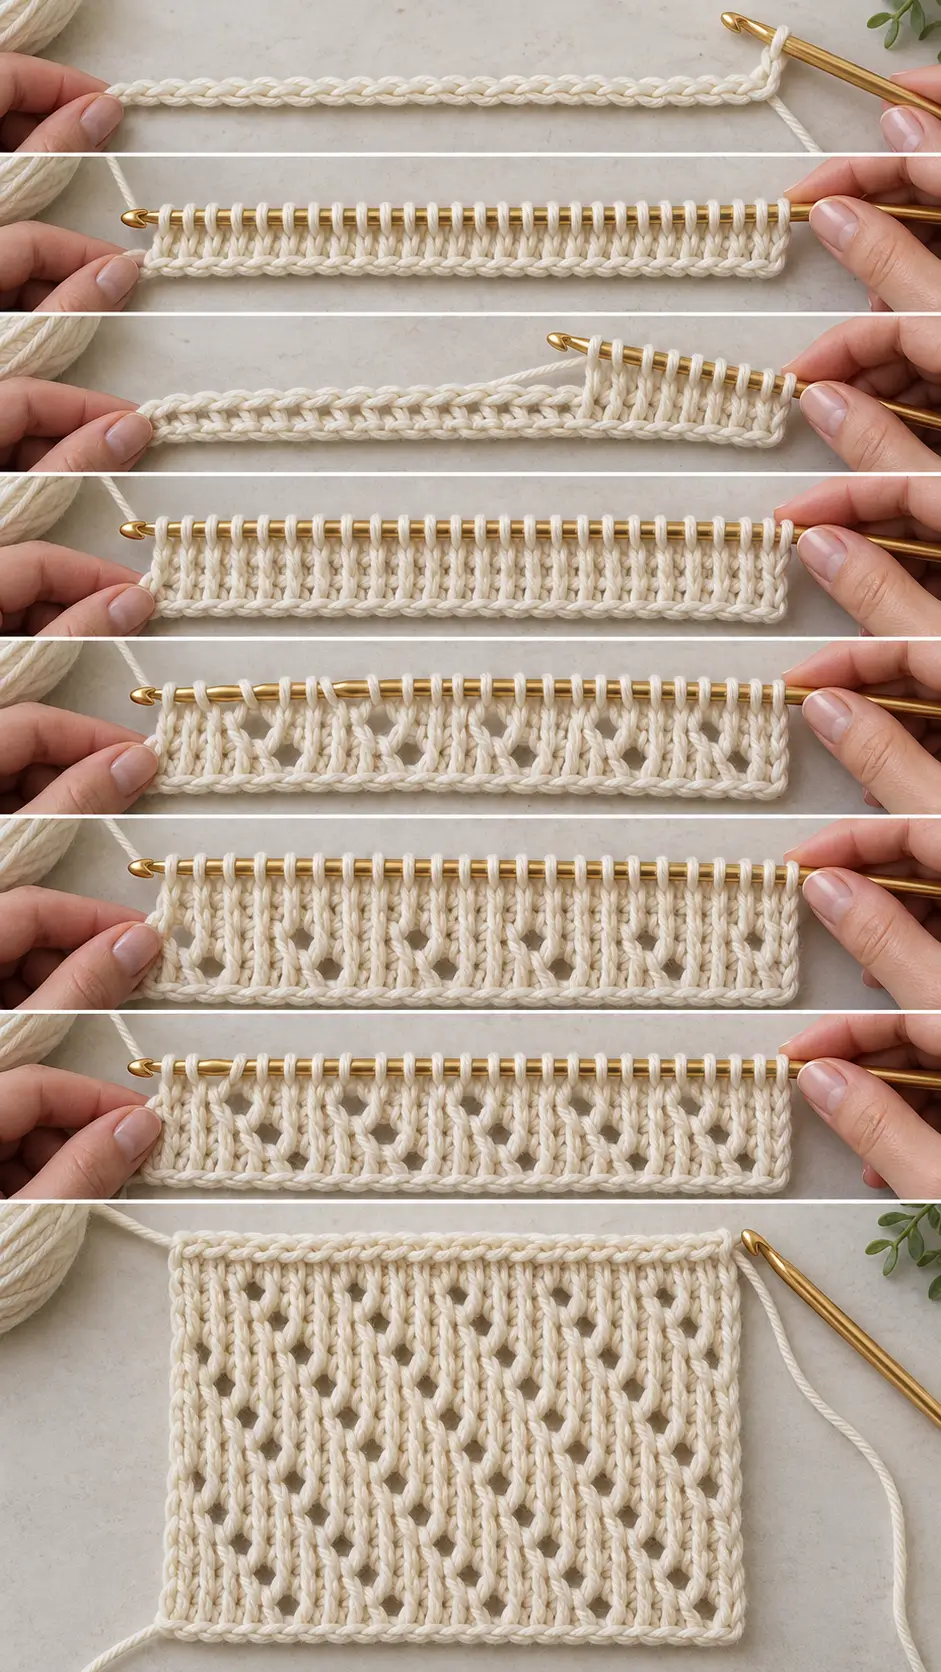
Row 1 — Tunisian Simple Stitch Setup
The first plain row creates stable vertical bars for the lace pattern.
Remember that the loop already on the hook counts as the first stitch.
Tss in each vertical bar across until only the final edge stitch remains.
For the last stitch, insert the hook under both vertical bars of the final stitch.
Yo and pull up a loop.
You should have the same number of loops you started with.
For the 30-stitch sample:
30 loops
Work the standard return pass.
Row 2 — Lace Row A
This row creates the first set of openings.
The first loop is already on the hook.
Across the center of the row repeat:
*yo, Tss2tog over the next 2 vertical bars*
Continue repeating from * to * until only the final edge stitch remains.
Work the last stitch by inserting the hook under both bars of the edge stitch.
Important
Every repeat uses two existing stitches and produces two new loops:
- 1 yarn-over loop
- 1 loop from Tss2tog
Therefore the overall stitch count stays the same.
For the sample you should still have:
30 loops
Work the standard return pass.
What You Should See
Small openings should begin appearing immediately before each paired decrease.
The vertical Tunisian bars remain visible between the openings.
Row 3 — Stabilizing Tunisian Simple Stitch Row
The plain row separates the lace sections and gives the fabric the strong vertical texture visible in the finished design.
Tss in every stitch across.
When working into the stitches created by the previous yarn overs, look carefully for the new vertical bars formed during the return pass.
Work the final stitch through both edge bars.
Maintain:
30 loops
Work the standard return pass.
Row 4 — Lace Row B
This time the placement is reversed so the openings shift to the opposite side.
Repeat across:
*Tss2tog over the next 2 vertical bars, yo*
Continue until the final edge stitch remains.
Work the last edge stitch through both vertical bars.
Maintain the same total number of loops.
Work the standard return pass.
What You Should See
The openings from Row 4 should sit slightly opposite the openings made in Row 2.
This alternating placement begins creating the subtle zigzag or lattice effect.
Row 5 — Tunisian Simple Stitch
Tss in every stitch across.
Work the final stitch through both edge bars.
Work the standard return pass.
Pattern Repeat
The complete stitch repeat is:
Row 2 — Lace A
Row 3 — Tss
Row 4 — Lace B
Row 5 — Tss
Repeat Rows 2–5 until the fabric reaches your desired length.
As more repeats are worked, the alternating yarn-over openings create narrow vertical lace columns with a gentle diagonal movement.
Keeping the Side Edges Straight
Tunisian crochet edges can become uneven if the first or last stitches are accidentally added or skipped.
The easiest method is:
- never work into the first vertical bar because the loop already on the hook represents that stitch
- always work the final stitch through both vertical bars
- count your loops every few rows
If you begin with 30 stitches, every completed forward pass should have:
30 loops
If you have 29 or 31, correct the mistake before continuing.
Why Tss2tog and Yarn Overs Are Paired
The lace effect depends on balancing increases and decreases.
A Tss2tog converts two stitches into one loop.
That would normally decrease the stitch count.
The yarn over adds one new loop.
Therefore:
Tss2tog + yo = no net change
This keeps the sides straight while creating an intentional opening.
How to Recognize a Yarn-Over Stitch
After completing the return pass, a yarn over looks slightly different from a standard Tunisian stitch.
It creates:
- a visible hole beneath it
- a looser vertical bar
- extra space between neighboring stitches
On the following plain row, work into the visible vertical bar associated with that yarn-over position just as you would any other stitch.
Do not skip it accidentally.
Example Baby Blanket
The stitch can easily be expanded into a blanket.
Using medium #4 yarn and a 6.5 mm Tunisian hook, make a gauge swatch first.
For a medium baby or lap blanket, a useful starting point is approximately:
Chain 102–126, depending on your gauge and preferred width.
Make sure your chosen number follows:
multiple of 2 + 2
Work the foundation row.
Work Row 1.
Then repeat Rows 2–5 until the blanket reaches the desired length.
Because yarn thickness and Tunisian tension vary considerably, measuring the actual fabric is more reliable than following an arbitrary row count.
Adding a Simple Crochet Border
Tunisian fabric often benefits from a border because it helps stabilize the edges and gives the project a polished finish.
After completing your final pattern repeat, work a closing row first.
Closing Row
Insert the hook as for Tss in the next stitch.
Yo and pull the yarn through both:
- the stitch
- the loop already on the hook
You have made a slip-stitch-style closing stitch.
Repeat across.
For the final edge stitch, insert under both vertical bars and complete the same closing stitch.
Fasten off.
Border Round 1
Switch to a standard crochet hook if desired.
Attach yarn at any corner.
Ch 1.
Work sc evenly around all four sides.
Along the top and bottom, work approximately one sc per stitch.
Along the long Tunisian edges, distribute the stitches evenly without crowding.
At each corner work:
3 sc
Join with a sl st.
Border Round 2
Ch 1.
Sc in every stitch around.
At each corner work:
3 sc in the center corner stitch
Join with a sl st.
Fasten off.
A simple border works especially well because the Tunisian lattice already provides plenty of visual texture.
Optional Wider Border
For a blanket, you can continue working additional rounds of:
- single crochet
- half double crochet
- moss stitch
- simple shells
Keep the border relatively understated so the central Tunisian texture remains the main feature.
How to Make the Fabric Wider
The width is easy to adjust.
Simply add or remove foundation chains in multiples of 2 while keeping the extra edge structure.
For example:
If 102 stitches is too narrow, try:
110, 118, 126, or 134 stitches
Make a gauge swatch first and calculate the width from your own tension.
How to Make the Fabric Longer
Simply continue repeating:
Rows 2–5
until the project reaches the desired length.
Always finish after a plain Tunisian simple stitch row if you want a particularly clean top edge.
Best Yarn for This Tunisian Stitch
The texture is easiest to see in a smooth yarn with good stitch definition.
Good options include:
- cotton
- cotton blends
- smooth acrylic
- wool-acrylic blends
A solid or lightly heathered color usually shows the vertical lattice more clearly than heavily variegated yarn.
Cream and white give the stitch a particularly clean, airy appearance.
Choosing a Tunisian Hook
Tunisian crochet usually requires a hook larger than you might use for ordinary crochet with the same yarn.
For medium #4 yarn, approximately:
6–7 mm
is a useful starting range.
For blankets, use a Tunisian hook with a flexible cable so it can comfortably hold all the loops.
A short straight Tunisian hook may work for:
- scarves
- swatches
- narrow panels
but it will not hold enough stitches for a wide blanket.
Preventing Tunisian Crochet From Curling
Some curling along the lower edge is normal, especially with Tunisian simple stitch.
Several things help.
Use a Larger Hook
A looser fabric curls less than an extremely tight one.
Add a Border
The border adds weight and helps stabilize the edges.
Block the Finished Fabric
Blocking opens the lace holes and relaxes the vertical bars.
Avoid Extremely Tight Return Passes
If the return chains are pulled too tightly, the fabric can become stiff and curl more strongly.
Common Mistakes
Stitch Count Keeps Changing
The most likely cause is forgetting the yarn over beside a Tss2tog.
Every decrease must be balanced by a yarn over.
Count the loops before every return pass.
Lace Holes Disappear
Make sure the yarn over is a separate loop on the hook.
Do not immediately pull it through another loop.
Leave it on the hook until the return pass.
Fabric Becomes Wider
You may be accidentally working the first vertical bar.
Remember:
The loop already on the hook counts as the first stitch.
Start with the next vertical bar.
Fabric Becomes Narrower
Check that you are not accidentally skipping a yarn-over stitch on the following plain row.
Also make sure every Tss2tog is paired with one yarn over.
Edge Looks Loose
For the final stitch of every forward pass, insert through both vertical bars of the edge stitch.
This creates a much cleaner side edge than working through only one bar.
Fabric Is Too Dense
Increase the hook size.
The small eyelets should open naturally without the fabric feeling stiff.
Fabric Is Too Open
Move down one hook size or choose a slightly thicker yarn.
The vertical bars should still form visible columns between the holes.
Blocking the Finished Stitch
Blocking makes a noticeable difference with Tunisian lace.
After finishing:
- Weave in all yarn tails.
- Dampen the project according to the yarn care instructions.
- Lay it flat.
- Straighten the side edges.
- Gently open the lace columns with your fingers.
- Pin to the desired dimensions if appropriate.
- Allow it to dry completely.
Do not stretch aggressively.
The goal is to relax the fabric and make the repeating openings more even.
Color Ideas
Although the stitch looks beautiful in solid white, it also works well in other palettes.
Soft Neutral
Cream, oatmeal, or warm beige.
Baby Blanket
White, pale pink, soft blue, mint, or lavender.
Modern Home Decor
Charcoal, natural cream, sage, or terracotta.
Lightweight Wrap
Dusty rose, soft gray, muted teal, or ivory.
Striped Version
Change color after every complete four-row pattern repeat.
This creates horizontal color bands while preserving the vertical lace texture.
Project Ideas
Baby Blanket
Use soft washable yarn and finish with a simple single crochet border.
Lightweight Throw
Use a slightly larger hook to create more drape.
Scarf
A narrow foundation chain makes this stitch particularly easy to practice.
Wrap
Use lightweight yarn and a larger Tunisian hook for an airy fabric.
Cushion Cover
Use a smaller hook for a firmer version and place the Tunisian panel over a simple fabric lining.
Summer Top
A lightweight cotton yarn can turn the pattern into a breathable decorative panel.
Easy Tunisian Lattice Crochet Stitch
This stitch gets its impressive appearance from a very simple idea: decrease two Tunisian stitches together, replace the lost stitch with a yarn over, and then reverse the placement on the next lace row.
The plain Tunisian simple stitch rows between the lace sections preserve the strong vertical bars, while the alternating openings create the subtle woven lattice effect.
Once the four-row repeat becomes familiar, the pattern is straightforward enough for larger projects while still producing a fabric that looks much more complicated than the actual crochet technique.



