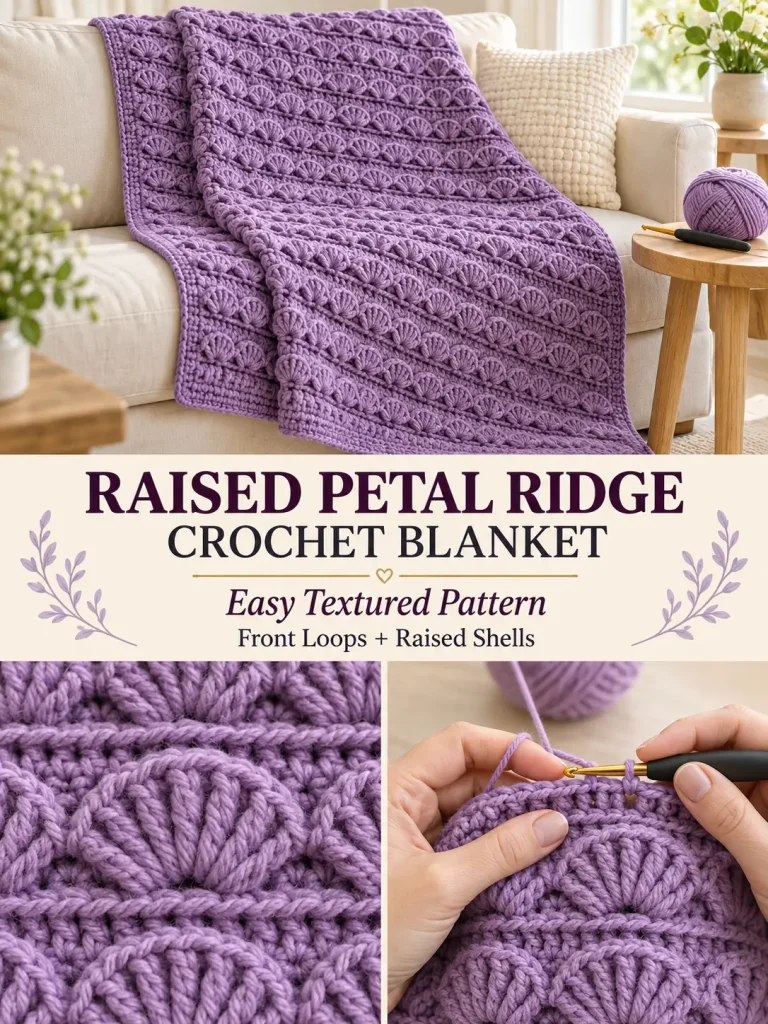
This textured crochet blanket uses a row of raised fan-shaped petals over a simple background, creating the dimensional look of overlapping shells or little folded leaves.
The effect looks elaborate, but the construction is surprisingly repetitive. The important trick is that each decorative petal row is worked into the front loops of a foundation row, while the next structural row is worked into the unused back loops behind the petals.
That keeps the blanket flat while allowing the shells to stand forward from the surface.
This version uses an original 6-stitch raised-petal repeat designed to create the same broad dimensional look while being easy to resize for blankets, scarves, wraps, cushion covers, and garment panels.
Pattern at a Glance
Skill level: Advanced beginner / intermediate
Terminology: US crochet terms
Construction: Worked flat in rows
Finished size: Approximately 36 × 48 inches
Yarn weight: Worsted / Category 4
Hook: 5 mm
Main repeat: 6 stitches
Petals across sample: 19
Color: Solid lavender
Border: Simple 3-round border
Materials
You will need:
- approximately 2,000–2,300 yards worsted-weight yarn
- 5 mm crochet hook
- yarn needle
- scissors
- stitch markers
- measuring tape
- blocking mats, optional
A smooth yarn works best because it keeps the raised petals clearly defined.
Good fibers include:
- mercerized cotton
- cotton/acrylic blend
- smooth acrylic
- smooth wool blend
Avoid very fuzzy yarn for your first version because it can hide the stitch structure.
Suggested Color
For the version shown here, use:
Rich Lavender / Orchid Purple
This texture also looks beautiful in:
- cream
- dusty rose
- sage green
- deep teal
- rust
- mustard
- charcoal
- soft blue
- burgundy
A solid color creates the strongest shadows around the raised petals.
Finished Measurements
Approximately:
36 inches wide × 48 inches long
including border.
The unbordered body should measure approximately:
34 × 46 inches
Your measurements may vary depending on yarn and tension.
Gauge
Approximately:
13–14 structural stitches = 4 inches
The decorative petal passes do not determine the blanket’s width because they sit on top of the underlying fabric.
For this particular design, finished dimensions are more important than matching gauge perfectly.
Abbreviations
- ch = chain
- sc = single crochet
- hdc = half double crochet
- dc = double crochet
- sl st = slip stitch
- FLO = front loop only
- BLO = back loop only
- st = stitch
- sts = stitches
- rep = repeat
Special Stitch — Raised Petal
The raised petal is worked into one front loop.
Work:
2 hdc, 5 dc, 2 hdc
all into the same front loop.
This creates:
9 stitches
inside one anchor point.
The slip stitches between petals pull the fabric back down and help each shell stand forward.
How This Pattern Is Constructed
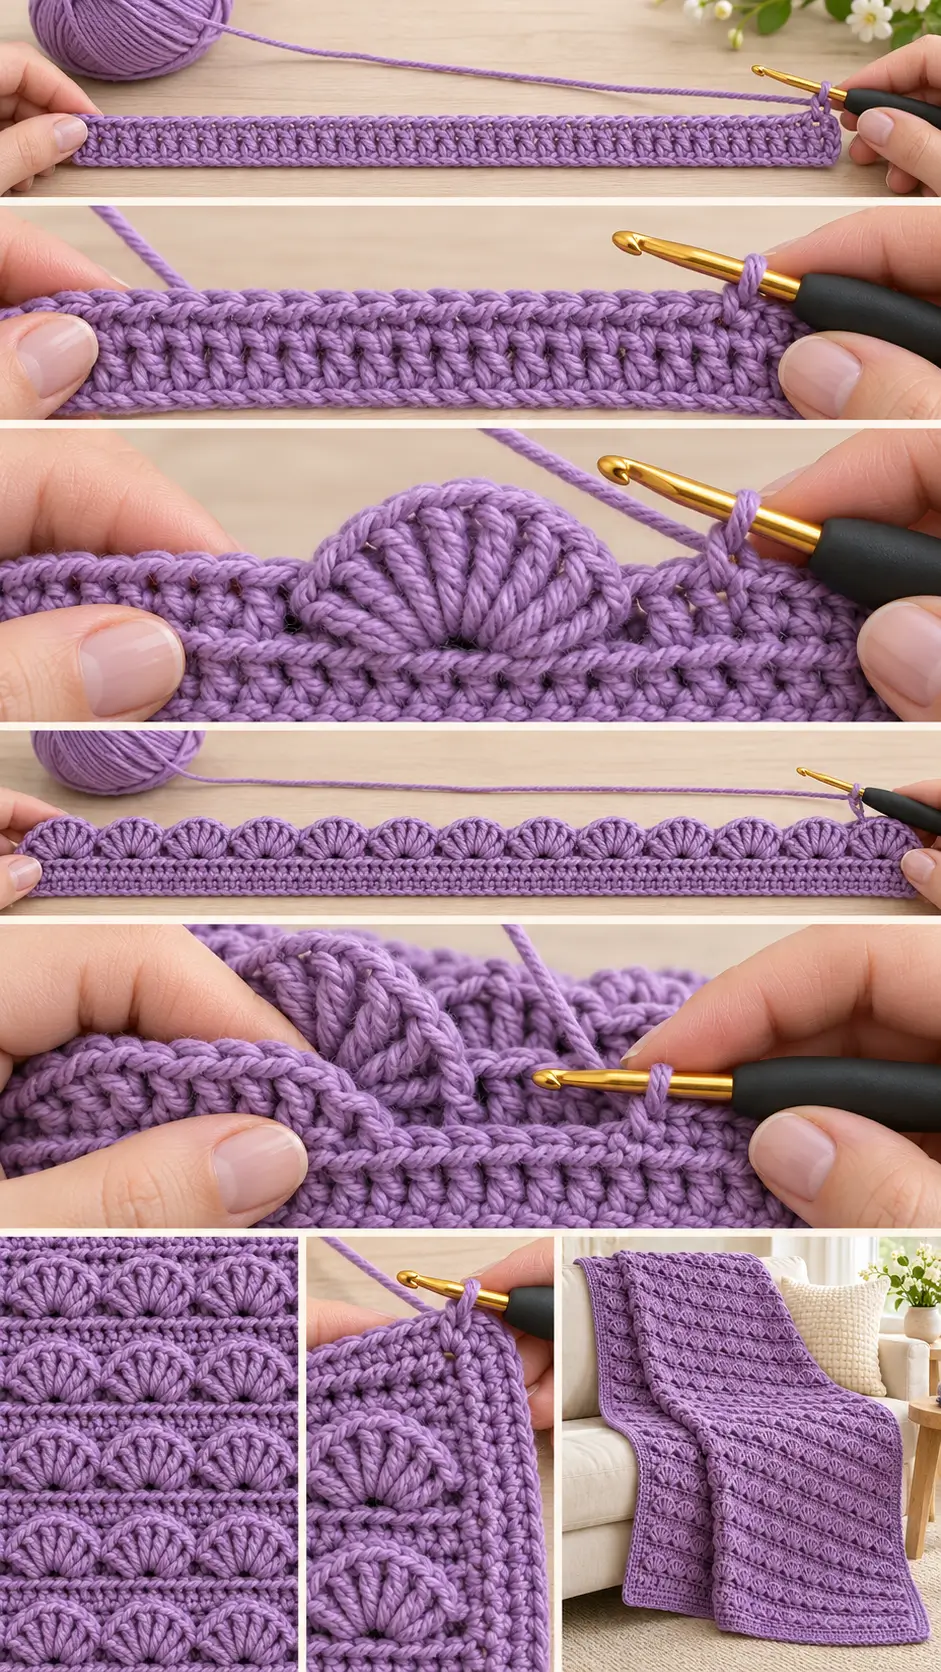
There are three important parts to each repeat.
1. Foundation Row
A regular row of sc creates the base.
2. Decorative Petal Pass
The petals are worked into the:
front loops only
of that sc row.
3. Structural Row
You turn the work and crochet into the unused:
back loops of that same sc row
behind the petals.
This means the petal row sits on the surface rather than replacing the main fabric.
That detail is what keeps the blanket from becoming excessively ruffled.
Stitch Multiple
The raised petal design uses:
Multiple of 6 + 1 stitches
For this blanket:
19 repeats × 6 = 114
Add 1:
115 stitches
Foundation
Using lavender yarn:
Ch 117.
Row 1 — Double Crochet Foundation
Dc in the third chain from the hook.
The skipped chains do not count as a stitch.
Dc in every remaining chain.
You should have:
115 dc.
Ch 1.
Turn.
Row 2 — Petal Foundation Row
Sc in every stitch across.
115 sc.
Do not fasten off.
Turn.
This sc row will support both the decorative petals and the next structural row.
Petal Pass 1
This pass is worked only into the front loops of Row 2.
Ch 1.
Sl st in the FLO of the first sc.
Now repeat:
Skip next 2 front loops.
Work into the FLO of the next stitch:
2 hdc, 5 dc, 2 hdc
Skip next 2 front loops.
Sl st in FLO of next stitch.
Repeat from:
skip 2 → petal → skip 2 → sl st
across.
You will make:
19 raised petals.
The final slip stitch lands in the final stitch of the row.
Important
Do not crochet through both loops during the petal pass.
You need the entire back loop of every stitch available for the next structural row.
The skipped front loops remain unused.
That is intentional.
Row 3 — Work Behind the Petals
Turn the work.
Gently fold the raised petals toward you so you can see the unused back loops of Row 2.
Ch 2.
The ch-2 does not count as a stitch.
Dc in the BLO of the first sc from Row 2.
Continue:
1 dc in every unused back loop across.
You should have:
115 dc.
The new row should sit neatly behind the petal ridge.
Ch 1.
Turn.
Check Your First Petal Ridge
From the right side, you should now see:
- one flat structural row
- one raised row of 19 shells
- a new solid row directly behind them
The petals should project slightly forward rather than lying completely flat.
They should not create a large ruffle in the blanket body.
Row 4 — Next Foundation Row
Sc in every dc across.
115 sc.
Turn.
Petal Pass 2
Work only in the front loops of Row 4.
Ch 1.
Sl st FLO in first stitch.
Repeat:
Skip 2 FLO, work 2 hdc + 5 dc + 2 hdc in FLO of next stitch, skip 2 FLO, sl st FLO in next stitch.
Repeat across.
19 petals.
Turn.
Row 5 — Structural Row
Working behind the new petals:
Ch 2.
Dc in the BLO of every stitch from Row 4.
115 dc.
Ch 1.
Turn.
Main Pattern Repeat
Continue repeating:
Foundation Row
Sc across.
Petal Pass
Sl st first FLO.
Repeat:
skip 2, raised petal, skip 2, sl st
across.
Structural Row
Dc across the unused BLO of the foundation row behind the petals.
Continue this sequence until the blanket body measures approximately:
46 inches long.
For the cleanest appearance, finish after completing a structural dc row.
Keeping the Petals Facing the Same Direction
The petals should all sit on the same side of the blanket.
That side becomes the:
Right Side.
Whenever you begin a decorative petal pass, check that you are working on the established right side.
If a petal ridge suddenly appears on the back, you have started the surface pass from the wrong side.
Making the Petals More Three-Dimensional
After completing several rows, use your fingers to gently shape each shell.
Push the center of the petal slightly forward while allowing the outer edges to curve backward.
Do not pull aggressively.
The yarn and stitch tension should create most of the shape naturally.
Optional More Pronounced Petal
If your yarn produces very flat shells, replace:
2 hdc, 5 dc, 2 hdc
with:
1 hdc, 2 dc, 5 tr, 2 dc, 1 hdc
This creates a taller shell.
Make a swatch first because the larger version uses significantly more yarn and produces a stronger three-dimensional effect.
Optional Smaller Petal
For a more subtle texture, work:
1 hdc, 5 dc, 1 hdc
instead.
This version works particularly well for scarves and garments.
Border
Once the body reaches approximately 46 inches, begin the border.
The decorative side remains the right side.
Border Round 1
With the right side facing:
Ch 1.
Sc evenly around the entire blanket.
Across the top and bottom:
Work approximately:
1 sc in each stitch
Along the side edges:
Work stitches evenly enough that the fabric lies flat.
At each corner:
3 sc.
Join with sl st to first sc.
Border Round 2
Ch 1.
Sc in every stitch around.
At each corner:
3 sc in the center corner stitch.
Join.
Border Round 3
Ch 2.
Hdc in every stitch around.
At each corner:
3 hdc.
Join with sl st.
Fasten off.
Optional Decorative Border
If you want the outside edge to echo the petal texture, add a very small shell border instead of Round 3.
Repeat around:
Skip 2 sts, 5 dc in next st, skip 2 sts, sl st in next st.
At the corners, adjust the spacing slightly so the shells sit flat.
A simple border is usually better if the blanket already has many raised petal rows.
Finishing
Weave in all yarn ends securely.
Because this texture uses raised elements, weave tails through several different directions rather than simply hiding them beneath one petal.
Trim after they are secure.
Blocking
Blocking improves the appearance considerably.
Lightly dampen the blanket or block according to the yarn manufacturer’s instructions.
Lay flat.
Straighten:
- top edge
- bottom edge
- side edges
- corners
Gently arrange the petals so they all face the same direction.
Allow the blanket to dry completely.
Do not flatten the petals aggressively.
How to Resize the Pattern
Use:
Multiple of 6 + 1 stitches.
Because the foundation begins with dc in the third chain from the hook, add:
2 additional chains.
Small Scarf
Use:
5 repeats
5 × 6 = 30
Plus 1:
31 stitches
Foundation chain:
Ch 33.
This produces approximately a 9–10-inch wide textured scarf depending on gauge.
For a narrower scarf, use 4 repeats:
4 × 6 + 1 = 25 stitches
Foundation:
Ch 27.
Baby / Stroller Blanket
Use:
15 repeats
15 × 6 = 90
Plus 1:
91 stitches.
Foundation:
Ch 93.
This produces approximately a 27–29-inch body before border depending on gauge.
Because the raised shells can catch small fingers and toes, this heavily textured version is better for supervised stroller use, tummy time, or decoration than unattended infant sleep.
Written Throw Size
Use:
19 repeats
19 × 6 + 1:
115 stitches.
Foundation:
Ch 117.
Finished width approximately:
36 inches
after border.
Wider Throw
Use:
23 repeats
23 × 6 = 138
Plus 1:
139 stitches.
Foundation:
Ch 141.
This should produce a body approximately 41–43 inches wide depending on gauge.
Large Sofa Throw
Use:
27 repeats
27 × 6 = 162
Plus 1:
163 stitches.
Foundation:
Ch 165.
Continue until approximately:
55–60 inches long.
Using the Stitch for a Cardigan
This texture works especially well as an accent rather than covering an entire sweater.
Try using the petal ridge on:
- lower cardigan body
- sleeve cuffs
- back panel
- shoulder panel
- cardigan hem
For garments, I recommend using the smaller petal:
1 hdc, 5 dc, 1 hdc
because it produces less bulk.
Always make a large gauge swatch before adapting the repeat to a fitted garment.
Using the Stitch for a Scarf
A scarf is one of the easiest ways to try the technique.
For an approximately 9-inch-wide scarf:
Ch 33.
Follow the same pattern.
Continue until approximately:
60–68 inches long.
Add a simple sc border.
The raised petals create a much more decorative surface than ordinary striped rows while still using only one color.
Using Two Colors
The pattern can also be worked in two colors.
For example:
Color A
Cream structural rows
Color B
Dusty rose petals
To do this cleanly, complete the sc foundation row in Color A.
Join Color B for the decorative FLO petal pass.
Fasten off Color B.
Return to Color A and work the structural row into the unused BLO.
This makes the petals look almost appliquéd onto the background.
Tonal Color Version
A more subtle combination is:
- light lavender background
- deep violet petals
Other combinations:
- cream + caramel
- sage + forest green
- blush + burgundy
- pale blue + navy
- oatmeal + rust
The darker color naturally emphasizes the three-dimensional shells.
Why Are My Petals Ruffling Too Much?
The shell may be too large for your yarn and hook combination.
Try changing:
2 hdc, 5 dc, 2 hdc
to:
1 hdc, 5 dc, 1 hdc.
You can also go up one hook size for the structural rows while keeping the petal pass slightly tighter.
Why Are My Petals Too Flat?
Possible causes include:
- very loose tension
- extremely soft yarn
- oversized hook
- not enough stitches in each shell
Try the taller petal variation:
hdc, 2 dc, 5 tr, 2 dc, hdc
or use a slightly smaller hook for the decorative pass.
Why Is My Blanket Getting Wider?
The structural rows must always contain:
115 stitches.
The decorative petal stitches do not count as additional blanket-width stitches because they sit on the surface.
When working the row behind the petals, make sure you place:
exactly one dc in each unused back loop.
Do not crochet into the petal stitches themselves.
Why Is My Stitch Count Wrong After the Petal Row?
Do not count the stitches inside the petals as your normal row count.
Each shell contains many decorative stitches, but your underlying foundation still contains:
115 positions.
The next structural row returns to those 115 back loops.
Why Can’t I Find the Back Loops?
Fold the petals toward the front of the work.
Look directly behind their base.
You should see a continuous line of unused loops running across the foundation row.
Those are the loops used for the next structural row.
A stitch marker placed in the first and last back loop before making the petals can help considerably.
My Shells Are Twisting
This usually happens when the shell stitches are very tight.
Work the 9 stitches into the front loop with relaxed tension.
After finishing the row, gently spread each shell with your fingers.
Blocking also helps.
The Side Edges Look Uneven
Three-dimensional rows naturally make the edges look busier.
Always keep the structural row count unchanged.
Adding the final border will straighten the visual edge considerably.
You can also place stitch markers in the first and last structural stitches throughout the project.
Can I Use DK Yarn?
Yes.
Try approximately:
4–4.5 mm hook.
Your petals will be finer and more delicate.
Increase the number of 6-stitch repeats to achieve the desired blanket width.
Can I Use Cotton Yarn?
Yes.
Cotton is actually one of the best fibers for this technique because it provides:
- excellent stitch definition
- crisp petal edges
- visible shadows
- less fuzz
Keep in mind that a full cotton blanket can become heavy.
A cotton/acrylic blend is another good option.
Can I Use Chunky Yarn?
You can, but reduce the number of repeats.
The raised petals become dramatically larger with bulky yarn.
Make a swatch before committing to a blanket because the decorative rows can become very heavy.
Is This Pattern Reversible?
Not exactly.
The back remains neat and attractive, but the dimensional petals appear primarily on the:
Right Side.
The reverse shows the structural fabric behind them.
Can I Space the Petal Rows Farther Apart?
Yes.
If you want a lighter blanket, work extra plain rows between decorative sections.
For example:
Row A
Sc across.
Petal Pass
Make petals in FLO.
Row B
Dc in unused BLO behind petals.
Row C
Sc across.
Row D
Dc across.
Row E
Sc across.
Then make the next petal pass.
This produces more negative space between ridges and uses less yarn.
Best Projects for This Crochet Technique
The raised petal texture works particularly well for:
- statement blankets
- scarves
- wraps
- cushion covers
- tote panels
- cardigan accents
- sweater hems
- decorative runners
- textured pillow fronts
For projects that receive heavy everyday wear, use fewer petal rows so the raised texture is less likely to snag.
Final Thoughts
The expensive-looking texture comes from one simple construction trick:
crochet the petals into the front loops, then build the real fabric through the unused back loops behind them.
The blanket therefore keeps its full structural stitch count while the decorative shells sit forward from the surface.
For the written throw, remember these three steps:
Sc foundation row
→ raised petals in the front loops
→ dc across the unused back loops
Then repeat.
The result is a deeply textured crochet fabric with rows of dimensional lavender petals that can be adapted easily for blankets, scarves, wraps, pillows, and cardigan details without needing complicated cable work or dozens of different stitches.



