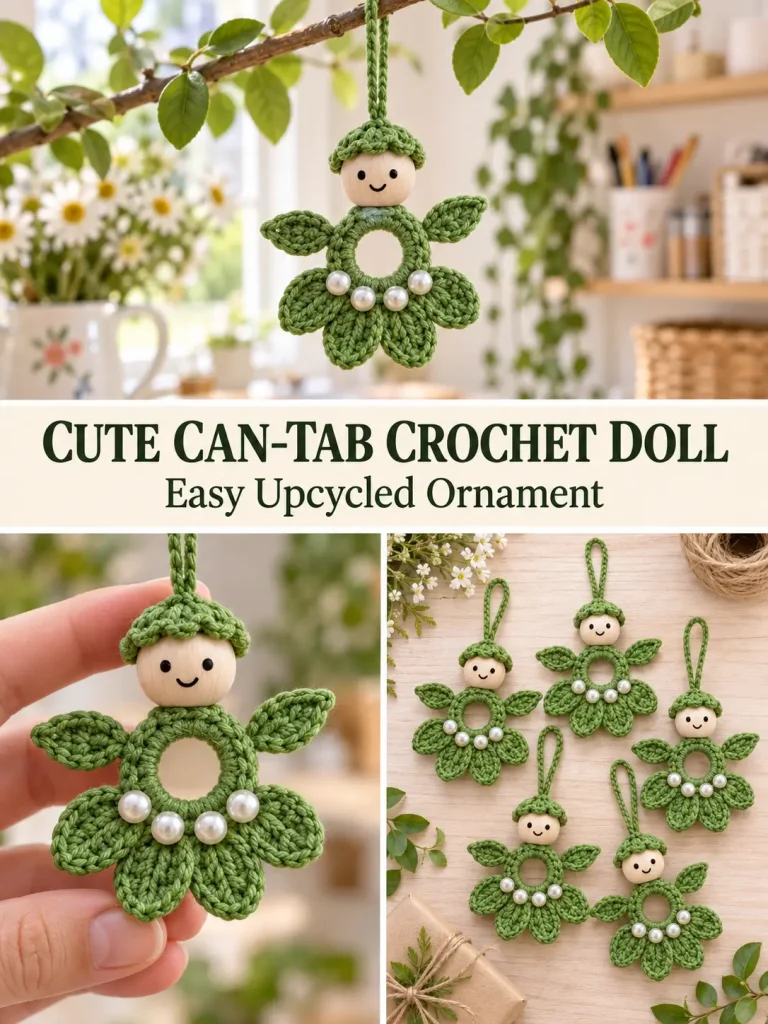
This tiny crochet doll turns an ordinary beverage-can pull tab into a cheerful little ornament with leafy arms, a flower-shaped skirt, pearl accents, a bead head, and a hanging loop.
The pull tab becomes the hidden framework for the body. Crochet stitches cover the large opening while still leaving a decorative open ring in the center, and the remaining pieces are attached around it.
The exact original construction cannot be determined from a thumbnail alone, so this is an original pattern built around the same general upcycled idea rather than a reconstruction of an unknown creator’s pattern.
Skill Level
Confident Beginner
You should know how to:
- chain
- slip stitch
- single crochet
- half double crochet
- double crochet
- treble crochet
- work around a ring
- sew small crochet pieces together
- attach beads
Finished Size
Using DK cotton and a standard beverage-can pull tab, one ornament measures approximately:
- 3–3½ inches tall without hanging loop
- 2½–3 inches wide across the leaves
- 5–6 inches total height including loop
Measurements will vary slightly because pull-tab sizes are not completely standardized.
Materials
- 1 clean aluminum beverage-can pull tab
- Small amount of DK / light #3 cotton yarn in green
- 2.5–3 mm crochet hook
- 1 wooden or acrylic bead approximately 12–14 mm for the head
- 4 faux pearl beads approximately 7–9 mm
- Small amount of black embroidery thread or permanent craft marker for the face
- Yarn needle
- Fine sewing needle if required for the pearls
- Scissors
- Stitch marker, optional
Important
Use only smooth, undamaged pull tabs.
Discard any tab with sharp, cracked, or rough metal edges.
Because this project contains a metal tab and small beads, it is intended as a decorative ornament, not as a baby toy.
Abbreviations — US Terms
ch – chain
sl st – slip stitch
sc – single crochet
hdc – half double crochet
dc – double crochet
tr – treble crochet
st(s) – stitch(es)
sp – space
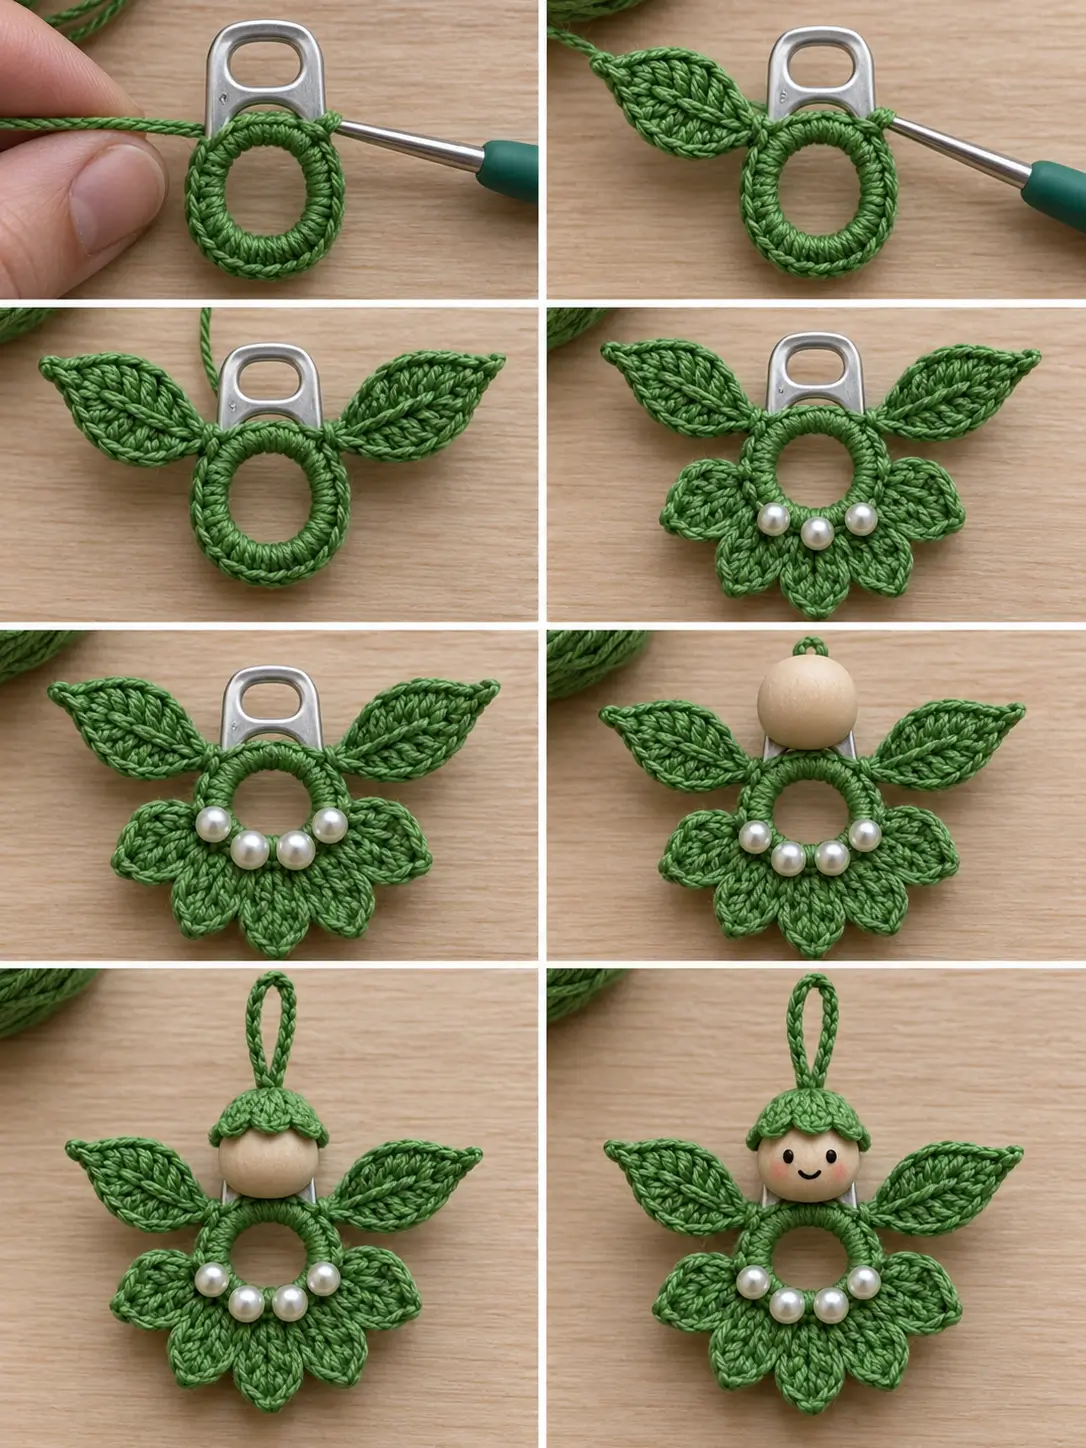
Pattern Construction
The ornament is built in this order:
- Cover the large opening of the pull tab with crochet.
- Add two leaf-shaped arms.
- Crochet the five-petal lower skirt.
- Add four pearl beads.
- Attach the bead head.
- Crochet and attach the small green cap.
- Add the hanging loop.
- Embroider or draw the face.
Keep the larger hole of the pull tab toward the bottom and the smaller hole toward the top.
The large hole becomes the visible open center of the doll’s body.
PART 1 — Cover the Pull Tab
Use green yarn.
Hold the pull tab vertically with the larger opening at the bottom.
Insert the hook through the large opening.
Pull up a loop of green yarn around the metal edge.
Ch 1 to secure.
Body Ring Round
Work approximately 20 sc evenly around the metal edge of the large opening.
To make each stitch:
- Insert the hook through the pull-tab opening.
- Bring the hook underneath the metal edge.
- Yarn over.
- Pull the yarn around the metal.
- Yarn over again.
- Complete the sc.
Push the stitches close together as you work so the metal edge becomes fully covered.
Join with a sl st to the first sc.
Check the Ring
You should still have a clearly visible open hole in the center.
The metal surrounding the large opening should be almost completely hidden by green crochet.
If your tab is slightly larger or smaller, use enough sc to cover it densely rather than forcing exactly 20 stitches.
For the remainder of the pattern, treat the bottom center of this ring as the 6 o’clock position.
PART 2 — First Leaf Arm
The two leaves are attached near the upper sides of the body ring.
Locate a stitch approximately at the 10 o’clock position.
Join green yarn.
Leaf Foundation
Ch 9.
Beginning in the second chain from the hook, work:
- sl st in next ch
- sc in next ch
- hdc in next ch
- dc in next ch
- dc in next ch
- hdc in next ch
- sc in next ch
- sl st in final ch
You have completed one side of the leaf.
Ch 1.
Rotate the foundation chain so you can work along the unused loops on the opposite side.
Work back toward the body:
- sl st
- sc
- hdc
- dc
- dc
- hdc
- sc
- sl st
Join with a sl st to the same body stitch where the leaf began.
Fasten off.
Shape the Leaf
Gently pull the tip outward.
The leaf should be approximately:
1¼–1½ inches long
with a pointed outer tip and a wider center.
PART 3 — Second Leaf Arm
Locate the corresponding stitch around the 2 o’clock position on the opposite side.
Repeat the complete leaf instructions.
Before fastening off, compare both leaves.
They should:
- point outward
- be approximately the same length
- sit at the same height
- mirror one another
Weave the tails into the back of the body.
Optional Leaf Rib
For the more detailed ribbed appearance, use a yarn needle and a short strand of matching green yarn.
Beginning at the base of a leaf, make a loose line of running stitches through the center toward the point.
Repeat for the second leaf.
Do not pull tightly.
This creates a subtle central leaf vein.
PART 4 — Crochet the Flower Skirt
The lower part of the ornament is formed from five rounded petals.
Find the center-bottom stitch of the covered body ring.
Count approximately two stitches to either side so you have five neighboring attachment positions along the lower edge.
Join green yarn to the first position.
Petal 1
Into the same body stitch work:
ch 2, 2 dc, 1 tr, 2 dc, ch 2, sl st
All stitches are worked into the same attachment point.
This creates one rounded petal.
Petals 2–5
Sl st into the next body stitch.
Into that stitch work:
ch 2, 2 dc, 1 tr, 2 dc, ch 2, sl st
Repeat in the next three stitches.
You should have exactly:
5 petals
forming a fan-shaped flower skirt beneath the open body ring.
Fasten off.
Shaping the Skirt
Gently spread the five petals with your fingers.
The center petal should point downward.
The two neighboring petals should angle diagonally downward.
The two outer petals should angle slightly outward.
This creates a balanced little flower shape rather than a straight row of scallops.
PART 5 — Add the Four Pearl Beads
The pearls sit between the open ring and the flower petals.
Use a strong sewing thread or matching green yarn thin enough to pass through your beads.
Arrange 4 pearl beads in a shallow arc.
A useful placement is:
- Pearl 1 above the left outer petal
- Pearl 2 between the left and center petals
- Pearl 3 between the center and right petals
- Pearl 4 above the right outer petal
Sew each pearl securely through the crochet body.
Pass through each bead at least twice.
Knot securely on the back.
Check the Placement
The four pearls should form a decorative row without completely covering the five green petals.
PART 6 — Attach the Head
Use a smooth wooden or acrylic bead approximately 12–14 mm.
The bead should sit directly above the covered pull-tab body.
Thread a long strand of green yarn onto a yarn needle.
Pass the yarn through or around the small upper opening of the pull tab.
Pass it through the bead if the bead has a hole.
Repeat several times until the head is held firmly against the top of the body.
Knot securely at the back.
If the Bead Has No Hole
Sew around the bead using several hidden stitches beneath the cap that will be added next.
A small amount of suitable craft adhesive can also stabilize a decorative ornament, but stitching is preferable whenever possible.
PART 7 — Crochet the Little Green Cap
The cap covers the upper part of the bead and helps hide the attachment.
Use green yarn.
Round 1
Make a magic ring.
Work:
6 sc into the ring
Pull closed.
6 sts
Round 2
Work:
2 sc in each stitch around
12 sts
Round 3 — Scalloped Brim
Repeat around:
sl st in next st, ch 2, sl st in same st
Work this little bump in each stitch around.
Fasten off, leaving a long tail.
The result should look like a tiny green cap with a slightly ruffled edge.
Attach the Cap
Place the cap over the top of the bead.
The scalloped edge should sit around the bead like a small leafy hat.
Using the long tail, sew the cap securely to the bead attachment and upper body.
Keep the face area uncovered.
PART 8 — Make the Hanging Loop
Join green yarn securely at the center top of the cap.
Chain approximately:
30–35
or until the loop reaches your desired length.
Bring the final chain back to the starting point.
Sl st securely into the cap.
For a stronger loop, work slip stitches back along the entire chain before fastening off.
Alternatively, leave the chain simple for a finer hanging loop.
Fasten off and weave the yarn tail into the cap.
PART 9 — Add the Face
The face should be simple and small.
Mark the positions lightly before permanently adding the features.
Eyes
Add two tiny black dots.
Keep them evenly spaced.
Mouth
Add a tiny curved smile below the eyes.
If using embroidery thread, make:
- one tiny stitch for each eye
- two short angled stitches for the smile
If using a permanent craft marker, test it on a spare bead first because some inks can bleed into unfinished wood.
Optional Pink Cheeks
For a softer doll-like expression, add two extremely small pink dots to either side of the mouth.
Keep them subtle.
Final Assembly Check
Lay the ornament flat.
Check that:
- the hanging loop is centered
- the cap sits straight
- the face is centered
- both leaves are symmetrical
- the central body opening remains visible
- all four pearls are firmly attached
- all five flower petals are visible
- no sharp part of the pull tab is exposed
Weave in every remaining yarn end.
Finished Ornament Structure
Your completed ornament should have:
- 1 green hanging loop
- 1 tiny green cap
- 1 bead head
- 2 pointed green leaf arms
- 1 open circular green body
- 4 pearl accents
- 5 rounded green flower petals
- 1 hidden recycled can tab providing structure
How to Make the Ornament Smaller
Use:
- crochet thread or fingering yarn
- approximately 1.75–2.25 mm hook
- a smaller bead
- 5–6 mm pearls
Use fewer covering stitches around the tab if needed.
The construction stays the same.
How to Make It Larger
Use:
- sport or DK cotton
- 3–3.5 mm hook
- 14–16 mm bead
- larger pearls
You can also lengthen the leaves by adding foundation chains.
For every additional chain, keep the stitch progression balanced on both sides.
Color Ideas
Although the all-green version gives the ornament a garden-fairy look, the same construction works beautifully in other combinations.
Christmas Elf
Forest green body + red cap + white pearls
Autumn Fairy
Olive body + rust cap + wooden beads
Spring Flower
Sage body + pink petals + cream pearls
Lavender Garden
Muted green leaves + lavender skirt + pearl accents
Neutral
Cream body + wooden head + natural wood beads instead of pearls
Pearl-Free Version
For a completely yarn-based version, replace each pearl with a small crochet bobble.
At each pearl position, work:
5-dc bobble
or embroider a small French knot using contrasting yarn.
This is also useful if you do not want separate decorative beads.
Face-Free Version
Leave the wooden bead completely plain for a minimalist Scandinavian-style ornament.
The cap, leaves, open body, and flower skirt still make the figure recognizable as a small decorative garden doll.
Ideas for Using the Crochet Dolls
These small ornaments can be used as:
- Christmas tree decorations
- spring branch ornaments
- gift toppers
- bag charms
- craft-room decorations
- garland pieces
- plant-pot decorations
- handmade favors
- decorative keyring charms
For a garland, make several dolls and thread their hanging loops onto a cord.
Make a Crochet Doll Garland
Create 5–7 ornaments.
Try alternating shades such as:
- forest green
- sage
- olive
- moss
- soft mint
Thread a long crochet chain through all the hanging loops.
Leave approximately 4–6 inches between dolls.
This creates a lightweight decorative garland for a craft room, spring display, or holiday tree.
Tips for Crocheting Around Can Tabs
Clean Them First
Wash and dry every tab before crocheting.
Check the Edges
Run a fingertip carefully around the metal.
Do not use damaged tabs.
Keep the Covering Stitches Tight
Dense single crochet helps stop the metal from showing through.
Push the Stitches Together
As you crochet around the opening, slide completed stitches close together.
Keep the Central Hole Open
Do not add so many stitches that they bunch into the center and close the decorative opening.
Common Problems
The Metal Is Still Visible
Add a few additional single crochet stitches around the tab and push them closer together.
The Body Ring Ruffles
There are too many covering stitches.
Remove several until the stitches sit snugly around the metal.
The Center Hole Is Too Small
Your stitches may be too bulky.
Use thinner yarn or a smaller hook.
One Leaf Is Larger
Count the foundation chains and stitches carefully.
Both leaves must use exactly the same construction.
Flower Petals Curl
Gently block the ornament or reshape the petals while slightly damp.
Pearls Fall Forward
Pass the sewing thread through each pearl twice and anchor it through several crochet stitches on the back.
Head Tilts Sideways
Reinforce the bead attachment through the upper tab opening before attaching the cap.
Loop Leans to One Side
Move its attachment point to the exact center of the cap.
Upcycled Crochet Can-Tab Doll
A single pull tab provides just enough structure to turn a handful of leftover yarn into a surprisingly detailed little ornament.
The open tab becomes the center of the body, pointed crochet leaves create the arms, five small petals form the skirt, and a bead and tiny crochet cap complete the character.
It is a particularly useful scrap-yarn project because each ornament requires very little yarn and can be customized with different greens, flowers, beads, faces, and hanging loops.



