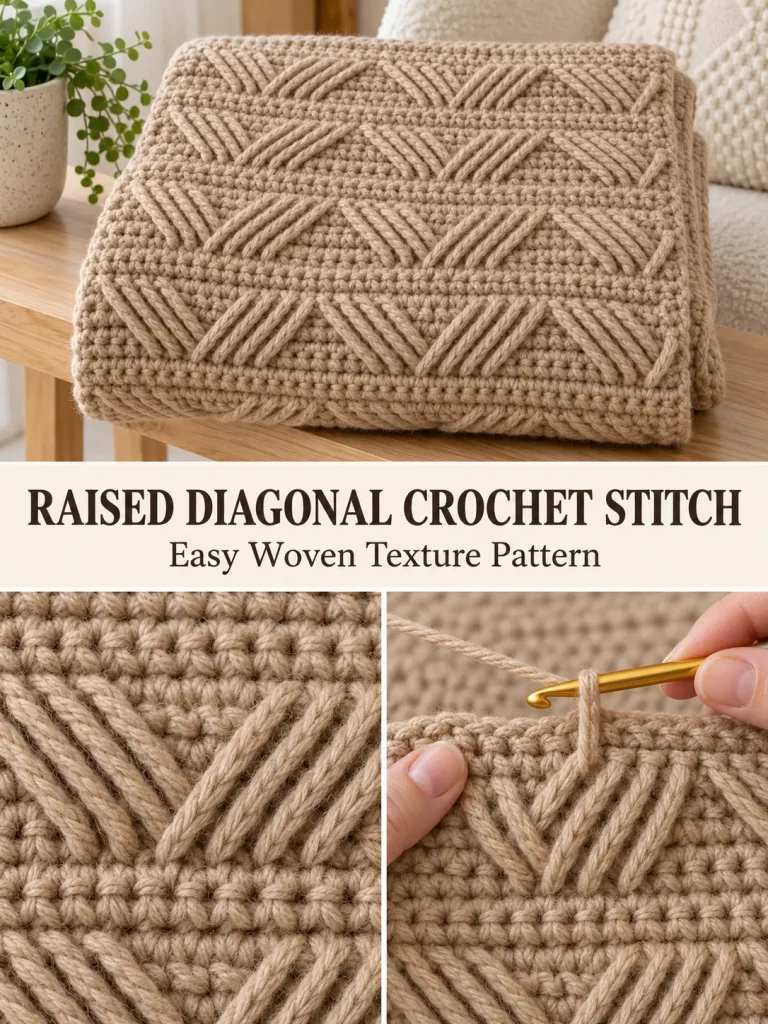
This deeply textured crochet stitch combines a dense background with raised diagonal strands that meet in repeating V-shaped sections. The long stitches sit across the front of the fabric, creating an almost woven or braided appearance without requiring cables or complicated post stitches.
From the images, the exact original stitch sequence cannot be verified, so the instructions below are an original construction designed to reproduce the same overall look: dense horizontal rows separated by raised groups of long diagonal crochet stitches.
The finished fabric is especially suitable for:
- baby blankets
- throws
- scarves
- cushion covers
- bags
- runners
- winter accessories
- textured home decor
Skill Level
Confident Beginner / Intermediate
The background uses only single crochet. The decorative rows require long spike stitches worked several rows below and slightly to the side, so accurate counting is important.
Once the first repeat is established, the pattern becomes much easier to recognize.
Materials
For a practice swatch:
- Medium weight #4 yarn
- 5.5 mm crochet hook
- Yarn needle
- Scissors
- Stitch markers
- Measuring tape
A smooth yarn with good stitch definition is best for showing the raised diagonal texture.
Abbreviations — US Terms
ch – chain
sc – single crochet
sl st – slip stitch
st(s) – stitch(es)
LFsc – long front spike single crochet
Special Stitch
Long Front Spike Single Crochet — LFsc
This stitch creates the long raised strand across the front of the fabric.
Instead of inserting the hook into the top of the next stitch in the current row:
- Insert the hook into the indicated stitch 3 rows below.
- Yarn over.
- Pull up a long loop until it reaches the height of the current row.
- Keep the loop relaxed. Do not tighten it against the lower row.
- Yarn over.
- Pull through both loops on the hook.
One LFsc replaces one normal single crochet in the current row.
Important
The elongated loop must lie on the front of the fabric.
If you pull the loop too tightly, the fabric will pucker.
Stitch Multiple
For this version, use:
multiple of 8 + 2
The extra 2 stitches form the side edges.
Examples:
- 26 chains
- 34 chains
- 42 chains
- 50 chains
- 66 chains
- 98 chains
- 130 chains
Practice Swatch
For the tutorial sample:
Chain 34.
You will have 32 working stitches after the foundation row.
Foundation Row
Sc in the second chain from the hook and in every chain across.
33 sc
Ch 1 and turn.
The turning chain does not count as a stitch.
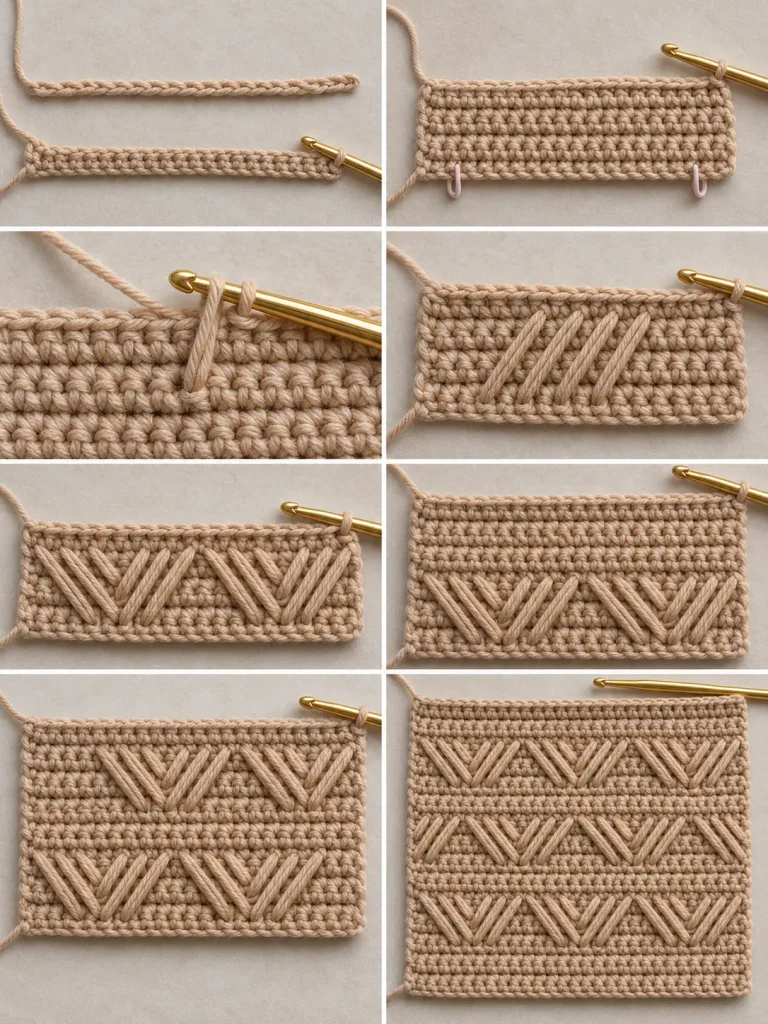
Row 1 — Plain Background
Sc in every stitch across.
33 sc
Ch 1 and turn.
Row 2 — Plain Background
Sc across.
33 sc
Ch 1 and turn.
Row 3 — Plain Background
Sc across.
33 sc
Ch 1 and turn.
You now have several solid rows available below the working edge. These rows will hold the long decorative stitches.
Understanding the Decorative Block
The diagonal texture is worked in groups of 8 stitches.
Within each 8-stitch section:
- the first 4 long stitches lean toward the center
- the next 4 long stitches lean back in the opposite direction
Together they create a shallow raised V.
Before beginning your first decorative row, it can help to place a stitch marker after every 8 stitches.
Row 4 — First Raised Chevron Row
Sc in the first stitch.
Now begin the first 8-stitch decorative block.
Look at the row 3 rows below the current working row.
Imagine the next 8 current stitches numbered:
1 – 2 – 3 – 4 – 5 – 6 – 7 – 8
For the first four stitches, work long spike stitches into lower-row stitches positioned slightly to the right:
- Current stitch 1 → LFsc into lower stitch 3
- Current stitch 2 → LFsc into lower stitch 4
- Current stitch 3 → LFsc into lower stitch 5
- Current stitch 4 → LFsc into lower stitch 6
These four elongated strands should lie parallel across the surface.
For the next four current positions, angle the stitches in the opposite direction:
- Current stitch 5 → LFsc into lower stitch 3
- Current stitch 6 → LFsc into lower stitch 4
- Current stitch 7 → LFsc into lower stitch 5
- Current stitch 8 → LFsc into lower stitch 6
The two groups now meet visually near the center and create a raised V-shaped woven section.
Repeat the same 8-stitch block across the row.
Sc in the final edge stitch.
Ch 1 and turn.
What You Should See
You should now have repeating raised diagonal groups sitting across the dense single crochet background.
The long loops should lie smoothly on the surface rather than pulling the lower row upward.
Row 5 — Locking Row
Sc in every stitch across.
When working this row, crochet into the normal top loops created by the previous decorative stitches.
Do not crochet around the long strands themselves.
33 sc
Ch 1 and turn.
This row locks the tops of the elongated stitches into place.
Row 6 — Plain Background
Sc across.
Ch 1 and turn.
Row 7 — Plain Background
Sc across.
Ch 1 and turn.
You now have another three-row depth beneath the working edge.
Row 8 — Offset Raised Chevron Row
The second decorative row is offset so the raised sections do not stack directly above the first row.
Sc in the first stitch.
Work 4 sc before beginning the first complete decorative block.
This shifts the pattern by half of the 8-stitch repeat.
Now work the same raised 8-stitch chevron:
First half:
- LFsc to lower stitch 3
- LFsc to lower stitch 4
- LFsc to lower stitch 5
- LFsc to lower stitch 6
Second half:
- LFsc back toward lower stitch 3
- LFsc back toward lower stitch 4
- LFsc back toward lower stitch 5
- LFsc back toward lower stitch 6
Repeat full 8-stitch groups across as space allows.
At the opposite end, finish the remaining 4 stitches with sc so the two sides balance.
Ch 1 and turn.
Visual Check
The raised V sections from this row should sit between the motifs from Row 4.
That staggered placement creates the flowing diagonal woven effect.
Row 9
Sc across.
Ch 1 and turn.
Row 10
Sc across.
Ch 1 and turn.
Row 11
Sc across.
Ch 1 and turn.
Row 12 — Return to Original Alignment
Repeat Row 4.
Work the raised chevron blocks from the original starting position.
Pattern Repeat
Continue repeating:
Rows 5–12
This gives you alternating raised motif rows:
- one aligned normally
- one shifted by 4 stitches
- next aligned normally
- next shifted
The plain single crochet rows between the decorative sections prevent the fabric from becoming too stiff and make the raised strands stand out clearly.
Keeping the Long Stitches Even
The most important part of this pattern is the height of the elongated loops.
When pulling up a LFsc loop:
- bring it all the way to the current row
- keep the yarn relaxed
- do not pull the lower fabric upward
- make every long loop approximately the same tension
After several stitches, run your fingers lightly across the strands.
They should sit on the fabric rather than squeezing it.
Why the Decorative Stitches Look Woven
Each LFsc begins several rows below its final position.
Because the anchoring point is shifted sideways, the elongated section travels diagonally across the fabric.
Several parallel LFsc stitches create one diagonal band.
The next group travels in the opposite direction.
This makes the fabric appear woven even though everything is created with a crochet hook.
Optional Simpler Version
If working diagonally into neighboring stitches feels difficult, make vertical spike groups first.
Instead of shifting the lower anchor point sideways, work each LFsc directly into the corresponding stitch 3 rows below.
This creates vertical raised bars.
Once you are comfortable controlling the long loops, move to the diagonal version.
Optional More Dramatic Texture
For longer raised strands, work into a stitch 4 rows below instead of 3.
Use a slightly larger hook and keep the loops especially relaxed.
This produces:
- longer diagonals
- deeper texture
- a more dramatic woven appearance
It also uses more yarn.
Example Baby Blanket
This stitch works particularly well for a warm textured baby blanket.
Using medium #4 yarn and a 5.5 mm hook, make a gauge swatch first.
A useful starting chain might be:
130 chains
because it follows the multiple of 8 + 2 formula.
Work the foundation row.
Then continue the pattern until the blanket reaches your preferred length.
For a baby blanket, approximately:
34–38 inches wide × 40–44 inches long
is a practical range, but measure your actual swatch rather than relying on stitch count alone.
Simple Baby Blanket Border
Because the stitch already has strong texture, use a simple border.
Border Round 1
After the final plain row, do not fasten off.
Ch 1.
Sc evenly around the entire blanket.
Along the top and bottom, work approximately one sc in each stitch.
Along the side edges, distribute the stitches evenly.
At each corner work:
3 sc
Join with a sl st.
Border Round 2
Ch 1.
Sc in each stitch around.
At every corner work:
3 sc in the center corner stitch
Join.
Border Round 3
Repeat Round 2.
Fasten off.
This creates a clean frame without competing with the woven texture.
Textured Crochet Scarf
For a scarf, use a narrower starting chain.
For example:
Chain 34 or 42
and work the same repeat until the scarf reaches your preferred length.
The stitch is especially attractive in:
- cream
- camel
- gray
- burgundy
- forest green
- dusty rose
Add fringe only if desired.
The texture is decorative enough on its own.
Crochet Bag Panel
The dense background makes this stitch a good option for bags.
For a medium tote, crochet two matching rectangular panels.
A starting chain of approximately:
50 or 58 chains
works well depending on yarn and desired dimensions.
Crochet both panels to the same height.
Joining the Bag
Place the two panels with wrong sides together.
Using matching yarn, sc through both layers along:
- first side
- bottom
- opposite side
Leave the top open.
Fasten off.
Add a Firm Top Edge
Attach yarn at the opening.
Work 2–3 rounds of sc around the top.
This stabilizes the opening before handles are attached.
Crochet Handles
For each handle:
Chain until the handle reaches the desired length.
Work approximately 5–7 sc across.
Continue in rows until the strap reaches the desired length.
Make two.
Sew the handles securely to the inside of the bag.
Reinforce every attachment point several times.
Optional Bag Lining
A fabric lining helps a textured crochet bag keep its shape.
It also prevents small objects from pushing through the stitches.
Cut lining fabric slightly larger than the finished crochet body.
Sew the lining into a simple pouch.
Fold the raw top edge inward.
Place inside the bag and hand-sew around the upper edge.
How to Resize the Stitch Pattern
Use:
multiple of 8 + 2
To make the project wider, add another 8 foundation chains.
To make it narrower, remove 8 chains.
For example:
34 chains
42 chains
50 chains
58 chains
66 chains
all preserve the repeat.
Best Yarn for This Stitch
The raised diagonal details show best in a smooth yarn.
Good choices include:
- acrylic
- wool-acrylic blend
- cotton blend
- smooth merino blend
Avoid very fuzzy yarn when learning the pattern because the anchoring stitches several rows below can become difficult to identify.
Hook Size
The inspiration uses a hook around the medium-worsted range.
For #4 yarn, 5–6 mm is a useful starting point.
If the fabric feels too stiff, move up one hook size.
If the elongated stitches look loose and floppy, move down slightly.
Always prioritize the finished fabric rather than the printed hook recommendation on the yarn label.
Tips for a Clean Raised Pattern
Count the Background Rows
Every decorative row relies on having enough solid fabric beneath it.
Losing track of the number of plain rows changes the length of the diagonal strands.
Use Stitch Markers
Mark each 8-stitch repeat while learning the pattern.
Do Not Tighten the Long Loops
This is the most common mistake.
The loop must reach the current row naturally.
Check the Back
The long strands should stay primarily on the front.
The reverse side should remain relatively flat.
Count Every Row
Accidental increases or decreases make the decorative blocks drift out of alignment.
Common Problems
The Fabric Puckers Under the Diagonal Sections
The LFsc loops are too short.
Undo the affected stitches and pull each loop all the way to the height of the current row before finishing the stitch.
The Long Strands Look Loose
The loops are being pulled too high.
Bring each loop only to the current working-row height.
The V Shapes Do Not Line Up
Check:
- the 8-stitch repeat
- the lower anchoring positions
- whether the current decorative row should be aligned or offset
Use markers until the pattern becomes easy to recognize.
The Raised Texture Disappears
Use a smoother yarn or slightly tighter background tension.
A heavily textured or fuzzy yarn can hide the long strands.
The Sides Become Uneven
Keep one plain edge stitch at both sides.
Count the stitches after every decorative row.
Color Ideas
Warm Neutral
Camel, oatmeal, cream, or beige emphasizes the woven appearance.
Baby Blanket
Soft blue, blush, sage, lavender, or ivory.
Modern Home Decor
Charcoal, olive, terracotta, or natural cream.
Bag
Camel, chocolate, black, deep green, or mustard.
Two-Color Variation
Work the plain rows in one color and change to a contrasting color only for each raised decorative row.
This makes the diagonal strands stand out dramatically.
For a subtler effect, use two shades from the same color family.
Finishing
After the final repeat, finish with at least one plain sc row.
Fasten off.
Weave the yarn tail securely through the wrong side.
For blankets and scarves, gently block the fabric so:
- the sides become straight
- the horizontal rows relax
- the raised diagonals remain evenly spaced
Do not press the fabric flat with heavy heat because this can flatten the dimensional stitches.
Easy Raised Diagonal Crochet Stitch
The visual effect of this pattern comes from combining two very simple ideas: a dense single crochet background and long stitches anchored several rows below.
By shifting those lower anchoring points sideways, the long loops become diagonal. Grouping several together produces bold raised bands, and reversing the direction forms the repeating woven V shapes.
The result looks far more complicated than the actual construction and creates a thick, attractive fabric that can work equally well for a baby blanket, warm scarf, cushion, or structured crochet bag.



