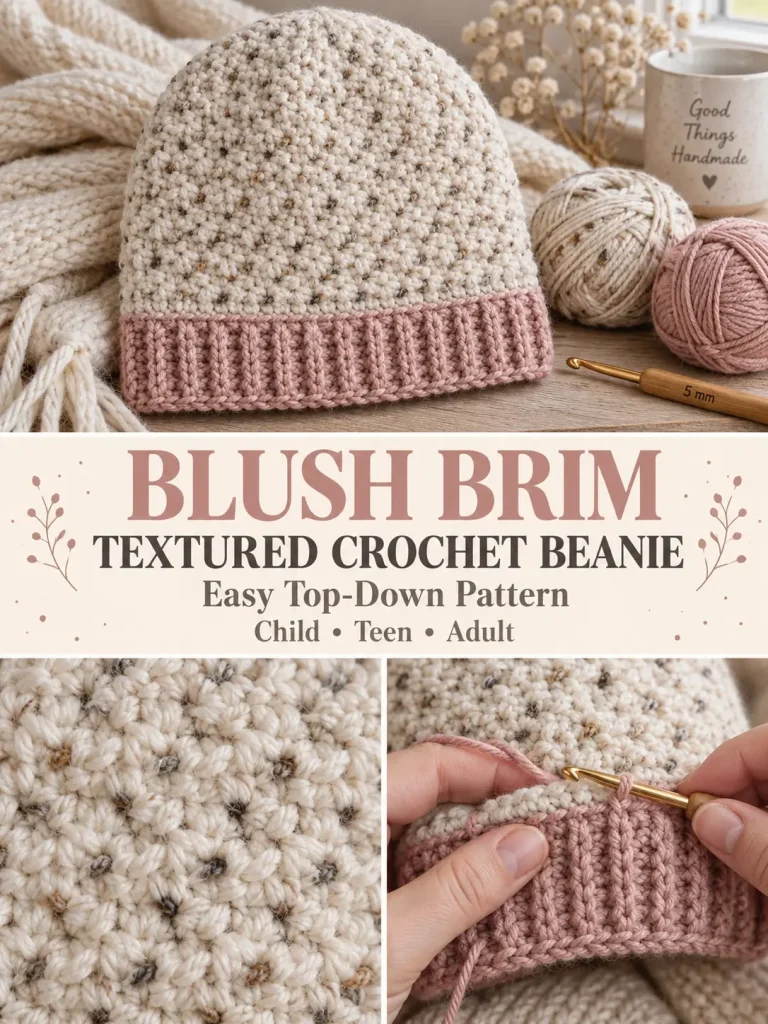
A simple cream beanie becomes much more interesting when you combine a softly pebbled crochet texture with a contrasting ribbed brim.
This version is worked from the top down, so you can easily adjust the depth before adding the pink brim. The body uses an easy alternating single-crochet and double-crochet texture, while front- and back-post stitches create the stretchy ribbed finish.
The broad color-blocked beanie idea was inspired by the look of Heidi Rodriguez’s Pebble Hat. That design is a paid Ravelry pattern using its own cluster-stitch, bottom-up construction; the pattern below uses a different top-down crown, different texture repeat, stitch counts, sizing, and brim construction. (Ravelry)
Pattern at a Glance
Skill level: Advanced beginner
Terminology: US crochet terms
Construction: Top down, worked in joined rounds
Sizes: Child, Teen, Adult
Yarn weight: Worsted / Category 4
Hook: 5 mm
Body texture: Alternating sc and dc
Brim: FPdc/BPdc ribbing
Colors: Speckled cream + dusty blush
Seaming: None
Finished Sizes
Child
Fits head circumference approximately:
19–20 inches
Finished hat height:
7½–8 inches
Teen
Fits head circumference approximately:
20–21½ inches
Finished hat height:
8–8½ inches
Adult
Fits head circumference approximately:
21½–23 inches
Finished hat height:
8½–9 inches
The fabric has stretch, so the finished circumference should be slightly smaller than the actual head measurement.
Materials
You will need:
Main Color — Cream
Approximately:
- Child: 120–140 yards
- Teen: 140–160 yards
- Adult: 160–185 yards
Contrast Color — Dusty Blush
Approximately:
35–50 yards
Also:
- 5 mm crochet hook
- yarn needle
- scissors
- stitch marker
- measuring tape
A smooth worsted-weight yarn works especially well.
For a look similar to the sample, choose a light cream or oatmeal yarn with tiny flecks of pink, gray, or brown.
Suggested Colors
Color A
Speckled Cream / Natural Oatmeal
Color B
Dusty Rose / Blush Pink
Other combinations that would work beautifully:
- oatmeal + rust
- cream + sage
- pale gray + mustard
- ivory + burgundy
- beige + forest green
- cream + dusty blue
Gauge
In the textured body pattern:
14 stitches × 12 rounds = approximately 4 inches
Gauge is important for a fitted hat.
If your stitches are too large, use a smaller hook.
If your stitches are too small, use a larger hook.
Abbreviations
- ch = chain
- sc = single crochet
- dc = double crochet
- hdc = half double crochet
- FPdc = front post double crochet
- BPdc = back post double crochet
- sl st = slip stitch
- st = stitch
- sts = stitches
- MR = magic ring
- rep = repeat
Important Pattern Notes
The beginning chain does not count as a stitch.
Join each round with a slip stitch to the first actual stitch.
Do not work into the joining slip stitch.
The crown is made with half double crochet because it creates a smooth, easy-to-shape circle.
Once the crown reaches the correct size, the hat switches to the textured stitch pattern.
Special Texture — Pebbled Seed Stitch
The body uses two alternating stitches:
sc, dc
On the following round, reverse them:
dc, sc
This means:
- dc is worked into the previous sc
- sc is worked into the previous dc
The alternating stitch heights create a gently raised pebbled surface without complicated clusters.
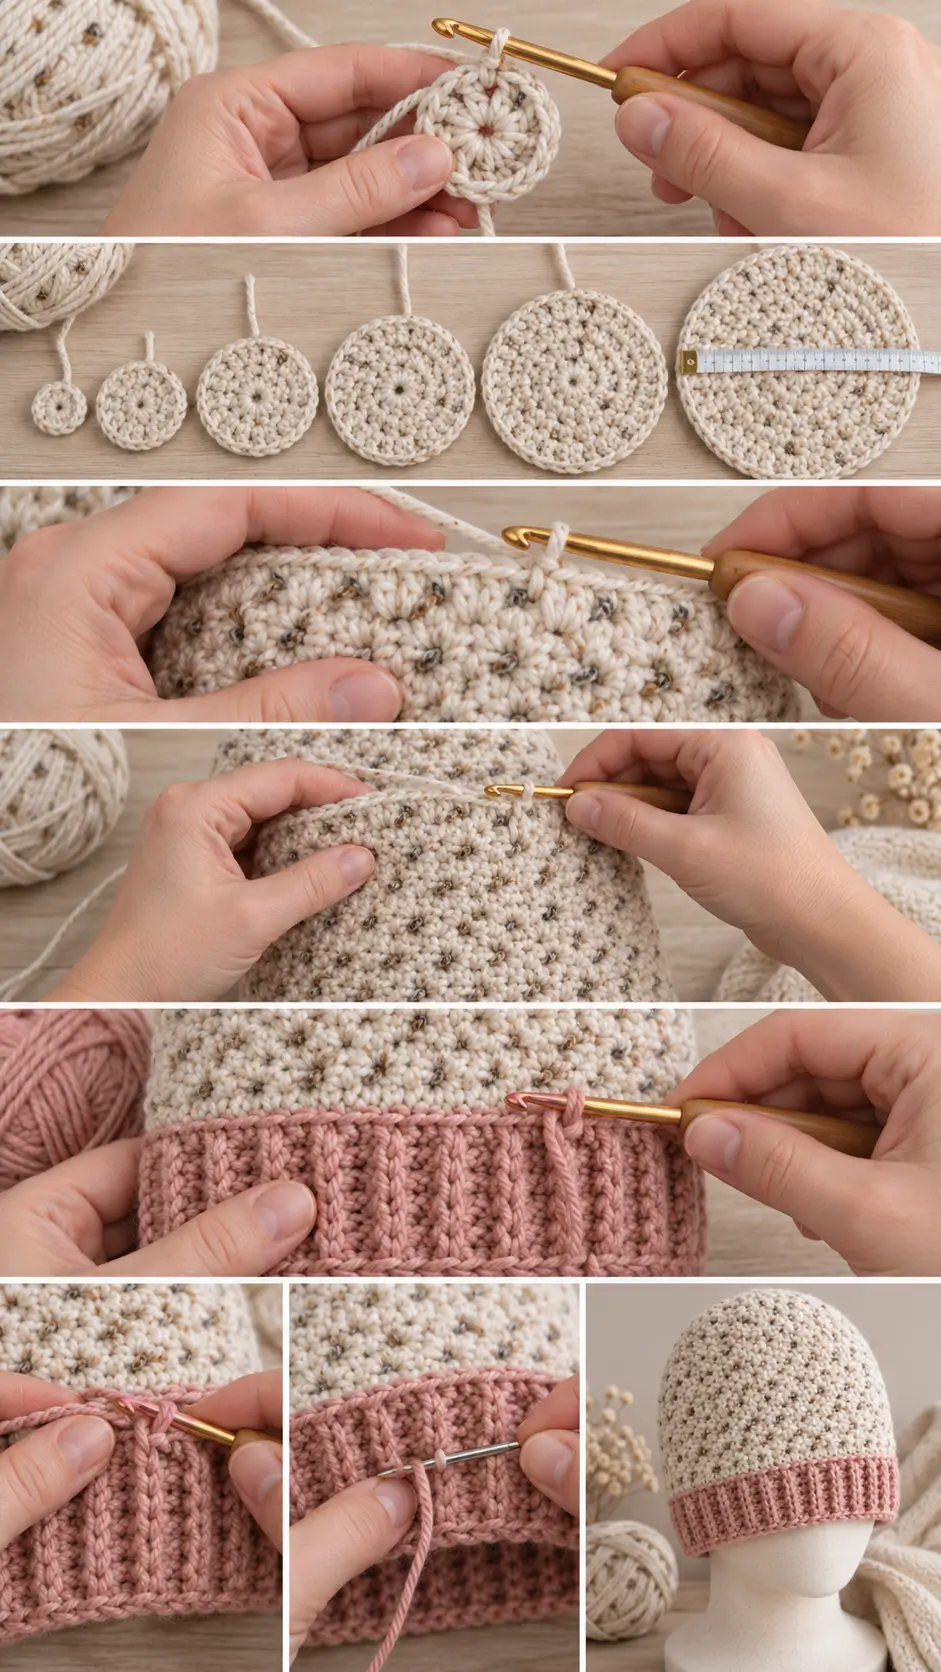
PART 1 — CROCHET THE CROWN
Using Color A and the 5 mm hook:
Make a magic ring.
Round 1
Ch 1.
Work:
12 hdc
into the magic ring.
Pull the ring closed.
Join with sl st to first hdc.
12 sts
Round 2
Ch 1.
Work:
2 hdc in every stitch around.
Join.
24 sts.
Round 3
Ch 1.
Repeat:
1 hdc in next st, 2 hdc in next st
around.
Join.
36 sts.
Round 4
Ch 1.
Repeat:
1 hdc in next 2 sts, 2 hdc in next st
around.
Join.
48 sts.
Round 5
Ch 1.
Repeat:
1 hdc in next 3 sts, 2 hdc in next st
around.
Join.
60 sts.
CHILD SIZE
For the Child size:
Stop increasing now.
You have:
60 stitches.
Continue to the textured body section.
The crown should measure approximately:
5½–5¾ inches across
when laid flat.
TEEN SIZE — Round 6
To increase from 60 to 64 stitches:
Ch 1.
Repeat 4 times:
Hdc in next 14 sts, 2 hdc in next st.
Join.
64 sts.
Continue to the body.
ADULT SIZE — Round 6
To increase from 60 to 68 stitches:
Ch 1.
Repeat the following sequence 4 times:
Hdc in next 6 sts, 2 hdc in next st, hdc in next 7 sts, 2 hdc in next st.
Join.
68 sts.
Continue to the body.
Check the Crown
Lay the crown flat.
It should look like a smooth circle without:
- waves
- deep cupping
- sharp corners
A tiny amount of cupping is fine because the hat will soon begin growing downward.
PART 2 — BEGIN THE TEXTURED BODY
All three sizes follow the same stitch pattern.
Your stitch count will remain:
- Child: 60
- Teen: 64
- Adult: 68
All counts are even, which is important for the alternating texture.
Texture Round 1
Ch 1.
Repeat around:
sc in next st, dc in next st.
Join to first sc.
Do not turn.
Texture Round 2
Ch 1.
Repeat around:
dc in next st, sc in next st.
Join to first dc.
Why the Second Round Is Reversed
Round 1 creates:
sc, dc, sc, dc
Round 2 creates:
dc, sc, dc, sc
That places:
dc over sc
and:
sc over dc
which creates the small pebbled texture.
Texture Round 3
Repeat Texture Round 1:
sc, dc
around.
Texture Round 4
Repeat Texture Round 2:
dc, sc
around.
Continue the Body
Keep alternating:
Odd texture rounds
sc, dc
Even texture rounds
dc, sc
Continue until the hat measures from the center of the crown:
Child
Approximately 6¼ inches
Teen
Approximately 6¾ inches
Adult
Approximately 7¼ inches
Do not fasten off yet.
Try the Hat On
This is one advantage of working top down.
Before adding the brim, try the hat on.
The lower edge should sit roughly:
1½ inches above where you want the finished hat to end.
The contrasting ribbed brim will supply the remaining length.
If you want a slouchier hat, add another:
½–1 inch
of textured rounds now.
PART 3 — PREPARE FOR THE RIBBED BRIM
Finish your final texture round.
Join.
Fasten off Color A.
Join Color B at the back of the hat.
Brim Setup Round
With Color B:
Ch 2.
Dc in every stitch around.
Join to first dc.
Keep the same stitch count:
- Child: 60
- Teen: 64
- Adult: 68
Ribbing Round 1
Ch 2.
Do not count the chain as a stitch.
Repeat:
FPdc around next dc
BPdc around next dc
around.
Join.
Ribbing Round 2
Ch 2.
Work:
FPdc around each FPdc
and:
BPdc around each BPdc
around.
Join.
The raised posts should begin forming clear vertical ribs.
Ribbing Round 3
Repeat Ribbing Round 2.
Ribbing Round 4
Repeat once more.
The brim should measure approximately:
1½ inches.
For a deeper brim, continue for another 1–2 rounds.
Final Edge Round
Ch 1.
Work:
1 sc loosely in every stitch around.
Join with sl st.
Fasten off.
Do not work this round tightly or the opening may lose its stretch.
Finished Hat Measurements
Approximate measurements after light blocking:
| Size | Circumference | Height |
|---|---|---|
| Child | 17–18″ relaxed | 7½–8″ |
| Teen | 18½–19½” relaxed | 8–8½” |
| Adult | 19½–20½” relaxed | 8½–9″ |
The ribbed edge and textured body stretch to fit a larger actual head circumference.
PART 4 — FINISHING
Thread the yarn tails onto a yarn needle.
Weave each end through several stitches.
Change direction and weave back through the fabric.
Trim only after the tails are secure.
Pay special attention to the color-change point at the brim.
Blocking
A hat generally needs only light blocking.
You can:
- Lightly dampen the hat.
- Shape it over a bowl or hat form.
- Smooth the crown.
- Straighten the ribbing.
- Allow it to dry completely.
Do not overstretch the brim.
How the Texture Should Look
The finished body should have:
- small raised bumps
- no large holes
- subtle horizontal texture
- soft flexibility
- more visual interest than plain double crochet
The stitch pattern should still look relatively smooth from a distance.
That makes it especially useful for everyday hats.
How to Make the Hat More Slouchy
Before starting the pink brim, simply crochet more textured rounds.
Add:
Slight slouch
1 extra inch
Moderate slouch
2 extra inches
Keep the stitch count unchanged.
How to Make a Close-Fitting Beanie
Stop the textured body slightly earlier.
When measured from the crown center, begin the brim at approximately:
Child
5¾–6 inches
Teen
6¼ inches
Adult
6¾ inches
Then add the 1½-inch brim.
How to Make the Brim Deeper
For a fold-up style brim, continue the FPdc/BPdc ribbing until it measures:
3–3½ inches.
Fold approximately half upward when worn.
You may need an additional:
30–50 yards
of contrast yarn.
One-Color Version
You do not need a contrasting brim.
Continue using Color A for the entire hat.
The different stitch textures still make the brim visually distinct.
A solid cream, camel, charcoal, forest green, or burgundy version would work especially well.
Three-Color Version
For a more playful hat:
Crown
Cream
Textured Body
Speckled gray
Brim
Dusty rose
Or divide the body into broad stripes.
Avoid changing colors every round because the stitch texture already adds visual activity.
Scrap-Yarn Brim
The brim requires relatively little yarn, making it a useful place to use leftovers.
Try:
- rust
- mustard
- dusty blue
- plum
- forest green
- blush
against a neutral cream body.
Optional Pom-Pom
You can attach a pom-pom to the center of the crown.
A removable pom-pom is especially practical because the hat is easier to wash without it.
For children’s hats, securely attach any embellishment and check it regularly for looseness.
Why Is My Crown Ruffling?
If the circle develops obvious waves, your stitches may be too loose.
Try:
- a smaller hook
- slightly tighter tension
Do not continue increasing indefinitely.
Once you reach the stitch count for your size, work straight without increases.
Why Is My Crown Cupping Too Early?
If the crown forms a bowl before the increase rounds are finished, your tension may be too tight.
Try:
- a larger hook
- looser hdc stitches
A small amount of cupping near the final crown round is normal.
Why Is My Hat Too Loose?
Check your gauge.
You can also remove stitches before starting the texture.
Because the body texture needs an even number, reduce by:
2 or 4 stitches.
Make decreases evenly around one hdc round before beginning the textured section.
Why Is My Hat Too Tight?
If the crown circumference is slightly too small, add one controlled increase round.
Increase:
4 stitches evenly
around.
Keep the final stitch count even.
Then begin the texture.
Why Does My Texture Look Different?
Make sure you are alternating stitch height.
One round should begin:
sc, dc
and the next:
dc, sc.
If you accidentally put:
sc over sc
and:
dc over dc
the texture begins forming vertical columns instead.
Why Is the Brim Flared?
FPdc/BPdc ribbing can flare if your post stitches are significantly looser than the body.
Try:
- slightly tighter tension
- a 4.5 mm hook for the brim
Do not intentionally decrease unless necessary because that can make the opening uncomfortable.
Why Is the Brim Too Tight?
Post stitches need enough room to stretch.
If necessary:
- return to the 5 mm hook
- crochet more loosely
- skip the final sc round
The brim should stretch comfortably over the widest part of the head.
Can I Use DK Yarn?
Yes, but you will need:
- a smaller hook
- more crown stitches
- additional body rounds
Make a gauge swatch first rather than using the worsted-weight stitch counts unchanged.
Can I Use Bulky Yarn?
Yes.
Use fewer crown stitches and an appropriately larger hook.
Because bulky yarn changes the proportions dramatically, make the crown according to diameter rather than following these exact stitch counts.
Can I Make This as a Gift Without Knowing the Exact Head Size?
The Teen size works well as a starting point for many older children and smaller adults, while Adult is better for a typical adult head.
If possible, get the recipient’s actual head circumference.
A difference of even one or two inches can change how a fitted beanie feels.
Simple Matching Scarf Idea
The same alternating texture works beautifully for a scarf.
Chain an even number of stitches to your desired width.
Work:
Row 1
Sc, dc across.
Row 2
Dc, sc across.
Repeat.
Finish each short edge with several rows of dusty-rose ribbing or simple sc.
This naturally turns the hat into a matching winter gift set.
Matching Cowl
For a quick coordinating project, crochet a rectangle using the same cream textured stitch.
Seam the short ends together.
Add dusty-rose post-stitch edging around both openings.
This gives you:
hat + cowl
using the same yarn combination.
Final Thoughts
This beanie gets most of its personality from two simple details:
a lightly pebbled cream body
and
a contrasting ribbed pink brim.
The top-down construction lets you control the fit before committing to the brim, and the body requires only single crochet and double crochet.
Once you remember:
sc, dc
then:
dc, sc
the texture becomes easy to repeat.
Add the post-stitch brim at the end, and a simple two-color beanie gets a much more polished, giftable finish.



