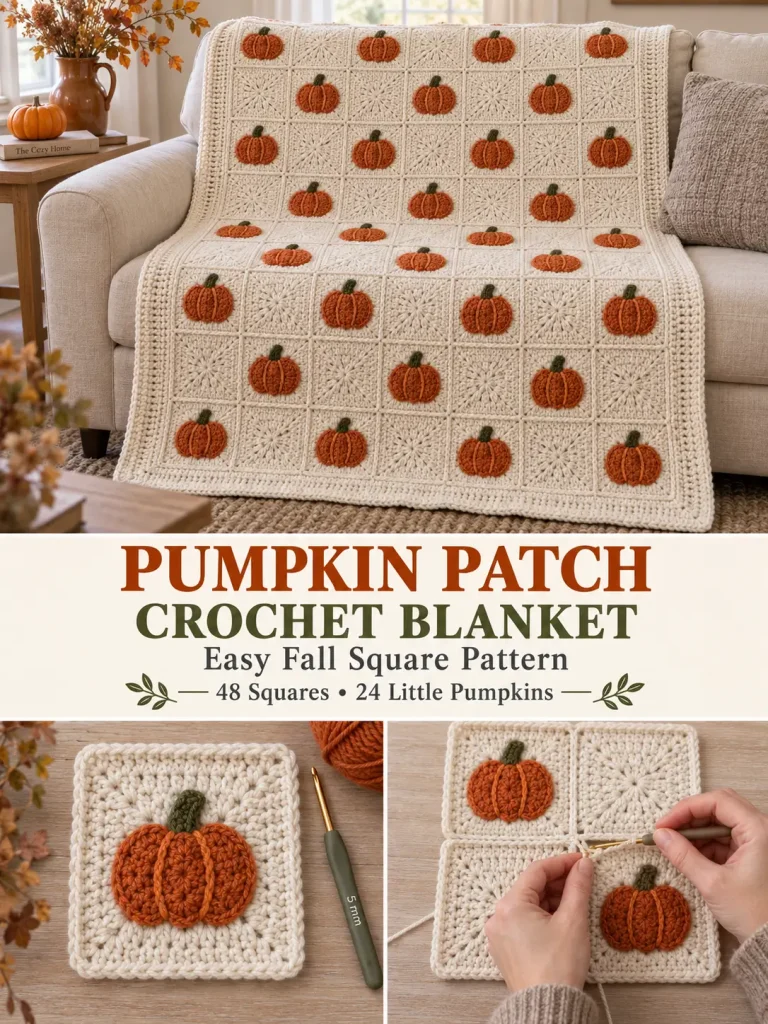
This cozy fall blanket combines warm cream crochet squares with simple burnt-orange pumpkin appliqués to create a patchwork blanket that feels perfect for September through Thanksgiving.
The pumpkin-patch look was inspired by the broad visual idea of The Pumpkin Patch Blanket by MJ’s Off The Hook Designs. That design is a paid copyrighted pattern; the version below uses an original construction with separate pumpkin appliqués, different square construction, a 6 × 8 layout, different stitch counts, joining method, and border. (Ravelry)
Because every pumpkin is added separately, you can easily make more or fewer pumpkin squares—or turn the same motif into pillows, tote bags, table runners, or smaller baby blankets.
Pattern at a Glance
Skill level: Advanced beginner
Terminology: US crochet terms
Finished size: Approximately 46 × 60 inches
Construction: 48 individual squares joined into a 6 × 8 layout
Pumpkin squares: 24
Plain squares: 24
Square size: Approximately 7 inches
Yarn weight: DK / Category 3
Main hook: 5 mm
Pumpkin hook: 4 mm
Joining: Flat slip-stitch or whip-stitch join
Border: 3 rounds
Materials
You will need approximately:
Cream
1,950–2,150 yards DK yarn
Burnt Orange
300–350 yards DK yarn
Forest or Olive Green
40–60 yards DK yarn
Also:
- 5 mm crochet hook
- 4 mm crochet hook
- yarn needle
- scissors
- stitch markers
- blocking mats, optional
Choose a smooth yarn that gives the square good stitch definition.
A washable acrylic, cotton/acrylic blend, or soft wool blend works well.
Suggested Colors
Color A
Warm Cream / Natural Ivory
Color B
Burnt Pumpkin Orange
Color C
Deep Olive or Forest Green
The simple three-color palette lets the pumpkins stand out without making the blanket visually busy.
Finished Measurements
Each blocked square:
Approximately 7 × 7 inches
Joined layout:
6 squares across × 8 squares down
Before border:
Approximately 42 × 56 inches
After border:
Approximately 46 × 60 inches
Exact measurements will depend on your gauge and joining tension.
Gauge
After Round 6, one blocked square should measure approximately:
7 inches square.
Exact stitch gauge is less important than making every square the same finished size.
If your square is too small, try a 5.5 mm hook.
If it is too large, try a 4.5 mm hook.
Abbreviations
- ch = chain
- sc = single crochet
- hdc = half double crochet
- dc = double crochet
- sl st = slip stitch
- BLO = back loop only
- st = stitch
- sts = stitches
- MR = magic ring
- rep = repeat
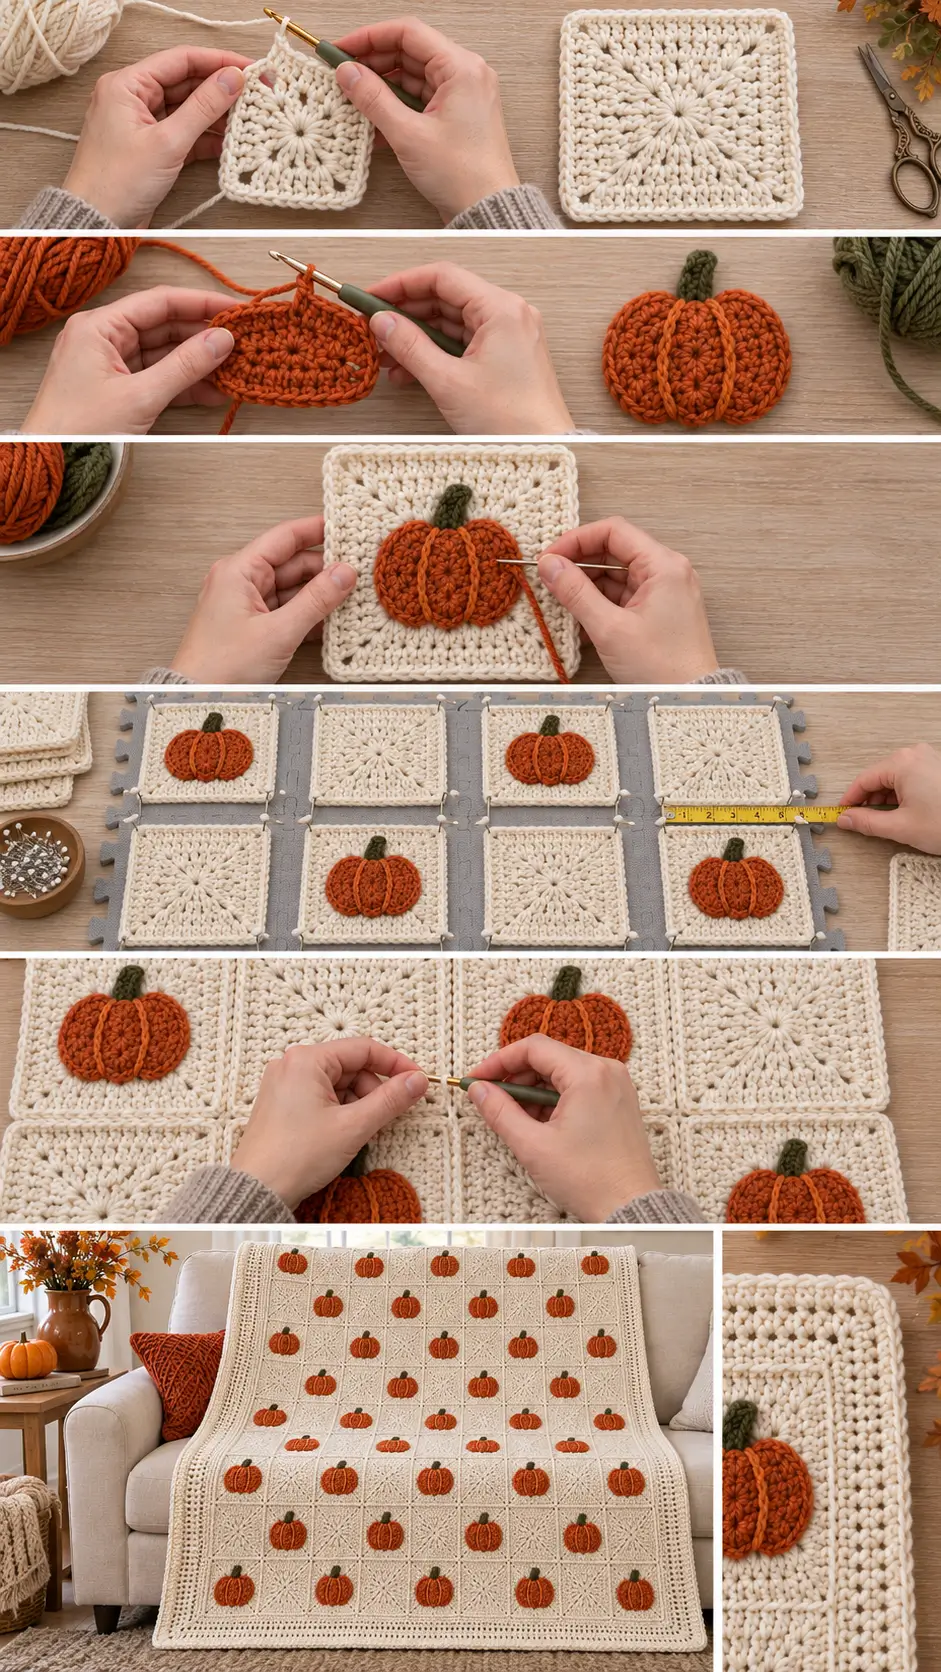
PART 1 — BASIC CREAM SQUARE
Both the pumpkin squares and plain squares begin with the same cream square.
Make:
48 squares total.
Twenty-four will remain plain.
Twenty-four will receive pumpkins.
Round 1
Using cream and the 5 mm hook, make a magic ring.
Ch 2.
The ch-2 does not count as a stitch.
Into the ring work:
3 dc, ch 2
Repeat that sequence 4 times total.
Join with sl st to first dc.
You should have:
- 12 dc
- 4 corner ch-2 spaces
Pull the magic ring closed.
Round 2
Ch 2.
Dc in each stitch until you reach the first corner.
In every ch-2 corner space work:
2 dc, ch 2, 2 dc
Continue working:
1 dc in every regular stitch
and:
2 dc, ch 2, 2 dc
in every corner.
Join to first dc.
You should have:
28 dc.
Round 3
Ch 2.
Dc in every dc around.
At each corner ch-2 space work:
2 dc, ch 2, 2 dc
Join.
You should have:
44 dc.
Round 4
Repeat Round 3.
You should now have:
60 dc.
Round 5
Repeat the same construction:
- 1 dc in every dc
- 2 dc, ch 2, 2 dc in every corner
You should have:
76 dc.
Round 6
Repeat once more.
You should have:
92 dc.
Fasten off.
Check the Square
Your finished motif should be:
- flat
- approximately 7 inches square
- slightly textured from the center-out construction
- identical on all four sides
- free from rippling
Block lightly before assembly.
PART 2 — CROCHET THE PUMPKINS
Make:
24 pumpkins.
Switch to the:
4 mm hook.
The pumpkins are crocheted separately and sewn onto the cream squares.
This keeps the blanket construction simple and gives the orange motifs a slightly raised appearance.
Pumpkin Body
Using burnt-orange yarn:
Ch 8.
Round 1
Work 2 sc in the second chain from the hook.
Sc in each of the next:
5 chains.
Work:
4 sc
in the final chain.
Now rotate the foundation chain and work along the unused loops on the opposite side.
Sc in next:
5 chains.
Work:
2 sc
into the remaining end of the first chain.
Join to first sc.
18 sc.
Round 2
Ch 1.
Work:
2 sc in each of next 2 sts.
Sc in next:
5 sts.
Work:
2 sc in each of next 4 sts.
Sc in next:
5 sts.
Work:
2 sc in each of final 2 sts.
Join.
26 sc.
Fasten off, leaving a long tail for sewing.
The pumpkin should form a broad rounded oval.
Shape the Pumpkin
Gently stretch the oval sideways rather than vertically.
The finished pumpkin body should measure approximately:
3–3¼ inches wide × 2–2¼ inches high
depending on your tension.
Pumpkin Ridge Lines
Cut approximately:
18 inches of orange yarn
and thread it onto a yarn needle.
Bring the needle from back to front near the upper edge of the pumpkin.
Make one relaxed vertical surface stitch from the top toward the bottom, slightly left of center.
Make a second vertical line slightly right of center.
Do not pull tightly.
The two lines should divide the pumpkin visually into:
3 rounded lobes.
Secure the yarn on the back.
Crochet the Stem
Using green yarn and the 4 mm hook:
Join to the center top of the pumpkin.
Ch 4.
Sl st in second ch from hook.
Sc in next 2 chains.
Sl st back into the pumpkin.
Fasten off.
You now have a short green stem.
Optional Tiny Leaf
Before fastening off the green yarn:
Ch 4.
Sl st in second chain from hook.
Sc in next chain.
Hdc in final chain.
Sl st back into the pumpkin beside the stem.
Fasten off.
Keep the leaf tiny so it doesn’t overwhelm the pumpkin.
PART 3 — ATTACH THE PUMPKINS
Choose:
24 of the 48 cream squares.
Place one pumpkin in the center of each selected square.
The stem should point toward one corner or directly upward.
For the most consistent blanket, position every pumpkin the same way.
Pin the Pumpkin
Center the pumpkin so approximately equal cream space remains:
- above
- below
- left
- right
Pin or hold securely.
Sew Around the Pumpkin
Using the long orange tail:
Whipstitch around the outer edge.
Catch only the top portion of the cream stitches where possible so the sewing is less visible on the reverse side.
Do not pull tightly enough to pucker the square.
Secure the yarn thoroughly.
Sew the Stem
Use green yarn to secure the stem and optional leaf.
The pumpkin should lie flat but remain slightly raised from the background.
Block the Finished Pumpkin Squares
Lay all 48 squares flat.
Shape each to:
7 × 7 inches.
Pay particular attention to the pumpkin squares because sewing on the appliqué can pull the center slightly inward.
PART 4 — BLANKET LAYOUT
Arrange your squares:
6 across × 8 down.
Alternate pumpkin and plain squares like a checkerboard.
Row 1
Pumpkin — Plain — Pumpkin — Plain — Pumpkin — Plain
Row 2
Plain — Pumpkin — Plain — Pumpkin — Plain — Pumpkin
Continue alternating throughout all 8 rows.
This gives you:
24 pumpkin squares
24 plain squares
Check Pumpkin Direction
Before joining anything, make sure every pumpkin stem points toward the top of the blanket.
This is especially important when working with many nearly identical cream squares.
Take a photo of the finished layout before moving the pieces.
It gives you an easy reference while joining.
PART 5 — JOIN THE SQUARES
You can use either of these methods.
Option 1 — Flat Slip-Stitch Join
This gives the blanket a subtle raised grid between squares.
Use cream and the 5 mm hook.
Hold two squares with wrong sides together.
Insert the hook through the corresponding outer loops of both squares.
Sl st through both.
Continue evenly across the entire side.
Keep your slip stitches loose.
Join the Rows First
Join the 6 squares of Row 1.
Repeat for all 8 blanket rows.
You will have:
8 long strips.
Then join those strips together horizontally.
Option 2 — Whip-Stitch Join
For a flatter seam:
Place squares right sides together.
Using cream yarn and a yarn needle, whipstitch through corresponding edge stitches.
Open the joined squares and gently flatten the seam with your fingers.
Check the Blanket Before Bordering
Once all 48 squares are joined, lay the blanket flat.
Check:
- square alignment
- pumpkin direction
- seam tension
- corners
- overall rectangle
Correct any obvious puckering before adding the border.
PART 6 — BORDER
Use cream and the 5 mm hook.
Border Round 1
Join cream at any outer corner.
Ch 1.
Sc evenly around the entire blanket.
Across each square edge:
Work approximately:
1 sc in each stitch
At each square seam:
Work normally across without adding unnecessary stitches.
At each blanket corner:
sc, ch 2, sc
Join with sl st to first sc.
Check the Border
Lay the blanket flat.
If the edge ripples, you have too many stitches.
If it pulls inward, add a few stitches evenly along the affected side.
Fix this before continuing.
Border Round 2
Ch 2.
Hdc in every stitch around.
At every corner ch-2 space work:
hdc, ch 2, hdc
Join.
Border Round 3
Ch 1.
Working in the BLO:
Sc in every stitch around.
At each corner:
sc, ch 2, sc
Join.
Fasten off.
The BLO round creates a subtle raised line around the finished blanket.
Optional Fourth Border Round
For a slightly wider border:
Work one final round of regular sc.
At each corner:
2 sc, ch 2, 2 sc
This creates a simple clean outer frame without competing with the pumpkins.
Finishing
Weave in every remaining yarn end.
Pay extra attention to:
- pumpkin stems
- appliqué tails
- joining yarn
- border joins
Because blankets receive frequent handling, weave each end in several directions before trimming.
Blocking the Finished Blanket
Light blocking helps the patchwork settle evenly.
Lay the blanket flat.
Shape it to approximately:
46 × 60 inches.
Straighten:
- all four outside edges
- square seams
- corners
Reshape any pumpkins that became distorted during assembly.
Allow the blanket to dry completely.
How to Make a Smaller Blanket
For a baby or lap-size version, use:
5 squares across × 6 squares down
for:
30 squares total.
Alternate:
- 15 pumpkin squares
- 15 plain squares
At 7 inches per square, the body will measure approximately:
35 × 42 inches
before the border.
Larger Throw
Use:
7 squares across × 9 squares down
for:
63 squares.
A checkerboard layout will require approximately:
- 32 pumpkin squares
- 31 plain squares
or the reverse.
The body will measure approximately:
49 × 63 inches
before border.
Bed-Size Version
For a larger blanket, first measure the bed and divide the desired width by:
7 inches.
Round to the nearest whole square.
For example:
8 squares across:
8 × 7 = 56 inches
10 squares across:
10 × 7 = 70 inches
Then choose enough rows to create your desired length.
Scrap-Yarn Pumpkin Version
Keep every square cream but make the pumpkins in several fall shades:
- burnt orange
- rust
- terracotta
- golden pumpkin
- muted brick
- deep copper
Use the same green stem on every pumpkin to make the blanket feel cohesive.
This is an easy way to use small leftover balls of fall-colored yarn.
More Subtle Version
Instead of putting a pumpkin on every other square, use only:
12 pumpkin squares.
Scatter them evenly through a field of plain cream squares.
This creates a quieter farmhouse-style blanket.
Pumpkin Pillow
The same squares work beautifully for a cushion.
Make:
9 squares.
Arrange:
3 × 3
with one, four, or five pumpkin motifs.
Join them into a front panel.
Make a simple solid crochet back or fabric envelope backing.
Pumpkin Table Runner
Make:
3 squares across × 7 squares long.
Alternate pumpkin and plain motifs.
Use only two border rounds so the runner stays light and flexible.
Pumpkin Tote Bag
Make:
8 squares.
Use:
- 4 for the front
- 4 for the back
Join into two 2 × 2 panels.
Add a cream gusset around the sides and bottom.
Finish with sturdy crochet handles.
One or two pumpkin squares on each side are enough to make the bag clearly seasonal.
Why Is My Square Ruffling?
You may have:
- added stitches between corners
- worked too many stitches into corner spaces
- used a hook that is too large
Every normal stitch receives:
1 dc.
Every corner receives only:
2 dc, ch 2, 2 dc.
Why Is My Square Cupping?
Try:
- a slightly larger hook
- looser corner chains
- blocking the square
If the center is extremely tight, your magic ring or first round may also be too tight.
Why Are My Pumpkins Puckering the Squares?
The appliqué stitches are probably too tight.
When sewing, allow the pumpkin to sit naturally on the cream square.
The sewing yarn should secure it—not cinch it.
Why Are My Pumpkins Different Sizes?
Check:
- hook size
- yarn weight
- stitch count
- tension
Every pumpkin should finish with:
26 stitches after Round 2.
Block the pumpkins before sewing if necessary.
Can I Make the Pumpkin Bigger?
Yes.
After Round 2, add a third round.
Work increases evenly around the two curved ends while working one stitch in each stitch along the long sides.
Make one sample before producing all 24 pumpkins so you can check the proportions against the 7-inch square.
Can I Use Worsted-Weight Yarn?
Yes.
Try approximately:
5.5–6 mm hook
for the squares and:
4.5–5 mm
for the pumpkins.
Your motifs will be larger, so make fewer squares if you want to maintain the same overall blanket size.
Can I Use Cotton?
Yes.
Cotton creates excellent definition for:
- square rounds
- pumpkin edges
- stems
- surface ridge lines
A full cotton throw can become heavy, however.
A cotton/acrylic blend is a good alternative.
Can I Use One Color for the Entire Square?
Absolutely.
The warm cream background is intentionally simple.
The orange pumpkins supply enough contrast that additional square colors aren’t necessary.
Can I Make Every Square a Pumpkin Square?
Yes.
For the written 6 × 8 blanket, make:
48 pumpkins.
The result will have a much stronger pumpkin-patch effect.
For a calmer design, the alternating checkerboard layout gives each pumpkin more visual breathing room.
Can I Leave Off the Pumpkin Ridge Lines?
Yes.
The oval still reads as a pumpkin once the green stem is attached.
The two surface lines simply create stronger lobe definition.
How to Make the Blanket Look More Expensive
Three details make the biggest difference:
Block every square to exactly the same size.
Keep every pumpkin positioned identically.
Use one consistent joining tension.
Those details create a much cleaner finished grid than adding more complicated stitches.
Best Internal Projects to Make With This Motif
Once you’ve made the pumpkin square, the same idea can lead naturally into:
- pumpkin crochet pillows
- fall crochet tote bags
- pumpkin table runners
- autumn granny-square projects
- scrap-yarn fall projects
- crochet gifts for Thanksgiving hosts
- fall yarn color combinations
The square doesn’t have to stay part of a blanket.
Final Thoughts
The visual payoff of this blanket comes from something very simple:
cream patchwork + bright little pumpkins + lots of repetition.
Make all 48 cream squares first.
Add pumpkins to half of them.
Arrange them in a checkerboard.
Join everything with cream.
Then finish with a clean understated border.
The result is a cozy autumn throw filled with small pumpkin motifs, while the separate-appliqué construction keeps the pattern flexible enough to reuse for pillows, runners, bags, and smaller seasonal projects.



