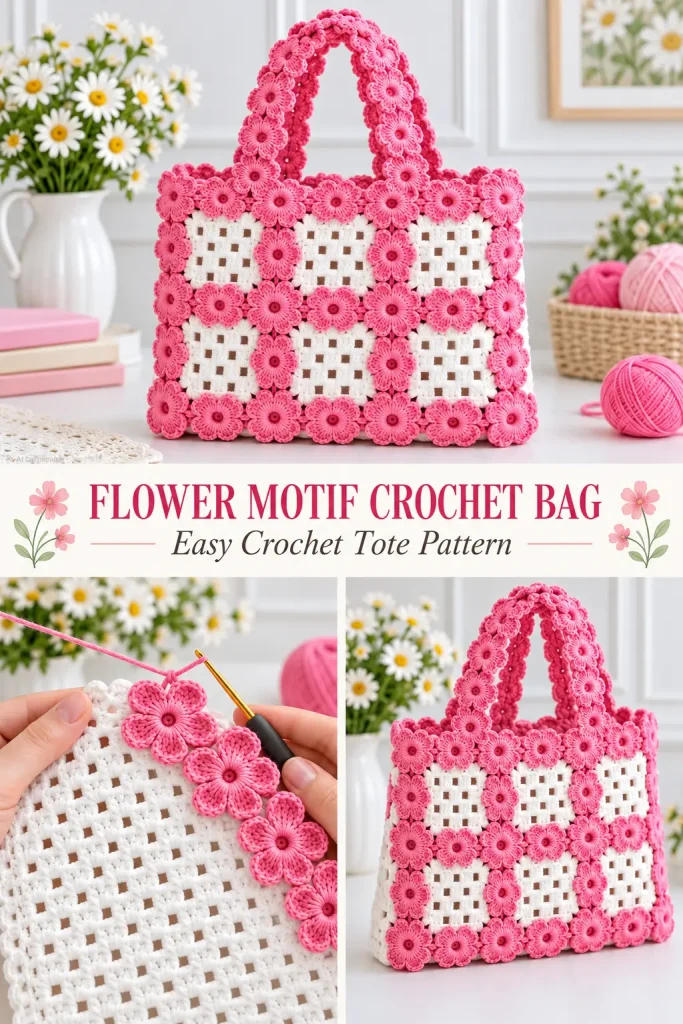
This cheerful crochet tote combines a simple white openwork body with dimensional pink five-petal flowers used as decorative trim around the bag and handles.
The exact construction of the pictured pattern cannot be determined from a single image, so the instructions below are an original bag pattern built around the same broad visual idea: a white lattice-style crochet bag, separately crocheted pink flower motifs, structured sides, and flower-decorated handles.
The flowers are made individually and sewn onto the finished bag, which makes the design much easier to customize. You can use a few flowers for a simple version or cover the edges and handles for a more dramatic look.
Skill Level
Confident Beginner / Intermediate
You should know how to:
- chain
- slip stitch
- single crochet
- double crochet
- work in chain spaces
- crochet in rounds
- sew crochet pieces together
- attach appliqués
Finished Size
Approximate finished bag:
- 11½ inches wide
- 10½ inches tall
- 3½ inches deep
- 9–10 inch handle drop
The size can easily be adjusted by adding or removing mesh repeats.
Materials
- Medium #4 cotton or cotton-blend yarn in white
- Approximately 450–550 yards white
- Medium #4 cotton or cotton-blend yarn in bright pink
- Approximately 250–325 yards pink
- 4 mm crochet hook
- Yarn needle
- Scissors
- Stitch markers
- Measuring tape
Optional:
- Cotton fabric for lining
- Magnetic snap
- Plastic canvas for reinforcing the base
- Cotton webbing for reinforcing the handles
Abbreviations — US Terms
ch – chain
sl st – slip stitch
sc – single crochet
hdc – half double crochet
dc – double crochet
st(s) – stitch(es)
sp – space
ch-sp – chain space
Special Stitches
Mesh Block
Work:
dc in next dc, ch 2, skip 2 sts
The next dc begins the next block.
Five-Petal Flower
Each flower is worked separately from the center outward.
The petals are made from several tall stitches worked into the same chain space.
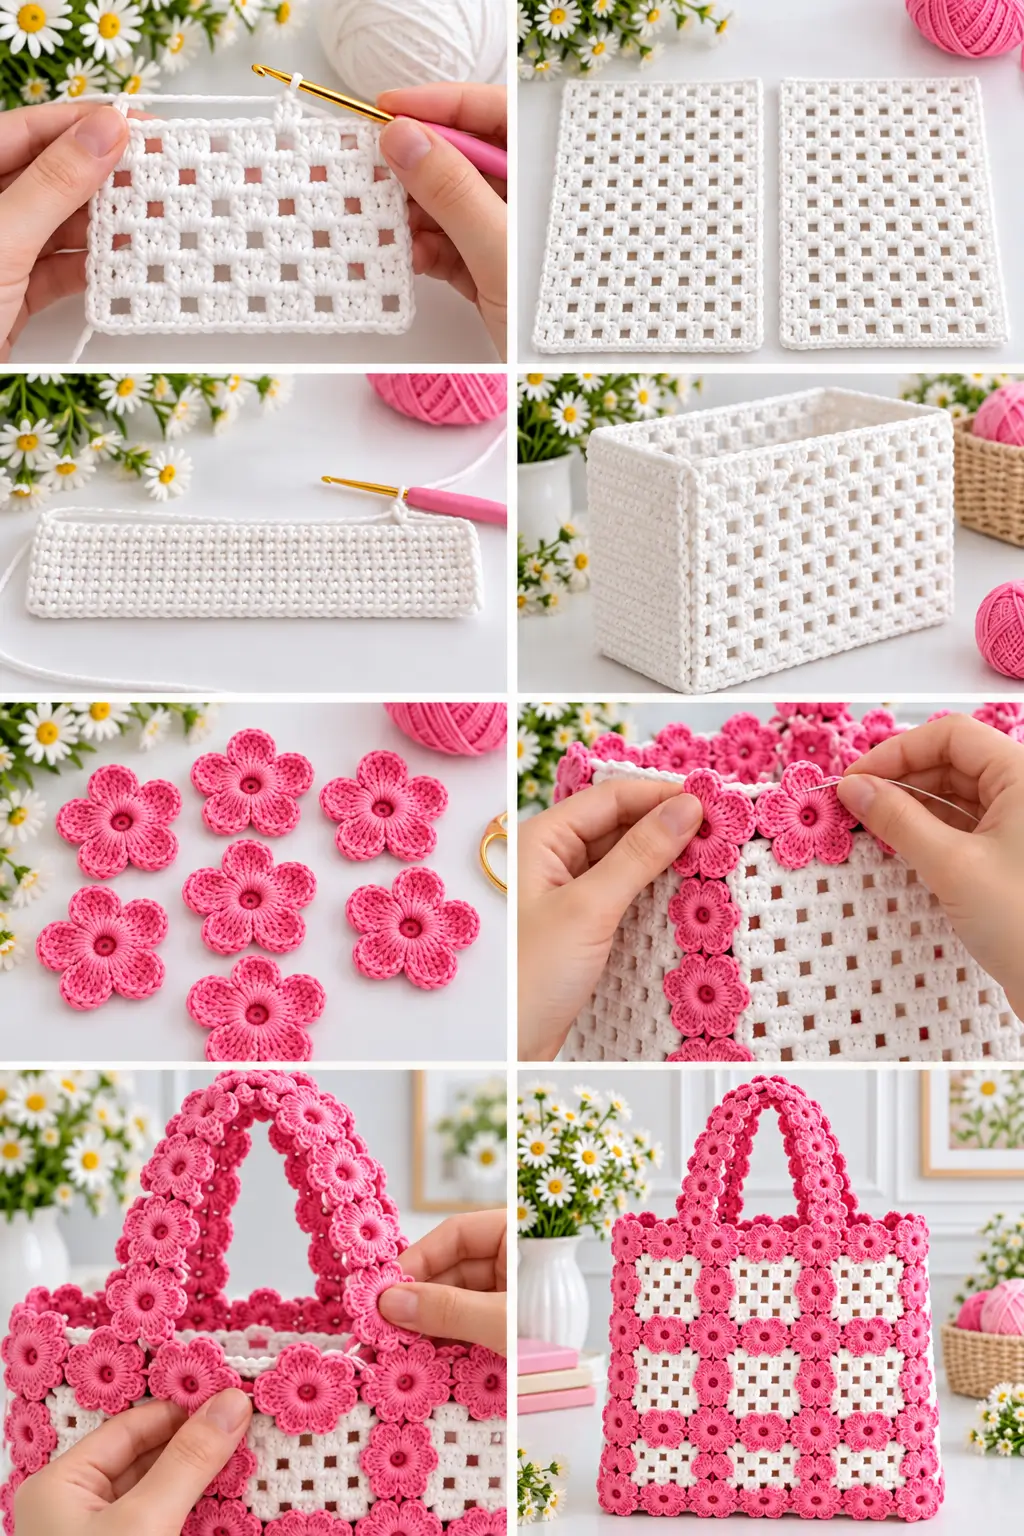
PART 1 — Make the Front Panel
Use white yarn.
The bag body uses a simple open lattice made from double crochet stitches and ch-2 spaces.
Foundation
Chain 45.
Row 1
Dc in the 4th chain from the hook.
The skipped chains count as the first dc.
Ch 2.
Skip the next 2 chains.
Dc in the next chain.
Repeat:
ch 2, skip 2 ch, dc in next ch
across.
You should finish with a dc in the final chain.
You now have a row of evenly spaced square openings.
Ch 3 and turn.
Row 2
The turning ch-3 counts as the first dc.
Ch 2.
Dc in the next dc.
Repeat across:
ch 2, dc in next dc
Do not work into the ch-2 spaces.
Ch 3 and turn.
Rows 3–18
Repeat Row 2.
Keep the mesh openings vertically aligned.
After Row 18, the panel should measure approximately:
11–11½ inches wide × 9–9½ inches tall
Do not fasten off yet.
PART 2 — Strengthen the Front Panel Edges
The open mesh needs a firmer border before the bag is assembled.
Border Round
Ch 1.
Work sc evenly around all four sides of the panel.
Across the top and bottom:
Work approximately 1 sc in each dc and 2 sc in each ch-2 space.
Along each side:
Work approximately 2 sc around each row-end dc.
At each corner:
Work 3 sc.
Join with a sl st.
Fasten off.
The panel should remain flat.
If the edge ruffles, reduce the number of side stitches slightly.
PART 3 — Make the Back Panel
Repeat the complete front-panel instructions.
You should now have:
2 identical white mesh rectangles
Block them gently so both panels have the same dimensions.
PART 4 — Crochet the Bottom and Side Gusset
The gusset creates the bottom and side depth of the tote.
Use white yarn.
Foundation
Chain 13.
Row 1
Sc in the second chain from the hook and across.
12 sc
Ch 1 and turn.
Row 2
Sc in every stitch across.
12 sc
Ch 1 and turn.
Continue
Repeat Row 2 until the strip is long enough to travel:
- up one side of the front panel
- across the bottom
- up the opposite side
For an 11½ × 9½ inch panel, the gusset should measure approximately:
30–31 inches long
Do not rely entirely on row count.
Measure the strip directly against the panel.
Fasten off, leaving a long sewing tail.
PART 5 — Attach the Gusset to the Front
Lay the front panel flat.
Beginning at the upper-left corner, pin one long edge of the gusset down:
- first side
- across bottom
- second side
The short ends of the gusset should stop at the top corners.
Using matching white yarn, sew or single crochet the gusset to the panel.
If crocheting the seam:
Insert the hook through both the panel edge and gusset edge.
Work sc evenly through both layers.
Keep the seam relaxed.
PART 6 — Attach the Back Panel
Place the back panel against the free edge of the gusset.
Make sure:
- top edges line up
- corners line up
- bag is not twisted
Join the back panel to the gusset using the same method.
Turn the bag right side out.
You now have a rectangular open-top bag approximately 3½ inches deep.
PART 7 — Strengthen the Top Opening
Attach white yarn at one side seam.
Top Round 1
Work sc evenly around the entire opening.
Join with a sl st.
Top Round 2
Ch 1.
Sc in every stitch around.
Join.
Top Round 3
Repeat Round 2.
Fasten off.
The top edge should now feel noticeably firmer than the mesh body.
PART 8 — Crochet the Pink Flowers
Make approximately 24 flowers for the version shown here.
You can make more or fewer depending on how densely you want to decorate the tote.
Use pink yarn.
Flower Center
Make a magic ring.
Ch 1.
Work:
10 sc into the ring
Pull the ring closed.
Join with a sl st to the first sc.
10 sts
Petal Setup Round
Ch 1.
Repeat around:
sc in next st, ch 3, skip next st
You should create:
5 ch-3 spaces
Join with a sl st.
These spaces form the foundations for the five petals.
PART 9 — Crochet the Five Petals
Sl st into the first ch-3 space.
In that space work:
sc, hdc, 3 dc, hdc, sc
You have completed one rounded petal.
In each remaining ch-3 space work:
sc, hdc, 3 dc, hdc, sc
You should have exactly:
5 petals
Join with a sl st.
Fasten off, leaving a long tail for sewing.
Flower Shape
Each flower should have:
- a small circular center
- exactly 5 rounded petals
- slightly raised dimensional texture
- approximately 2–2¼ inch diameter
Gently shape the petals with your fingers.
If necessary, lightly block the flowers before attaching them.
PART 10 — Optional Defined Flower Center
For a more decorative center, join a darker shade of pink or matching pink yarn through the center.
Work a few tight surface stitches around the opening.
Alternatively, sew several small French knots into the center.
Keep the center subtle so the five-petal shape remains the main feature.
PART 11 — Arrange the Flowers on the Bag
Before sewing anything, place all the flowers on the bag.
A balanced arrangement is:
Front Top Edge
5 flowers
Back Top Edge
5 flowers
Front Side Edges
3 flowers on each side
Back Side Edges
3 flowers on each side
This uses:
22 flowers
Keep 2 flowers for handle decoration or replacement.
You can also use additional flowers across the lower corners if desired.
Flower Placement
Place flowers so neighboring petals slightly overlap.
The flowers should create a continuous decorative trim without completely hiding the white crochet body.
Use stitch markers or safety pins to hold everything in place.
Check both sides before sewing.
PART 12 — Sew the Flowers to the Bag
Thread the long flower tail onto a yarn needle.
Sew through:
- flower center
- base of several petals
- strong stitches along the bag border
Avoid sewing only through the tips of the petals.
Each flower should remain slightly dimensional.
Secure each one in at least:
4–5 attachment points
Weave the yarn tail into the inside of the bag.
Repeat for all flowers.
PART 13 — Crochet the Handles
Make 2 identical handles using pink yarn.
Foundation
Chain 61.
Row 1
Sc in the second chain from the hook and across.
60 sc
Ch 1 and turn.
Rows 2–5
Sc in each stitch across.
Ch 1 and turn.
After Row 5, fasten off.
The strap should be approximately:
1¼ inches wide
and long enough to create a comfortable handbag handle.
Make the second strap exactly the same.
PART 14 — Reinforce the Handles
Crochet handles can stretch.
For a stronger bag, either:
- sew cotton webbing to the underside
- insert a length of non-stretch cord inside
- add a fabric backing
Do this before attaching the decorative flowers.
PART 15 — Attach the Handles
Position one handle on the front.
Place each end approximately:
2½–3 inches from the nearest side edge
Allow approximately:
9–10 inches of handle drop
Pin both ends.
Sew each attachment area securely across the entire strap width.
Use several passes of yarn.
Repeat with the second handle on the back.
Check that both handles are:
- the same height
- centered
- untwisted
- equally spaced
PART 16 — Add Flowers to the Handles
For the decorated-handle version, make additional flowers as needed.
A good arrangement is:
4–5 flowers per handle
Space them along the outer side of each pink strap.
Sew each flower through its center and the base of several petals.
Do not completely cover the strap.
Leave enough visible pink crochet between flowers to keep the handle flexible.
PART 17 — Optional Flower-Only Handle Look
For a more heavily decorated version, make approximately:
8 flowers per handle
Overlap them slightly along the entire strap.
The pink strap beneath provides the actual strength.
The flowers should remain decorative only.
Do not build the handle solely from flower-to-flower joins if the bag will carry weight.
PART 18 — Optional Fabric Lining
A lining is strongly recommended because the white body contains open mesh.
Without a lining, small items may poke through the openings.
Cut the Lining
Measure:
- finished bag width
- finished height
- side depth
Cut two fabric rectangles slightly larger than the front and back.
Add side and bottom pieces if using a structured lining, or make a simple boxed pouch.
Allow approximately:
½ inch seam allowance
Sew the Lining
Place lining pieces with right sides together.
Sew along:
- side
- bottom
- opposite side
Create boxed bottom corners if desired.
Fold the upper raw edge inward.
Press carefully.
Insert the Lining
Place the lining inside the bag.
The folded fabric edge should sit approximately:
½ inch below the crochet opening
Hand sew it to the firm top crochet rounds.
Keep stitches small and hidden.
Do not sew through the flower petals.
Optional Magnetic Snap
Install a magnetic snap in the lining before attaching it to the crochet bag.
Place the closure at the center of the top opening.
Reinforce the fabric behind the snap with a small square of interfacing.
Optional Firm Base
Cut a rectangle of plastic canvas slightly smaller than the bottom of the bag.
Slide it between the crochet bottom and lining.
This helps the tote hold its rectangular shape.
Do not make the insert so large that it pushes against the side seams.
How to Make the Bag Wider
The white mesh panel can be resized easily.
The foundation needs to preserve the repeating mesh structure.
Add chains in multiples of:
3
Every additional 3 chains creates another mesh section.
Make both panels identical.
Adjust the gusset length to match the new dimensions.
How to Make the Bag Taller
Simply work additional mesh rows before adding the single crochet border.
For example:
- 18 rows = medium handbag
- 22 rows = taller tote
- 26 rows = larger project bag
Measure the fabric rather than relying only on row count.
How to Make a Larger Tote
For a larger shoulder bag:
- widen the panels
- add more mesh rows
- make the gusset 4–5 inches wide
- lengthen the handles
- reinforce the handles
- add a strong fabric lining
The flower motifs can remain the same size.
Use additional flowers to fill the longer edges.
Color Ideas
Romantic
White + bright pink
Soft Vintage
Cream + dusty rose
Spring
White + lavender
Summer
Cream + coral
Botanical
Natural white + sage green flowers
High Contrast
Black body + cream flowers
Multicolor Garden
White body with flowers in:
- pink
- lavender
- yellow
- peach
- pale blue
Keep the handles in one coordinating color so the bag does not become visually too busy.
Best Yarn for This Bag
Cotton is particularly useful because the motifs and mesh remain well defined.
A firm cotton or cotton blend helps:
- maintain the rectangular shape
- keep flowers crisp
- reduce excessive stretching
- make seams easier to reinforce
Very fuzzy yarn can hide the flower details and mesh openings.
Tips for Consistent Flowers
Use the Same Hook
Even a small hook-size difference can make flower motifs noticeably different.
Count the Petals
Every flower must have exactly:
5 ch-3 spaces
and therefore:
5 petals
Keep Petal Tension Even
Each petal uses:
sc, hdc, 3 dc, hdc, sc
Maintain consistent tension so all petals are the same size.
Make Flowers in Batches
Crochet all centers first.
Then work all petal setup rounds.
Then finish all petals.
This can make producing 20+ flowers much faster.
Common Problems
Flowers Curl
The petal stitches may be too tight.
Use slightly looser tension or lightly block the finished flowers.
Flower Has Six Petals
Check Round 2 carefully.
You need exactly:
5 ch-3 spaces
Bag Body Stretches
Add a fabric lining and reinforce the handles.
Cotton yarn also helps reduce stretch.
Mesh Panels Are Different Sizes
Count both rows and mesh blocks.
Block both panels before assembly.
Gusset Is Too Long
Do not force excess fabric into the corners.
Remove rows until it fits the two sides and bottom exactly.
Flowers Sag Away From the Bag
Add more attachment points around the base of the petals.
Do not attach flowers only through their centers.
Handles Stretch Too Much
Add cotton webbing or another non-stretch reinforcement.
Finishing
Before using the bag:
- weave in all yarn tails
- check every flower
- reinforce loose petals
- inspect both handle attachments
- shape the bag
- insert lining if using one
- block gently if necessary
When blocking, avoid flattening the flowers completely.
The petals should retain some dimensional shape.
Pink Flower Crochet Tote
This bag gets its visual impact from combining two very simple crochet elements: an open white mesh panel and small five-petal flower appliqués.
The white lattice keeps the bag light and airy, while the repeated pink flowers create a bold decorative frame around the structure and handles.
Because the flowers are made separately, the same base pattern can be customized in many ways—from a lightly decorated everyday tote with just a few blossoms to a heavily embellished floral bag covered with dimensional crochet flowers.