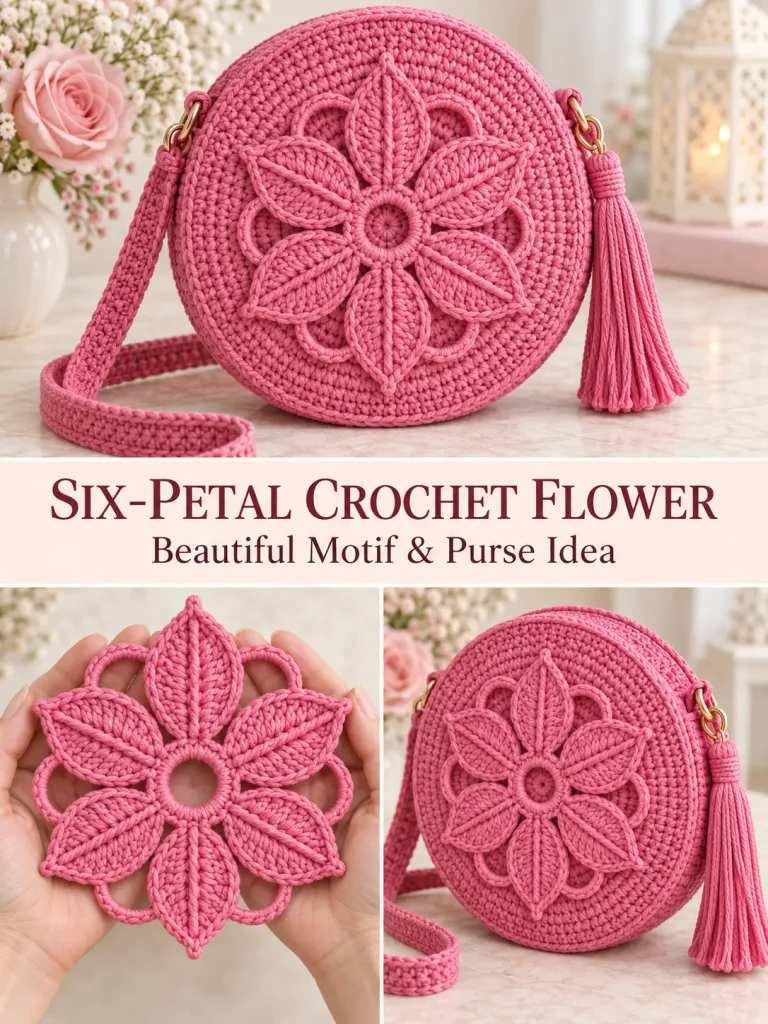
This dimensional crochet flower combines a bold open center, six pointed leaf-style petals, and six rounded chain arches to create an elegant lace medallion.
The motif works beautifully as a decorative centerpiece for:
- crochet bags
- purses
- cushion covers
- table runners
- placemats
- wall decor
- joined motif panels
- lightweight blankets
- decorative appliqués
The exact original stitch sequence cannot be confirmed from the image alone, so the instructions below are an original six-petal medallion designed around the same visual idea rather than a reconstruction of another creator’s pattern.
The important visual features are preserved: an open circular center, six large ribbed leaves, six open loops between the leaves, and a strong dimensional outline.
Skill Level
Intermediate
The stitches themselves are familiar, but the motif requires:
- working on both sides of a foundation chain
- tall stitches
- keeping six sections evenly spaced
- working around chain arches
- shaping pointed petals
- maintaining even tension
Materials
- DK / light #3 cotton or cotton-blend yarn
- 3.5 mm crochet hook
- Yarn needle
- Scissors
- Stitch markers
- Blocking mat and pins, optional
For a purse or bag decoration, firm cotton yarn works especially well because it helps the petals keep their shape.
Abbreviations — US Terms
ch – chain
sl st – slip stitch
sc – single crochet
hdc – half double crochet
dc – double crochet
tr – treble crochet
dtr – double treble crochet
st(s) – stitch(es)
sp – space
Finished Size
Using DK cotton and a 3.5 mm hook, the blocked motif should measure approximately:
5–5½ inches across
The exact measurement depends on your yarn and tension.
Gauge
Exact gauge is not critical.
For projects containing several motifs, consistency is much more important.
Make every motif using the same:
- yarn
- hook
- tension
- stitch counts
and block them to matching dimensions.
Pattern Construction
The motif is made in four stages:
- Crochet the open center ring.
- Build six pointed leaf petals.
- Create one open arch between every pair of petals.
- Add an outer edging that defines both the petals and arches.
There are exactly:
- 6 petals
- 6 open arches
- 6 petal anchor points
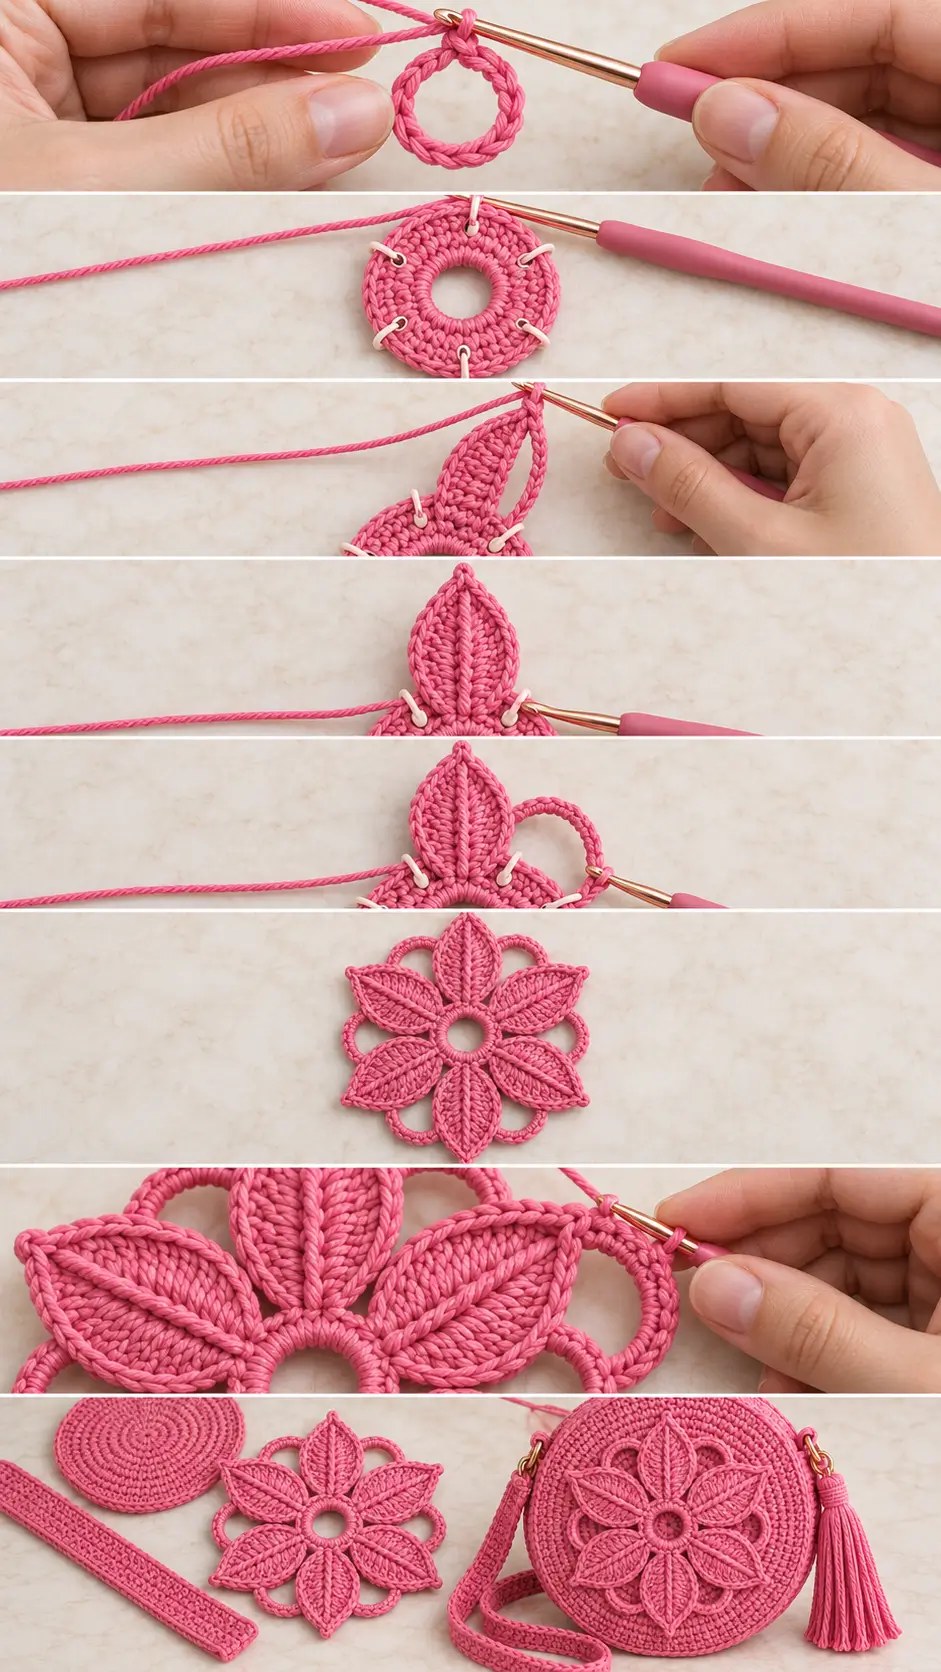
PART 1 — Crochet the Open Center
Chain 12.
Join with a sl st into the first chain to form a ring.
Make sure the chain is not twisted.
Round 1
Ch 1.
Work 24 sc into the center ring.
Push the stitches together evenly so the entire foundation ring is covered.
Join with a sl st to the first sc.
24 sc
What You Should See
You should have a firm circular ring with a clearly visible open center.
This opening remains part of the finished design.
Understanding the Six Sections
The 24 stitches are divided into:
6 groups of 4 stitches
The petal anchor stitches will be:
- stitch 1
- stitch 5
- stitch 9
- stitch 13
- stitch 17
- stitch 21
If helpful, place a stitch marker in each of these six stitches.
Every petal begins from one marked stitch.
PART 2 — Crochet the First Pointed Leaf
Begin in the first marked stitch.
Sl st into that stitch if necessary.
Leaf Foundation
Chain 9.
You will work down one side of this chain and then back along the opposite side.
Beginning in the second chain from the hook, work:
- sl st in next ch
- sc in next ch
- hdc in next ch
- dc in next ch
- tr in next ch
- dtr in next ch
- dtr in next ch
- dtr in final ch
The stitches gradually increase in height as you approach the base of the leaf.
Ch 1.
Rotate the work so you can crochet along the unused loops on the opposite side of the same foundation chain.
Work:
- dtr in first available loop
- dtr in next
- dtr in next
- tr in next
- dc in next
- hdc in next
- sc in next
- sl st in final loop
Sl st back into the same body-ring stitch where the leaf began.
Leaf Shape
You should now have one elongated leaf with:
- narrow pointed outer tip
- broad lower section
- matching left and right sides
- central foundation chain running through the middle
Do not pull the tall stitches tightly.
The leaf should lie mostly flat.
PART 3 — Make the First Open Arch
After completing the first leaf:
Ch 8.
Skip the next 3 sc from Round 1.
Sl st into the next sc.
That stitch becomes the anchor for the second leaf.
The ch-8 section forms the open rounded loop between the first and second petals.
PART 4 — Remaining Five Leaves
At the new anchor stitch, repeat the complete leaf instructions.
Leaf
Ch 9.
Working down the first side:
- sl st
- sc
- hdc
- dc
- tr
- dtr
- dtr
- dtr
Ch 1.
Working back along the opposite side:
- dtr
- dtr
- dtr
- tr
- dc
- hdc
- sc
- sl st
Sl st into the anchor stitch.
Then:
ch 8, skip 3 sc, sl st into next anchor
Continue until you have made exactly:
6 leaves
and:
6 ch-8 arches
After the sixth leaf, ch 8, skip the final 3 sc of Round 1, and join to the first petal anchor.
Check the Motif
Before continuing, count carefully.
You should have:
- 1 open circular center
- 6 pointed leaves
- 6 open chain loops
- all petals approximately the same size
The leaves and loops should alternate:
leaf – loop – leaf – loop
all the way around.
PART 5 — Define the Petal Edges
This round gives the motif a stronger outline and makes the leaves resemble the sculpted petals seen in dimensional floral crochet.
Attach yarn near the base of any petal if necessary.
Ch 1.
First Side of Leaf
Work 1 sc into each stitch along the first outer edge of the leaf.
You should work approximately 8 sc along this side.
When you reach the pointed end, work into the ch-1 tip:
sc, ch 2, sc
This keeps the tip sharp rather than rounded.
Second Side
Work 1 sc into each stitch down the opposite side.
Approximately:
8 sc
You are now back at the base.
Edge the Open Arch
Work 10 sc evenly around the next ch-8 arch.
Do not work into individual chain loops if that makes the arch twist.
Instead, insert the hook beneath the entire chain and crochet around it.
Slide the stitches together as needed.
The arch should look like a smooth crocheted cord.
Continue Around
Repeat:
- sc along first side of next leaf
- sc, ch 2, sc at leaf point
- sc down second side
- 10 sc around next ch-8 arch
Continue around all six sections.
Join with a sl st to the first sc.
Fasten off.
PART 6 — Add the Raised Leaf Rib
This detail gives the leaves more of the textured appearance seen in the inspiration.
Use matching yarn and a yarn needle.
Begin near the base of the first petal.
Follow the center foundation chain toward the tip.
Work a line of loose surface stitches through the middle of the petal.
You can use either:
- surface slip stitches with a crochet hook
- simple running stitches with a yarn needle
Stop just before the pointed tip.
Repeat on all six petals.
Important
Do not pull these stitches tightly.
The center line should sit slightly raised on the surface without making the leaf curl.
Finished Motif Structure
The completed medallion should have:
- one clean open center
- six large pointed leaf petals
- six open rounded loops
- raised center ribs on each leaf
- defined outer edging
- balanced circular shape
Blocking the Motif
Blocking helps the petals and loops become symmetrical.
Lightly dampen the motif according to the yarn manufacturer’s care instructions.
Lay it flat.
Pin the six petal tips first.
Arrange them at equal distances around the center.
Then shape the six open arches.
The sequence should remain:
petal – arch – petal – arch
Pin the center opening into a clean circle if necessary.
Allow the motif to dry completely.
Optional More Dimensional Petals
For a fuller petal, work two dtr into each of the three deepest foundation-chain positions instead of one.
This creates a wider petal with a more pronounced raised appearance.
Use this variation consistently on all six petals.
Optional Smaller Flower
For a smaller motif:
- use fingering-weight cotton
- use a 2–2.5 mm hook
- chain 7 instead of 9 for each leaf
- reduce the number of tall stitches accordingly
Keep exactly six leaves and six arches.
Optional Larger Flower
For a larger motif:
- use worsted #4 cotton
- use a 4–4.5 mm hook
- chain 10 or 11 for each leaf
- extend the tall-stitch section
Make one test petal first before crocheting all six.
How to Join Several Motifs
These medallions can also be joined into decorative fabric.
The easiest joining points are:
- petal tips
- centers of the rounded arches
Sewn Join
Block all motifs first.
Place two motifs side by side.
Use matching yarn and a yarn needle.
Join corresponding outer points with several small stitches.
For a stronger connection, join:
- one neighboring petal tip
- one arch
- second neighboring petal tip
This creates a stable three-point connection.
Join-As-You-Go Option
While edging the second motif, replace part of the ch-2 petal tip with a slip stitch into the corresponding tip of the neighboring motif.
At an arch, work half of the sc edging, slip stitch into the matching neighboring arch, then finish the remaining sc.
Keep joins loose enough for the motifs to lie flat.
Make a Round Crochet Purse
The motif makes a striking decorative centerpiece for a circular purse.
Instead of relying on the flower itself to support the contents, crochet a firm round bag body and attach the medallion as an appliqué.
PART 7 — Crochet the Round Purse Panel
Use the same pink yarn.
Make a magic ring.
Round 1
Work 6 sc into the ring.
6 sts
Round 2
2 sc in each stitch.
12 sts
Round 3
Repeat:
sc in next st, 2 sc in next st
18 sts
Round 4
Repeat:
sc in next 2 sts, 2 sc in next st
24 sts
Round 5
Repeat:
sc in next 3 sts, 2 sc in next st
30 sts
Round 6
Repeat:
sc in next 4 sts, 2 sc in next st
36 sts
Continue the standard flat-circle increase:
Every new round adds one additional sc between increases.
Stop when the circle measures approximately:
7½–8 inches across
The panel must remain flat.
Make Two Purse Panels
Crochet:
- one front circle
- one back circle
Block them to identical dimensions.
PART 8 — Attach the Flower Motif
Center the blocked six-petal medallion on the front purse panel.
Pin it in place.
Use matching pink yarn and a yarn needle.
Attach the motif at:
- center-ring area
- petal bases
- petal tips
- selected points along each arch
Keep the outer petals slightly raised.
Do not sew every edge completely flat.
The slight dimension is part of the design.
PART 9 — Crochet a Gusset
For a purse with depth, make a narrow strip.
Chain enough stitches for approximately:
2–2½ inches
Sc in the second chain and across.
Continue in rows until the strip is long enough to travel around:
- one side
- bottom
- opposite side
of the round purse panels.
Leave the upper section open.
Join the Purse
Attach one long gusset edge to the front circle.
Attach the opposite edge to the back circle.
Use either:
- sc through both layers
- slip stitch
- mattress stitch
The top remains open.
PART 10 — Add a Zipper
A zipper is especially useful for a round motif purse.
Choose a zipper close to the width of the opening.
Pin it evenly inside the upper edges.
Hand-sew the zipper to the crochet fabric with strong matching thread.
Check that it opens freely before securing all stitches.
PART 11 — Optional Fabric Lining
A fabric lining helps the purse hold its shape.
Cut two fabric circles slightly smaller than the crochet panels.
Add a fabric gusset matching the depth of the bag.
Sew them together into a pouch.
Insert the lining.
Fold the top raw edge inward.
Hand-sew it beneath the zipper.
PART 12 — Crochet Shoulder Strap
Chain until the strap reaches your preferred length.
For a crossbody strap, approximately:
42–48 inches
is a common starting range.
Strap Row 1
Sc in second chain from hook and across.
Ch 1 and turn.
Rows 2–4
Sc across.
Fasten off.
For extra strength, sew cotton webbing or ribbon along the underside.
Attach the Strap
Position one strap end on each side of the purse.
Sew through a wide section of crochet fabric.
Do not attach the strap to only one or two stitches.
Reinforce each attachment point several times.
Optional Metal Hardware
You can attach small D-rings to the sides and clip the strap to them.
If using hardware, reinforce the crochet area beneath it.
Optional Tassel
A long matching pink tassel adds movement to the round purse.
Wrap yarn around a piece of cardboard approximately 5–6 inches tall.
Tie firmly at the top.
Cut the opposite end.
Wrap yarn several times below the top to form the tassel head.
Trim evenly.
Attach it to the zipper pull or side ring.
Color Ideas
Romantic Pink
Rose pink throughout the entire motif and purse.
Vintage Neutral
Cream, beige, or warm ivory.
Botanical
Sage green with a cream lining.
Dramatic
Black motif over a black round purse.
Two-Tone
Cream purse body with dusty rose flower motif.
Summer
Coral, aqua, sunny yellow, or lavender.
Yarn Tips
A smooth cotton yarn shows the petal ribs and open loops particularly well.
For a handbag or purse, cotton also provides useful structure.
Avoid extremely fuzzy yarn when making the first motif because it can hide:
- foundation chains
- tall stitches
- petal edges
- joining points
Tips for Consistent Petals
Mark the Six Anchor Stitches
This prevents accidentally creating five or seven petals.
Count Every Leaf
Both sides of every leaf should contain the same stitch progression.
Keep Tall Stitches Relaxed
Very tight dtr stitches can make the leaves curl.
Compare Petals as You Work
After Petal 2, compare it to Petal 1.
Correct tension problems early instead of discovering them after all six are completed.
Shape the Tip
Make sure the ch-1 foundation tip remains visible before adding the final edging.
The outer sc, ch 2, sc preserves the pointed shape.
Common Problems
The Motif Has Seven Sections
Recount Round 1.
You need:
24 sc
with one anchor every 4 stitches.
That produces exactly six sections.
Petals Are Different Sizes
Check the leaf foundation.
Each petal begins with:
ch 9
and uses the exact same graduated stitch sequence on both sides.
Open Loops Are Different Sizes
Every gap between petals should begin with:
ch 8
Keep the chain tension consistent.
Petals Curl Strongly
The tall stitches may be too tight.
Use a slightly larger hook or deliberately loosen your dtr loops.
Center Ring Is Too Large
Use fewer foundation chains or a smaller hook.
Do not close the center entirely; the open circle is part of the motif.
Arch Edging Ruffles
Reduce the number of sc around each ch-8 arch.
Try 8 or 9 instead of 10.
Arch Pulls Tight
Increase the number to 11 or 12 sc.
The correct number depends slightly on your yarn and chain tension.
Finishing
After completing the motif or finished project:
- weave in all ends
- inspect the six petal tips
- straighten the six arches
- gently block
- avoid crushing the raised leaf ribs
- allow the crochet to dry completely
For a purse, block the motif before sewing it to the bag panel.
Six-Petal Crochet Flower Motif
The visual impact of this motif comes from alternating two very different shapes: large pointed leaves and simple rounded loops.
The open circular center keeps the design light, while the graduated tall stitches create broad dimensional petals. The surface rib adds definition, and the six curved arches provide enough negative space to make each leaf stand out.
Used alone, it makes a striking appliqué. Repeated and joined, it can become decorative lace fabric. Attached to a structured round crochet purse, it creates an especially strong visual centerpiece without requiring the flower itself to carry the weight of the bag.