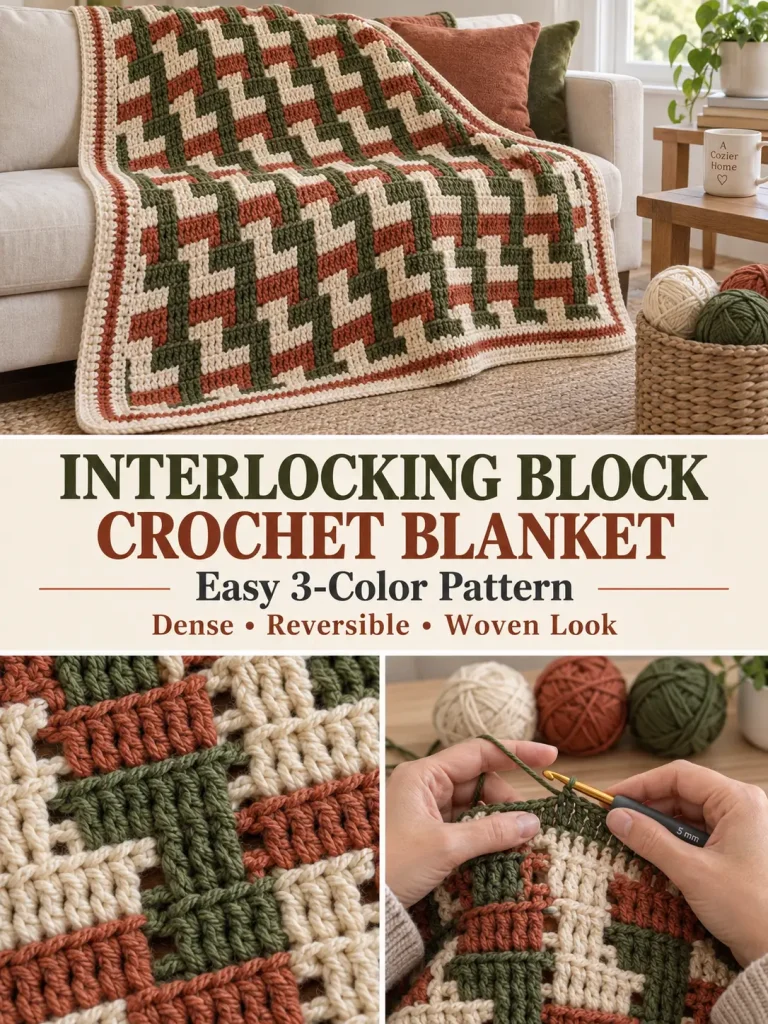
This three-color crochet blanket creates a woven, almost plaid-like surface without complicated colorwork.
The texture is built from alternating groups of double crochet and chain spaces. On later rows, the double crochets reach down into the row two levels below, filling the open spaces and making the color blocks appear to interlock.
The interlocking block stitch is also commonly called a plaid stitch. It creates a dense, reversible fabric and works especially well with two or three colors.
This blanket version uses an original fall-inspired palette of warm cream, terracotta, and deep olive, plus a simple solid border.
Pattern at a Glance
Skill level: Advanced beginner / intermediate
Terminology: US crochet terms
Finished size: Approximately 42 × 54 inches
Yarn weight: Worsted / Category 4
Hook: 5 mm
Construction: Worked flat in rows
Color repeat: 3 colors
Stitch multiple: 6 + 5 chains
Main repeat: 2 rows after setup
Border: 4 rounds
Fabric: Dense and reversible
Materials
You will need approximately:
Color A — Warm Cream
1,050–1,150 yards
Color B — Burnt Terracotta
850–950 yards
Color C — Deep Olive Green
850–950 yards
Also:
- 5 mm crochet hook
- yarn needle
- scissors
- stitch markers
- measuring tape
- blocking mats, optional
A smooth worsted yarn gives the clearest interlocking effect.
Suggested Color Palette
For the sample blanket:
A — Warm Cream
B — Burnt Terracotta
C — Deep Olive
Other combinations that would work beautifully:
- cream + mustard + charcoal
- blush + burgundy + oatmeal
- ivory + sage + dusty blue
- camel + rust + forest green
- light gray + navy + mustard
Choose colors with enough contrast that the blocks remain visible.
Finished Measurements
Approximately:
42 inches wide × 54 inches long
including the border.
The unbordered body should measure approximately:
39–40 inches wide × 51 inches long
Your exact measurements may vary with yarn and tension.
Gauge
Approximately:
14 foundation stitches × 8 pattern rows = 4 inches
Gauge is not critical for a blanket, but it affects finished size and yarn usage.
Abbreviations
- ch = chain
- sc = single crochet
- dc = double crochet
- sl st = slip stitch
- st = stitch
- sts = stitches
- sp = space
- rep = repeat
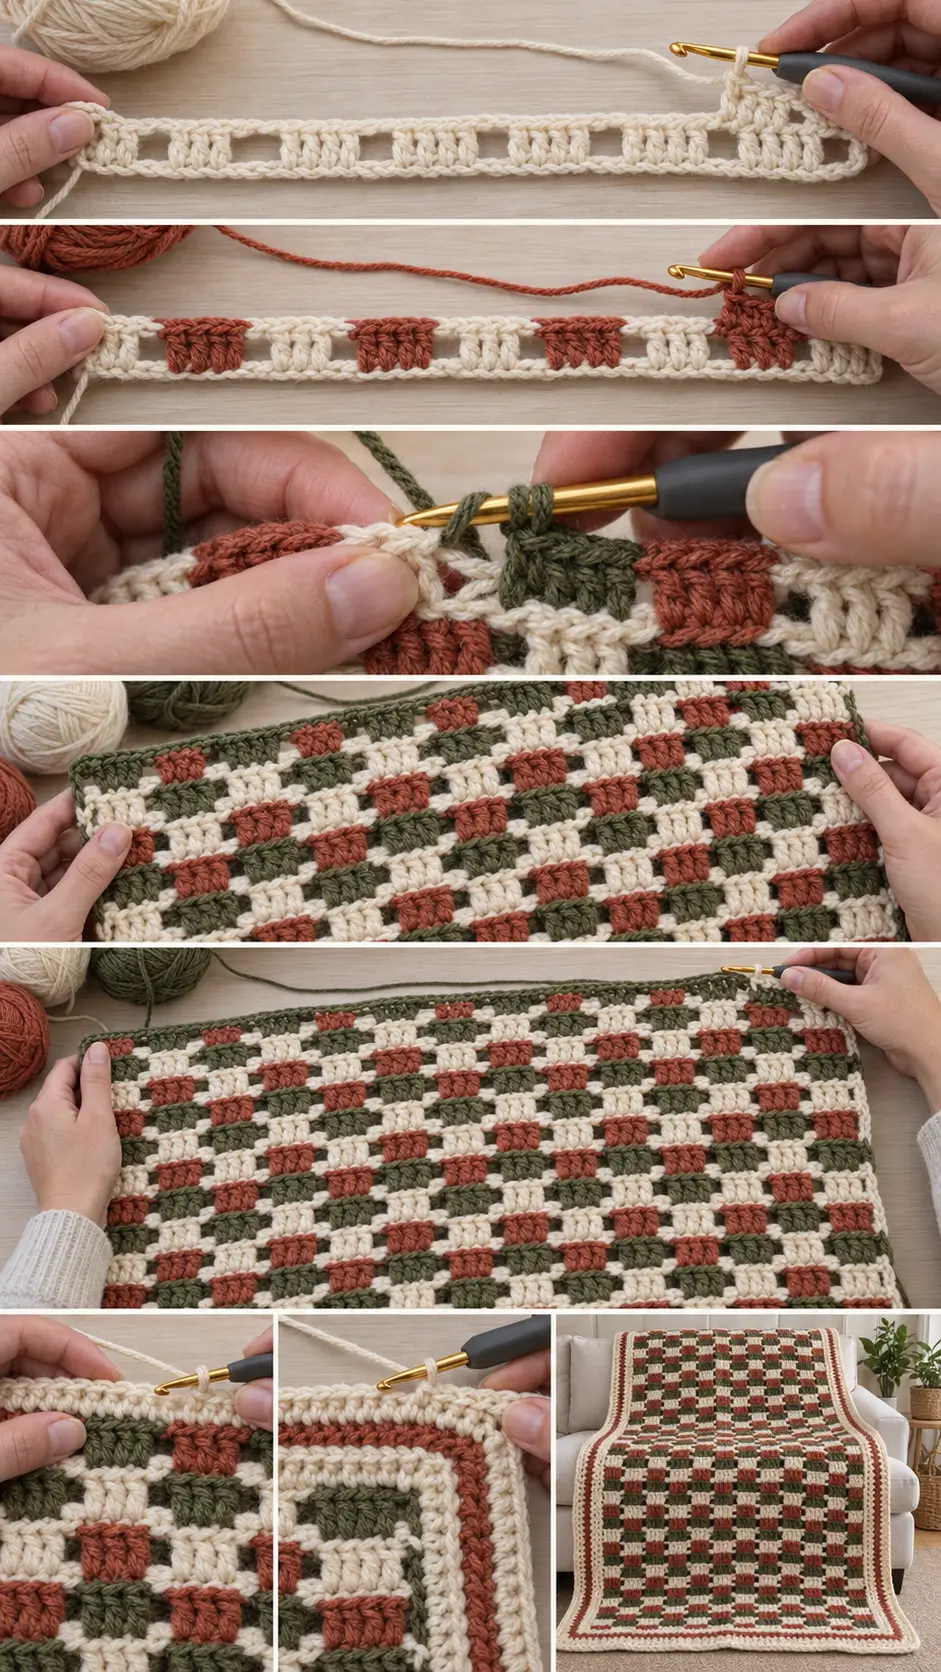
Special Technique — Long Double Crochet Two Rows Below
Instead of working into the top of the row immediately below, some double crochets are worked into stitches from:
Two rows below.
Yarn over.
Insert the hook into the indicated stitch two rows below, passing in front of the ch-3 space.
Pull up a slightly taller loop.
Complete the dc normally:
- yarn over, pull through 2
- yarn over, pull through 2
The long dc should reach naturally to the current row without pulling the fabric upward.
Do not crochet tightly.
How the Interlocking Effect Works
One row creates:
3-dc blocks + ch-3 spaces
The next color fills those open sections by reaching into the row beneath.
Then the following color returns to the opposite block positions.
As the colors rotate:
A → B → C → A → B → C
the blocks appear to weave through one another.
Because each color is picked up again at the same side where it was left, you usually do not need to cut the yarn after every row.
Stitch Multiple
The foundation chain must be:
Multiple of 6 + 5
For the written blanket:
23 × 6 = 138
138 + 5 =
143 chains.
FOUNDATION
Using Color A:
Ch 143.
Keep the chain relaxed.
If your foundation chains are usually tight, make them with a 5.5 mm hook and then switch back to the 5 mm hook.
ROW 1 — FIRST BLOCK ROW
Using Color A:
Dc in the:
4th chain from hook.
Dc in next chain.
You now have the beginning edge block.
Repeat across:
Ch 3, skip 3 chains, dc in next 3 chains.
Continue until the end.
Your row should finish with a group of:
3 dc.
Do not fasten off Color A.
ROW 2 — SECOND COLOR INTERLOCK
Join Color B at the end of Row 1.
Ch 3.
Turn.
The ch-3 functions as the beginning edge spacing.
Skip the first dc block directly below.
Look through the first ch-3 opening from Row 1.
Work:
3 dc
into the 3 skipped foundation chains underneath that opening.
Now repeat:
Ch 3.
Skip the next visible 3-dc block.
Work:
3 dc into the 3 foundation chains beneath the next ch-3 space.
Continue across.
At the end:
Ch 3.
Sl st into the top of the original turning chain at the far edge.
Do not cut Color B.
What You Should See
The Color B blocks should sit:
between
the Color A blocks.
You should now have an alternating checker-like arrangement.
The fabric may look loose at this stage.
The interlocking structure becomes much clearer after the next two rows.
ROW 3 — THIRD COLOR
Join Color C.
Ch 3.
Turn.
Now work into the Color A stitches from:
two rows below.
Work dc into each of the next:
2 Color A dc.
The turning chain from Row 1 visually completes this first group.
Ch 3.
Skip the Color B block directly below.
Work:
3 dc
into the next group of 3 Color A dc two rows below.
Repeat across:
Ch 3, skip the block immediately below, 3 dc into the next 3 dc two rows below.
Continue to the end.
Finish with the final 3-dc group.
Do not cut Color C.
ROW 4 — RETURN TO THE OPPOSITE BLOCK POSITION
Pick up Color A.
Ch 3.
Turn.
Skip the first 3-dc block directly below.
Work:
3 dc
into the Color B stitches two rows below.
Repeat across:
Ch 3, skip next current-row block, 3 dc into the next 3 stitches two rows below.
Continue until the final block has been worked.
Ch 3.
Sl st into the turning chain at the far edge.
Do not cut Color A.
ROW 5
Pick up Color B.
Ch 3.
Turn.
Repeat the same structure as Row 3:
Work the first edge dc stitches into the appropriate stitches two rows below.
Then repeat:
Ch 3, skip the current-row block, 3 dc into the next 3 dc two rows below.
Continue across.
ROW 6
Pick up Color C.
Repeat the same structure as Row 4.
Main Color Rotation
From this point onward, continue:
Row 7
Color A
Row 8
Color B
Row 9
Color C
Then repeat:
A → B → C
for the entire blanket.
Easy Way to Remember the Pattern
There are really only two visual row types.
Block Row A
Begin with the edge block.
Then:
ch 3 → 3 dc two rows below
across.
Block Row B
Begin with:
ch 3
Then work:
3 dc two rows below → ch 3
across.
Finish with the edge slip stitch.
Alternate those two row structures while rotating the three yarn colors.
Why the Double Crochets Reach Two Rows Down
If you worked the dc into the row directly underneath, the blocks would stack rather than interlock.
By reaching through the open space to the stitches:
two rows below,
the new block occupies the empty section left by the previous color.
That is what creates the woven appearance.
Continue the Blanket
Continue the established pattern until the body measures approximately:
51 inches long.
For the cleanest upper edge, stop after completing a full block sequence.
LAST ROW — CLOSE THE OPEN SPACES
The normal pattern contains ch-3 openings along the upper edge.
For the final row, close those openings instead of leaving them open.
Use the next color in your rotation.
Ch 1.
Turn.
Whenever you are directly above an existing 3-dc block:
Work:
1 sc in each of those 3 stitches.
Whenever you reach an open section that would normally receive ch 3:
Work the corresponding:
3 long dc
into the 3 stitches two rows below.
Continue alternating:
3 sc across the raised block
and:
3 long dc into the recessed block two rows below
until the edge is completely filled.
This gives you a much easier edge for bordering.
Check the Finished Body
Before adding the border, lay the blanket flat.
The surface should show:
- repeating 3-stitch blocks
- three rotating colors
- no large permanent holes
- interlocking vertical and horizontal movement
- dense reversible fabric
- approximately straight sides
Both sides should look attractive.
Why This Stitch Is Reversible
The long double crochets pass through the open chain spaces rather than being attached as surface decoration.
That allows the blocks to become part of the actual fabric instead of sitting only on one face.
The original stitch tutorial also describes the resulting fabric as reversible. (Nordic Hook)
PART 2 — BORDER
Use Color A — Warm Cream.
Border Round 1
Join cream in any corner.
Ch 1.
Sc evenly around the entire blanket.
Across the top and bottom:
Work approximately:
1 sc in every stitch.
Along the row ends:
Distribute stitches evenly so the edge lies flat.
At every corner:
3 sc.
Join with sl st.
Check the Border
Lay the blanket flat.
If the border ripples:
Remove a few side stitches.
If the edge pulls inward:
Add a few stitches.
Do this before continuing.
Border Round 2
Ch 1.
Sc in every stitch around.
At each corner:
3 sc
in the center corner stitch.
Join.
Border Round 3
Switch to Color B — Terracotta.
Ch 2.
Hdc in every stitch around.
At each corner:
3 hdc.
Join.
Border Round 4
Switch back to Color A.
Ch 1.
Working in the back loop only:
Sc around.
At each corner:
3 BLO sc.
Join.
Fasten off.
Finished Border
The border should be approximately:
1½–2 inches wide.
It should frame the pattern without distracting from the interlocking blocks.
Weaving in Ends
One advantage of the three-color rotation is that you do not need to cut the yarn after every row.
You should have far fewer ends than a typical striped blanket.
Thread remaining tails onto a yarn needle.
Weave each tail through several stitches.
Change direction.
Weave through several more stitches.
Trim.
Blocking
Light blocking helps the block pattern settle into place.
Lay the blanket flat.
Shape approximately to:
42 × 54 inches.
Straighten all four edges.
Avoid stretching the fabric aggressively.
Allow to dry completely.
How to Make a Baby Blanket
Use:
Ch 101.
Why?
96 is divisible by 6.
96 + 5 =
101.
Work the pattern until approximately:
34–36 inches long
then add the border.
This creates a compact stroller or supervised-use blanket.
Lap Blanket
Use:
Ch 125.
120 + 5 = 125.
Continue until approximately:
44–48 inches long.
Written Throw
Use:
Ch 143.
Continue to approximately:
51 inches before border.
Finished:
about 42 × 54 inches.
Larger Sofa Throw
Use:
Ch 167.
162 + 5 = 167.
Continue until approximately:
58–60 inches long.
Wide Throw
Use:
Ch 185.
180 + 5 = 185.
Continue to approximately:
60–64 inches long.
Easy Resizing Formula
Choose any number divisible by:
6
Then add:
5 chains.
Examples:
- 60 + 5 = 65
- 78 + 5 = 83
- 96 + 5 = 101
- 120 + 5 = 125
- 138 + 5 = 143
- 162 + 5 = 167
- 180 + 5 = 185
Two-Color Version
You can use only two colors.
Alternate:
A → B → A → B
The woven effect becomes stronger and more graphic.
Good combinations include:
- cream + charcoal
- ivory + navy
- oatmeal + rust
- blush + burgundy
- sage + cream
Three-Color Version
Three colors create more movement.
Rotate:
A → B → C
without changing the sequence.
Keeping the order consistent makes the blocks easier to follow.
Four-Color Version
A four-color rotation also works:
A → B → C → D
then repeat.
However, the yarn waiting at the edges becomes slightly less convenient.
For a first blanket, three colors is the easiest balance of visual interest and yarn management.
Scrap-Yarn Version
This stitch can also use leftovers.
Instead of three fixed colors, change colors every row.
Keep similar yarn weights and choose enough contrast that neighboring rows remain visible.
Because every new row interacts with a row two levels below, avoid using two nearly identical colors directly in the same section.
Why Are My Long Double Crochets Too Tight?
You probably aren’t pulling the first loop high enough.
When working two rows below:
Pull the loop upward until it comfortably reaches the current row.
Then complete the dc.
The stitch should fill the space without pulling the row underneath upward.
Why Is My Fabric Puckering?
Common causes include:
- long dc worked too tightly
- tight ch-3 spaces
- inconsistent hook tension
Relax your chain stitches.
Make the long dc slightly taller.
Why Are There Holes Between My Blocks?
A small amount of space is normal.
But large holes usually mean:
- ch-3 spaces are too loose
- long dc stitches are too short
- hook size is too large
Try making your ch-3 slightly more compact.
Why Don’t My Blocks Line Up?
Check that every new 3-dc group is worked into the correct group:
two rows below,
not into the row directly underneath.
Each block should fall into the gap between blocks of the previous row.
Why Is My Edge Uneven?
Make sure the two row types remain consistent.
One begins with the edge block.
The alternate row begins with the ch-3 section.
If you accidentally begin two consecutive rows in the same position, the pattern shifts sideways.
Can I Carry the Yarn?
Yes.
With a three-color rotation, each yarn naturally returns to the edge where it is needed again after the other two rows are worked.
This is one reason the stitch is especially convenient in three colors.
Can I Use Cotton?
Yes.
Cotton makes the blocks extremely crisp.
It works particularly well for:
- baby blankets
- pillows
- placemats
- washcloths
- bags
For a large throw, cotton can become heavy.
A cotton/acrylic blend is a lighter alternative.
Can I Use DK Yarn?
Yes.
Try approximately:
4–4.5 mm hook.
You’ll need more repeats to achieve the same width.
Always make a swatch first.
Can I Use Chunky Yarn?
Yes.
This creates a bold oversized block pattern.
Use:
- fewer repeats
- larger hook
- shorter finished dimensions
Chunky interlocking fabric can become very thick, so it works especially well for cushions and cold-weather throws.
Matching Pillow
This stitch makes an excellent cushion cover because the fabric is dense.
Make two panels approximately:
18 × 18 inches.
Join them around three sides.
Insert an 18-inch pillow form.
Close the final side using:
- crochet seam
- buttons
- zipper
For a cleaner look, make the back panel in solid sc or hdc.
Interlocking Block Scarf
Use approximately:
Ch 35.
30 + 5 = 35.
Work until:
60–68 inches long.
A two-color scarf looks especially graphic.
Add simple sc edging rather than fringe if you want a clean modern finish.
Interlocking Block Tote
This dense fabric is also useful for bags.
Make two rectangular panels.
Join around:
- sides
- bottom
Add:
- firm handles
- optional lining
- magnetic closure
The interlocking texture hides everyday wear better than very open crochet stitches.
Best Projects for This Stitch
The dense reversible construction works particularly well for:
- blankets
- scarves
- cardigans
- cushion covers
- tote bags
- placemats
- washcloths
- table runners
- winter accessories
The original tutorial similarly recommends the stitch for projects needing warmth, structure, and durability. (Nordic Hook)
Final Thoughts
The interlocking effect looks much more complicated than the actual repeat.
The key idea is:
make a row of 3-dc blocks and ch-3 spaces
then:
fill those spaces by crocheting into the row two levels below.
Rotate three colors:
cream → terracotta → olive
and the blocks begin weaving visually through one another.
Once the first few rows are established, you can recognize exactly where each new group belongs without constantly counting.
The result is a warm, dense, reversible crochet blanket with enough visual complexity to look impressive while still relying mostly on chains and double crochet.