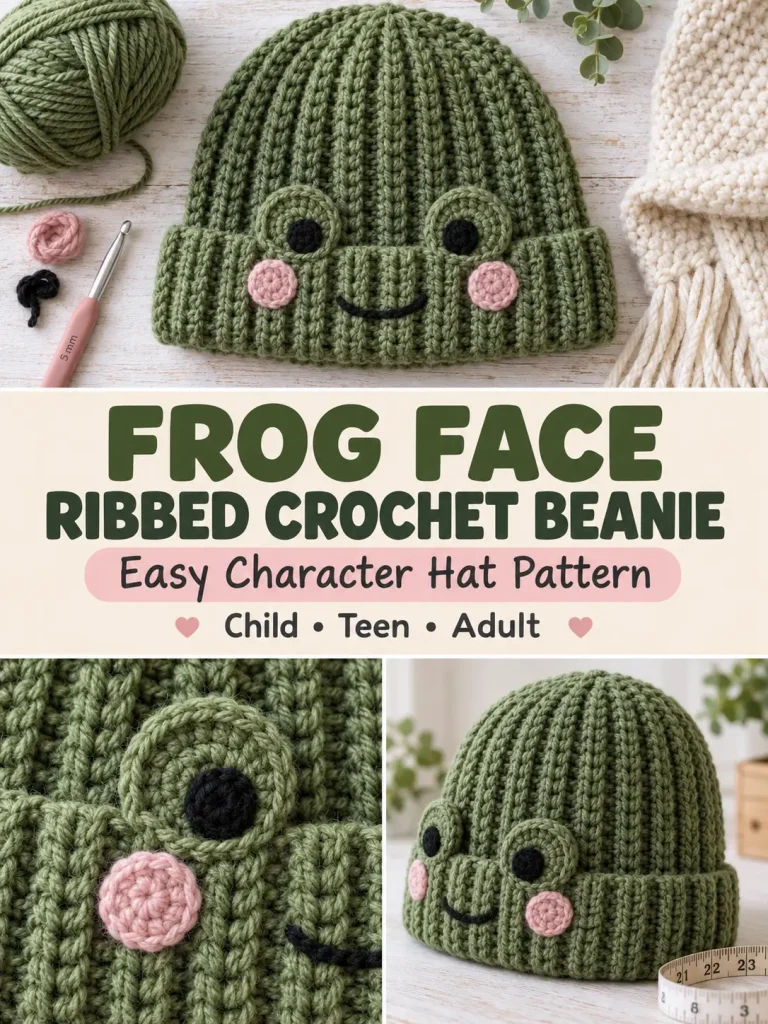
This playful green crochet beanie combines deep vertical ribbing with a folded brim and a simple frog face.
The hat is worked from the top down, beginning with a smooth half-double-crochet crown before transitioning into stretchy front-post and back-post ribbing. The extra-deep lower section folds upward to create the brim, giving you a perfect place to add the frog’s eyes, cheeks, and smile.
Instead of plastic safety eyes, this version uses flat crocheted eye pieces, making the face soft and comfortable.
Pattern at a Glance
Skill level: Advanced beginner / intermediate
Terminology: US crochet terms
Construction: Top down in joined rounds
Sizes: Child, Teen, Adult
Yarn: Worsted / Category 4
Hook: 5 mm
Main color: Moss / frog green
Texture: FPdc/BPdc vertical ribbing
Brim: Fold-up ribbed brim
Face: Crocheted eyes and cheeks + embroidered mouth
Seaming: None for hat body
Finished Sizes
Child
Fits approximately:
19–20-inch head
Finished height after folding brim:
7½–8 inches
Teen
Fits approximately:
20–21½-inch head
Finished height:
8–8½ inches
Adult
Fits approximately:
21½–23-inch head
Finished height:
8½–9 inches
The ribbing has considerable stretch, so the relaxed circumference is intentionally smaller than the actual head measurement.
Materials
You will need:
Green
Approximately:
- Child: 160–180 yards
- Teen: 180–200 yards
- Adult: 200–225 yards
Black
Small amount for pupils and mouth
Pink
Small amount for cheeks
Also:
- 5 mm crochet hook
- 4 mm crochet hook for face pieces
- yarn needle
- scissors
- stitch marker
- measuring tape
Suggested Yarn Colors
Main Color
Moss Green / Olive Green / Frog Green
Pupils + Mouth
Black
Cheeks
Bubblegum Pink / Dusty Rose
A slightly heathered green yarn gives the ribbing especially nice depth.
Gauge
In established post-stitch ribbing:
14 sts × approximately 11 rounds = 4 inches
Check gauge before making a fitted size.
Abbreviations
- ch = chain
- sc = single crochet
- hdc = half double crochet
- dc = double crochet
- FPdc = front post double crochet
- BPdc = back post double crochet
- sl st = slip stitch
- MR = magic ring
- st = stitch
- sts = stitches
- inc = 2 stitches in same stitch
Important Pattern Notes
The beginning chain does not count as a stitch.
Join each round with a slip stitch to the first actual stitch.
Do not turn unless instructed.
The crown is worked first.
A plain dc setup round creates posts for the vertical ribbing.
After that, the stitch count remains unchanged.
Special Stitch — Front Post Double Crochet
Yarn over.
Insert the hook:
front → back → front
around the post of the next stitch.
Yarn over and pull up a loop.
Complete the double crochet normally.
This pushes the stitch toward the front.
Special Stitch — Back Post Double Crochet
Yarn over.
Insert the hook:
back → front → back
around the post of the next stitch.
Yarn over and pull up a loop.
Complete the double crochet normally.
This pushes the stitch toward the back.
Alternating FPdc and BPdc produces the strong vertical ribbing.
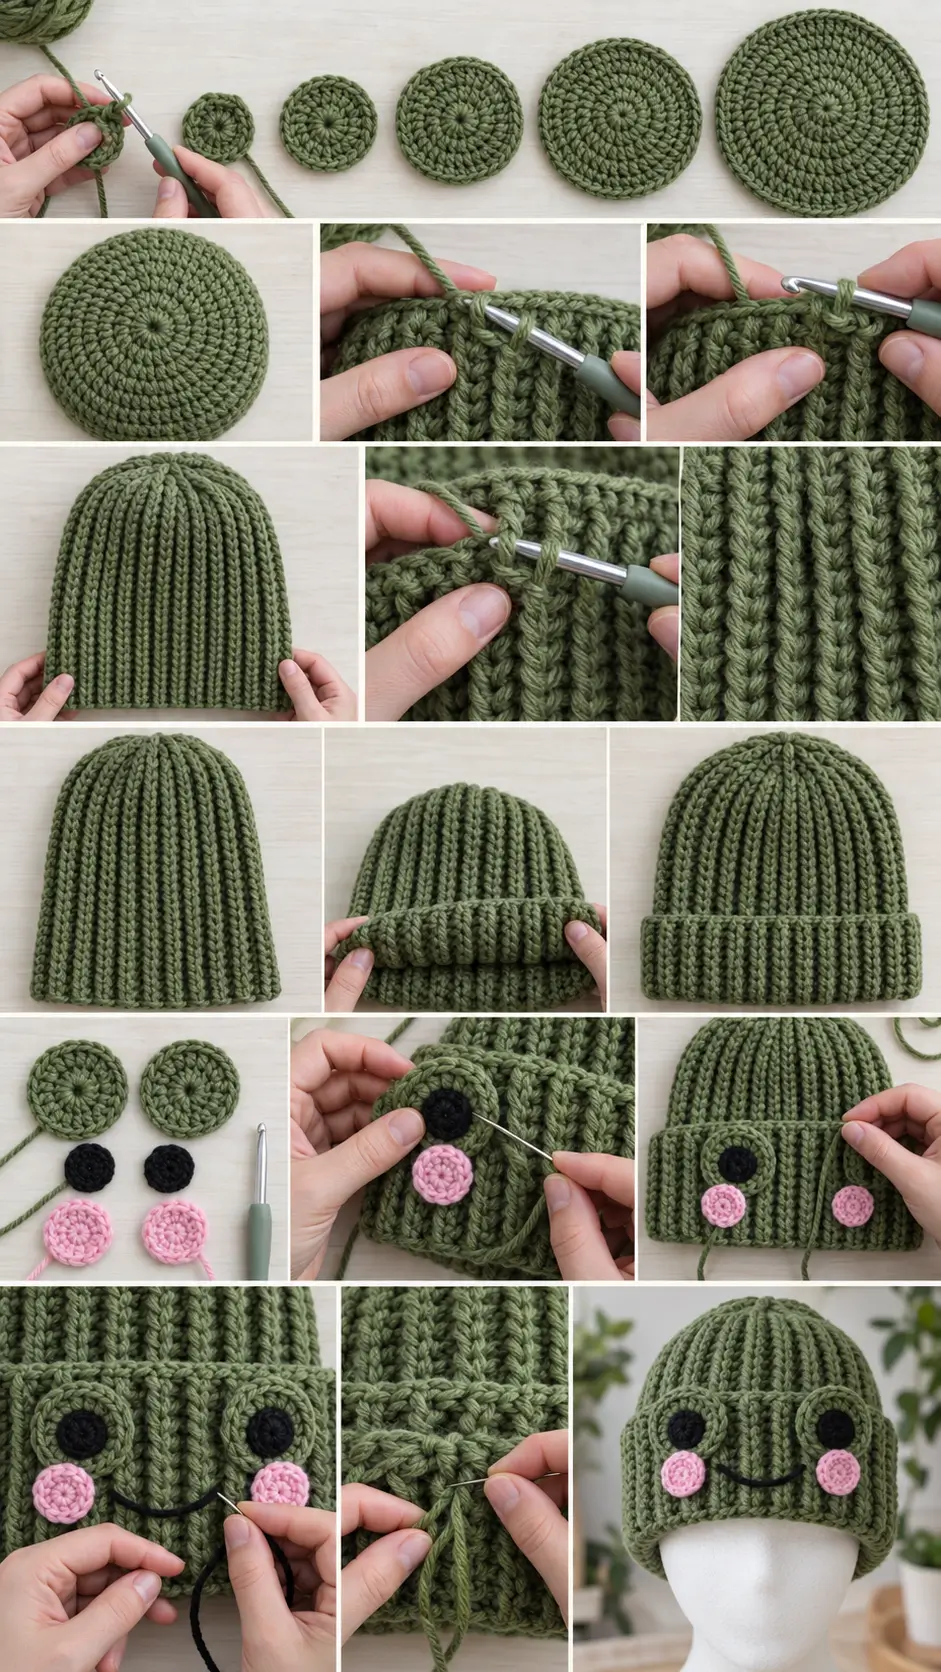
PART 1 — CROWN
Using green yarn and the 5 mm hook:
Make a magic ring.
Round 1
Ch 1.
Work:
12 hdc
into the ring.
Pull closed.
Join.
12 sts
Round 2
Ch 1.
Work:
2 hdc in every stitch
around.
Join.
24 sts
Round 3
Repeat:
hdc in next st, 2 hdc in next st
around.
Join.
36 sts
Round 4
Repeat:
hdc in next 2 sts, 2 hdc in next st
around.
Join.
48 sts
Round 5
Repeat:
hdc in next 3 sts, 2 hdc in next st
around.
Join.
60 sts
Child Size
Stop increasing.
Continue with:
60 stitches.
Teen Size — Round 6
Repeat 6 times:
hdc in next 9 sts, 2 hdc in next st
Join.
66 stitches.
Adult Size — Round 6
Repeat around:
hdc in next 4 sts, 2 hdc in next st
Join.
72 stitches.
Check the Crown
The crown should lie mostly flat with only slight natural cupping.
Approximate diameter:
Child
5½–5¾ inches
Teen
6–6¼ inches
Adult
6½–6¾ inches
Small differences are fine if your circumference gauge is correct.
PART 2 — RIBBING SETUP
Ch 2.
Dc in every stitch around.
Join.
Keep the same stitch count:
- Child: 60
- Teen: 66
- Adult: 72
This round gives us the vertical posts required for the ribbing.
PART 3 — VERTICAL RIBBED BODY
Ribbing Round 1
Ch 2.
Repeat around:
FPdc around next stitch
BPdc around next stitch
Join.
Ribbing Round 2
Ch 2.
Work:
FPdc around each FPdc
and:
BPdc around each BPdc
around.
Join.
Continue Ribbing
Repeat Ribbing Round 2 until the hat measures approximately:
Child
9½ inches from crown center
Teen
10¼ inches
Adult
10¾ inches
Do not fold the brim yet.
This extra length includes the section that will eventually fold upward.
Why the Hat Looks Too Long Right Now
That is intentional.
The bottom section becomes the folded brim.
After folding, the finished hat becomes approximately:
- Child: 7½–8 inches
- Teen: 8–8½ inches
- Adult: 8½–9 inches
PART 4 — FINISH THE LOWER EDGE
Work one final round:
Ch 1.
Sc loosely in every stitch around.
Join.
Fasten off.
Do not make this edge tight.
It needs enough stretch to fit comfortably over the head.
PART 5 — FOLD THE BRIM
Fold the lower edge outward.
Approximate fold depth:
Child
1½ inches
Teen
1¾ inches
Adult
1¾–2 inches
Smooth the ribs so they remain vertical.
The folded section becomes the frog’s face.
Optional Brim Tack
If you want the brim to stay permanently folded:
Use green yarn and a yarn needle.
Place 4–6 tiny hidden stitches around the hat:
- back
- sides
- front between facial features
Catch only small portions of the inner and outer layers.
Do not sew continuously around the brim because that can reduce stretch.
PART 6 — CROCHET THE FROG EYES
Make:
2 green eye bases.
Switch to the 4 mm hook.
Eye Base — Round 1
Using green:
Make a magic ring.
Work:
8 hdc
into the ring.
Join.
8 sts
Eye Base — Round 2
Work:
2 hdc in every stitch
around.
Join.
16 hdc.
Fasten off, leaving a long sewing tail.
Each eye base should measure approximately:
1½ inches across.
BLACK PUPILS
Make 2.
Using black yarn:
Make a magic ring.
Work:
6 sc
into the ring.
Join.
Fasten off, leaving a sewing tail.
The pupil should measure approximately:
½–¾ inch
depending on yarn and tension.
Assemble the Eyes
Place one black pupil slightly below the center of each green eye base.
Sew securely.
Do not place it too high.
Leaving more green visible above the pupil creates the cute raised frog-eye appearance.
PART 7 — PINK CHEEKS
Make 2.
Using pink yarn:
Make a magic ring.
Round 1
Work:
6 sc
into the ring.
Join.
Round 2
Work:
2 sc in every stitch
around.
Join.
12 sc.
Fasten off, leaving a sewing tail.
Each cheek should measure approximately:
¾–1 inch across.
PART 8 — POSITION THE FACE
Lay the hat flat with the seam or least attractive join positioned at the back.
The frog face belongs on the front of the folded brim.
Eye Placement
Position the green eye bases approximately:
Adult
3–3½ inches apart
measured center to center.
For smaller hats, reduce the spacing slightly.
Place them so the upper halves rise just above the top edge of the folded brim.
This gives the frog its characteristic raised-eye look.
Sew the Eyes
Using the green tails:
Sew around the lower and side edges of each green eye base.
Leave the top portion slightly free if you want the eye to stand outward.
For a flatter, more durable hat:
Sew all the way around.
Important Comfort Tip
When sewing face pieces to the folded brim:
Catch only the:
outer brim layer.
Avoid sewing through both layers whenever possible.
This keeps the inside of the hat smoother against the forehead.
PART 9 — ADD THE MOUTH
Thread a yarn needle with black yarn.
Create a simple curved smile between the eyes.
Begin approximately:
½ inch inside the left eye
and finish approximately:
½ inch inside the right eye.
Use several short embroidery stitches rather than one extremely long loose strand.
A slight upward curve produces the friendliest expression.
Optional Straight Mouth
For an understated frog:
Embroider one short straight black line between the eyes.
This creates a cute neutral expression.
Optional Tiny Smile Corners
At each end of the mouth, add one small diagonal stitch angled upward.
Keep these stitches very short.
PART 10 — ADD THE CHEEKS
Place one pink cheek:
- below the left eye
- slightly toward the outside
Place the second:
- below the right eye
- slightly toward the outside
Keep the placement symmetrical.
Sew around each cheek using the pink yarn tails.
Again, stitch primarily through the outer brim layer.
Final Face Layout
Your front brim should now show:
green eye — black pupil
pink cheek — smile — pink cheek
green eye — black pupil
The expression should remain simple and easy to recognize from several feet away.
PART 11 — FINISHING
Weave in all ends securely.
Check:
- crown closure
- color ends
- eyes
- pupils
- cheeks
- mouth
Trim only after every tail is well secured.
Blocking
Lightly block if needed.
Do not heavily stretch the ribbing.
You can place the hat over:
- a bowl
- balloon
- hat form
and allow it to dry.
Re-form the eyes and folded brim while damp.
How to Make the Hat Slouchier
Before finishing the bottom edge, add:
1–2 additional inches
of ribbing.
Then fold the same brim depth.
The extra length remains above the brim and creates a relaxed crown.
How to Make a Shorter Beanie
Remove approximately:
½–1 inch
of ribbing before finishing.
Do not make the folded brim much narrower than 1½ inches, because you need enough space for the face.
How to Make the Brim Deeper
For a bigger cartoon-style frog face, work the hat:
1 additional inch longer
before finishing.
Fold up:
2½ inches
instead.
Then slightly enlarge the eye bases and cheeks.
Bigger Frog Eyes
For larger eyes, add another round:
After Round 2:
Repeat:
hdc in next st, 2 hdc in next st
around.
You will have:
24 sts.
Use these only for a larger adult or oversized hat.
Smaller Frog Eyes
For a child-size hat, you can stop after:
Round 1 — 8 hdc.
That produces a smaller eye base.
Make smaller black pupils with:
5 sc in a magic ring.
No-Sew Eye Option
Instead of crocheted eye pieces, embroider:
- a small black oval
- surrounded by a green outline
directly onto the brim.
This creates a flatter hat that is especially useful under hoods or helmets.
Sleepy Frog Variation
Instead of black pupils, embroider each eye as:
one short curved black line
with tiny lashes.
Add the same pink cheeks and smile.
Happy Frog Variation
Add tiny white embroidery stitches to the upper corner of each black pupil.
This creates a small highlight.
Only a stitch or two is needed.
Different Frog Colors
The pattern doesn’t have to be bright green.
Try:
- sage
- avocado
- lime
- forest green
- teal green
- olive
- pale mint
For an especially soft look:
sage hat + blush cheeks + charcoal face
works beautifully.
Scrap Yarn Version
The face pieces use very little yarn.
This makes the project ideal for leftover:
- black
- pink
- cream
- yellow
yarn.
You can make every frog expression slightly different without changing the actual hat construction.
Can I Use DK Yarn?
Yes, but don’t use the worsted-weight stitch counts unchanged.
Make a gauge swatch and continue crown increases until the circle produces the circumference you need.
A:
4–4.5 mm hook
is a good place to start.
Can I Use Bulky Yarn?
Yes.
Use a larger hook and fewer crown stitches.
For bulky yarn, sizing by crown diameter and head measurement is more reliable than following the written stitch counts.
Why Is My Crown Wavy?
Too many increases for your tension can create ruffling.
Try:
- smaller hook
- tighter tension
- stopping the increases one round earlier
The crown should be flat or only slightly cupped.
Why Is My Crown Cupping Too Much?
You may need:
- larger hook
- looser tension
- one more increase round
Do not add random increases once the ribbing has begun.
Correct the crown before starting the body.
Why Does the Ribbing Spiral?
Post stitches can naturally shift slightly because the work is joined in rounds.
Keep every FPdc directly around the FPdc below and every BPdc around the BPdc below.
A small diagonal movement is normal.
Strong twisting usually means you accidentally shifted by one stitch.
Why Is the Brim Too Tight?
The final sc round may have been worked too tightly.
You can:
- work the sc loosely
- use a 5.5 mm hook for that round
- omit the sc finishing round entirely
The post ribbing itself is already a clean edge.
Why Are the Eyes Flopping Forward?
Secure a little more of the upper eye edge.
If you want them strongly raised, leave only the uppermost:
¼ inch
unsewn.
For a very sturdy hat, sew the eye bases completely flat.
Can I Use Safety Eyes?
Crocheted or embroidered pupils are softer and avoid hard plastic parts.
They are especially practical for hats intended for children.
If you use any detachable embellishment, make sure it is secured appropriately for the wearer.
Child Safety
For young children, avoid:
- plastic safety eyes
- buttons
- beads
- bells
- loose decorative pieces
Use crocheted or embroidered facial features and secure every yarn tail carefully.
Matching Frog Scarf
A fun companion project is a simple green ribbed scarf.
Work a rectangle using alternating:
FPdc / BPdc
or ordinary BLO hdc.
Add:
- one frog face near each end
- pink cheek appliqués
- simple black smiles
This creates an easy matching winter gift set.
Frog Hat Gift Idea
Because the hat only uses one main yarn color plus tiny amounts for the face, it also works well as a quick handmade gift.
Pair it with:
- matching scarf
- frog amigurumi
- green mittens
- crochet frog bag
- frog-themed gift basket
That gives the finished hat natural internal-link opportunities with other playful crochet projects.
Final Thoughts
The frog face gets all the attention, but the actual hat construction is straightforward:
crochet the crown
→ make one dc setup round
→ work FPdc/BPdc ribbing
→ make the hat extra long
→ fold the brim
→ add the frog face
The raised vertical ribs make the green hat look polished even without decoration, while the crocheted eyes and pink cheeks turn the folded brim into a playful frog face.
Because the facial pieces are added at the end, you can use the same ribbed beanie construction again for bears, cats, monsters, or other character hats simply by changing the appliqués.