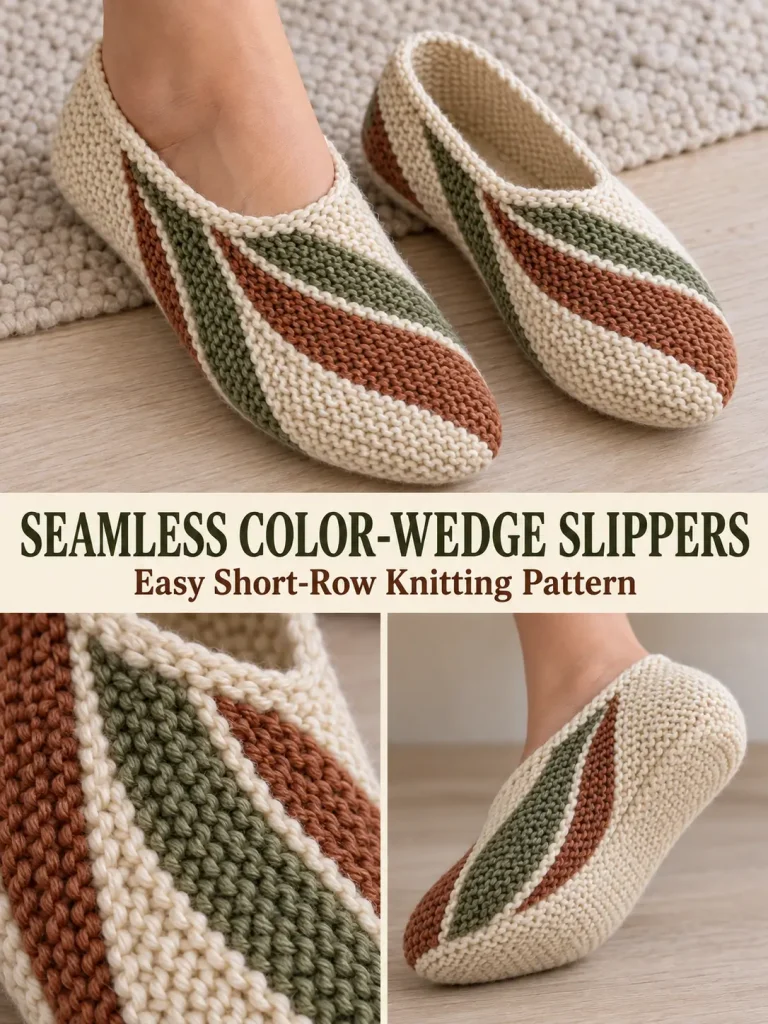
This striking slipper is knitted with two needles rather than crocheted. The upper is built from alternating cream separators and short-row wedges in green and cinnamon, creating the curved flame-like stripes visible across the foot.
The most interesting part of the construction is that the slipper is essentially seamless: after the colorful upper is finished, stitches are picked up along its wide edge and the sole is worked directly onto it. The heel is then joined to the sides as it is knitted, so there is no traditional sole or heel seam. The source demonstration uses 23 stitches for the upper, size 3 knitting needles, and 21 colored sections for approximately EU shoe sizes 38–39.
Skill Level
Intermediate
The entire slipper is worked mainly in garter stitch, but the pattern requires careful short rows, color changes, picking up stitches, decreases, and joining the heel to the upper as you work.
Materials
- Slipper yarn in cream
- Slipper yarn in cinnamon/rust
- Slipper yarn in olive or sage green
- Size 3 knitting needles, approximately 3 mm
- Crochet hook suitable for the yarn, for the final edging
- Yarn needle
- Scissors
- Stitch markers, optional
Abbreviations
k – knit
k2tog – knit 2 together
k3tog – knit 3 together
st(s) – stitch(es)
RS – right side
WS – wrong side
Important Pattern Notes
The slipper is worked almost entirely in garter stitch, meaning the stitches are knitted on both sides.
At the beginning of most short rows:
Slip the first stitch without knitting it.
When turning during the short-row sections, keep the working yarn on the appropriate side without pulling it tightly.
The colorful wedges are shaped by knitting progressively shorter rows:
11 → 10 → 9 → 8 → 7 → 6 → 5 stitches
The green and cinnamon wedges use the same short-row shaping, but they begin from different positions across the 23-stitch row. This is what makes the colored shapes alternate across the upper.
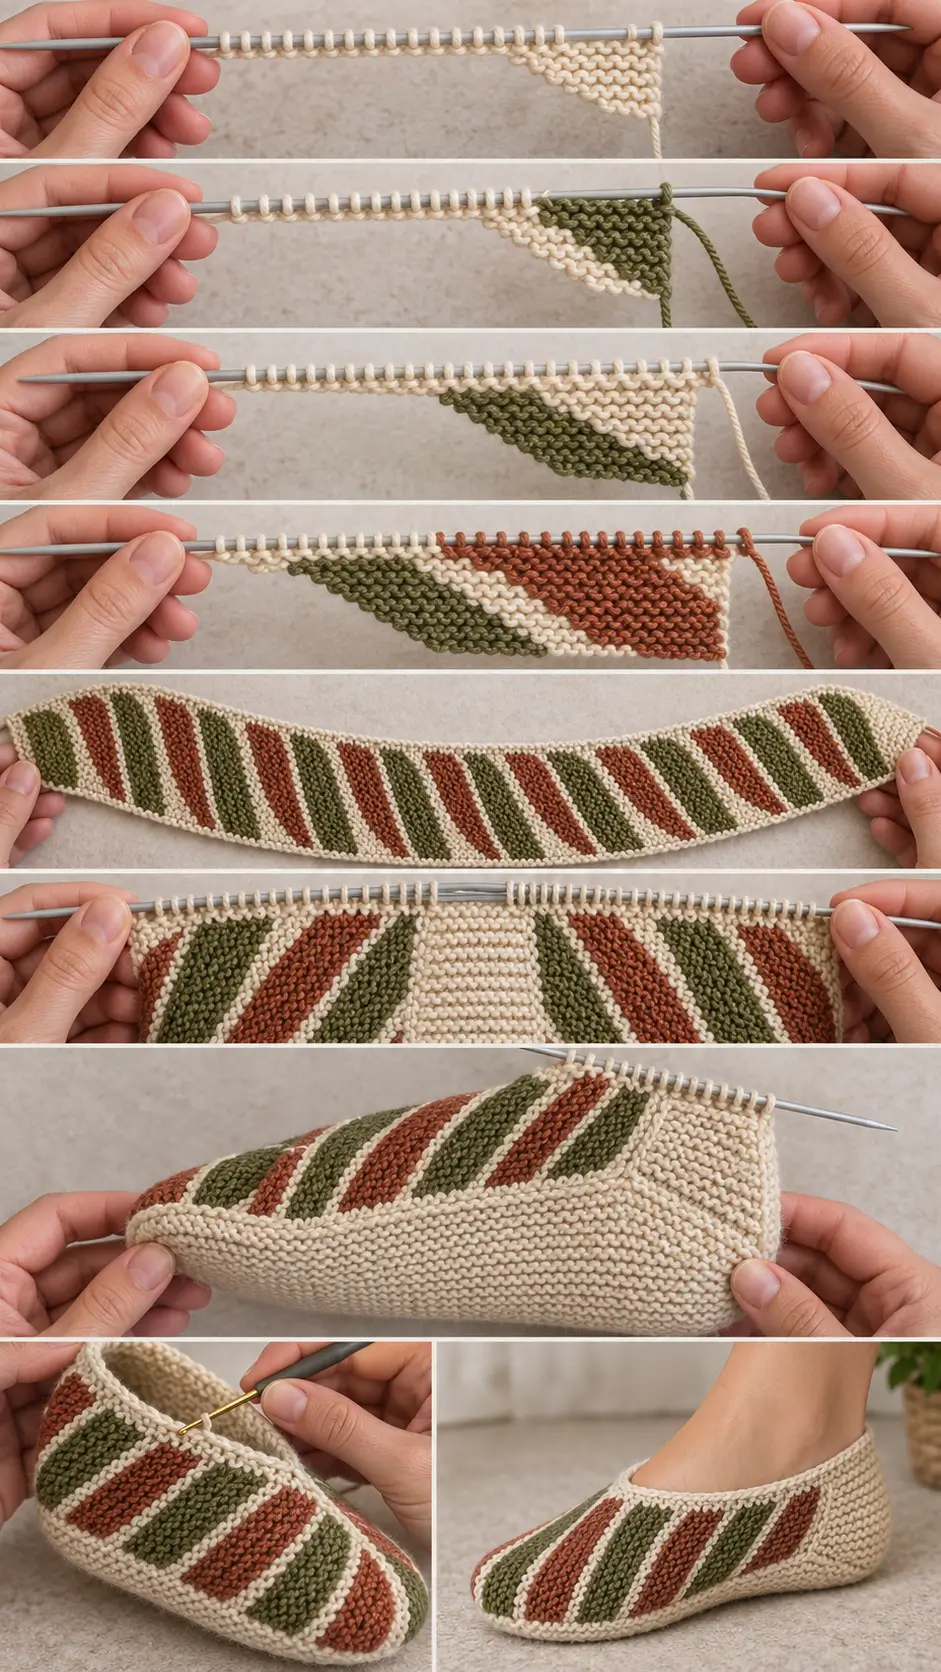
PART 1 — Cast On
With cream yarn:
Cast on 23 stitches.
Work across all 23 stitches in knit.
Turn.
Knit back across all 23 stitches.
You now have the first cream garter ridge.
PART 2 — Cream Separator Section
The cream section separates each colored wedge.
On the RS:
Slip the first stitch.
Knit until you have worked 9 stitches total.
Turn.
Slip the first stitch and knit back across the stitches just worked.
Turn.
Slip the first stitch.
Knit 7 stitches total.
Turn.
Slip the first stitch and knit back across those stitches.
You are now ready to change to the first colored yarn.
Important Counting Note
The source narration briefly gives a different count during the very first explanation, but the separator is repeatedly demonstrated later as the 9-stitch turn followed by the 7-stitch turn, so use this sequence consistently.
PART 3 — First Green Wedge
Attach green yarn on the RS.
Leave the unused cream yarn loose enough along the edge that it does not restrict the stretch of the slipper.
Green Setup Row
Using green, knit across all 23 stitches.
Turn.
Position the Green Wedge
On the WS:
Slip the first stitch.
Work 4 stitches total at the edge.
Then knit 11 additional stitches.
You have worked 15 stitches and left 8 stitches unworked at the far edge.
Turn.
Green Short Rows
Slip the first stitch.
Knit 11 stitches total.
Turn.
Slip the first stitch.
Knit 10 stitches.
Turn.
Slip the first stitch.
Knit 9 stitches.
Turn.
Continue in exactly the same manner:
- knit 8, turn
- knit 7, turn
- knit 6, turn
- knit 5, turn
Each successive short row becomes one stitch shorter.
After completing the 5-stitch row, turn once more.
Slip the first stitch and knit all the way across the row to the opposite edge.
The first green wedge is complete.
What You Should See
The colored section should have a broad end that gradually narrows to a small 5-stitch section.
The short rows create the rounded, tapered wedge visible in the finished slipper.
PART 4 — Cream Separator
Return to cream yarn.
Keep the carried green yarn loose along the edge.
Work one complete garter ridge:
Knit across all 23 stitches.
Turn.
Knit back across all 23 stitches.
Now repeat the cream short-row separator:
On the next row, work 9 stitches, turn, and knit back.
Then work 7 stitches, turn, and knit back.
Prepare to change color on the RS.
PART 5 — First Cinnamon Wedge
Attach cinnamon yarn.
Cinnamon Setup Row
On the RS:
Knit across all 23 stitches.
Turn.
Position the Cinnamon Wedge
On the WS:
Work 8 stitches total from the edge.
Then knit 11 additional stitches.
You have worked:
19 stitches
and left:
4 stitches unworked
at the far edge.
Turn.
This reversed placement is what shifts the cinnamon wedge relative to the green wedge.
Cinnamon Short Rows
Slip the first stitch.
Knit 11 stitches.
Turn.
Then work increasingly shorter rows:
- 10 stitches, turn
- 9 stitches, turn
- 8 stitches, turn
- 7 stitches, turn
- 6 stitches, turn
- 5 stitches, turn
After the 5-stitch row, turn again.
Slip the first stitch and knit across all remaining stitches to the opposite edge.
The cinnamon wedge is complete.
PART 6 — Repeat the Upper Pattern
Return to cream and work the separator again:
- Knit one complete garter ridge across all 23 stitches.
- Work the 9-stitch short row and return.
- Work the 7-stitch short row and return.
Then work another green wedge exactly like the first green wedge.
Work another cream separator.
Then work another cinnamon wedge exactly like the first cinnamon wedge.
Continue alternating:
Green → Cream Separator → Cinnamon → Cream Separator
around the upper.
Number of Colored Wedges
The demonstrated slipper uses:
21 colored wedges total
with green and cinnamon alternating.
The source states that this version fits approximately:
EU 38–39
and has enough stretch that it may also accommodate some size 40 feet.
Because garter stitch stretches considerably, the demonstrator also suggests adjusting the number of wedges.
Approximate guidance from the demonstration:
- 18 wedges: around EU 35–36
- 20 wedges: a slightly snugger version around EU 38–39
- 21 wedges: demonstrated size, approximately EU 38–39
- 22 wedges: larger version around EU 40–41
Treat these as starting points rather than exact shoe-sizing standards because yarn, tension, and foot width affect the fit.
PART 7 — Finish the Upper
After completing your final colored wedge, work one final cream separator:
- one full garter ridge
- 9-stitch short row
- 7-stitch short row
Then bind off all 23 stitches loosely.
Do not bind off tightly.
You will pick up stitches along this edge later, so the edge needs enough flexibility for the needle to enter cleanly.
The upper section is now complete.
PART 8 — Pick Up Stitches for the Sole
Begin at the wider edge of the slipper upper.
With cream yarn, pick up one stitch through each available edge stitch.
Insert the needle through both legs of the edge stitch whenever possible.
For the demonstrated 21-wedge slipper, the source picks up:
87 stitches
from one end of the upper to the other.
Your number may be different if you made more or fewer colored wedges.
That is okay.
First Sole Preparation Row
Turn.
Slip the first stitch.
Knit across all picked-up stitches.
Turn.
You are now ready to shape the sole.
PART 9 — Calculate the Sole Center
The sole begins with a 7-stitch center section.
Use this formula:
Total picked-up stitches − 7 = side stitches
Then divide the remaining stitches equally between both sides.
For the demonstrated slipper:
87 − 7 = 80
80 ÷ 2 = 40
So the layout is:
40 side stitches | 7 center stitches | 40 side stitches
If you picked up a different number of stitches, use the same calculation.
PART 10 — Begin the Toe/Sole
With the RS facing:
Knit across the first side stitches.
For the 87-stitch version:
Knit 40 stitches.
Then knit the 7 center stitches.
Leave the remaining 40 stitches unworked.
Turn.
Slip the first stitch.
Knit back across the 7 center stitches.
Turn.
The sole is now beginning from the center of the toe.
PART 11 — Increase the Sole From 7 to 11 Stitches
The sole will widen gradually from:
7 stitches → 8 → 9 → 10 → 11
On the next row:
Slip the first stitch.
Knit across the 7 center stitches.
Then knit 1 additional stitch from the side section.
You now have:
8 sole stitches
Turn.
Slip the first stitch.
Knit across the 8 sole stitches.
Pick up and knit 1 stitch from the opposite side.
You now have:
9 sole stitches
Turn.
Repeat the same method to reach:
10 stitches
Then:
11 stitches
The working sole section is now 11 stitches wide.
PART 12 — Work the 11-Stitch Sole
From this point forward, the sole stays approximately 11 stitches wide while consuming the side stitches one at a time.
For each row:
- Slip the first stitch.
- Knit the next stitches until you have worked 10 sole stitches.
- Knit the next sole stitch together with 1 side stitch.
- Turn.
In other words:
Knit 10, then k2tog using the 11th sole stitch and the next side stitch.
Turn and repeat on the opposite side.
Continue:
slip first, knit 9 more, k2tog with next side stitch, turn
on every row.
The sole grows lengthwise while being attached directly to the upper.
There is no separate sole seam.
PART 13 — Continue Until One Side Stitch Remains
Continue the 11-stitch sole method until only:
1 unworked side stitch remains on each side.
Do not bind off.
The last two joins are worked differently to shape the heel transition.
PART 14 — Final Sole Decreases
On the next row:
Slip the first stitch.
Knit until the final 3 stitches involved in the edge join remain, including the remaining side stitch.
Work those 3 stitches together:
k3tog
Turn.
Repeat the same operation on the opposite side:
Slip the first stitch.
Knit until the final 3 stitches remain at the join.
k3tog
These two triple decreases narrow the sole and transition directly into the heel section.
After these decreases, the demonstration proceeds with approximately:
9 working heel stitches.
PART 15 — Knit the Seamless Heel
The back of the slipper is now worked upward while simultaneously being attached to the edge stitches of the upper.
The working heel section remains approximately:
9 stitches wide.
First Heel Join
Slip the first stitch.
Knit until 2 stitches remain.
Knit those last 2 stitches together:
k2tog
You now have 8 working stitches.
Pick up 1 stitch from the next available edge stitch of the slipper upper.
You are back to:
9 stitches
Turn.
Next Row
Slip the first stitch.
Knit until 2 stitches remain.
K2tog.
Pick up 1 stitch from the next edge stitch on that side.
Turn.
Continue this process.
Each row:
- Slip first stitch.
- Knit across until 2 remain.
- K2tog.
- Pick up 1 new stitch from the adjacent slipper edge.
- Turn.
Because one stitch is removed and one edge stitch is picked up, the heel maintains its width while attaching itself to the slipper.
PART 16 — Continue Around the Heel
Continue joining one edge stitch at a time.
Work upward until you have incorporated the final available edge stitches from both sides of the upper.
The heel should now be fully connected.
There should be no sewn heel seam.
PART 17 — Finish the Remaining Heel Stitches
Once the final edge stitches have been incorporated, finish the remaining heel stitches loosely.
The demonstration decreases/binds them off gradually rather than creating a bulky straight edge.
Cut the yarn, leaving a tail.
Secure the final stitch.
Weave the yarn tail into the inside of the slipper.
PART 18 — Crochet the Opening Edge
The final crochet edging cleans up the slipper opening.
Use cream yarn and a crochet hook suitable for your yarn.
Join yarn at the opening.
Work single crochet evenly around the entire slipper opening.
Insert the hook through both loops of each available edge stitch.
Keep the single crochet stitches firm but not tight.
Continue all the way around until you return to the starting point.
Join.
Chain 2.
Fasten off.
Weave in the remaining yarn tail.
Finished Construction
The completed slipper has:
- 23-stitch short-row upper
- alternating green and cinnamon wedges
- cream garter separators
- no sewn sole seam
- no sewn heel seam
- center-worked sole
- joined-as-you-knit heel
- single crochet opening edge
The stripes should radiate diagonally across the foot, creating the distinctive leaf/flame appearance visible in the finished slipper.
Understanding the Green and Cinnamon Difference
Both colored wedges use the same short-row sequence:
11 → 10 → 9 → 8 → 7 → 6 → 5
The difference is where the 11-stitch section begins.
Green
Work approximately:
4 edge stitches + 11 wedge stitches
leaving about 8 stitches at the opposite side before turning.
Cinnamon
Work approximately:
8 edge stitches + 11 wedge stitches
leaving about 4 stitches at the opposite side.
This shift causes the colored wedges to alternate positions.
That is what creates the flowing pattern rather than a stack of identical stripes.
Tips for Cleaner Short Rows
Slip the First Stitch
The source consistently slips the first stitch of short rows rather than knitting it.
This creates cleaner turning edges.
Keep Carried Yarn Loose
When carrying cream, green, or cinnamon along the edge, do not pull tightly.
A tight float will reduce the stretch of the slipper.
Count the 11-Stitch Section Carefully
Every colored wedge begins with an 11-stitch short-row area.
A missed stitch changes the wedge shape.
Stop at Five
Each colored wedge decreases its short-row length until:
5 stitches remain
Then the next row is worked across the complete width.
Tips for the Sole
Keep the Bind-Off Edge Loose
You must pick up stitches from the upper edge.
A very tight bind-off makes this difficult.
Count the Picked-Up Stitches
Before beginning the sole, record your total.
Then calculate:
(total − 7) ÷ 2
to determine how many stitches belong to each side.
Maintain 11 Sole Stitches
Once the sole reaches 11 stitches, it stays at that working width while side stitches are consumed through the decreases.
Do Not Tighten the Edge Joins
The sole and heel need enough elasticity to fit comfortably.
Making the Slipper Smaller
The simplest adjustment described in the source is to reduce the number of colored wedges around the upper.
Try approximately:
18 colored wedges
for a substantially smaller slipper around EU 35–36.
Do not change the 23-stitch upper construction unless you also intend to alter the width/depth of the slipper.
After making fewer wedges, pick up stitches around the resulting upper and use the same sole formula.
Making the Slipper Larger
For a larger foot, increase the number of colored wedges.
Approximately:
22 wedges
is suggested as a starting point for EU 40–41.
Your picked-up stitch count will likely be greater than 87.
That does not change the sole calculation.
Reserve:
7 center stitches
and divide everything else equally between the two sides.
Color Ideas
The three-color construction can look completely different with another palette.
Autumn
Cream + rust + olive
Coastal
Cream + navy + dusty blue
Soft Neutral
Ivory + camel + taupe
Feminine
Cream + dusty rose + plum
Modern
Light gray + charcoal + mustard
Christmas
Cream + forest green + deep red
The cream separator is especially useful because it clearly outlines each colored wedge.
Common Problems
Colored Wedges Are Different Sizes
Check the short-row sequence.
Each wedge should use:
11, 10, 9, 8, 7, 6, 5
before returning across the full row.
Slipper Upper Is Too Tight
The carried yarn along the color-change edge is probably too tight.
Keep every unused strand relaxed.
Upper Is Too Large Around the Foot
Use fewer colored wedge repeats.
Sole Is Off Center
Recheck your calculation:
total picked-up stitches − 7
Then divide equally between the two sides.
Sole Becomes Wider Than 11 Stitches
Once the center reaches 11 stitches, stop adding stitches.
Begin joining the 11th stitch to a side stitch with a decrease.
Heel Develops a Seam or Gap
Make sure you pick up one new edge stitch after each heel decrease.
The heel should join directly to the upper as it grows.
Opening Edge Becomes Tight
Use a larger crochet hook or loosen your single crochet tension.
The slipper must still stretch comfortably over the heel.
Finishing
Weave in all yarn ends securely on the inside.
Shape the slipper by hand.
Because the pattern uses garter stitch, the finished fabric is naturally stretchy.
If desired, lightly block the slipper without stretching it beyond its intended dimensions.
For better grip on smooth floors, you can add a suitable non-slip treatment to the sole after testing it on a small area first.
Seamless Short-Row Slippers
The unusual appearance of this slipper comes almost entirely from short rows.
Each colored section begins as an 11-stitch area and becomes progressively shorter until only 5 stitches are worked. Alternating where those wedges begin causes the green and cinnamon sections to fan in opposite positions, while the cream garter ridges separate and emphasize every shape.
The sole then uses a second short-row technique: a small central section grows from 7 to 11 stitches before consuming the side stitches one row at a time. Finally, the heel is attached to the upper as it is knitted.
The result is a stretchy, colorful slipper with the sole, heel, and upper connected into one continuous construction rather than sewn together afterward.