
This deeply textured crochet blanket combines tall, elongated puff stitches with clean horizontal ridge rows to create repeating little wheat-kernel or leaf-shaped motifs.
The fabric has three distinct visual elements:
- raised elongated puff motifs
- tiny openings between the motifs
- strong horizontal crochet ridges separating each textured band
The finished blanket is warm and substantial without requiring complicated shaping. Once the first textured section is established, the same four-row sequence repeats for the entire project.
Skill Level
Confident Beginner / Intermediate
You should know how to:
- chain
- single crochet
- yarn over
- pull up long loops
- work into chain spaces
- work in the back loop only
- turn rows
- add a simple border
Finished Size
Approximately:
34–36 inches wide × 40–42 inches long
The pattern is easy to resize.
Materials
- Medium weight #4 yarn
- Approximately 1,200–1,450 yards
- 5 mm crochet hook
- Yarn needle
- Scissors
- Stitch markers
- Measuring tape
A smooth yarn is important because the elongated strands need good stitch definition.
Cream, ivory, beige, sage, dusty blue, camel, blush, and other solid colors work especially well.
Abbreviations — US Terms
ch – chain
sc – single crochet
sl st – slip stitch
st(s) – stitch(es)
sp – space
BLO – back loop only
EP – elongated puff stitch
Stitch Multiple
The textured pattern uses:
multiple of 3 + 1 working stitches
The foundation chain therefore uses:
multiple of 3 + 2 chains
For this blanket:
Chain 122
This produces:
121 working stitches
and:
40 raised puff motifs across each textured row
Smaller Examples
- Chain 38 → 37 working stitches
- Chain 50 → 49 working stitches
- Chain 74 → 73 working stitches
- Chain 98 → 97 working stitches
- Chain 122 → 121 working stitches
- Chain 146 → 145 working stitches
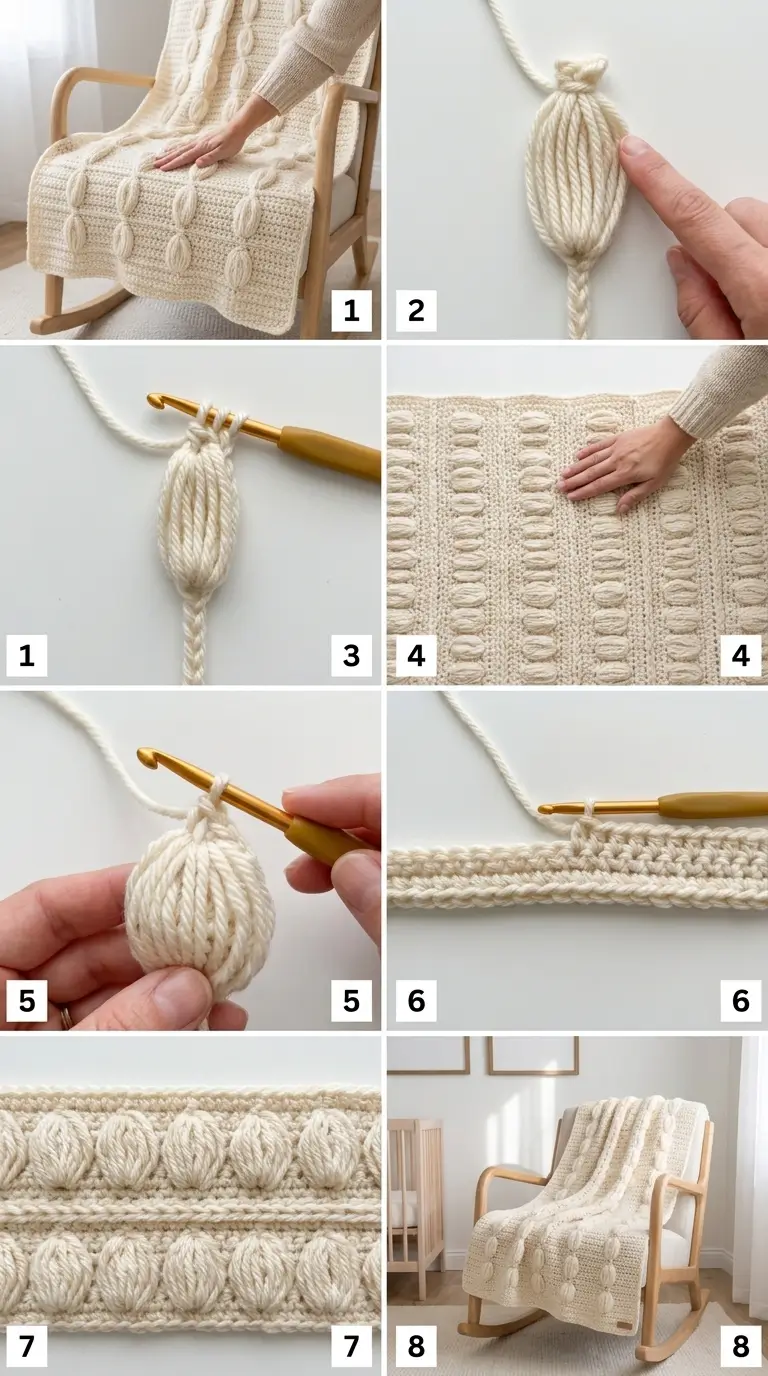
Special Stitch — Elongated Five-Loop Puff
The elongated puff creates the raised wheat-like motif.
Unlike a normal short puff stitch, every loop is deliberately pulled tall so the strands remain clearly visible.
How to Make the EP
Yarn over.
Insert the hook into the indicated stitch.
Yarn over and pull up a loop approximately:
¾–1 inch tall
Keep the loop loose.
Repeat this sequence in the same stitch four more times:
yarn over, insert hook, yarn over, pull up a long loop
You have now drawn up:
5 elongated loops
and should have:
11 loops on the hook
including the original working loop.
Yarn over.
Pull through the first 10 loops, leaving 2 loops on the hook.
Yarn over again.
Pull through the final 2 loops.
Ch 1 to secure the puff.
That locking chain is considered the top of the puff.
What the Puff Should Look Like
The finished motif should have:
- one narrow base
- five clearly visible long strands
- rounded full center
- narrow gathered top
- slightly raised three-dimensional shape
Do not pull the five long loops tightly.
The visible vertical strands are the main decorative feature.
Practice Swatch
Before beginning the blanket:
Ch 38.
Work the first five rows of the pattern.
You should have:
37 working stitches
and:
12 raised motifs
across the puff row.
A practice swatch helps you determine exactly how tall to pull your elongated loops.
All five loops in every motif should be approximately the same height.
Foundation Row
Ch 122.
Sc in the second chain from the hook.
Sc in every remaining chain across.
You should have:
121 sc
Ch 1.
Turn.
We will treat this first completed row as the setup row.
Row 2 — First Raised Wheat Puff Row
This is a right-side decorative row.
Sc in the first stitch.
Now repeat:
*EP in next st, ch 1, skip next st, sc in next st*
Repeat from * to * across.
You should have:
- 1 edge sc
- 40 elongated puff motifs
- 40 ch-1 openings
- 40 separating sc stitches
The row still represents:
121 working positions
Ch 1.
Turn.
Important
The ch 1 after the puff is part of the pattern.
You then make another ch 1 for the open space indicated in the repeat.
So visually, the top of each puff is locked first, and the neighboring chain creates the small opening beside it.
Keep these chains relaxed.
What Row 2 Should Look Like
Each repeat should show:
raised puff → small opening → sc anchor
The puffs should sit upright rather than leaning heavily sideways.
You should see small triangular gaps between the motifs.
Do not worry if the row looks slightly uneven before the next row is added.
Row 3 — Stabilizing Single Crochet Row
Ch 1 does not count as a stitch.
Sc in the first stitch.
Now work across carefully.
For each pattern repeat:
- sc into the locking top of the EP
- sc into the ch-1 space
- sc into the next sc
Continue across.
You should finish with:
121 sc
Ch 1.
Turn.
Why This Row Matters
This row:
- locks the puff tops into position
- fills the open spaces
- restores a solid foundation
- prepares the fabric for the raised horizontal ridge
Do not accidentally skip the chain space.
The stitch count must remain constant.
Row 4 — Horizontal Ridge Row
This row creates the prominent horizontal line visible between puff bands.
Sc in the back loop only of the first stitch.
Continue:
sc BLO in every stitch across
121 sc BLO
Ch 1.
Turn.
What BLO Does
By inserting the hook through only the back loop, the unused front loop remains visible on the surface.
That row of unused loops forms a clean chain-like horizontal ridge.
This line separates one wheat-puff band from the next.
Keep your tension even.
If this row is worked too tightly, the blanket will begin narrowing.
Row 5 — Solid Setup Row
Sc through both loops of every stitch across.
121 sc
Ch 1.
Turn.
This plain row provides enough depth between the horizontal ridge and the next group of elongated motifs.
Main Pattern Repeat
Repeat:
Rows 2–5
until the blanket reaches the desired length.
The four-row sequence is:
Row A
Elongated puff motifs
Row B
Solid sc stabilization
Row C
BLO sc horizontal ridge
Row D
Plain sc foundation
Then begin another puff row.
Visual Pattern
As the fabric grows, it should look approximately like:
raised wheat puffs
solid foundation
horizontal chain ridge
short plain section
raised wheat puffs
solid foundation
horizontal chain ridge
repeated throughout.
The motifs should stack vertically from one textured band to the next.
Keeping the Puffs the Same Height
Consistency is especially important with elongated stitches.
For every puff:
- Yarn over.
- Insert into the stitch.
- Pull the new loop to the same height as the previous puff.
- Hold that height while creating the remaining loops.
A useful technique is to compare every new loop against the first long loop already on the hook.
Do not allow the later loops to become progressively shorter.
How Tall Should the Loops Be?
For medium #4 yarn and a 5 mm hook:
¾–1 inch
is a useful starting point.
Shorter loops create:
- compact round puffs
- denser fabric
Longer loops create:
- taller leaf shapes
- stronger dimensional texture
The blanket shown by this style looks best when the motifs are elongated rather than round.
Keep the Five Strands Visible
After closing each puff, gently spread the long strands with your fingers.
You should be able to distinguish approximately five parallel elongated sections.
Do not aggressively separate them.
Just arrange them enough to prevent the strands from twisting into one rope.
Stitch Count
Every completed solid row should have:
121 stitches
Count regularly.
If your stitch count changes, the motif positions will gradually move and your side edges will no longer remain straight.
Where Stitch Counts Are Usually Lost
The most common places are:
- forgetting the sc in the chain space on Row 3
- missing the final edge stitch
- accidentally crocheting into the turning chain
- skipping the locking top of a puff
- adding an extra stitch around the puff top
Place stitch markers in the first and last stitch if necessary.
Working Into the Puff Top
The locking chain at the top of the puff may look smaller than an ordinary stitch.
Gently pull the motif downward.
You should see the small top V.
Insert the hook beneath both loops of that top V.
Work one sc.
Do not crochet around the entire puff.
The Tiny Openings Between Motifs
The small holes are intentional.
They come from the:
ch 1, skip 1
section of the textured row.
These spaces keep the raised motifs visually separated.
They should remain small.
If the openings become very large:
- tighten your chain slightly
- move down one hook size
Why the Blanket Is Still Warm
Although the motif rows contain small openings, most of the fabric consists of:
- single crochet
- back-loop single crochet
- dense puff stitches
The result is much denser than a traditional lace blanket.
Suggested Blanket Length
Continue the four-row repeat until the body measures approximately:
39–40 inches
before adding the border.
For a 40–42 inch finished blanket, stop after completing a Row 5 plain sc row.
This gives you a clean solid edge for the border.
Final Body Row
After your final complete repeat, work one additional plain row:
Sc in every stitch across.
121 sc
Do not fasten off if you are adding the border in the same yarn.
Simple Single Crochet Border
The blanket already has strong texture, so the border should stay simple.
Border Round 1
Ch 1.
Work sc evenly across the top.
At the first corner:
3 sc
Work sc evenly down the first long side.
At the second corner:
3 sc
Sc across the foundation edge.
At the third corner:
3 sc
Work evenly up the opposite long side.
At the final corner:
3 sc
Join with a sl st.
Side Border Placement
The puff pattern creates rows of different heights.
Do not automatically work exactly one sc into every visible side loop.
Instead, distribute your stitches evenly.
A good starting point is:
- 1 sc in the end of each short sc row
- 2 sc distributed across the side of each taller puff section
Lay the blanket flat occasionally while working.
The edge should remain straight.
Border Round 2
Ch 1.
Sc in every stitch around.
At each corner, locate the center stitch of the previous 3-sc corner.
Work:
3 sc in that stitch
Continue around.
Join.
Fasten off.
Optional Raised-Ridge Border
If you want the border to match the horizontal lines in the blanket:
After Border Round 2, work one round of:
sc BLO
around the entire blanket.
At the corners:
work the three corner stitches normally so the fabric can turn.
This creates one final chain-like raised line around the project.
Optional Wider Border
For a more substantial baby blanket border:
Round 1
sc
Round 2
sc
Round 3
sc BLO
Round 4
sc
This creates a simple framed finish without competing with the puff texture.
Finished Size
After light blocking:
approximately 34–36 × 40–42 inches
Your dimensions may vary depending on:
- yarn
- hook size
- puff height
- crochet tension
Smaller Stroller Blanket
Start with:
Chain 98
This creates:
97 working stitches
and:
32 puff motifs per textured row
Continue until approximately:
30–34 inches long
Add the same border.
Larger Baby Blanket
Start with:
Chain 146
This gives:
145 working stitches
and:
48 puff motifs
Continue until approximately:
42–44 inches long
Lap Blanket
Try:
Chain 170
which produces:
169 working stitches
Continue until approximately:
48–52 inches long.
Throw Blanket
For a larger sofa throw:
Chain 206
This gives:
205 working stitches
Continue until approximately:
58–62 inches long.
Because the elongated puff stitches use considerably more yarn than ordinary single crochet, buy extra yarn for larger projects.
How to Calculate Your Own Width
Choose the number of puff repeats you want.
Each repeat uses:
3 working stitches
Then add:
1 edge stitch
Formula:
number of motifs × 3 + 1 = working stitches
Then add one foundation chain.
For example:
20 motifs
20 × 3 + 1 = 61 working stitches
Chain 62
30 motifs
30 × 3 + 1 = 91 working stitches
Chain 92
40 motifs
40 × 3 + 1 = 121 working stitches
Chain 122
50 motifs
50 × 3 + 1 = 151 working stitches
Chain 152
Solid Cream Version
Cream or ivory emphasizes every detail:
- five elongated puff strands
- small openings
- horizontal front-loop ridges
- layered rows
This is one of the best color choices if you want the stitch texture itself to be the focal point.
Sage Green Version
Muted sage creates a softer modern look while still showing the raised motif clearly.
Pair with a cream border if desired.
Two-Color Version
You can make the puff bands one color and the separating rows another.
For example:
Puff Row
Cream
Stabilizing + Ridge + Setup Rows
Camel
Then return to cream for the next puff row.
Other combinations:
- cream + sage
- ivory + dusty rose
- light blue + navy
- beige + chocolate
- pale gray + charcoal
Stripe Version
For wider horizontal stripes, keep one color for several complete four-row repeats.
For example:
2 repeats cream
2 repeats sage
2 repeats cream
This preserves the stitch structure while adding stronger color blocks.
Best Yarn for This Pattern
Choose yarn with good stitch definition.
Good options include:
- smooth acrylic
- cotton-acrylic blend
- merino-acrylic blend
- soft washable wool
- smooth baby yarn
Avoid:
- extremely fuzzy yarn
- eyelash yarn
- loosely spun roving
You need to see the individual elongated puff strands clearly.
Hook Size
For medium #4 yarn:
5 mm
is a good starting point.
If the fabric is extremely stiff:
try 5.5 mm.
If your puffs look floppy:
try 4.5 mm.
The ideal fabric should be:
- substantial
- flexible
- clearly textured
- easy to drape
Common Problems
My Puffs Look Round Instead of Tall
Pull each loop higher before closing the stitch.
Aim for approximately:
¾–1 inch
rather than ordinary puff-stitch height.
The Five Strands Are Different Heights
When pulling up the loops, compare every new one to the first loop.
Do not tighten the working yarn between pull-ups.
Puff Is Difficult to Close
Eleven loops can be bulky.
Keep the loops loose and aligned on the thicker part of the hook.
Yarn over and gently pull through the first 10 loops.
Do not force the hook.
Puff Comes Apart at the Top
Make sure you:
- pull through the first 10 loops
- yarn over and pull through the final 2
- ch 1 firmly
That final chain locks the puff.
Motifs Lean Sideways
Check your loop height.
Also make sure the sc separating the motifs is not extremely tight.
Gently shape the puff vertically after finishing it.
Openings Are Too Large
Tighten the ch-1 slightly or use a smaller hook.
Blanket Is Getting Narrower
Count your stitches after every solid row.
You may be:
- missing a chain-space sc
- missing an edge stitch
- making the BLO ridge too tightly
Blanket Is Getting Wider
Make sure you are not crocheting into the turning chain.
The ch-1 at the beginning of a row does not count as a stitch.
Horizontal Ridge Is Hard to See
On the ridge row, work through:
back loop only
not both loops.
The unused front loops should form a continuous visible chain.
Ridge Row Is Too Tight
BLO single crochet can naturally become tighter.
Deliberately relax your tension or use a hook 0.5 mm larger for that row.
Side Edges Look Uneven
Mark the first and final stitches of every row.
The border will tidy minor variations, but correct stitch counts are still important.
Blocking
Light blocking improves the final appearance.
After weaving in the ends:
- Wash or dampen according to yarn instructions.
- Lay the blanket flat.
- Straighten the edges.
- Gently shape each puff with your fingers.
- Straighten the horizontal ridges.
- Allow the blanket to dry completely.
Do not flatten the puff stitches.
Avoid heavy pressing or direct ironing.
The raised dimension should remain intact.
Make a Matching Pillow
Use the same stitch pattern to crochet two rectangular panels.
For an approximately 16-inch pillow:
Start with:
Chain 62
Work until the panel is approximately square.
Make two.
Place wrong sides together.
Sc around three edges.
Insert the pillow form.
Sc the final edge closed.
The raised wheat motifs make especially attractive home-decor cushions.
Make a Scarf
For a textured winter scarf:
Chain 26
Work:
25 stitches
This creates:
8 puff motifs
across.
Continue the four-row repeat until the scarf reaches approximately:
65–70 inches
Finish with one plain sc row.
Raised Wheat Puff Crochet Blanket
The dramatic appearance of this blanket comes from combining two simple textures.
Five long yarn-over loops create each elongated wheat-like puff, while the back-loop single crochet rows leave a continuous line of unused front loops across the fabric.
Those strong horizontal ridges frame every row of dimensional motifs and make the puffs appear even more raised.
Once the four-row repeat becomes familiar, the pattern is easy to extend to virtually any rectangular project—from baby blankets and throws to scarves, cushions, bed runners, and textured home decor.


