Introduction
A crochet pumpkin headband is one of those fall accessories that feels cute, cozy, and instantly giftable. It is small enough to make quickly, but it still has that handmade “wow” factor moms love for photos, markets, autumn outfits, and pumpkin patch days.
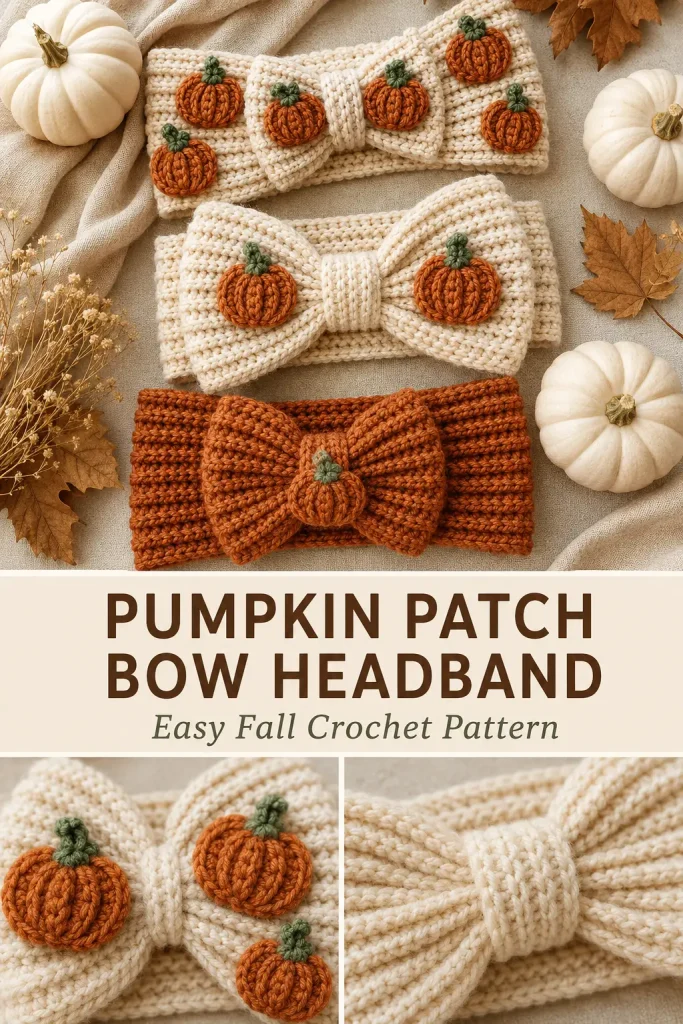
This Pumpkin Patch Bow Crochet Headband is an original pattern inspired by fall bow-style headbands, but the construction, stitch counts, pumpkin appliqués, and finishing details are created fresh. The design uses a stretchy ribbed headband base, a soft oversized bow, and small raised pumpkin appliqués sewn across the front for a sweet seasonal look.
You can make it in a solid rust color for a simple fall bow, or use a cream base with tiny pumpkins for a more playful boutique-style version.
Description
The finished headband has a wide ribbed band that stretches comfortably around the head. A gathered bow is made separately, cinched in the center, and sewn onto the front. Small pumpkin appliqués are added to the bow and headband for a cute autumn pattern.
The design works beautifully in cream, burnt orange, rust, oatmeal, warm brown, and sage green. The pumpkins are made with rust-orange yarn and tiny green stems, giving the headband a cheerful fall look without making it too complicated.
This easy crochet pattern is great for handmade gifts, fall photos, craft fairs, mommy-and-me accessories, and cozy autumn outfits.
Materials
- Worsted weight yarn in cream or rust for the headband base
- Worsted weight yarn in burnt orange for pumpkin appliqués
- Small amount of dark sage or olive green yarn for pumpkin stems
- 5 mm crochet hook
- Yarn needle
- Scissors
- Measuring tape
- Stitch markers, optional
Finished Size
This pattern is written for a child size, with adjustment notes included.
Approximate finished sizes:
- Toddler: 17–18 inches around
- Child: 19–20 inches around
- Adult: 21–22 inches around
The ribbed crochet fabric has stretch, so make the band about 1–2 inches smaller than the actual head circumference.
Gauge
Approximate gauge in ribbed pattern:
- 13 hdc stitches = 4 inches
- 10 rows = 4 inches
Gauge matters for fit. Measure the headband strip before seaming.
Abbreviations
- ch: chain
- sc: single crochet
- hdc: half double crochet
- dc: double crochet
- sl st: slip stitch
- BLO: back loop only
- st: stitch
- sts: stitches
- FO: fasten off
Pattern Notes
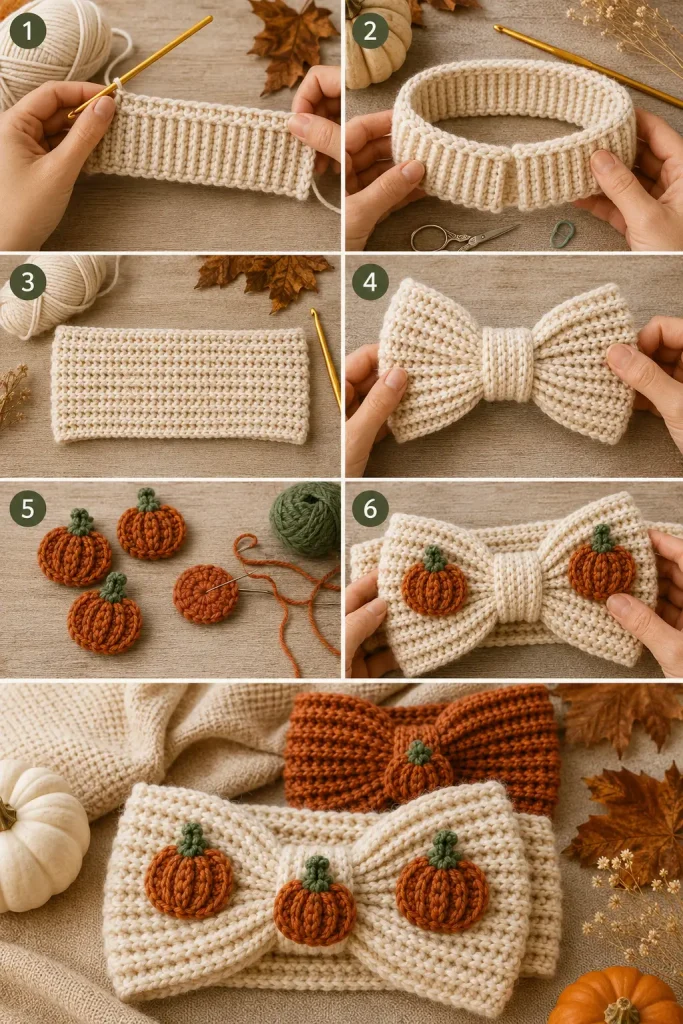
The headband base is worked flat in rows, then seamed into a loop.
The bow is worked as a rectangle, then cinched in the center.
The pumpkin appliqués are made separately and sewn on.
The base can be made plain rust or cream with pumpkins.
Ch 1 at the beginning of rows does not count as a stitch.
Step-by-Step Instructions
Headband Base
Use cream or rust yarn and a 5 mm hook.
Foundation Chain
Ch 13.
Row 1
Hdc in the 2nd ch from hook and in each ch across. (12)
Ch 1, turn.
Row 2
Hdc in BLO of each st across. (12)
Ch 1, turn.
Rows 3–46
Repeat Row 2 until the strip measures about 19 inches for child size.
For toddler size, work until the strip measures about 17 inches.
For adult size, work until the strip measures about 21 inches.
Do not stretch the strip while measuring.
Seaming the Headband
Fold the strip so the short ends meet.
Make sure the ribbed lines are vertical.
Sl st or whip stitch the two short ends together.
FO and weave in ends.
Turn the seam to the inside.
Bow Rectangle
Use the same yarn as the headband base.
For a cream pumpkin-print bow, use cream yarn.
For a solid fall bow, use rust yarn.
Foundation Chain
Ch 31.
Row 1
Hdc in the 2nd ch from hook and in each ch across. (30)
Ch 1, turn.
Row 2
Hdc in each st across. (30)
Ch 1, turn.
Rows 3–12
Repeat Row 2.
FO and weave in ends.
You now have a simple rectangle.
Bow Center Wrap
Use the same yarn as the bow, or use rust yarn for contrast.
Foundation Chain
Ch 8.
Row 1
Sc in the 2nd ch from hook and in each ch across. (7)
Ch 1, turn.
Rows 2–8
Sc in each st across. (7)
FO, leaving a long tail for sewing.
Shaping the Bow
Pinch the bow rectangle in the center.
Wrap the bow center strip around the pinched middle.
Sew the short ends of the wrap together at the back of the bow.
Pull snugly enough to shape the bow, but not so tight that the fabric bunches unevenly.
Sew the shaped bow onto the front of the headband, covering the seam if desired.
Pumpkin Appliqués
Make 6–10 small pumpkins, depending on how many you want on the bow and band.
Use burnt orange yarn.
Pumpkin Body
Ch 5.
Row 1
Sc in 2nd ch from hook.
Hdc in next ch.
Dc in next ch.
Hdc in last ch. (4)
Ch 1, turn.
Row 2
Sc in first st.
Hdc in next st.
Dc in next st.
Hdc in last st. (4)
Do not fasten off.
Edging
Sc evenly around the pumpkin shape.
Work 2 sc in each side edge to round the shape.
Join with sl st.
FO, leaving a long tail for sewing.
Pumpkin Stem
Use dark sage or olive green yarn.
Join yarn to the top center of the pumpkin.
Ch 3.
Sl st in the 2nd ch from hook and next ch.
Sl st back into the top of the pumpkin.
FO and weave in the green end.
Repeat for each pumpkin.
Pumpkin Ridge Details
Use a yarn needle and burnt orange yarn, or a slightly darker orange yarn.
Make 2 short vertical stitches on each pumpkin to create pumpkin grooves.
Keep the stitches soft and slightly curved.
Do not pull too tightly.
Attaching Pumpkins
Lay the bow and headband flat.
Place 3–5 pumpkins across the bow.
Place 3–5 pumpkins around the visible front section of the headband.
Pin each pumpkin in place.
Sew each pumpkin securely around the edge.
Make sure all yarn tails are woven in neatly on the back.
Optional Mini Leaves
Use sage green yarn.
Ch 5.
Sl st in 2nd ch from hook.
Sc in next ch.
Hdc in next ch.
Sl st in last ch.
FO, leaving a tail for sewing.
Sew one leaf near a few pumpkin stems if you want extra detail.
Finishing
Weave in all ends.
Check that the bow is centered.
Stretch the headband gently to make sure the seam and bow are secure.
If needed, lightly steam-block the bow so it sits flat.
Do not press the pumpkins flat; they should stay slightly raised.
Size Adjustments
Baby Size
Ch 11 for the band width.
Work until the strip measures about 15–16 inches.
Make a smaller bow by chaining 25 and working 9 rows.
Toddler Size
Ch 12 or 13.
Work until the strip measures about 17–18 inches.
Child Size
Follow the pattern as written.
Adult Size
Work the headband strip until it measures about 21–22 inches.
For a larger bow, chain 35 and work 14 rows.
Tips & Variations
Use cream for the base and orange pumpkins for the cutest pumpkin patch look.
Use solid rust yarn for a simpler fall headband.
Use oatmeal beige with terracotta pumpkins for a soft boutique version.
Use mustard yellow pumpkins for a warmer autumn palette.
Use dark brown for the bow center wrap for a rustic look.
For a flatter headband, sew the pumpkins only onto the bow.
For a more decorative version, scatter pumpkins across the full visible band.
Use cotton yarn for crisp stitch definition.
Use acrylic yarn for softer stretch and comfort.
FAQ
Is this pumpkin crochet headband beginner-friendly?
Yes. The headband and bow use simple rows, and the pumpkin appliqués are small and easy to sew on.
Is this the exact pattern from the photo?
No. This is a new original version inspired by the pumpkin bow headband style. The construction, stitch counts, bow shape, and appliqués are original.
Can I make this for adults?
Yes. Make the headband strip longer before seaming. Measure around the head and make the strip about 1–2 inches smaller for stretch.
What yarn works best?
Worsted weight acrylic or cotton yarn works well. Acrylic gives more stretch, while cotton gives cleaner stitch definition.
Can I skip the pumpkins?
Yes. You can make a plain ribbed bow headband in rust, cream, or brown for a simpler fall accessory.
Conclusion
The Pumpkin Patch Bow Crochet Headband is a sweet, cozy fall project that looks cute in photos and works beautifully as a handmade gift or market item. The ribbed band gives it comfort and stretch, while the bow and tiny pumpkin appliqués add the perfect autumn detail.
Make it in cream and orange for a pumpkin patch look, or try rust, oatmeal, and sage for a softer farmhouse style. This beginner crochet project is quick, useful, and full of handmade fall charm.



