Introduction
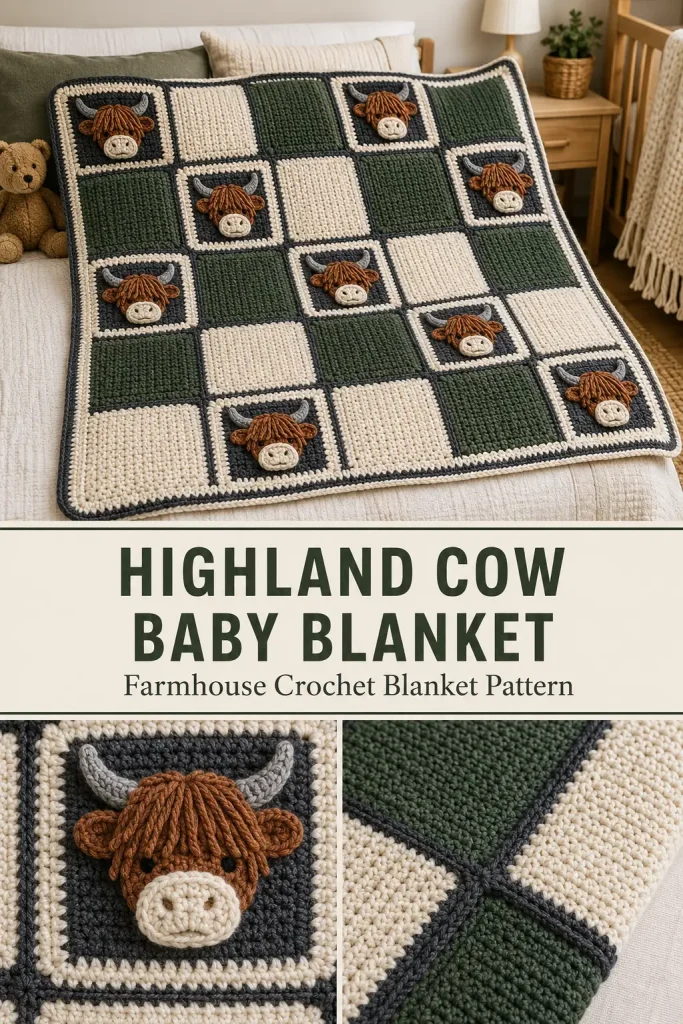
There is something so cozy and heartwarming about a handmade farm animal blanket. A Highland cow design feels rustic, sweet, and full of character, especially when it is made with soft granny squares and little raised cow faces.
This Highland Cow Baby Blanket is an original crochet blanket pattern inspired by the look of a patchwork farm blanket, but the construction, stitch counts, motif layout, and appliqué details are created fresh so it can be made clearly and safely. The blanket is built from simple crochet squares, joined together, then decorated with Highland cow appliqués on selected squares.
The design uses cream, forest green, charcoal, rust brown, warm ivory, and soft gray for a cozy farmhouse color palette. It makes a beautiful handmade gift, nursery decor blanket, stroller blanket, or keepsake crochet project.
Description
This blanket is made from three types of crochet squares: plain cream squares, plain forest green squares, and dark framed squares with a raised Highland cow face sewn on top. The cow squares have a charcoal base, a cream border, a rust-brown shaggy head, a soft ivory muzzle, small gray horns, and rounded ears.
The blanket is joined with dark gray crochet seams, giving it a clear patchwork look. The finished style feels warm, rustic, and handmade, with enough texture to look special without making the construction impossible.
This pattern is best for confident beginners or intermediate crocheters. The plain squares are simple, while the cow face appliqués require a little shaping and sewing.
Materials
- Worsted weight yarn in cream
- Worsted weight yarn in forest green
- Worsted weight yarn in charcoal gray
- Worsted weight yarn in rust brown
- Worsted weight yarn in warm ivory
- Worsted weight yarn in soft gray
- Small amount of black yarn for optional nostrils or face details
- 5 mm crochet hook
- Yarn needle
- Scissors
- Stitch markers or pins
- Measuring tape
Finished Size
Approximate finished size:
- 36 x 42 inches
This blanket uses:
- 30 squares total
- 5 squares across
- 6 squares down
- Each square about 7 inches after blocking
You can make the blanket larger by adding more rows or columns.
Gauge
One finished square should measure about 7 inches.
Gauge is important because all squares need to be the same size.
If your square is too small, use a larger hook.
If your square is too large, use a smaller hook.
Abbreviations
- MR: magic ring
- ch: chain
- sc: single crochet
- hdc: half double crochet
- dc: double crochet
- tr: treble crochet
- sl st: slip stitch
- st: stitch
- sts: stitches
- sp: space
- ch-sp: chain space
- FO: fasten off
Special Stitch
Granny Cluster
Work 3 dc in the same stitch or space.
Pattern Notes
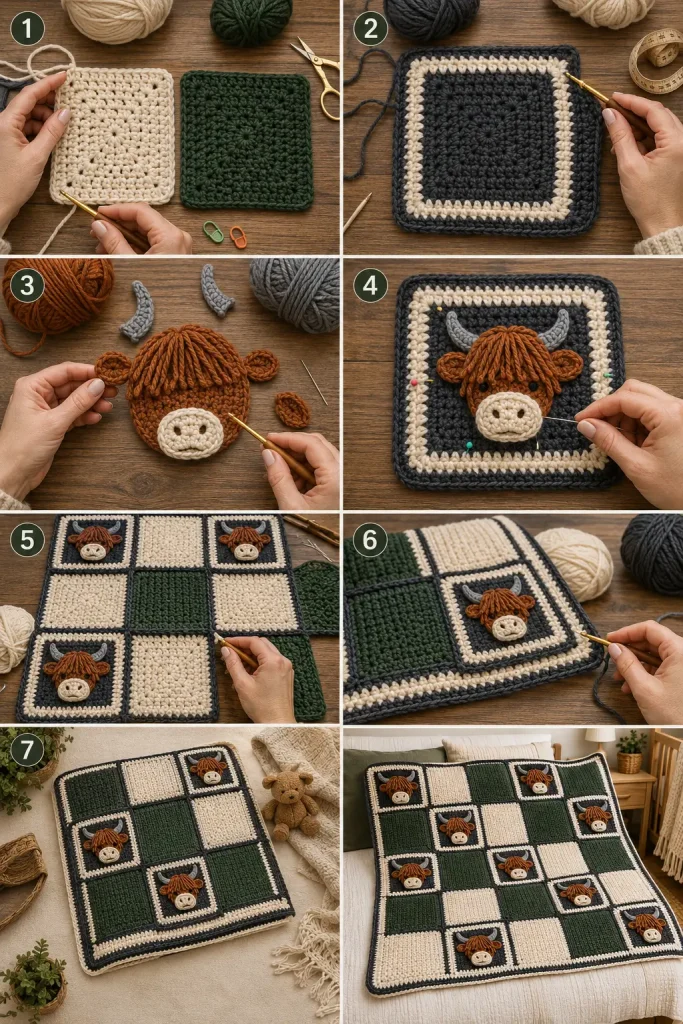
The blanket is made from separate crochet squares.
All squares are made first, then appliqués are sewn to the cow squares.
The squares are joined together after all appliqués are attached.
The cow face is made from separate pieces: head, muzzle, horns, and ears.
The Highland cow hair texture is made with simple loop stitches or short yarn fringe.
If this blanket is for a baby, sew every appliqué piece very securely and avoid loose long strands.
Blanket Layout
Make 30 squares total.
Use this layout:
Row 1: cream, cow, green, cow, cream
Row 2: green, cream, cow, cream, green
Row 3: cow, green, cream, green, cow
Row 4: cream, cow, green, cow, cream
Row 5: green, cream, cow, cream, green
Row 6: cow, green, cream, green, cow
You will need:
- 10 cream squares
- 10 forest green squares
- 10 cow base squares
Step-by-Step Instructions
Plain Granny Square
Make 10 in cream and 10 in forest green.
Round 1
Make a MR.
Ch 3. This counts as the first dc.
Work 2 dc into the ring.
Ch 2.
Repeat 3 times: 3 dc into the ring, ch 2.
Pull the ring closed.
Join with sl st to top of beginning ch 3.
You should have 4 granny clusters and 4 corner spaces.
Round 2
Sl st into the next corner ch-2 sp.
Ch 3, work 2 dc, ch 2, 3 dc in the same corner sp.
Ch 1.
In each remaining corner ch-2 sp, work: 3 dc, ch 2, 3 dc.
Ch 1 between each corner group.
Join with sl st to top of beginning ch 3.
Round 3
Sl st into the next corner ch-2 sp.
Ch 3, work 2 dc, ch 2, 3 dc in the same corner sp.
Ch 1.
Work 3 dc in each side ch-1 sp.
Ch 1.
In each corner ch-2 sp, work: 3 dc, ch 2, 3 dc.
Continue around.
Join with sl st.
Rounds 4–6
Repeat Round 3.
Each round adds one more granny cluster along each side.
FO and weave in ends.
Square Border for Plain Squares
Use charcoal gray yarn.
Join yarn in any corner ch-2 sp.
Border Round 1
Ch 1.
Sc in each stitch and ch-sp around.
Work 3 sc in each corner ch-2 sp.
Join with sl st to first sc.
FO and weave in ends.
This dark border helps all squares match before joining.
Cow Base Square
Make 10.
Use charcoal gray yarn for the main square.
Rounds 1–5
Work the same as the Plain Granny Square pattern using charcoal gray.
FO charcoal gray.
Cream Frame Round
Join cream yarn in any corner ch-2 sp.
Ch 3, work 2 dc, ch 2, 3 dc in the same corner sp.
Ch 1.
Work 3 dc in each side ch-1 sp.
Ch 1.
In each corner ch-2 sp, work: 3 dc, ch 2, 3 dc.
Continue around.
Join with sl st.
FO cream.
Dark Edge Round
Join charcoal gray yarn in any corner.
Ch 1.
Sc in each stitch and ch-sp around.
Work 3 sc in each corner ch-2 sp.
Join with sl st.
FO and weave in ends.
The cow square should have a charcoal center, cream frame, and dark outer edge.
Highland Cow Head Appliqué
Make 10 using rust brown yarn.
The head is worked as a textured oval circle.
Round 1
Make a MR.
Ch 1.
Work 8 hdc into the ring.
Pull ring closed.
Join with sl st to first hdc. (8)
Round 2
Ch 1.
Work 2 hdc in each st around.
Join with sl st. (16)
Round 3
Ch 1.
Repeat around: hdc in next st, 2 hdc in next st.
Join with sl st. (24)
Round 4
Ch 1.
Repeat around: hdc in next 2 sts, 2 hdc in next st.
Join with sl st. (32)
Round 5
Ch 1.
Hdc in each st around.
Join with sl st. (32)
FO, leaving a long tail for sewing.
The head should be a round, slightly puffy rust-brown piece.
Shaggy Forehead Texture
Use rust brown yarn.
You can choose either loop stitches or short fringe.
Option 1: Loop Stitch Hair
Join rust brown yarn near the upper front of the head appliqué.
Work surface loop stitches across the upper half of the head.
Make 3 short rows of loops.
FO and secure ends.
Trim only if needed.
Option 2: Short Fringe Hair
Cut 12–16 short strands of rust brown yarn, each about 3 inches long.
Attach them across the top half of the cow head using a lark’s head knot.
Trim to about 1 inch.
Do not make the fringe too long if the blanket is for a baby.
For baby use, sew or knot each strand very securely.
Muzzle
Make 10 using warm ivory yarn.
Round 1
Ch 6.
Sc in 2nd ch from hook.
Sc in next 3 ch.
Work 3 sc in last ch.
Now work along the opposite side of the foundation chain.
Sc in next 3 ch.
Work 2 sc in last ch.
Join with sl st. (12)
Round 2
Ch 1.
Work 2 sc in first st.
Sc in next 3 sts.
Work 2 sc in each of next 3 sts.
Sc in next 3 sts.
Work 2 sc in each of last 2 sts.
Join with sl st.
FO, leaving a long tail for sewing.
The muzzle should be a small oval.
Optional: Use black yarn to sew two small nostril stitches on the muzzle.
Horns
Make 20 using soft gray yarn.
Each cow needs 2 horns.
Horn
Ch 6.
Sc in 2nd ch from hook.
Hdc in next 2 ch.
Dc in next ch.
Hdc in last ch.
FO, leaving a tail for sewing.
The horn should look like a small curved triangle.
When sewing, curve the horn slightly inward.
Ears
Make 20 using rust brown yarn.
Each cow needs 2 ears.
Ear
Ch 5.
Sc in 2nd ch from hook.
Hdc in next ch.
Dc in next ch.
Hdc in last ch.
FO, leaving a tail for sewing.
The ear should be small and rounded.
Assembling Each Cow Face
Place one rust-brown head in the center of a cow base square.
The head should sit slightly above the center of the square.
Pin it in place.
Sew around the outer edge of the head securely.
Place the ivory muzzle near the lower center of the head.
Sew the muzzle securely in place.
Place one horn on each upper side of the head.
Sew the horns behind or slightly under the top edge of the head.
Place one ear near each horn, slightly lower and outward.
Sew the ears securely.
If desired, add tiny black embroidered eyes above the muzzle.
Keep the face simple so the cow appliqué does not become too bulky.
Repeat for all 10 cow squares.
Blocking the Squares
Before joining, block all squares to the same size.
Lay each square flat.
Gently shape the corners.
Make sure all squares measure about 7 inches.
Let dry completely if wet blocking.
Do not press the cow appliqués flat.
Joining the Blanket
Arrange the squares according to the layout.
Use charcoal gray yarn for joining.
Slip Stitch Join Method
Place two squares wrong sides together.
Insert hook through the outer loops of both squares.
Sl st evenly across the edge.
Do not pull too tightly.
Join squares into rows first.
Then join the rows together.
Whip Stitch Join Method
Place two squares side by side with right sides facing up.
Using a yarn needle and charcoal yarn, whip stitch through the outer loops.
Keep tension even.
Join all squares according to the layout.
The charcoal joining lines should create the patchwork grid look.
Blanket Border
After all squares are joined, add a full border.
Use charcoal gray yarn.
Border Round 1
Join yarn in any corner.
Ch 1.
Sc evenly around the entire blanket.
Work 3 sc in each corner.
When you reach square joins, place stitches evenly so the edge stays flat.
Join with sl st.
Border Round 2
Ch 1.
Sc in each st around.
Work 3 sc in the center stitch of each corner.
Join with sl st.
FO charcoal gray.
Border Round 3
Join cream yarn in any corner.
Ch 1.
Sc in each st around.
Work 3 sc in each corner.
Join with sl st.
FO cream.
Border Round 4
Join charcoal gray yarn.
Ch 1.
Sc in each st around.
Work 3 sc in each corner.
Join with sl st.
FO and weave in ends.
This creates a clean framed edge that matches the square joins.
Finishing
Weave in every yarn tail securely.
Check every appliqué piece.
Make sure horns, ears, muzzle, and head pieces are tightly sewn down.
Gently shape the blanket.
Do not pull the cow appliqués too much while blocking.
If the blanket will be used for a baby, inspect every attachment before use.
Size Adjustments
Smaller Security Blanket
Make 16 squares total.
Arrange them 4 across by 4 down.
Use 5 or 6 cow squares and fill the rest with plain squares.
Larger Toddler Blanket
Make 42 squares total.
Arrange them 6 across by 7 down.
Use 12–14 cow squares and fill the rest with plain cream and green squares.
Larger Throw Blanket
Make 48 squares total.
Arrange them 6 across by 8 down.
Add more plain squares to keep the design balanced.
Tips & Variations
Use rust brown for a classic Highland cow look.
Use cream and forest green for a cozy farmhouse palette.
Use oatmeal beige instead of cream for a warmer rustic blanket.
Use sage green instead of forest green for a softer nursery style.
Use dark gray joining for a strong patchwork look.
For a flatter baby blanket, make the cow face with simple embroidered details instead of raised pieces.
For a more textured decorative blanket, use loop stitch or short fringe for the cow hair.
Use cotton-blend yarn if you want more structure.
Use soft acrylic yarn if you want the blanket warmer and easier to wash.
FAQ
Is this Highland cow blanket beginner-friendly?
This pattern is best for confident beginners. The granny squares are simple, but the cow appliqués require sewing and careful placement.
Is this the exact pattern from the photo?
No. This is a new original version inspired by the general look of a Highland cow patchwork blanket. The square layout, stitch counts, appliqués, and construction are original.
Can I make the cow faces flatter?
Yes. Skip the raised head appliqué and embroider the cow face directly onto the square, or sew down the pieces more firmly.
What yarn works best?
Worsted weight acrylic or cotton-blend yarn works well. Acrylic is soft and washable, while cotton-blend yarn gives cleaner stitch definition.
Is this safe for babies?
For baby use, sew all appliqués very securely and avoid long loose fringe. Use embroidered eyes instead of plastic safety eyes.
Conclusion
The Highland Cow Baby Blanket is a cozy farm-inspired crochet project with a warm patchwork feel. The mix of cream, forest green, charcoal, and rust-brown cow squares creates a blanket that feels rustic, cute, and full of handmade charm.
Make it as a nursery blanket, baby shower gift, farmhouse decor throw, or keepsake crochet project. With simple granny squares, careful joining, and sweet Highland cow appliqués, this blanket is both practical and memorable.



