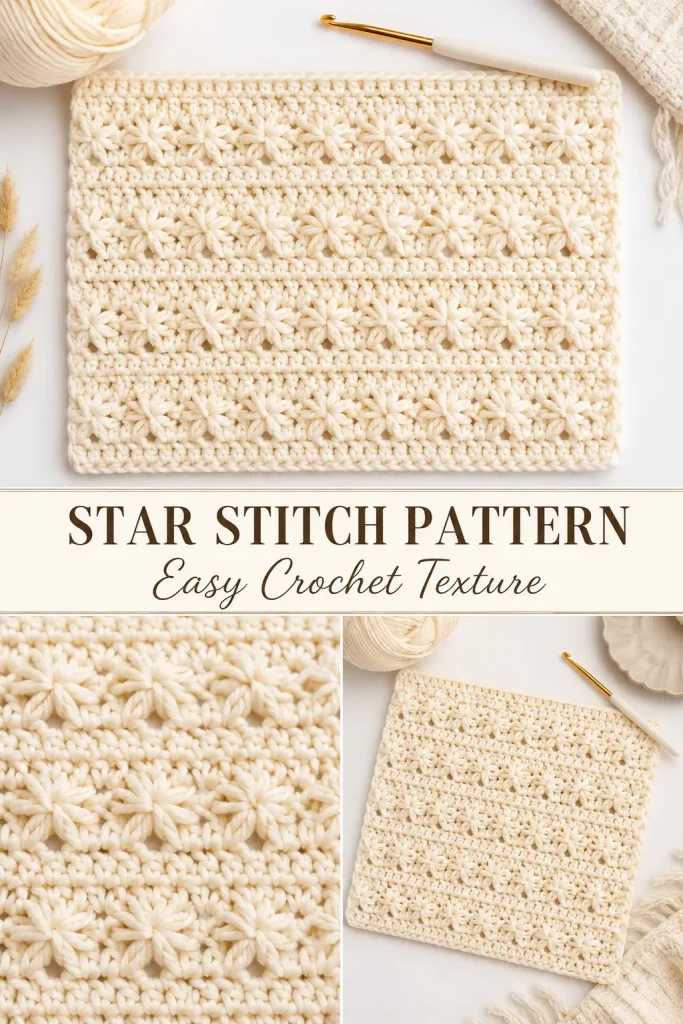
This beautiful crochet star stitch has a soft floral look that makes even simple projects feel special. The little star-shaped clusters sit neatly in rows, creating a delicate raised texture that works beautifully for baby blankets, cardigans, scarves, cushions, hats, and cozy handmade garments.
The stitch looks detailed, but it is built from a simple two-row repeat. One row creates the star clusters, and the next row fills the small openings with half double crochet stitches so the stars become clear and balanced.
This is an original written stitch pattern inspired by the visible cream star-stitch sample. It is designed to help you create the same type of textured crochet fabric without copying a paid or copyrighted pattern.
Description
This crochet stitch pattern creates a soft rectangular fabric covered with small raised star or flower-like motifs. The stars are formed by pulling up multiple loops, closing them together, and making a chain to create the center “eye” of each star. The following row works half double crochet stitches into each star center, giving the fabric structure and making the star pattern stand out. In cream or white yarn, the stitch has a clean, elegant look with a slightly shiny, delicate texture, making it ideal for blankets, baby items, pillows, and feminine crochet garments.
Materials
- DK or light worsted yarn in cream, white, or your chosen color
- 4.0 mm to 4.5 mm crochet hook
- Scissors
- Yarn needle
- Stitch markers, optional
- Measuring tape
Abbreviations
- ch = chain
- st = stitch
- sts = stitches
- yo = yarn over
- hdc = half double crochet
- dc = double crochet
- rep = repeat
Pattern Notes
- This pattern uses US crochet terms.
- The stitch is worked back and forth in rows.
- The star stitch is made over several chains or stitches by pulling up loops.
- Each star is closed with ch 1, which creates the small center hole of the star.
- The next row works 2 hdc into each star center.
- The starting chain should be an odd number.
- For a practice swatch, start with ch 21.
- Keep your loops even when making each star so the texture looks neat.
- This stitch works best with smooth yarn that shows stitch definition clearly.
Step-by-Step Instructions
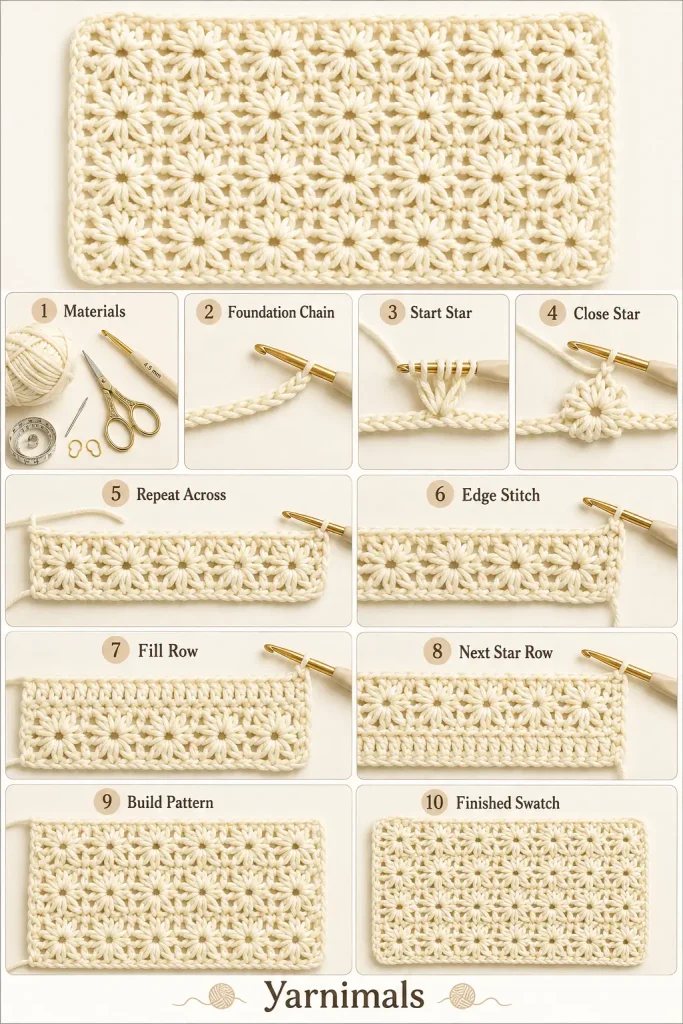
Foundation Chain
Ch 21 for a small practice swatch.
For a larger project, chain any odd number until you reach your desired width.
Row 1: First Star Stitch Row
Insert hook into the 2nd ch from the hook.
Yo and pull up a loop.
Insert hook into the next ch.
Yo and pull up a loop.
Continue pulling up one loop in each of the next 3 chains.
You should have 6 loops on your hook.
Yo and pull through all 6 loops.
Ch 1 to close the star.
This creates the first half-star cluster.
Continue Row 1
To make the next star:
Insert hook into the center hole of the star you just made.
Yo and pull up a loop.
Insert hook under the side strand of the same star.
Yo and pull up a loop.
Insert hook into the last chain used by the previous star.
Yo and pull up a loop.
Insert hook into the next unused chain.
Yo and pull up a loop.
Insert hook into the next unused chain.
Yo and pull up a loop.
You should have 6 loops on the hook.
Yo and pull through all 6 loops.
Ch 1 to close the star.
Repeat this same method across the row.
For each new star, pull up loops from:
- the center hole of the previous star
- the side strand of the previous star
- the last stitch used by the previous star
- the next 2 unused foundation chains
Continue until you reach the end of the row.
End of Row 1
When you reach the final star, do not close the edge with only a chain if it leaves the side uneven.
After closing the final star, work 1 dc into the last chain or final edge stitch.
This helps create a straighter side edge.
Turn.
Row 2: Half Double Crochet Fill Row
Ch 2.
The turning chain does not count as a stitch.
Work 2 hdc into the center hole of the first star.
Work 2 hdc into the center hole of each star across the row.
At the end of the row, work 1 hdc into the top of the ending dc or turning edge.
Turn.
This row fills the star centers and completes the full star stitch texture.
Row 3: Next Star Stitch Row
Ch 3.
Insert hook into the 2nd ch from the hook.
Yo and pull up a loop.
Insert hook into the 3rd ch from the hook.
Yo and pull up a loop.
Insert hook into the first stitch of the row.
Yo and pull up a loop.
Insert hook into the next stitch.
Yo and pull up a loop.
Insert hook into the next stitch.
Yo and pull up a loop.
You should have 6 loops on the hook.
Yo and pull through all 6 loops.
Ch 1 to close the star.
Continue Row 3
Make each next star the same way as before:
Insert hook into the center hole of the previous star.
Yo and pull up a loop.
Insert hook under the side strand of the previous star.
Yo and pull up a loop.
Insert hook into the last stitch used by the previous star.
Yo and pull up a loop.
Insert hook into the next stitch.
Yo and pull up a loop.
Insert hook into the next stitch.
Yo and pull up a loop.
Yo and pull through all 6 loops.
Ch 1 to close.
Repeat across the row.
At the end of the row, work 1 dc into the last edge stitch to keep the side neat.
Turn.
Row 4: Fill Row
Ch 2.
Work 2 hdc into the center hole of each star across.
Work 1 hdc into the final edge stitch.
Turn.
Main Stitch Repeat
Repeat Rows 3 and 4 until your piece reaches the length you want.
Rows 3 and 4 create the complete repeating star stitch pattern.
Optional Border for a Swatch, Blanket, or Garment Panel
If you are making a blanket, scarf, cushion panel, or sample square, a simple border helps the edges look clean.
Round 1: Ch 1. Work sc evenly around all 4 sides, placing 3 sc in each corner. Join with sl st to the first sc.
Round 2: Ch 1. Sc in each st around, placing 3 sc in the middle stitch of each corner. Join with sl st.
Fasten off and weave in the ends.
For garments, you can skip the border if the panel will be seamed.
How to Use This Stitch for a Blanket
Start with an odd-numbered foundation chain in the width you want.
Work the star stitch repeat until the blanket reaches your desired length.
Add a simple single crochet border or a soft shell border.
This stitch looks lovely in:
- baby blankets
- stroller blankets
- lap blankets
- pillow covers
- textured scarves
- cardigans
- sweater panels
Finishing
Weave in all yarn tails with a yarn needle.
Lay the piece flat and gently smooth it with your hands.
Light blocking can help open the stitches and straighten the edges.
Do not over-stretch the fabric, because the star texture looks best when it stays slightly raised and full.
Tips & Variations
Use smooth yarn for the clearest star definition.
Use cream or white yarn for an elegant soft look like the image.
Pastel pink, baby blue, lavender, sage, beige, and pearl gray also work beautifully for baby projects.
Keep all pulled-up loops the same height so the stars look even.
If the fabric curls, loosen your tension slightly or use a larger hook.
If the stars look too loose, use a smaller hook.
For blankets, use a washable yarn that stays soft after laundering.
For garments, make a gauge swatch first because star stitch can create a slightly thicker fabric.
FAQ
Is crochet star stitch beginner-friendly?
It is best for confident beginners. You should know how to chain, yarn over, pull up loops, half double crochet, and double crochet.
What can I make with this stitch?
This stitch is great for blankets, baby garments, scarves, cushions, hats, cardigans, and decorative panels.
Why does my star stitch look uneven?
Usually the loops are different heights. Try pulling each loop up to the same height before closing the star.
Does the chain 1 count as part of the star?
Yes. The chain 1 closes the cluster and creates the small center hole where the next row is worked.
Conclusion
This easy crochet star stitch is a beautiful textured pattern that looks delicate, soft, and handmade. Once you learn the two-row repeat, it becomes relaxing and enjoyable to work for blankets, garments, cushions, and accessories.
Try it first as a small cream swatch, then use it for your next cozy crochet blanket or handmade clothing project.




I need som help to make Easy Crochet Star Stitch Pattern, do you have a video please.
Best regards Evy
I love this design & would love to use it for a baby cardigan. Do you have a pattern for a cardigan. TIA