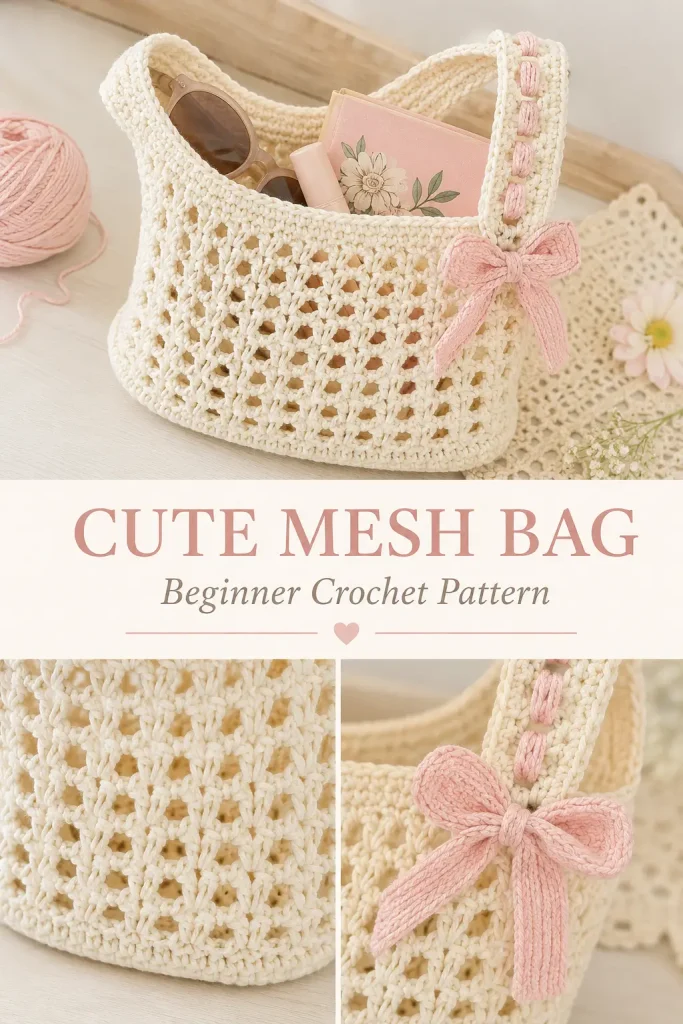
This cute mesh crochet bag is the perfect beginner-friendly project if you want a small handmade bag that feels light, pretty, and useful. The design has a simple oval base, an airy V-stitch mesh body, one soft shoulder strap, and an optional bow detail threaded through the strap.
It is the kind of crochet accessory that works beautifully for summer outfits, beach days, bookshop trips, coffee dates, or carrying small everyday items. The sample style is made in soft cream with a pale pink bow detail, giving it a sweet and feminine handmade look.
This is an original crochet mesh bag pattern inspired by the visible bag design and the shared tutorial notes. The bag uses an oval double crochet base, a V-stitch mesh body, and a strap worked directly from the bag body.
Description
This crochet mesh bag has a rounded rectangular base, an open V-stitch body, and one wide shoulder strap. The bag is made in a soft cream color with a simple airy texture that stretches slightly while still holding its shape. A pale pink ribbon or yarn strand is woven through the strap and tied into cute bows at the sides. The finished bag is lightweight, casual, and perfect for holding a book, sunglasses, lip balm, a small wallet, or other light items.
Materials
- DK or medium weight yarn in cream
- Pale pink ribbon, thick yarn, or wool for the bow detail
- 4.5 mm crochet hook, or hook size suitable for your yarn
- 2 stitch markers
- Scissors
- Yarn needle
- Measuring tape
- Optional: bobby pins instead of stitch markers
Abbreviations
- ch = chain
- sl st = slip stitch
- dc = double crochet
- st = stitch
- sts = stitches
- sp = space
- rep = repeat
Pattern Notes
- This bag is worked from the bottom up.
- The base is crocheted around both sides of a foundation chain to create an oval shape.
- The body is worked in joined rounds using V-stitches.
- The strap is worked directly from one side of the bag, then joined to the opposite side.
- The pink bow detail is optional and is threaded through the strap after the bag is finished.
- The pattern can be adjusted to any size by changing the foundation chain and the number of body rounds.
- Use tighter chains for the base so the bottom of the bag is sturdy.
Finished Size
The size depends on your foundation chain, yarn, hook, and number of rounds.
For a small everyday bag, start with:
Ch 36, then ch 2 more for turning.
You can chain fewer stitches for a mini bag or more stitches for a larger book bag.
Step-by-Step Instructions
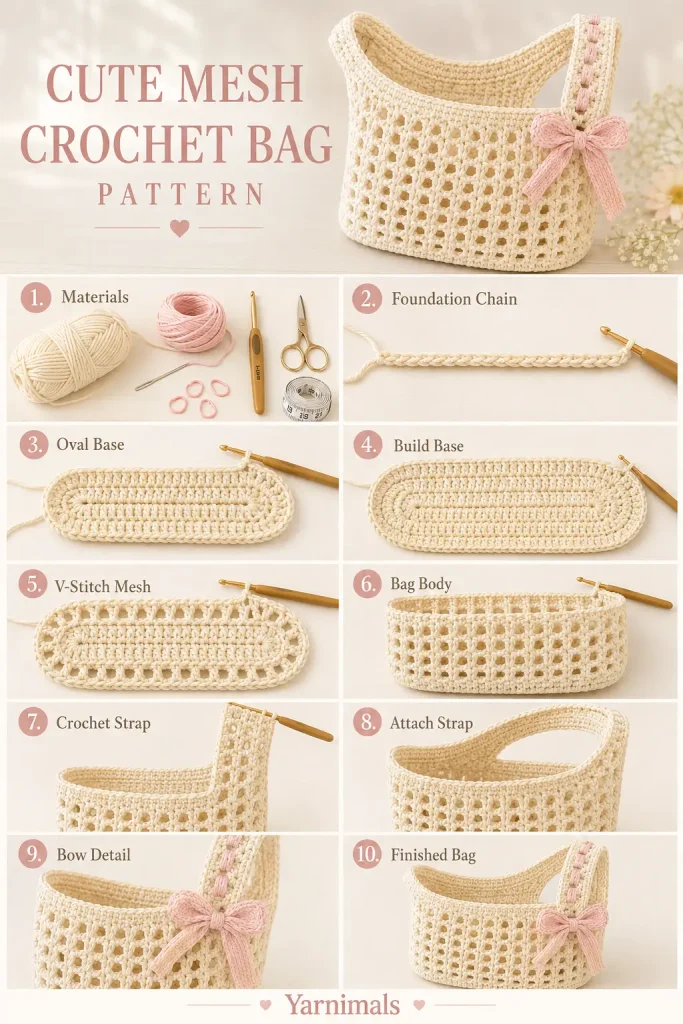
Part 1: Bag Base
Foundation Chain
With cream yarn, make a slip knot.
Ch 36.
Ch 2 more for turning.
You now have 38 chains total.
The first 36 chains create the width of the bag, and the extra 2 chains help begin the first round.
Round 1: Oval Base
Work 6 dc into the 3rd ch from the hook.
If a large hole appears at the beginning, place the last dc slightly into the small side space near the chain to help close the gap.
Dc in each chain across until you reach the last chain.
Work 6 dc into the last chain.
Now rotate your work so you can crochet along the opposite side of the foundation chain.
Dc in each chain across the other side.
Do not work into the 2 turning chains.
Join with sl st to the first dc.
You should now have an oval base.
Round 2: Increase the Base
Ch 2.
The ch 2 does not count as a stitch.
Work 2 dc in the same st.
Work 2 dc in each of the next 5 sts.
This increases around the first curved end.
Dc in each st across the long side.
At the opposite curved end, work 2 dc in each of the next 6 sts.
Dc in each st across the remaining long side.
Join with sl st to the first dc.
Your oval base should now be wider and flatter.
Part 2: Mesh Bag Body
Round 1: First V-Stitch Round
Ch 3.
This ch 3 counts as the first dc.
Ch 1.
Dc into the same st where the ch 3 began.
This creates the first V-stitch.
Skip 2 sts.
In the next st, work: dc, ch 1, dc.
Rep from skip 2 sts, work dc, ch 1, dc in next st around.
If you reach the end and do not have exactly 2 sts left to skip, place the final V-stitch where it fits best so the round closes neatly. A small adjustment at the end will not affect the finished look.
Join with sl st to the 3rd ch of the beginning ch 3.
Round 2: V-Stitch Into Spaces
Ch 3.
Ch 1.
Dc into the first ch-1 space.
This creates the first V-stitch of the round.
In each ch-1 space around, work: dc, ch 1, dc.
Join with sl st to the 3rd ch of the beginning ch 3.
Body Repeat
Repeat Round 2 until the bag body reaches your desired height.
For a small bag similar to the image, work about 12 rounds of V-stitch mesh.
You can make the bag shorter for a mini purse or taller for a book bag.
The joining line can be used as the back of the bag.
Part 3: Crochet Strap
After finishing the final body round, do not fasten off.
The strap begins from the top edge of the bag.
Strap Row 1
Ch 4.
Dc into the first V-stitch space near the beginning point.
In the next V-stitch space, work: dc, ch 1, dc.
In the next V-stitch space, work: dc, ch 1, dc.
Dc into the next available space.
This creates a strap width made from 2 V-stitches with edge double crochets.
Turn.
Strap Row 2
Ch 2.
Dc in the same first st.
In the first ch-1 space, work: dc, ch 1, dc.
In the second ch-1 space, work: dc, ch 1, dc.
Dc into the final dc of the row.
Turn.
Strap Repeat
Repeat Strap Row 2 until the strap reaches your preferred length.
For a short shoulder bag strap, work about 35 to 40 rows.
For a longer crossbody-style strap, work more rows.
Try the bag against your shoulder before attaching the strap.
Attach the Strap
Place stitch markers on the opposite side of the bag where the strap should attach.
Turn the bag inside out.
Without fastening off, bring the strap end to the marked area.
Insert your hook through the strap stitch and the matching stitch or space on the bag body.
Sl st through both layers.
Continue slip stitching across the strap width to attach it securely to the bag.
Ch 1 or ch 2 for extra security.
Fasten off and weave in the end.
Turn the bag right side out.
Part 4: Optional Pink Bow Detail
Cut 2 long strands of pale pink ribbon, thick yarn, or wool.
Each strand should be long enough to weave through the strap and tie into a bow at the side.
Starting at one side of the strap, thread the pink strand through the center openings of the strap.
Use your crochet hook or fingers to pull the strand up and down through the strap spaces.
Continue weaving the strand along the full strap until it comes out on the opposite side.
Repeat with the second strand if you want matching bow ties on both sides.
Tie the ends into small bows near the side of the bag.
Trim the bow ends neatly.
Finishing
Weave in all yarn tails securely.
Shape the base with your hands so the bag sits neatly.
Straighten the mesh body and strap.
Adjust the pink bow detail so it sits evenly along the strap.
Lightly steam or block the bag if needed, but do not stretch the mesh too much.
Tips & Variations
Use cotton yarn for a sturdier bag with less stretch.
Use acrylic yarn for a softer, lighter bag.
For a beachy look, use cream, beige, sage, or pastel yellow.
For a cute girly look, use cream with pink ribbon like the image.
For a simple version, skip the bow detail and leave the strap plain.
To make the bag wider, start with a longer chain.
To make the bag deeper, add more V-stitch rounds.
To make the strap thicker, work more V-stitches across the strap width.
To make the strap thinner, work only 1 V-stitch with edge stitches.
If the base curls at first, keep going. It usually settles as the body rounds are added.
If the mesh looks too loose, use a smaller hook.
FAQ
Is this mesh crochet bag beginner-friendly?
Yes. This is a beginner-friendly crochet bag if you already know how to chain, double crochet, slip stitch, and work in rounds.
Can I make this bag any size?
Yes. Chain the width you want for the base, then work more or fewer body rounds for height. The strap length can also be adjusted.
What yarn is best for this bag?
Cotton yarn is best if you want the bag to feel sturdy. Acrylic yarn also works and gives the bag a softer feel.
Can I use this as a book bag?
Yes, but avoid making the mesh too loose if you want to carry heavier items. Use cotton yarn, firm tension, and a strong strap for better support.
Conclusion
This cute mesh crochet bag is a simple and stylish project that you can adjust to almost any size. The oval base, airy V-stitch body, soft strap, and optional pink bow detail make it a sweet handmade crochet accessory for everyday use.
Make it in cream and pink like the sample, or try your favorite colors for a custom summer bag that feels light, useful, and handmade.




Just a beginner, want to achieve crochet making items at its best.