Intro
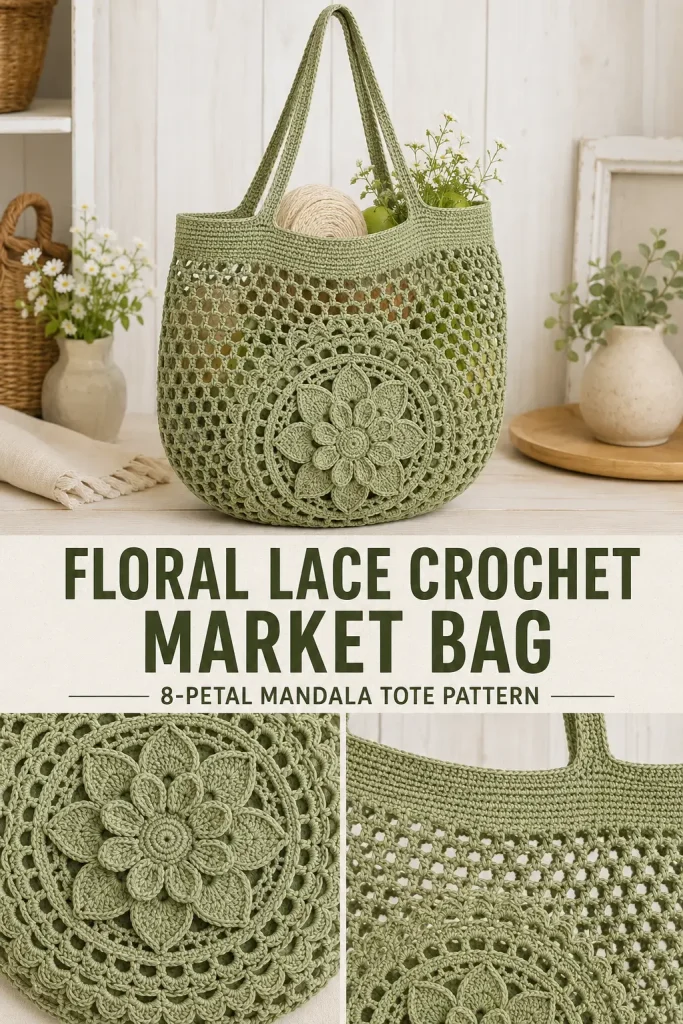
This floral lace crochet market bag combines a large layered flower medallion with an airy mesh body, firm upper band, and long crochet shoulder handles. The entire bag is worked in one soft sage-green cotton yarn, giving the decorative flower and practical market-bag shape the same elegant monochrome look.
This version is built around a true 8-petal flower construction and a clearly defined lace transition. Every decorative round has its own anchor points, so you never have to guess whether you should crochet into a petal, behind a petal, or into an earlier chain space.
The lower bag is also constructed from two matching floral medallions rather than treating one complete flower circle as the bottom of the bag. This keeps the entire round flower visible on the front, creates the same rounded lower silhouette, and gives the finished market bag a matching decorative back.
Description
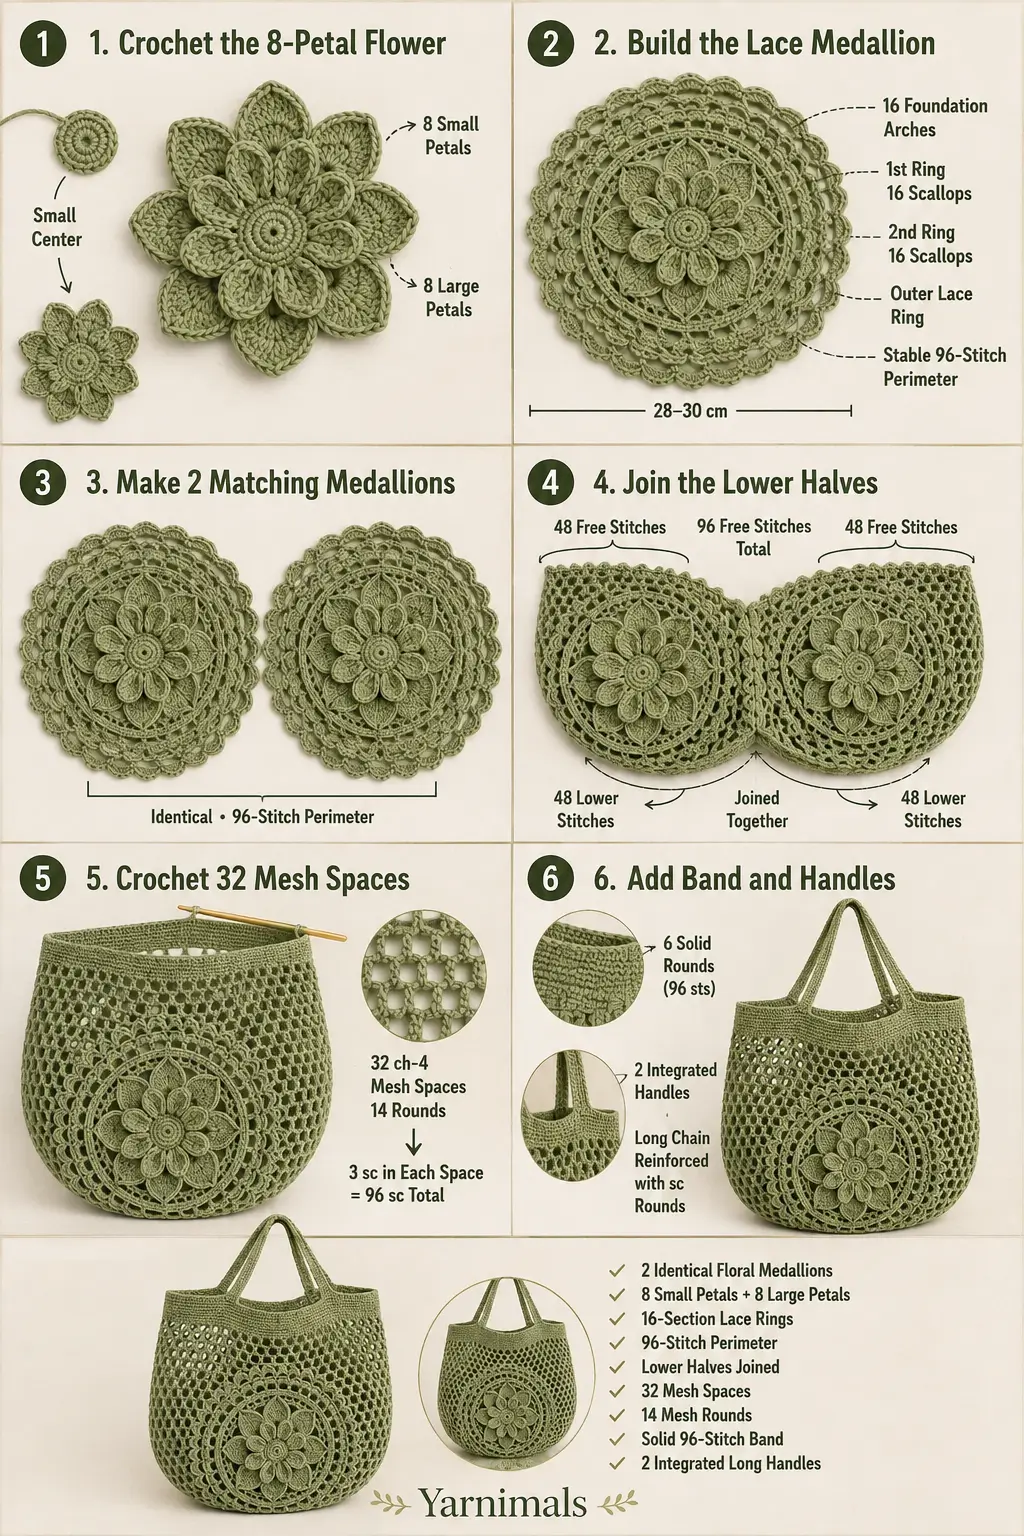
The finished bag has a large round floral mandala on both the front and back. Each medallion begins with an 8-petal flower, followed by a second larger 8-petal layer and two decorative 16-scallop lace rings.
The two medallions are joined only along their lower semicircles. Their remaining upper edges become the foundation for the open mesh body.
From there, the bag continues upward seamlessly with:
- 32 evenly spaced mesh sections
- an expandable lace body
- a solid 6-round upper band
- two integrated long crochet handles
- no separately sewn straps
- no separate bottom panel
The result is a lightweight reusable crochet market bag that keeps the large flower fully visible instead of folding the motif underneath the bag.
Materials
- DK or light worsted weight cotton yarn in muted sage or olive green
- Approximately 350–450 g yarn
- 4 mm crochet hook
- Yarn needle
- Scissors
- 6–8 stitch markers
- Measuring tape
- Blocking mat and pins
Abbreviations
- MR – magic ring
- ch – chain
- sc – single crochet
- hdc – half double crochet
- dc – double crochet
- tr – treble crochet
- sl st – slip stitch
- st – stitch
- sts – stitches
- sp – space
- sk – skip
Pattern Notes
- US crochet terminology is used.
- Difficulty: intermediate.
- Make 2 identical floral lace medallions.
- Every medallion begins with exactly 8 petals.
- The second petal layer also has exactly 8 petals.
- Later decorative lace rounds contain 16 scallops.
- The final perimeter of every medallion contains exactly 96 sc.
- The lower 48 perimeter stitches of the two medallions are joined together.
- The remaining 48 stitches on each medallion stay free.
- Those 96 free stitches become the mesh body.
- The mesh contains 32 spaces throughout.
- Do not work into the tops of the dimensional petals unless the instructions specifically tell you to.
- When a round says to work behind the petals, use the foundation chain spaces from the named earlier round.
- Block both medallions before joining them.
Approximate Finished Size
After blocking:
- Floral medallion diameter: approximately 28–30 cm
- Bag width laid flat: approximately 31–34 cm
- Bag height excluding handles: approximately 32–35 cm
- Handle drop: approximately 24–28 cm
- Overall handle length: approximately 60–70 cm
The mesh stretches considerably when the bag is filled.
Step-by-Step Instructions
Part 1: Crochet the First Floral Medallion
Use sage green yarn throughout.
Round 1 – Flower Foundation
Make an MR.
Ch 1.
Work:
16 sc into MR
Pull the ring firmly closed.
Join with sl st to the first sc.
16 sc
This 16-stitch center is important because the flower uses alternate stitches to create exactly 8 petals.
Part 2: First 8-Petal Layer
Round 2 – Petal Arches
Ch 1.
Sc in the same st.
Work:
ch 3, sk next st, sc in next st
Repeat around.
After the eighth ch-3 space, join with sl st to the first sc.
You should have:
- 8 sc anchor stitches
- 8 ch-3 spaces
- 8 skipped stitches from Round 1
Those skipped Round 1 stitches will be used later for the second flower layer.
Round 3 – First Petals
Sl st into the first ch-3 sp.
In the same space work:
sc, hdc, 3 dc, hdc, sc
Repeat this exact sequence in each remaining ch-3 sp.
You should have:
8 rounded petals
Join with sl st to the first sc.
Do not fasten off.
Gently push the petals forward.
Part 3: Second 8-Petal Layer
Round 4 – Second-Layer Foundations
This round is worked behind Round 3.
Do not crochet into the tops of the first petals.
Looking behind the flower, locate the 8 skipped sc from Round 1.
Join yarn into any one of those unused stitches.
Ch 1 and sc in the same st.
Ch 5.
Sc in the next unused skipped Round 1 stitch.
Continue:
ch 5, sc in next unused Round 1 st
around.
Join to the first sc.
You should have exactly:
8 ch-5 spaces
behind the first petal layer.
Round 5 – Large Petals
Work into the first ch-5 sp:
sc, hdc, 2 dc, 3 tr, 2 dc, hdc, sc
Repeat in every ch-5 sp.
You should have:
8 large outer petals
Join with sl st.
Push these petals gently behind the smaller first-layer petals.
The flower should now have:
- 8 smaller inner petals
- 8 larger outer petals
Part 4: First 16-Scallop Lace Ring
Round 6 – Make 16 Lace Arches
This round is worked behind the large petals into the Round 4 ch-5 foundation loops.
Do not work into Round 5 petal stitches.
For each one of the 8 Round 4 ch-5 loops, work the following behind the petal:
sc around the first side of the ch-5 loop, ch 5, sc around the second side of the same loop, ch 5
Repeat for all 8 foundation loops.
Join the final ch 5 to the first sc with sl st.
You now have:
16 ch-5 spaces
This cleanly doubles the design from 8 petals to 16 lace sections.
Round 7 – 16 Lace Scallops
Into every ch-5 sp work:
sc, hdc, 3 dc, hdc, sc
Repeat around.
You should have:
16 scallops
Join with sl st.
These scallops form the first decorative lace ring surrounding the flower.
Part 5: Second 16-Scallop Lace Ring
Round 8 – Outer Lace Foundations
Work behind Round 7.
Locate the 16 sc anchors from Round 6 between the scallops.
Join with a standing sc in any Round 6 sc.
Work:
ch 7, sc in next Round 6 sc
Repeat around.
After the final ch 7, join to the beginning sc.
You should have:
16 ch-7 spaces
Round 9 – Large Outer Scallops
Into each ch-7 sp work:
sc, hdc, 2 dc, 3 tr, 2 dc, hdc, sc
Repeat around all 16 spaces.
Join with sl st.
You should have:
16 large decorative scallops
These larger scallops create the pronounced flower-lace section visible around the center medallion.
Part 6: Stabilize the Medallion
Round 10 – Hidden Stabilizing Round
This round is worked behind the Round 9 scallops.
Locate each Round 8 ch-7 foundation space.
Work:
6 sc into each ch-7 sp
Repeat for all 16 spaces.
16 × 6 = 96 sc
Join with sl st to the first sc.
96 sts
This round creates a mathematically even foundation for the final outer lace.
Part 7: Final Decorative Lace Ring
Round 11 – Outer Lace Arches
Ch 1.
Sc in the first st.
Work:
ch 6, sk next 5 sts, sc in next st
Repeat around.
At the end you should have:
16 ch-6 spaces
Join with sl st to the first sc.
Each repeat uses exactly 6 stitches of the 96-stitch perimeter.
Round 12 – Final Scallops
Into every ch-6 sp work:
sc, hdc, 5 dc, hdc, sc
Repeat around.
You should have:
16 final scallops
Join with sl st.
Round 13 – Final Assembly Edge
Work behind the Round 12 scallops into the Round 11 ch-6 foundation spaces.
Work:
6 sc into every ch-6 sp
Repeat around.
96 sc
Join with sl st.
Fasten off.
This is the edge that will be used for assembling the bag.
Do not use the tips of the scallops for joining.
Part 8: Block the First Medallion
Wet block or steam carefully according to your yarn.
Pin the medallion into a neat circle approximately:
28–30 cm across
Arrange:
- the 8 inner petals
- the 8 larger petals
- the 16 inner lace scallops
- the 16 outer scallops
Allow it to dry completely.
Part 9: Make the Second Medallion
Repeat Parts 1–8 exactly.
You need:
2 identical medallions
Both must finish with:
96 sc around the assembly edge
Block them to the same diameter.
Part 10: Mark the Upper and Lower Halves
Lay one medallion flat.
Position one flower petal straight upward.
Fold or visually divide the circle horizontally.
Place one marker at the exact left side and one at the exact right side.
Count the perimeter stitches.
You should have:
- 48 stitches along the upper semicircle
- 48 stitches along the lower semicircle
Adjust the marker positions by one stitch if necessary so each half contains exactly 48 stitches.
Repeat on the second medallion.
Make sure the flowers face the same direction.
Part 11: Join the Lower Medallions
Place the two medallions together with wrong sides facing each other and right sides facing outward.
Match the left and right side markers.
Using sage yarn and a yarn needle, join the 48 lower stitches only.
Use a neat mattress or whipstitch seam.
Match:
1 stitch from the front medallion to 1 stitch from the back medallion
all the way around the lower semicircle.
Do not join the upper 48 stitches.
When finished, the lower halves form the rounded bag bottom while both complete floral medallions remain visible.
You should now have:
- 48 free upper stitches on the front
- 48 free upper stitches on the back
- 96 free stitches total
Part 12: Begin the Mesh Body
Join yarn at one side marker.
Work around both free upper arcs as one continuous bag opening.
Mesh Round 1
Sc in the first free stitch.
Work:
ch 4, sk next 2 sts, sc in next st
Repeat across all 48 front stitches.
Continue immediately across the 48 back stitches using the same repeat.
Join with sl st to the first sc.
You should have:
32 ch-4 mesh spaces
The count is exact because:
96 stitches ÷ 3 = 32 repeats
Part 13: Continue the Mesh
Mesh Round 2
Sl st into the first ch-4 sp.
Ch 1.
Sc in the same ch-4 sp.
Work:
ch 4, sc in next ch-4 sp
Repeat around.
After the final ch 4, join to the first sc.
You should still have:
32 mesh spaces
Mesh Rounds 3–14
Repeat Mesh Round 2.
Keep:
32 ch-4 spaces in every round
Do not increase.
As you continue without increases, the lace naturally forms the upper bag body.
Work more or fewer rounds if you want to adjust the finished height.
For the proportions shown, use approximately:
14 mesh rounds total
Part 14: Solid Top Band Foundation
After completing the final mesh round:
Sl st into the first ch-4 sp.
Ch 1.
Work:
3 sc into each ch-4 space
Repeat around.
There are 32 spaces.
32 × 3 = 96 sc
Join with sl st.
96 sts
The bag is now back to the same 96-stitch circumference used at the medallion edge.
Part 15: Build the Solid Top Band
Band Round 2
Ch 1.
Sc in every stitch around.
96 sc
Join.
Band Round 3
Repeat.
96 sc
Band Round 4
Repeat.
96 sc
Band Round 5
Repeat.
96 sc
Band Round 6
Repeat.
96 sc
The finished upper band should measure approximately:
3–4 cm high
Do not fasten off.
Part 16: Mark the Handle Positions
Lay the bag completely flat.
You should have approximately:
- 48 top-band stitches across the front
- 48 across the back
On the front:
- count 8 stitches from the left side and place Marker 1
- count 32 stitches across the center
- place Marker 2
- 8 stitches should remain before the right side
Repeat on the back.
This gives each handle a wide opening while leaving sturdy crochet at both sides.
Part 17: First Integrated Handle Round
Continue from the beginning of the round.
Work:
sc in first 8 sts
Then:
ch 70
Skip the next:
32 sts
Sc in the remaining:
8 front sts
Continue onto the back.
Sc in the first:
8 back sts
Then:
ch 70
Skip:
32 sts
Sc in the final:
8 sts
Join with sl st to the first sc.
You now have exactly:
2 handle openings
Check carefully that neither chain is twisted.
Part 18: Reinforce the Handles
Handle Round 2
Ch 1.
Sc in every existing sc.
When you reach each handle chain:
work 1 sc in every chain
Continue around the entire new upper edge.
Join.
Handle Round 3
Ch 1.
Sc in every stitch around, including across both handles.
Join.
Handle Round 4
Repeat one more full round of sc.
Join.
Fasten off.
The handles now contain three solid crochet layers around the original foundation chains.
Part 19: Reinforce the Handle Bases
Thread matching yarn onto a yarn needle.
At each of the four points where a handle meets the top band, make several discreet reinforcement stitches.
Sew through:
- handle edge
- upper band
- several nearby solid stitches
Do not sew through only one stitch.
This distributes the load when the market bag is filled.
Part 20: Final Blocking
Lightly dampen the finished bag.
Do not stretch the mesh aggressively.
Shape:
- both floral medallions
- rounded lower seam
- mesh body
- top band
- handles
Lay flat to dry.
Open the petals and scallops gently with your fingers.
Finished Construction Check
Before using the bag, confirm that your finished project has:
Floral Medallions
- 2 matching medallions
- 8 small petals each
- 8 large petals each
- 16 first lace scallops
- 16 larger outer scallops
- 96 final perimeter stitches each
Lower Bag
- 48 lower perimeter stitches joined
- 48 free upper stitches per medallion
- rounded front and back floral sections
Mesh Body
- 96 starting stitches
- 32 mesh spaces
- approximately 14 mesh rounds
- no increases after the first mesh round
Top
- 96-stitch solid foundation
- 6 solid top-band rounds
Handles
- exactly 2 integrated handles
- 70-chain foundation for each
- 3 reinforcing crochet rounds
- 4 reinforced handle bases
Design Consistency Lock
For the finished bag to match the intended design, preserve these details.
Color
Use one color throughout:
muted sage / fresh olive green
Do not add contrasting colors.
Flower
The center must contain:
- exactly 8 small petals
- exactly 8 larger petals behind them
Do not use 6 petals.
Lace
Keep the layered circular lace construction surrounding the flower.
The medallion should remain visibly floral rather than becoming a plain crochet circle.
Lower Shape
Use two medallions so the entire flower remains visible on the front and back.
Do not fold a complete floral circle underneath the bag as a conventional flat base.
Mesh
Use open ch-4 mesh throughout the upper body.
Keep exactly 32 spaces so the mesh remains even.
Top Band
Keep it dense and solid to prevent the open mesh from stretching directly into the handles.
Handles
Use two long integrated crochet handles in the same sage yarn.
Do not add:
- leather straps
- wooden handles
- metal rings
- drawstrings
- zippers
- buttons
Tips & Variations
Use Cotton for Better Strength
Smooth cotton or mercerized cotton is ideal for this bag because the decorative flower stays defined while the mesh remains strong enough for reusable shopping.
Do Not Skip Blocking
The floral medallions contain several dimensional layers.
Blocking before assembly keeps:
- the circles equal in size
- the scallops open
- the lower bag balanced
Keep the Petal Foundation Rounds Visible
When working behind the petals, gently push the finished petal layer forward.
This makes it much easier to find the earlier chain spaces.
Never guess which stitch belongs to the next round.
Make the Bag Taller
Repeat additional Mesh Round 2 rounds before beginning the solid top band.
Every extra mesh round adds height without changing the circumference.
Make Shorter Handles
Replace ch 70 with approximately:
ch 50–55
for shorter hand-carry handles.
Make Longer Shoulder Handles
Use:
ch 80–90
for a deeper shoulder drop.
Keep both handles identical.
FAQ
Why does this version use two flower medallions?
Using one complete circular medallion as a conventional bottom would place much of the flower underneath the filled bag. Two medallions allow the large floral design to remain visible on the front and back while still creating a rounded lower section.
How many petals should the flower have?
Each medallion has exactly 8 first-layer petals and 8 larger second-layer petals.
Where do I work after making the petals?
The instructions specify the foundation round each time. The second petal layer uses the unused Round 1 stitches. The 16-space lace round is worked around the Round 4 foundation chains behind the large petals. Later stabilizing rounds are likewise worked into specifically named chain spaces rather than into undefined petal tops.
How many mesh spaces should I have?
You should have exactly:
32 ch-4 mesh spaces
throughout the mesh body.
Keeping this count consistent is important for an even bag.
Can I carry groceries in this bag?
The cotton mesh expands substantially, making it suitable for lightweight market items, produce, yarn, beach accessories, and similar contents. Avoid sharp objects that could snag the openwork.
Conclusion
This floral lace crochet market bag keeps the dramatic flower motif at the center of the design while using a construction that remains clear from beginning to end. Two 8-petal floral medallions create the rounded lower body, 32 consistent mesh spaces build the stretchy upper section, and a 96-stitch solid band supports two integrated shoulder handles.
The finished sage-green bag has the same combination of dimensional flowers, decorative lace, open market mesh, sturdy edging, and long handles, but every section now has a defined stitch count and a clear place to work the next round.




your pattern does not match the illustration which has 8 petals in first petal round
How many oz of yarn will take to crochet to make this blanket?
On Round 6 it starts talking about skipping stitches, etc. this would make you think you are working into the top of the petals from round 5…however when looking at the picture it does not match directions. Pattern is very confusing and almost unusable for me.
How many oz of yarn do I need for this pattern?
May I please have help with this pattern. The directions do not match the picture for the pattern. It’s a beautiful market bag, can you please email me the correct pattern that matches the pictures provided. Thank you
The pattern does not match the illustration on the flower medallion after the centre 8 petal flower. There are clearly more than 16 scallops on the lace edge.
Can the correct pattern be emailed to me
Ok this is a beautiful bag. Does anyone have the correct pattern? Or is there a correction. I need this bag 🤣