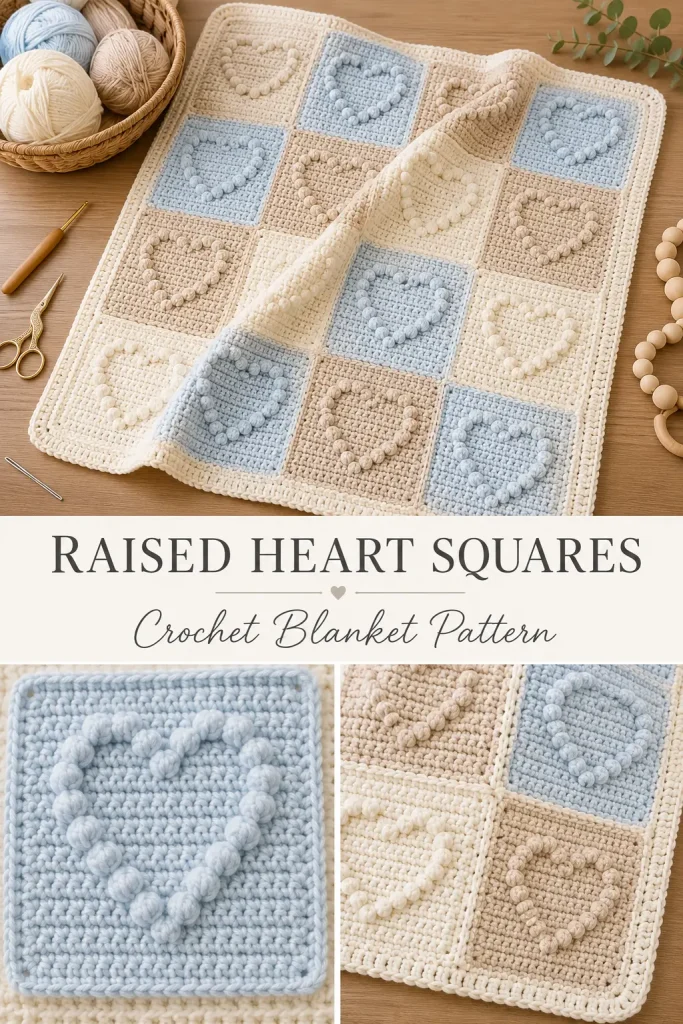
This raised heart granny square blanket is soft, sweet, and full of handmade charm. Each square has a simple crochet background with a textured bobble heart in the center, giving the blanket a beautiful dimensional look without making the design too complicated.
The color palette is calm and cozy, with blocks of cream, beige, and soft blue joined together into a patchwork-style blanket. It is a lovely crochet project for baby blankets, nursery decor, Valentine’s gifts, cozy throws, or handmade keepsakes.
This is an original crochet pattern inspired by the visible blanket design. It is written to help you create the same style of square blanket with raised heart motifs, clean joined panels, and a simple finished border.
Description
This crochet blanket is made from individual square panels, each worked in rows with a raised bobble heart design in the center. The background of every square is made with neat single crochet rows, while the heart is formed using puff or bobble stitches that stand out from the surface. The squares are made in soft neutral colors, then joined into vertical strips and finally joined into a full blanket. A simple border frames the entire blanket for a clean, polished finish.
Materials
- Medium weight yarn in cream
- Medium weight yarn in beige
- Medium weight yarn in soft blue
- 4.0 mm or 4.5 mm crochet hook
- Yarn needle
- Scissors
- Stitch markers
- Measuring tape
- Blocking mat and pins, optional
Abbreviations
- ch = chain
- sc = single crochet
- dc = double crochet
- bobble = bobble stitch
- sl st = slip stitch
- st = stitch
- sts = stitches
- RS = right side
- WS = wrong side
- rep = repeat
Pattern Notes
- This blanket is made from separate crochet squares.
- Each square has a raised bobble heart in the center.
- The background is worked in single crochet rows.
- Bobbles should pop to the front/right side of the square.
- Work the bobble rows on the wrong side so the bobbles push out on the right side.
- You can make all squares the same color or use cream, beige, and soft blue like the image.
- Block the squares before joining for the neatest blanket shape.
- The pattern below makes one square. Repeat it to create as many squares as needed.
Finished Size
One square: about 6 x 6 inches, depending on yarn and tension.
Baby blanket idea: 5 squares wide x 6 squares long.
Throw blanket idea: 6 squares wide x 8 squares long.
You can adjust the blanket size by making more or fewer squares.
Special Stitch: Bobble Stitch
Bobble: Yarn over, insert hook into the stitch, yarn over and pull up a loop, yarn over and pull through 2 loops. Repeat this 4 more times in the same stitch. You should have 6 loops on the hook. Yarn over and pull through all loops. Ch 1 to close.
Push the bobble gently toward the front of the work.
Step-by-Step Instructions
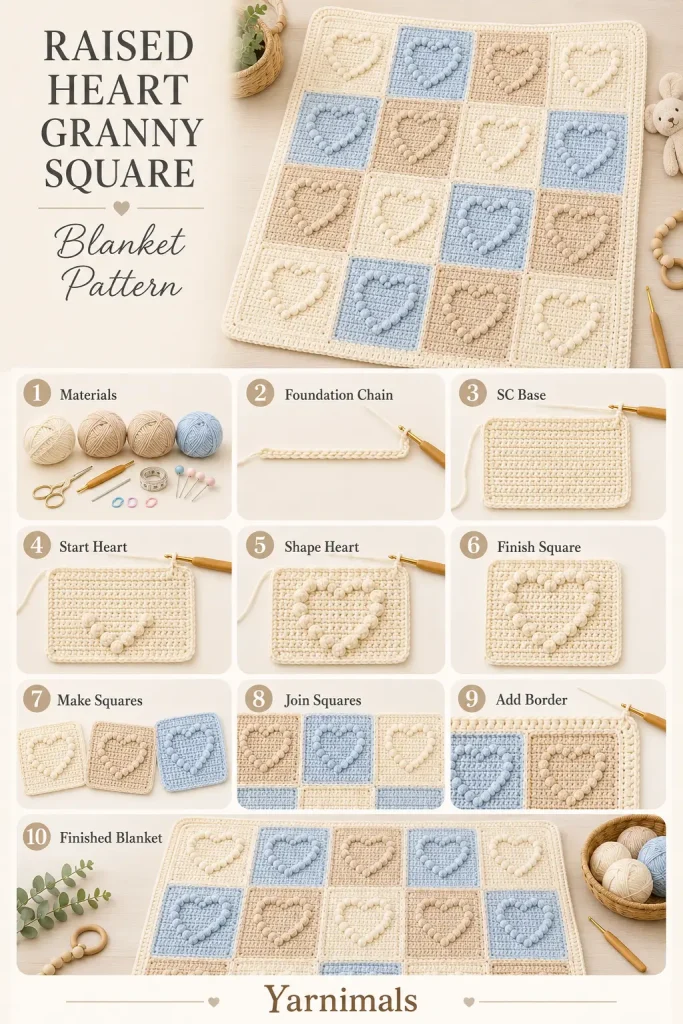
Raised Heart Granny Square
Make one square.
Ch 31.
Row 1
Sc in the 2nd ch from hook.
Sc in each ch across.
Ch 1, turn.
30 sc
Row 2
Sc in each st across.
Ch 1, turn.
30 sc
Row 3
Sc in each st across.
Ch 1, turn.
30 sc
Row 4
Sc in each st across.
Ch 1, turn.
30 sc
Row 5
Sc in each st across.
Ch 1, turn.
30 sc
Row 6
Sc in each st across.
Ch 1, turn.
30 sc
Row 7
Sc in first 14 sts.
Bobble in next st.
Sc in remaining 15 sts.
Ch 1, turn.
Row 8
Sc in each st across.
Ch 1, turn.
Row 9
Sc in first 12 sts.
Bobble in next st.
Sc in next 3 sts.
Bobble in next st.
Sc in remaining 13 sts.
Ch 1, turn.
Row 10
Sc in each st across.
Ch 1, turn.
Row 11
Sc in first 10 sts.
Bobble in next st.
Sc in next 7 sts.
Bobble in next st.
Sc in remaining 11 sts.
Ch 1, turn.
Row 12
Sc in each st across.
Ch 1, turn.
Row 13
Sc in first 8 sts.
Bobble in next st.
Sc in next 11 sts.
Bobble in next st.
Sc in remaining 9 sts.
Ch 1, turn.
Row 14
Sc in each st across.
Ch 1, turn.
Row 15
Sc in first 7 sts.
Bobble in next st.
Sc in next 13 sts.
Bobble in next st.
Sc in remaining 8 sts.
Ch 1, turn.
Row 16
Sc in each st across.
Ch 1, turn.
Row 17
Sc in first 6 sts.
Bobble in next st.
Sc in next 15 sts.
Bobble in next st.
Sc in remaining 7 sts.
Ch 1, turn.
Row 18
Sc in each st across.
Ch 1, turn.
Row 19
Sc in first 6 sts.
Bobble in next st.
Sc in next 15 sts.
Bobble in next st.
Sc in remaining 7 sts.
Ch 1, turn.
Row 20
Sc in each st across.
Ch 1, turn.
Row 21
Sc in first 7 sts.
Bobble in next st.
Sc in next 13 sts.
Bobble in next st.
Sc in remaining 8 sts.
Ch 1, turn.
Row 22
Sc in each st across.
Ch 1, turn.
Row 23
Sc in first 8 sts.
Bobble in next st.
Sc in next 4 sts.
Bobble in next st.
Sc in next 3 sts.
Bobble in next st.
Sc in next 4 sts.
Bobble in next st.
Sc in remaining 9 sts.
Ch 1, turn.
Row 24
Sc in each st across.
Ch 1, turn.
Row 25
Sc in first 9 sts.
Bobble in next st.
Sc in next 3 sts.
Bobble in next st.
Sc in next 5 sts.
Bobble in next st.
Sc in next 3 sts.
Bobble in next st.
Sc in remaining 10 sts.
Ch 1, turn.
Row 26
Sc in each st across.
Ch 1, turn.
Row 27
Sc in first 10 sts.
Bobble in next st.
Sc in next 2 sts.
Bobble in next st.
Sc in next 5 sts.
Bobble in next st.
Sc in next 2 sts.
Bobble in next st.
Sc in remaining 11 sts.
Ch 1, turn.
Row 28
Sc in each st across.
Ch 1, turn.
Row 29
Sc in each st across.
Ch 1, turn.
Row 30
Sc in each st across.
Fasten off and weave in ends.
The bobbles should form a raised heart outline in the center of the square.
Optional Square Border
To make each square easier to join, add a simple border around every square.
Join yarn in any corner.
Ch 1.
Work sc evenly around the square, placing 3 sc in each corner.
Join with sl st to the first sc.
Fasten off and weave in ends.
Repeat for every square.
Make More Squares
Make as many raised heart squares as needed for your blanket.
For the look shown in the image, make squares in:
- cream
- beige
- soft blue
Suggested baby blanket layout:
Row 1: cream, beige, blue, cream, beige
Row 2: blue, cream, beige, blue, cream
Row 3: beige, blue, cream, beige, blue
Row 4: cream, beige, blue, cream, beige
Row 5: blue, cream, beige, blue, cream
Row 6: beige, blue, cream, beige, blue
You can also arrange the colors randomly for a softer patchwork effect.
Joining the Squares
Lay all squares flat with the hearts facing up.
Arrange the colors until you like the layout.
Use stitch markers to hold squares together.
Join the squares using one of these methods:
Slip Stitch Join
Place 2 squares with right sides together.
Insert hook through both edge stitches.
Sl st across the side.
Repeat to join squares into strips.
Then join the strips together.
This creates a slightly raised seam.
Mattress Stitch Join
Place squares side by side with right sides facing up.
Use a yarn needle and matching yarn.
Sew through the inside edge loops from one square to the next.
Pull gently to close the seam.
This creates a softer, flatter join.
Blanket Border
After all squares are joined, work a border around the whole blanket.
Border Round 1
Join yarn in any corner.
Ch 1.
Sc evenly around the entire blanket.
Work 3 sc in each corner.
Join with sl st to first sc.
Border Round 2
Ch 1.
Sc in each st around.
Work 3 sc in the middle stitch of each corner.
Join with sl st to first sc.
Border Round 3
Repeat Border Round 2.
Optional Scalloped Edge
For a softer decorative edge:
Ch 1.
Skip 1 st.
Work 5 dc in next st.
Skip 1 st.
Sl st in next st.
Repeat around.
At the corners, adjust spacing slightly so the scallops sit neatly.
Fasten off and weave in ends.
Finishing
Weave in all remaining yarn tails.
Lay the blanket flat.
Shape the corners and edges.
Gently block the blanket if needed, especially if the squares have slightly different tension.
Use your fingers to puff the bobble hearts forward so the heart shapes are clear.
Do not press the bobbles flat.
Tips & Variations
Use baby yarn or soft acrylic yarn for a cozy blanket.
Cotton yarn will give a firmer square with stronger stitch definition.
Use one color for a simple textured blanket, or use three colors like the image for a soft patchwork effect.
For a baby blanket, choose washable yarn.
For a romantic throw, try blush pink, cream, and beige.
For a nursery blanket, try sage, cream, and oatmeal.
If your square is not perfectly square, block it before joining.
If the bobbles appear on the wrong side, work the bobble rows from the opposite side or push each bobble forward as you work.
For a smaller square, use fewer background rows before and after the heart.
For a larger square, add more sc rows around the heart before finishing.
FAQ
Is this a granny square?
It is a modern granny-style crochet square, but it is worked in rows instead of the traditional granny cluster round. The raised heart design gives it a textured patchwork look.
Can beginners make this blanket?
Yes, confident beginners can make it. The square uses mostly single crochet, with bobble stitches for the heart outline.
Can I make the blanket in one color?
Yes. A one-color version looks very elegant because the raised hearts still show through the texture.
How do I keep all squares the same size?
Use the same yarn, hook, and tension for every square. Blocking each square before joining also helps a lot.
Conclusion
This raised heart granny square blanket is a beautiful handmade project with soft colors, textured hearts, and a cozy patchwork finish. Each square is simple to make, and the blanket becomes more special as the hearts come together row by row.
Make it in cream, beige, and soft blue like the image, or choose your favorite color palette for a sweet crochet blanket full of handmade love.




Wonderfil patterns thank you
I get to row 23 end up needing more than 30 stitches and the bubbles are not in the right spots. Am I doing something wrong or is there a miss print. If you count the stitches needed I need 32?
Hi .
I have got to row 23 and by the pattern when u count the stitches on the pattern there is 32 stitches not 30 as the pattern has u start with. This does not make the heart come out even. Please drop me a message on how to correct this error. Thanks
Your pattern is not correct. You start out with 30 sc and when you get up to Row 23 it adds up to 32; rows 25 + 27 add up to 34 stitches. Your pictures show the hearts with 20 bobbles but your pattern has 27 bobbles, you left out the center bobble where the heart dips, your picture shows about 20 sc across and your pattern calls for 30 sc. it would be best if you didn’t give out false directions to a beautiful blanket. Shame on you!
Agreed! Row 23 is where I ran into issues. Having to count out on my own. But like you, now realizing the center dip of heart is missing a bobble! Thought it was just me but glad it’s not!!!!
Agree! It all goes wrong at row 23. Do you have a corrected pattern? So frustrating.
Please message me to correct the error.
Dee and Joanne are absolutely correct. The directions fall apart at step 23. The pattern given doesn’t match the images of the blanket. The number of bobbles dont match up. Center bobble is missing in instructions. The starting stitches dont match the number in the directions.
On top of that when you download the pdf directions, it doesnt mention the bobbles at all.
My first crochet blanket in 40 years and I was doubting myself. It isnt me, it’s your directions.
Oh yeah, same here. I got to row 23 to and notice there were now 32 stitches and it didn’t come out for the bobbles either. So mad because I did alot of work for nothing and people should not put a pattern on here that’s not right. Shame. Shame
pdf print is not working
This clearly is ai as how come everyone has the same issues. I used 31 stitches and the heart never turned out like the picture. Very disappointing!!!
Beautiful!
This is so disappointing. Instructions are not correct and does not match the photo shared. Has anyone figured it out past row 23?