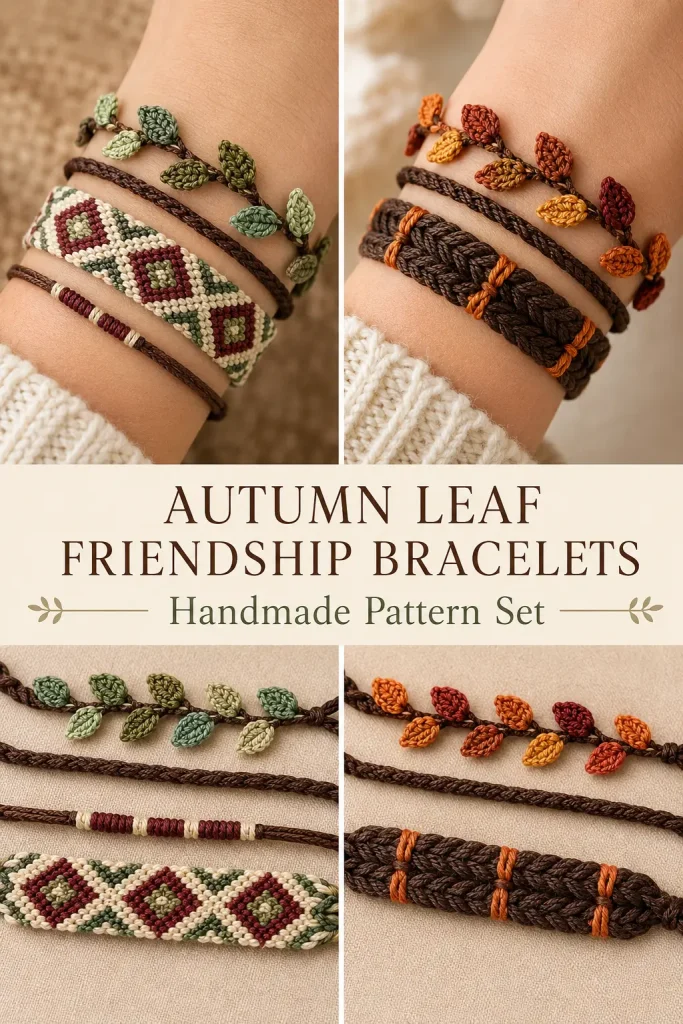
If you want a bracelet stack that looks handmade, earthy, and special, this autumn leaf friendship bracelet set is a beautiful project to try. The look combines a leafy vine bracelet, a simple cord bracelet, and a wider diamond friendship band in cozy forest or fall colors.
This set is inspired by the visible bracelet style in the image: wrapped wrist bracelets with tiny leaves, braided cords, and geometric woven bands. It is not a single crochet-only project. It uses a mix of simple crochet leaves, braided cords, and friendship bracelet knots so the finished set matches the look much better.
Description
This handmade friendship bracelet set includes three matching bracelet styles. The first is a delicate vine bracelet with small crochet leaves attached along a dark brown cord. The second is a simple wrapped cord bracelet that adds balance to the stack. The third is a wider diamond-pattern friendship bracelet made with knotting cords in brown, cream, sage green, burgundy, and rust tones. Together, they create a cozy woodland bracelet stack that can be made in green forest colors or red-orange autumn colors.
Materials
- Embroidery floss, cotton yarn, or thin macrame cord
- Dark brown cord or yarn for the bracelet bases
- Sage green, olive green, cream, burgundy, rust, orange, and red yarn or floss
- 2.0 mm to 3.0 mm crochet hook for the leaves
- Clipboard, tape, or safety pin for holding cords
- Scissors
- Yarn needle
- Measuring tape
- Optional: small beads or metal tag charm
Abbreviations and Knot Terms
- ch = chain
- sl st = slip stitch
- sc = single crochet
- hdc = half double crochet
- dc = double crochet
- FK = forward knot
- BK = backward knot
- SK = square knot
Pattern Notes
- This pattern makes a bracelet stack similar to the image.
- The leafy vine bracelet uses crochet leaves sewn onto a cord.
- The diamond bracelet uses friendship bracelet knots, not crochet stitches.
- You can make the set in forest colors or autumn colors.
- Measure your wrist before starting.
- Average adult bracelet length is 6.5–7 inches before ties.
- Add 3–4 inches of tie cord on each end.
- Keep your knots firm but not too tight, so the bracelet stays flexible.
Step-by-Step Instructions
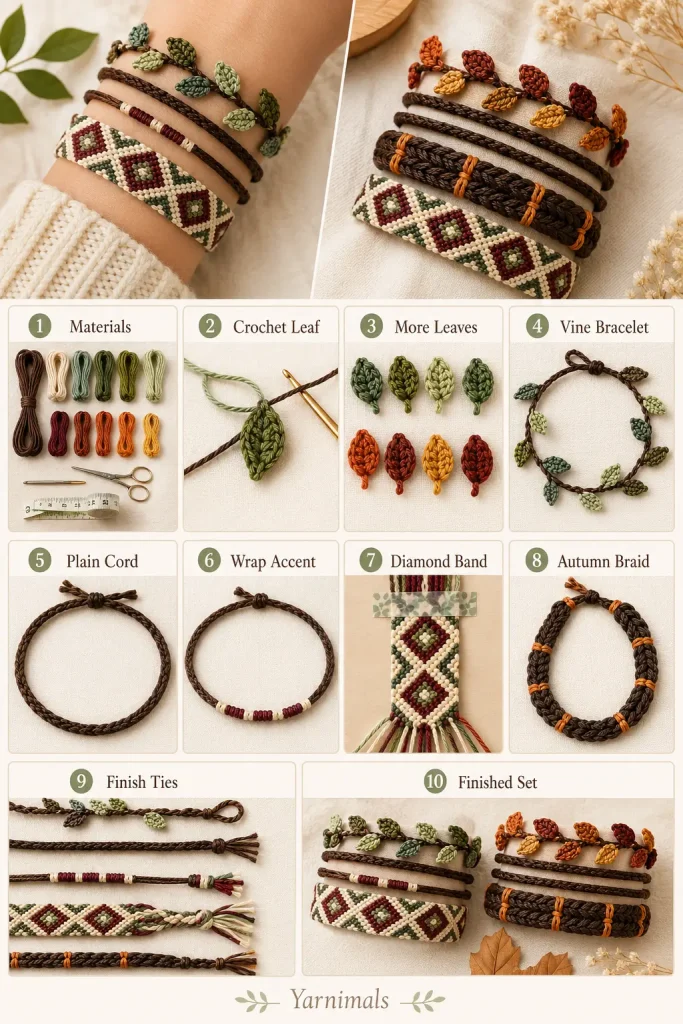
Part 1: Leaf Vine Bracelet
This bracelet creates the small leafy strand shown wrapped around the wrist.
Vine Cord
Cut one dark brown cord about 28 inches long.
Fold it in half.
Tie a small knot near the folded end to create a loop closure.
The loop should be large enough for the ending knot to pass through.
Twist the two brown strands together for about 6.5–7 inches, or braid them if you prefer a stronger bracelet.
Tie a temporary knot at the end so the twist does not come undone.
This will be the vine base.
Crochet Leaves
Make 8–12 leaves.
With green yarn, ch 8.
Sl st in the 2nd ch from hook.
Sc in next ch.
Hdc in next ch.
Dc in next 2 ch.
Hdc in next ch.
Sc in last ch.
Ch 1.
Now work down the opposite side of the chain.
Sc in next st.
Hdc in next st.
Dc in next 2 sts.
Hdc in next st.
Sc in next st.
Sl st at the base of the leaf.
Fasten off, leaving a long tail for sewing.
Repeat until you have enough leaves.
For the autumn version, make leaves in red, orange, mustard, and rust.
For the forest version, make leaves in sage, olive, and light green.
Attach the Leaves
Lay the brown vine flat.
Place the leaves along the vine, alternating sides.
Space each leaf about 0.5–0.75 inch apart.
Use the yarn tails to sew each leaf securely to the brown cord.
Sew only at the base of the leaf so the pointed leaf can lift slightly.
When all leaves are attached, tie a firm knot at the end of the vine.
Trim the tie ends neatly, leaving enough length to fasten the bracelet.
Part 2: Simple Wrapped Cord Bracelet
This is the plain middle bracelet in the stack.
Cut 3 dark brown strands, each about 28 inches long.
Tie them together, leaving a 3-inch tail.
Braid the strands until the bracelet reaches your wrist length.
Tie a knot at the end.
For a smoother look, wrap one extra brown strand around the braid tightly from one end to the other, then knot and hide the ends with a yarn needle.
This simple bracelet adds a clean base between the leafy vine and the diamond band.
Part 3: Diamond Friendship Bracelet
This creates the wider geometric bracelet shown in the image.
Cut the Strands
Cut 8 strands, each about 48–60 inches long.
Use this color order:
- Dark brown
- Cream
- Sage green
- Burgundy
- Burgundy
- Sage green
- Cream
- Dark brown
Tie all strands together at the top, leaving 3–4 inches for tying.
Tape the knot to a table or secure it to a clipboard.
Arrange the strands in the exact order above.
Knot Guide
Forward Knot: Use the left strand to make two knots over the strand beside it. The knotting strand moves to the right.
Backward Knot: Use the right strand to make two knots over the strand beside it. The knotting strand moves to the left.
Each bracelet knot is made twice in the same direction.
Diamond Row 1
Take the far-left dark brown strand.
Make FK over the cream strand.
Make FK over the sage strand.
Make FK over the burgundy strand.
The dark brown strand is now near the center.
Take the far-right dark brown strand.
Make BK over the cream strand.
Make BK over the sage strand.
Make BK over the burgundy strand.
The right dark brown strand is now near the center.
Tie the two dark brown center strands together with one FK.
You have made the first V shape.
Diamond Row 2
The cream strands are now on the outside.
Take the far-left cream strand.
Make FK over each strand until it reaches the center.
Take the far-right cream strand.
Make BK over each strand until it reaches the center.
Tie the two cream center strands together with one FK.
Diamond Row 3
Repeat the same method with the sage green strands.
Left sage works FK toward the center.
Right sage works BK toward the center.
Tie the two sage strands together at the center.
Diamond Row 4
Repeat the same method with the burgundy strands.
Left burgundy works FK toward the center.
Right burgundy works BK toward the center.
Tie the two burgundy strands together at the center.
This completes one nested diamond section.
Continue the Bracelet
Repeat Rows 1–4 until the band reaches your desired wrist length.
Keep the knots even so the edges stay straight.
If the band twists, loosen your knots slightly and flatten the bracelet with your fingers as you work.
Finish the Diamond Band
When the bracelet is long enough, divide the strands into 2 groups.
Braid each group for 3–4 inches.
Tie knots at the ends.
Trim neatly.
You can now tie the bracelet around the wrist.
Part 4: Autumn Braided Bracelet Variation
This creates the darker braided bracelet with orange accent wraps.
Cut 6 dark brown strands, each about 36 inches long.
Tie them together, leaving a 3-inch tail.
Divide into 3 groups of 2 strands.
Braid tightly for the length of your wrist.
Every 0.75 inch, wrap orange or yellow yarn around one braid section 4–5 times.
Tie the accent yarn at the back and hide the ends.
Continue until the braid is finished.
Tie the end securely.
This creates the warm autumn version shown in the lower bracelet stack.
Part 5: Closure Options
Simple Tie Closure
Leave braid tails on both ends and tie them around the wrist.
Loop and Knot Closure
Make a loop at one end.
At the other end, tie one large knot.
Push the knot through the loop to close.
Adjustable Sliding Knot
Leave long tails.
Overlap the two bracelet ends.
Use a separate short cord to make 4–6 square knots around both tails.
Trim and secure the knot.
This creates an adjustable bracelet.
Finishing
Check all knots and leaves.
Trim any loose tails.
Use a yarn needle to hide small yarn ends.
Gently shape the leaves with your fingers.
For the diamond band, press the bracelet flat under a book for a few hours if it curls.
Wear the bracelets stacked together for the full woodland look.
Tips & Variations
Use sage green and cream for a soft forest bracelet set.
Use brown, orange, rust, and red for an autumn leaf set.
Use thinner embroidery floss for a delicate bracelet.
Use cotton yarn or 1 mm cord for a chunkier handmade look.
For smaller wrists, make the bracelet body about 6 inches before ties.
For larger wrists, make it 7.5–8 inches before ties.
If your leaf bracelet feels too floppy, use a firmer cotton cord for the brown vine.
If your diamond band looks uneven, slow down and tighten each knot with the same pressure.
Make matching sets for friends by using the same brown base and changing only the leaf colors.
FAQ
Is this a crochet friendship bracelet?
Part of the set uses crochet leaves, but the wider diamond bracelet uses classic friendship bracelet knotting. This combination gives the closest result to the visible design.
Can beginners make this bracelet set?
Yes. Start with the simple cord bracelet and leaf vine first. The diamond bracelet takes more patience, but the knot repeat becomes easier after a few rows.
Can I make only the leaf bracelet?
Yes. The leaf vine bracelet is beautiful on its own and is the fastest piece in the set.
What thread works best?
Embroidery floss gives a thin, smooth friendship bracelet. Cotton yarn or thin macrame cord gives a thicker, more visible handmade texture.
Conclusion
This autumn leaf friendship bracelet set is a beautiful handmade project for anyone who loves earthy colors, tiny crochet leaves, and woven bracelet textures. The leafy vine, simple cord bracelet, and diamond knot band look lovely together and can be customized in forest greens, warm autumn shades, or your favorite colors.
Make one full stack for yourself, or create matching sets as handmade friendship gifts.



