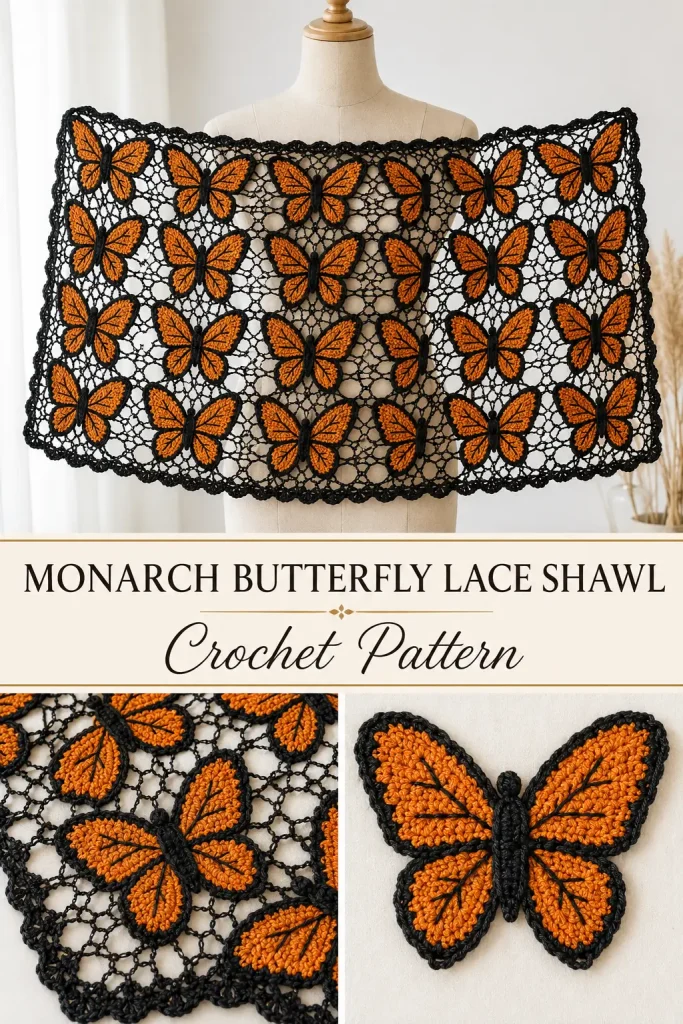
This monarch butterfly crochet shawl is a stunning statement piece made from individual butterfly motifs joined with airy black lace. The orange wings, black outlines, and delicate open spaces create a dramatic handmade wrap that looks elegant, artistic, and eye-catching.
The design is inspired by a butterfly lace shawl style, with each butterfly worked separately and then joined into a lightweight wearable fabric. You can make it as a scarf, shoulder wrap, rectangular shawl, or decorative lace panel depending on how many motifs you crochet.
This is an original crochet pattern written to help you create the same style of orange-and-black butterfly lace wrap without copying a paid or copyrighted pattern.
Description
This crochet shawl is made from flat butterfly motifs with orange wings, black borders, and simple stitched vein details. Each butterfly has two large upper wings, two smaller lower wings, and a narrow black body. The butterflies are joined together with black chain lace to create a mesh-style fabric. A final scalloped black border finishes the outside edge, giving the wrap a lace shawl look. The finished piece is lightweight, dramatic, and perfect for handmade fashion, costume styling, festival outfits, photo shoots, or bold crochet accessories.
Materials
- Fine weight or sport weight yarn in bright orange
- Fine weight or sport weight yarn in golden orange, optional for shading
- Fine weight or sport weight yarn in black
- Small amount of cream or white yarn, optional for tiny accent stitches
- 2.5 mm to 3.5 mm crochet hook, depending on yarn
- Yarn needle
- Scissors
- Stitch markers
- Blocking mat and pins
Abbreviations
- MR = magic ring
- ch = chain
- sl st = slip stitch
- sc = single crochet
- hdc = half double crochet
- dc = double crochet
- tr = treble crochet
- st = stitch
- sts = stitches
- sp = space
- rep = repeat
Pattern Notes
- This shawl is made from separate butterfly motifs.
- Each butterfly is made with 4 wings and 1 body.
- The orange wings are outlined in black.
- Black surface stitches are added to create wing veins.
- The motifs are joined together with black chain mesh.
- The final border is worked in black.
- This pattern is best for intermediate crocheters.
- Use the same yarn weight for every motif so the butterflies match in size.
- Block every butterfly before joining for the neatest lace look.
Finished Size
One butterfly motif measures about 4.5 to 5.5 inches wide, depending on yarn and hook size.
Suggested layouts:
- Small scarf: 3 motifs wide x 8 motifs long
- Shoulder wrap: 4 motifs wide x 8 motifs long
- Large shawl: 5 motifs wide x 10 motifs long
- Decorative panel: any size you like
The sample-style wrap works best when the motifs are joined in a slightly staggered layout.
Step-by-Step Instructions
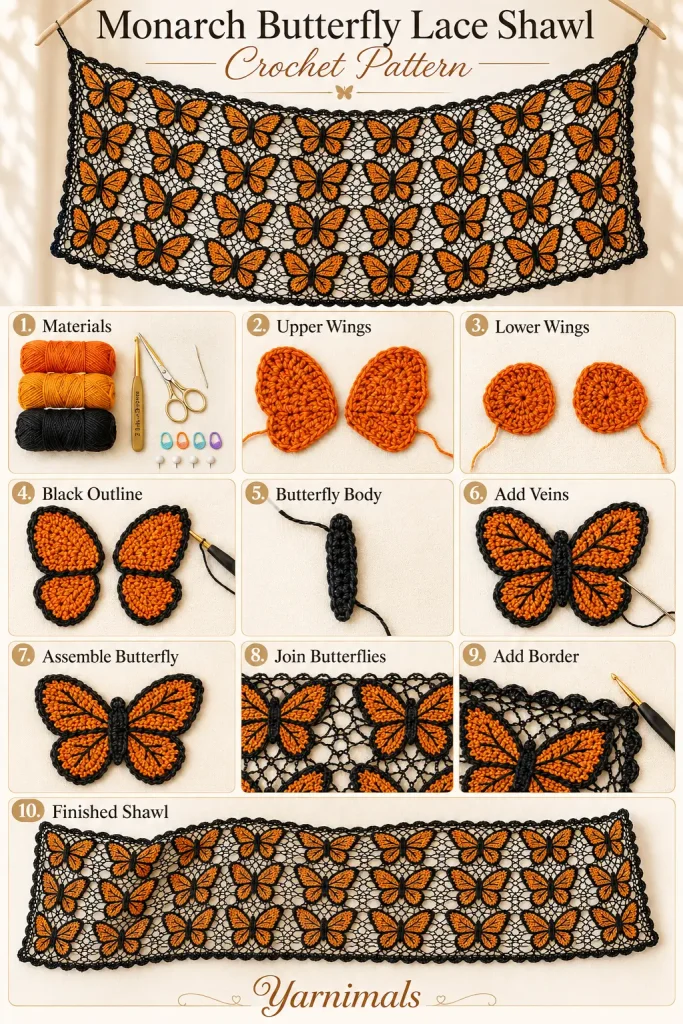
Butterfly Motif
Make as many butterfly motifs as needed for your shawl.
Each butterfly includes:
- 2 large upper wings
- 2 smaller lower wings
- 1 black body
- black outline
- black vein embroidery
Large Upper Wing
Make 2.
With orange yarn, ch 11.
Round 1
Sc in the 2nd ch from hook.
Hdc in next ch.
Dc in next 2 ch.
Tr in next 3 ch.
Dc in next 2 ch.
Hdc in next ch.
Work 5 dc in the last ch to round the wing tip.
Now work along the opposite side of the foundation chain.
Hdc in next st.
Dc in next 2 sts.
Tr in next 3 sts.
Dc in next 2 sts.
Hdc in next st.
Sc in final st.
Join with sl st.
Round 2
Ch 1.
Sc in next 2 sts.
Hdc in next 3 sts.
Dc in next 5 sts.
Work 2 dc in each of the 5 sts around the rounded wing tip.
Dc in next 5 sts.
Hdc in next 3 sts.
Sc in remaining sts.
Join with sl st.
Fasten off orange.
Black Outline for Upper Wing
Join black yarn at the inner bottom edge of the wing.
Ch 1.
Sc evenly around the wing.
At the outer wing tip, work:
Sc, ch 3, sl st into first ch, sc.
This creates a small picot point.
Continue sc around the wing.
Add a small picot every 4 to 5 stitches along the outer curved edge only.
Join with sl st and fasten off, leaving a tail for assembly.
Make the second upper wing the same way.
Small Lower Wing
Make 2.
With orange yarn, ch 8.
Round 1
Sc in the 2nd ch from hook.
Hdc in next ch.
Dc in next 2 ch.
Hdc in next ch.
Sc in next ch.
Work 5 dc in last ch.
Now work along the opposite side.
Sc in next st.
Hdc in next st.
Dc in next 2 sts.
Hdc in next st.
Sc in final st.
Join with sl st.
Round 2
Ch 1.
Sc in next 2 sts.
Hdc in next 2 sts.
Dc in next 3 sts.
Work 2 dc in each of the 5 sts around the rounded tip.
Dc in next 3 sts.
Hdc in next 2 sts.
Sc in remaining sts.
Join with sl st.
Fasten off orange.
Black Outline for Lower Wing
Join black yarn near the inner edge.
Ch 1.
Sc evenly around the lower wing.
At the outer rounded tip, work:
Sc, ch 3, sl st into first ch, sc.
Add 1 or 2 more picots along the outer edge.
Join with sl st and fasten off, leaving a tail for assembly.
Make the second lower wing the same way.
Butterfly Body
With black yarn, ch 13.
Sc in the 2nd ch from hook and in each ch across.
Ch 1, turn.
Sc in each st across.
Fasten off, leaving a long tail.
This creates a slim black body for the center of the butterfly.
Assemble the Butterfly
Lay the black body vertically.
Place the 2 large upper wings near the top of the body, one on each side.
Place the 2 smaller lower wings below them, one on each side.
The wings should slightly overlap near the body.
Use the black yarn tails to sew the inner edges of the wings to the body.
Keep the stitching neat and secure.
The butterfly should have:
- 2 large upper wings
- 2 smaller lower wings
- black body in the center
- black outline around each wing
- picot-style black edging around the outer wing edges
Add Wing Veins
Thread black yarn onto a yarn needle.
On each orange wing, stitch simple vein lines:
- one long line from the inner wing base toward the outer tip
- 2 or 3 short diagonal lines branching from the main line
- one curved line near the lower edge of the wing
Keep the stitches loose enough so the wing stays flat.
Repeat on all 4 wings.
For extra detail, add a few tiny cream stitches near the black border to mimic small butterfly wing spots.
Make More Butterflies
Make multiple butterflies in orange tones.
For a more natural monarch-style look, use:
- bright orange for most wings
- golden orange for a few wings
- darker burnt orange for accent butterflies
- black for every outline and body
Keep the black outline consistent across all motifs so the shawl looks connected.
Arrange the Shawl
Lay all butterflies on a large flat surface.
Arrange them in staggered rows.
Suggested layout for a shawl:
Row 1: 4 butterflies
Row 2: 5 butterflies
Row 3: 4 butterflies
Row 4: 5 butterflies
Row 5: 4 butterflies
Row 6: 5 butterflies
Repeat until the wrap is long enough.
Turn some butterflies slightly so the layout looks natural, but keep most bodies vertical.
Make sure wing tips touch nearby wing tips. These touching points will be used for joining.
Join the Butterflies with Black Lace
Use black yarn for the joining mesh.
Join black yarn to a picot loop on one butterfly wing.
Ch 6.
Sc into a matching picot loop on the next butterfly.
Ch 6.
Sc into the next nearby picot loop.
Continue connecting the butterflies where their wing tips meet.
Use 2 or 3 joining points between neighboring butterflies so the shawl is secure but still flexible.
Fill Open Spaces
After joining the main wing tips, you will see open spaces between groups of butterflies.
To create the lace mesh:
Join black yarn to one nearby picot or edge stitch.
Ch 5.
Sc into the next nearby wing picot or edge stitch.
Ch 5.
Sc into the next point.
Continue around the gap until the opening looks connected.
Fasten off and weave in ends, or continue into the next gap if possible.
Keep the chain loops relaxed so the shawl drapes softly.
Optional Lace Connectors
For larger gaps between butterflies, add a small black lace ring.
Ch 8 and join with sl st to form a ring.
Ch 5, sc into a nearby butterfly picot.
Ch 5, sc back into the ring.
Repeat to connect the ring to 3 or 4 surrounding butterflies.
This creates the spiderweb-style black lace effect visible between motifs.
Outer Border
After all butterflies are joined, work a border around the full shawl.
Join black yarn at any outer edge.
Border Round 1
Ch 1.
Sc evenly around the outside edge.
When working across wing edges, sc into existing black outline stitches.
When crossing a gap, ch 4 or ch 5, then sc into the next solid point.
At outer corners or pointed wing tips, work:
Sc, ch 3, sc.
Join with sl st to first sc.
Border Round 2: Scalloped Lace Edge
Ch 1.
Sc in first st.
Ch 5.
Skip 2 sts.
Sc in next st.
Rep from ch 5, skip 2 sts, sc in next st around.
At corners or deep points, work ch 6 instead of ch 5 so the border does not pull.
Join with sl st.
Border Round 3: Picot Finish
Sl st into first ch-5 space.
Ch 1.
In each ch-5 space, work:
Sc, hdc, dc, ch 3, sl st into first ch, dc, hdc, sc.
Repeat in every chain space around.
Fasten off and weave in ends.
This gives the shawl a black scalloped lace finish.
Blocking
Blocking is very important for this pattern.
Pin the shawl flat on a blocking mat.
Gently shape each butterfly wing.
Open the black lace spaces evenly.
Pin the border scallops and picots into shape.
Mist lightly with water or steam carefully.
Let dry completely before removing pins.
Do not stretch too aggressively, or the butterfly shapes may distort.
Tips & Variations
Use cotton thread or fine cotton yarn for a delicate lace shawl.
Use sport weight yarn for a larger, softer wrap.
Use black for the outlines to create the bold monarch look.
Try orange, amber, rust, and golden yellow for natural butterfly shading.
For a softer version, use cream outlines instead of black.
For a dramatic evening wrap, use metallic thread held with the black border yarn.
Make fewer motifs for a scarf.
Make more motifs for a large rectangular shawl.
Use the butterfly motif alone as an applique for bags, hats, cardigans, or wall decor.
FAQ
Is this butterfly shawl beginner-friendly?
It is best for intermediate crocheters. The individual stitches are simple, but the project requires motif assembly, joining, shaping, and blocking.
Can I make this as a blanket instead of a shawl?
Yes. Use thicker yarn and make more motifs. Join them in rows and add the same black lace border around the full blanket.
Can I make the butterflies in different colors?
Yes. You can create a rainbow butterfly shawl, pastel version, or natural monarch version. Keep the outline color consistent for the cleanest look.
Do I have to embroider the wing veins?
No, but the black vein stitches help the butterflies look more detailed and closer to the monarch style.
Conclusion
This monarch butterfly lace shawl is a beautiful crochet project for anyone who loves bold texture, dramatic color, and wearable art. The orange butterfly motifs, black outlines, airy lace joins, and scalloped border come together to create a handmade wrap that feels truly special.
Make it in classic orange and black for a monarch-inspired look, or try your favorite butterfly colors for a custom crochet shawl full of movement and personality.



