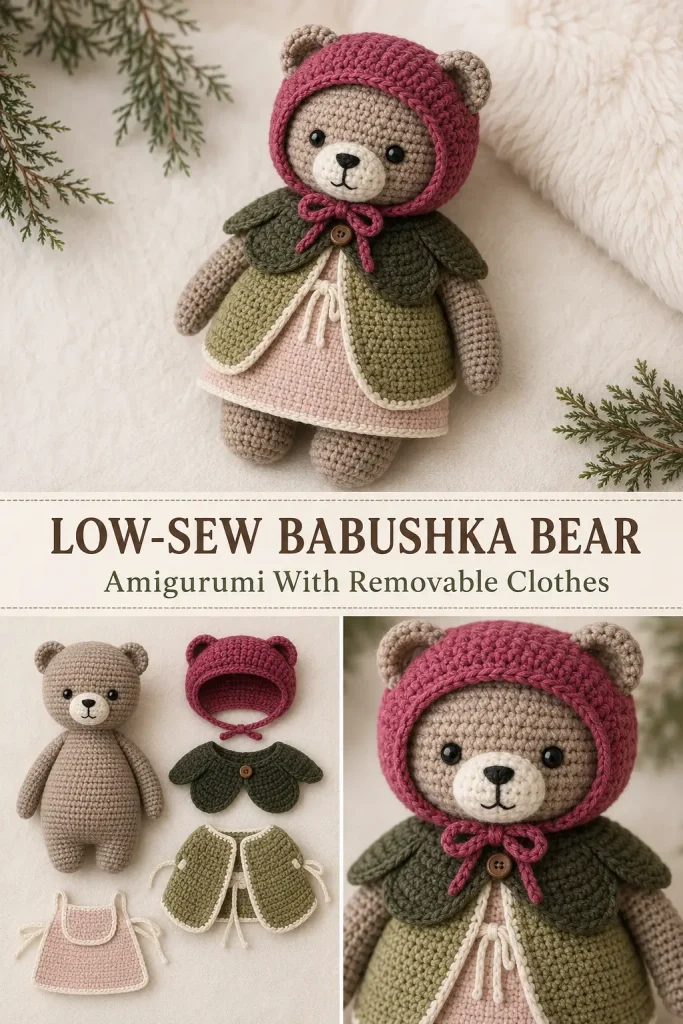
This sweet woodland bear is dressed for a cozy storybook adventure in a berry-colored bonnet, a dark olive capelet, a light olive vest, and a softly trimmed apron dress. Every clothing piece is removable, making the finished amigurumi perfect for gentle dress-up play, nursery decoration, or a thoughtful handmade gift.
The bear is worked with a low-sew construction. The legs join directly into the pear-shaped body, the head continues from the neck, and the arms are crocheted into the body as you work. Only the ears, muzzle, and optional tail require sewing. The complete pattern below is an original, image-inspired construction designed to create the same visible style without reproducing another designer’s paid instructions.
Description
The finished amigurumi is a small taupe teddy bear with a rounded head, tiny ears, glossy black eyes, a raised cream muzzle, and a softly shaped pear body. Short legs and slim arms give the bear a gentle doll-like appearance.
The removable outfit includes a pale blush apron dress with cream edging, a light olive open-front vest with long rounded panels, a dark olive four-panel capelet with a wooden-style button, and a berry-pink babushka bonnet with ear openings and chin ties. When fully dressed, the layered pieces create the cozy woodland look shown in the reference design.
Materials
Bear
- DK or light worsted-weight yarn in taupe
- Small amount of cream yarn for the muzzle
- Small amount of black yarn or embroidery floss
- Two 8 mm black safety eyes
- Polyester fiberfill
- 2.5 mm crochet hook
Removable Clothes
- DK yarn in berry pink
- DK yarn in dark olive
- DK yarn in light olive
- DK yarn in pale blush
- Small amount of cream yarn for trim and ties
- One 12–15 mm brown button
Tools
- Yarn needle
- Scissors
- Stitch markers
- Sewing pins
- Measuring tape
- Black sewing thread, optional
- Fabric-safe blush, optional
Abbreviations
- BLO: back loop only
- ch: chain
- dc: double crochet
- dec: invisible single crochet decrease
- hdc: half double crochet
- inc: two single crochet stitches in the same stitch
- MR: magic ring
- Rnd: round
- sc: single crochet
- sc2tog: single crochet two together
- sl st: slip stitch
- st: stitch
- sts: stitches
Finished Size
Using DK yarn and a 2.5 mm hook:
- Bear height: approximately 7–8 inches
- Head width: approximately 3 inches
- Body width: approximately 3¼ inches
- Bonnet circumference: approximately 8–9 inches
- Capelet width: approximately 6 inches
- Apron dress length: approximately 4½ inches
The final size will vary with yarn, hook size, and tension.
Pattern Notes
- This pattern uses US crochet terminology.
- Work the bear in continuous spiral rounds unless instructed otherwise.
- Place a stitch marker in the first stitch of each round.
- Stuff firmly enough to hold the shape without stretching the stitches.
- The bear’s legs, body, neck, and head are worked as one continuous piece.
- The arms are made separately but crocheted directly into the body.
- The removable clothes are sized for the bear made from this pattern.
- Try every clothing piece on before fastening off.
- Use embroidered eyes and a crocheted closure instead of safety eyes and a button when making the toy for a child under three.
- Difficulty level: intermediate.
Special Stitch
Invisible Decrease
Insert the hook through the front loop of the next stitch.
Insert the hook through the front loop of the following stitch.
Yarn over and pull through both front loops.
Yarn over and pull through the two loops on the hook.
Step-by-Step Instructions
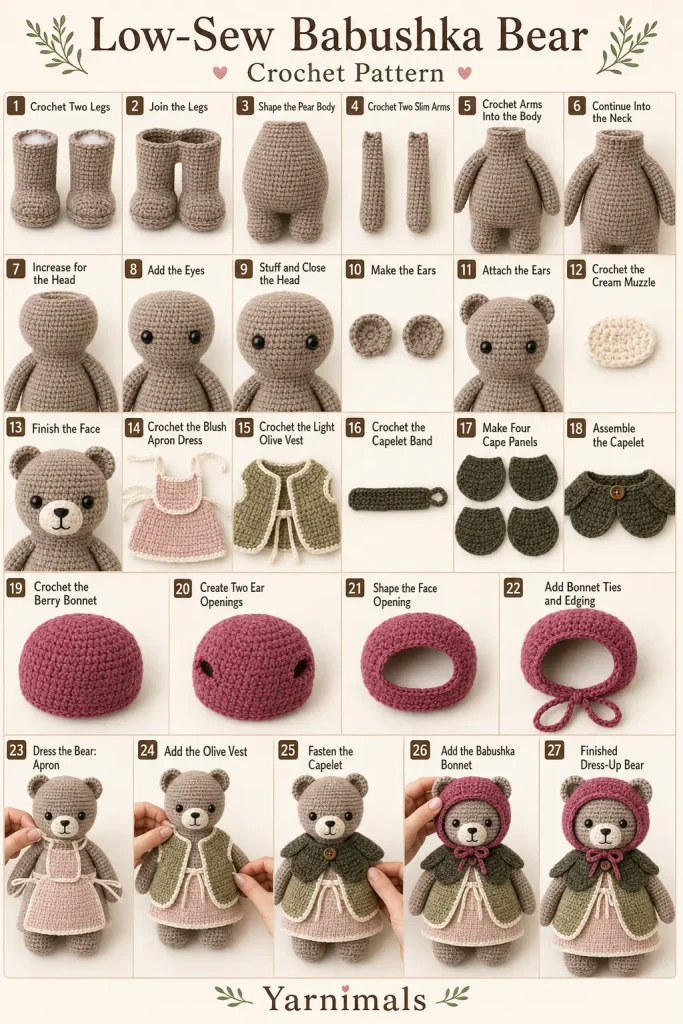
Teddy Bear
First Leg
Using taupe yarn:
Rnd 1: Make 6 sc in a MR. (6)
Rnd 2: Inc in each st around. (12)
Rnd 3, BLO: Sc in each st around. (12)
Rnds 4–5: Sc in each st around. (12)
Fasten off the first leg.
Stuff lightly, keeping the upper edge open.
Second Leg
Repeat Rnds 1–5.
Do not fasten off.
Stuff the second leg lightly.
Join the Legs
Position both legs with the toes facing forward.
From the second leg:
Ch 3.
Join to any stitch on the first leg with 1 sc.
Body Round 1
Sc in the remaining 11 sts of the first leg.
Sc in each of the 3 chains.
Sc in all 12 sts of the second leg.
Sc in the unused loops on the opposite side of the 3 chains.
30 sts
Place the beginning marker at the center back.
Body Round 2
Repeat around:
- Sc in each of the next 4 sts
- Inc in the next st
36 sts
Body Rounds 3–6
Sc in each st around. (36)
Begin stuffing the legs and lower body.
Body Round 7
Repeat around:
- Sc in each of the next 4 sts
- Dec
30 sts
Body Rounds 8–10
Sc in each st around. (30)
Body Round 11
Repeat around:
- Sc in each of the next 3 sts
- Dec
24 sts
Body Round 12
Sc in each st around. (24)
Do not complete the next round until both arms have been made.
Arms
Make two using taupe yarn.
Arm Round 1
Make 6 sc in a MR. (6)
Arm Round 2
Repeat three times:
- Sc in the next st
- Inc in the next st
9 sts
Arm Rounds 3–9
Sc in each st around. (9)
Stuff only the lower half of the arm.
Flatten the open edge.
Do not fasten off until the arm is flattened and positioned. Work 4 sc through both layers to close the top.
Fasten off and weave in the tail.
Repeat for the second arm.
Crochet the Arms Into the Body
Pin one arm to each side of the body.
The arms should face downward with the closing stitches aligned against the body.
Body Round 13
Work:
- Sc in the next 5 body sts
- Sc through the next body st and the first closed arm st
- Repeat through the next 3 body sts and arm sts
- Sc in the next 6 body sts
- Attach the second arm across the next 4 body sts in the same way
- Sc in the final 5 body sts
24 sts
Body Round 14
Sc in each st around. (24)
Continue stuffing the body.
Body Round 15
Repeat around:
- Sc in each of the next 2 sts
- Dec
18 sts
Body Round 16
Sc in each st around. (18)
This forms the neck.
Add enough stuffing to keep the neck firm.
Head
Continue with taupe yarn.
Head Round 1
Inc in each st around. (36)
Head Round 2
Repeat around:
- Sc in each of the next 5 sts
- Inc
42 sts
Head Rounds 3–9
Sc in each st around. (42)
Insert the safety eyes between Head Rounds 5 and 6.
Position the eyes approximately 8 stitches apart.
Check the placement before attaching the washers.
Head Round 10
Repeat around:
- Sc in each of the next 5 sts
- Dec
36 sts
Head Round 11
Repeat around:
- Sc in each of the next 4 sts
- Dec
30 sts
Begin stuffing the head.
Keep the neck and lower face especially firm.
Head Round 12
Repeat around:
- Sc in each of the next 3 sts
- Dec
24 sts
Head Round 13
Repeat around:
- Sc in each of the next 2 sts
- Dec
18 sts
Add the remaining stuffing.
Shape the head into a softly rounded form.
Head Round 14
Repeat around:
- Sc in the next st
- Dec
12 sts
Head Round 15
Dec around. (6)
Fasten off, leaving a tail.
Thread the tail through the remaining front loops and pull closed.
Secure and hide the yarn end inside the head.
Ears
Make two using taupe yarn.
Ear Round 1
Make 6 sc in a MR. (6)
Ear Round 2
Inc in each st around. (12)
Ear Round 3
Sc in each st around. (12)
Fasten off, leaving a long sewing tail.
Do not stuff.
Flatten each ear into a semicircle.
Position the ears between Head Rounds 3 and 5, with approximately 9–10 stitches between them across the top.
Sew the lower edge of each ear securely to the head.
Muzzle
Using cream yarn:
Ch 5.
Muzzle Round 1
Beginning in the second ch from the hook:
- Work 2 sc in the first ch
- Sc in each of the next 2 ch
- Work 4 sc in the final ch
Rotate the chain.
Work:
- Sc in each of the next 2 unused loops
- Work 2 sc in the final loop
12 sts
Muzzle Round 2
Work:
- Inc in each of the first 2 sts
- Sc in each of the next 2 sts
- Inc in each of the next 4 sts
- Sc in each of the next 2 sts
- Inc in each of the final 2 sts
20 sts
Sl st in the next st.
Fasten off, leaving a long sewing tail.
Place the muzzle between and slightly below the eyes.
The top of the muzzle should sit approximately one round below the eyes.
Stuff very lightly before closing the final section.
Sew securely around the edge.
Nose and Mouth
Using black embroidery floss:
Embroider a small triangular nose near the top center of the muzzle.
Bring one straight vertical stitch downward from the nose.
Add one short curved stitch to each side to create a gentle mouth.
Secure all ends inside the head.
Optional Tail
Using taupe yarn:
Rnd 1: Make 6 sc in a MR. (6)
Rnd 2: Inc in each st around. (12)
Rnd 3: Sc in each st around. (12)
Fasten off, leaving a sewing tail.
Stuff lightly.
Sew the tail to the center back of the body around Body Rounds 6–8.
Optional Blush
Add a tiny amount of fabric-safe blush below each eye.
Keep the coloring soft and subtle.
Berry Babushka Bonnet
The bonnet is worked from the crown downward, with two ear openings and a framed face opening.
Using berry-pink yarn:
Bonnet Round 1
Make 6 sc in a MR. (6)
Bonnet Round 2
Inc in each st around. (12)
Bonnet Round 3
Repeat around:
- Sc in the next st
- Inc
18 sts
Bonnet Round 4
Repeat around:
- Sc in each of the next 2 sts
- Inc
24 sts
Bonnet Round 5
Repeat around:
- Sc in each of the next 3 sts
- Inc
30 sts
Bonnet Round 6
Repeat around:
- Sc in each of the next 4 sts
- Inc
36 sts
Try the crown over the bear’s head.
It should sit comfortably without stretching tightly.
Bonnet Round 7: Ear Openings
Work:
- Sc in the next 6 sts
- Ch 4 and skip the next 4 sts
- Sc in the next 12 sts
- Ch 4 and skip the next 4 sts
- Sc in the final 10 sts
36 positions
Bonnet Rounds 8–10
Sc in each sc and each ch around. (36)
Join with a sl st at the end of Round 10.
Fasten off.
Shape the Face Opening
Place the bonnet on the bear.
Mark 10 centered stitches across the front of the bonnet.
These stitches will remain unworked.
Join berry yarn at one marker.
Face Row 1
Work sc around the side and back of the bonnet until you reach the second marker.
You should work across the remaining 26 stitches.
Turn. (26)
Face Rows 2–4
Ch 1.
Sc in each st across.
Turn. (26)
Do not fasten off after Row 4.
First Bonnet Tie
At the end of Face Row 4:
Ch 28.
Beginning in the second ch from the hook, sl st in each ch back to the bonnet.
Fasten off.
Second Bonnet Tie
Join yarn at the opposite lower front corner.
Ch 28.
Beginning in the second ch from the hook, sl st in every ch.
Fasten off.
Face Edging
Join berry yarn at one lower front corner.
Work sc evenly:
- Up the first row-end edge
- Across the 10 unworked front stitches
- Down the opposite row-end edge
Fasten off.
For a slightly raised frame, join again and work loose surface slip stitches around the same face opening.
Bonnet Finishing
Weave in all yarn ends.
Place the bonnet over the bear’s head and gently pull the ears through the openings.
Tie the cords beneath the chin in a small bow.
The opening should frame the face without covering the eyes or muzzle.
Pale Blush Apron Dress
This removable underdress is worked flat and tied behind the bear.
Using pale blush yarn:
Skirt Foundation
Ch 41.
Skirt Row 1
Beginning in the second ch from the hook, hdc across.
Turn. (40)
Skirt Rows 2–8
Ch 1.
Hdc in each st across.
Turn. (40)
Skirt Row 9: Gather the Waist
Ch 1.
Sc2tog across.
Turn. (20)
Do not fasten off.
Apron Bib
The bib is worked over the center 12 stitches.
Sl st across the first 4 sts.
Bib Row 1
Ch 1.
Sc in each of the next 12 sts.
Turn. (12)
Leave the final 4 waist stitches unworked.
Bib Rows 2–5
Ch 1.
Sc in each st across.
Turn. (12)
Fasten off after Bib Row 5.
Cream Neck Ties
Join cream yarn at one upper bib corner.
Ch 25.
Beginning in the second ch from the hook, sl st in each ch.
Fasten off.
Repeat at the opposite upper bib corner.
Cream Waist Ties
Join cream yarn at one upper outer skirt corner.
Ch 30.
Beginning in the second ch from the hook, sl st in each ch.
Fasten off.
Repeat at the opposite skirt corner.
Cream Dress Edging
Join cream yarn at one lower skirt corner.
Work sc evenly around:
- The first side edge
- The entire hem
- The opposite side edge
- The top skirt edge
- The bib sides and top
Work 3 sc in each lower corner.
Fasten off.
Dress Fit
Place the apron against the bear’s front.
Tie the neck cords behind the neck.
Wrap the skirt around the body.
Tie the waist cords securely at the back.
The skirt should finish just above the bear’s feet.
Light Olive Open-Front Vest
The vest is worked as one back panel with two attached front flaps.
It remains open at the front and is secured with cream waist ties.
Back Panel
Using light olive yarn:
Ch 19.
Back Row 1
Beginning in the second ch from the hook, hdc across.
Turn. (18)
Back Rows 2–10
Ch 1.
Hdc in each st across.
Turn. (18)
Do not fasten off.
First Shoulder
Shoulder Row 1
Ch 1.
Hdc in the first 7 sts.
Turn. (7)
Leave the remaining stitches unworked.
Shoulder Rows 2–3
Ch 1.
Hdc in each st across.
Turn. (7)
Do not fasten off.
First Front Panel
Continue directly from the shoulder.
Front Row 1
Ch 1.
Hdc in each st across.
Turn. (7)
Front Row 2
Ch 1.
Inc in the first st.
Hdc in the next 5 sts.
Inc in the final st.
Turn. (9)
Front Row 3
Ch 1.
Hdc in each st across.
Turn. (9)
Front Row 4
Ch 1.
Inc in the first st.
Hdc in the next 7 sts.
Inc in the final st.
Turn. (11)
Front Rows 5–9
Ch 1.
Hdc in each st across.
Turn. (11)
Front Row 10
Ch 1.
Hdc2tog.
Hdc in each of the next 7 sts.
Hdc2tog.
Turn. (9)
Front Row 11
Ch 1.
Hdc2tog.
Hdc in each of the next 5 sts.
Hdc2tog.
Turn. (7)
Front Row 12
Ch 1.
Hdc2tog.
Hdc in each of the next 3 sts.
Hdc2tog.
Turn. (5)
Front Row 13
Ch 1.
Hdc2tog.
Hdc in the next st.
Hdc2tog.
Fasten off. (3)
Second Shoulder and Front Panel
Return to Back Row 10.
Skip the center 4 stitches for the neck opening.
Join light olive yarn in the final 7 stitches.
Repeat the First Shoulder and First Front Panel instructions.
The finished piece should have:
- One rectangular back
- Two shoulder sections
- Two long rounded front flaps
- One open center front
- Open sides for the arms
Vest Edging
Join light olive yarn at the lower back corner.
Work sc evenly around the entire vest:
- Back lower edge
- First side
- First front flap
- Neck opening
- Second front flap
- Second side
- Remaining back edge
Work 3 sc around each lower flap point.
Fasten off.
Cream Neck Trim
Join cream yarn at the top of one front flap.
Work surface slip stitches or loose sc evenly:
- Up the front flap
- Around the neck opening
- Down the opposite front flap
Fasten off.
Cream Waist Ties
Make two.
Using cream yarn:
Ch 30.
Beginning in the second ch from the hook, sl st in each ch.
Fasten off, leaving a sewing tail.
Sew one tie to each side of the vest near the lower edge of the back panel.
To dress the bear:
- Place the vest behind the bear.
- Bring the front flaps over the shoulders.
- Position the arms through the open sides.
- Bring the cream ties around the waist.
- Tie them at the front beneath the two flaps.
The front panels should overlap the apron dress slightly while leaving a narrow section of the blush skirt visible.
Dark Olive Capelet
The capelet consists of one neck band and four overlapping rounded panels.
Neck Band
Using dark olive yarn:
Ch 25.
Band Row 1
Beginning in the second ch from the hook, sc across.
Turn. (24)
Band Row 2
Ch 1.
Inc in the first st.
Sc in each of the next 22 sts.
Inc in the final st.
Turn. (26)
Fasten off, leaving a long sewing tail.
Button Loop
Join dark olive yarn at one end of the band.
Ch 6.
Sl st into the same band corner to form a loop.
Fasten off securely.
Check that the loop fits around the chosen button.
Rounded Cape Panels
Make four using dark olive yarn.
Panel Row 1
Ch 7.
Beginning in the second ch from the hook, sc across.
Turn. (6)
Panel Row 2
Ch 1.
Inc in the first st.
Sc in each of the next 4 sts.
Inc in the final st.
Turn. (8)
Panel Row 3
Ch 1.
Hdc in each st across.
Turn. (8)
Panel Row 4
Ch 1.
Inc in the first st.
Hdc in each of the next 6 sts.
Inc in the final st.
Turn. (10)
Panel Rows 5–6
Ch 1.
Hdc in each st across.
Turn. (10)
Panel Row 7
Ch 1.
Hdc2tog.
Hdc in each of the next 6 sts.
Hdc2tog.
Turn. (8)
Panel Row 8
Ch 1.
Hdc2tog.
Hdc in each of the next 4 sts.
Hdc2tog.
Turn. (6)
Panel Row 9
Ch 1.
Sc in each st across. (6)
Fasten off, leaving a sewing tail.
Panel Edging
Join dark olive yarn at one upper corner of each panel.
Sc evenly around the side, rounded lower edge, and opposite side.
Leave the straight upper edge unworked.
Fasten off.
Repeat for all four panels.
Assemble the Capelet
Place the neck band horizontally with the wrong side facing upward.
Arrange the four panels along the lower edge:
- Two panels toward the front
- Two panels toward the back and sides
- Each panel overlapping the next by approximately ½ inch
The top edges of the panels should sit behind the neck band.
Sew each panel securely to the band.
Keep the lower edges loose so they drape over the shoulders.
Add the Button
Sew the brown button to the end of the neck band opposite the button loop.
Place the capelet around the bear’s neck.
Bring the ends together at the center front.
Fasten the loop over the button.
The front two panels should overlap beneath the button.
Dressing the Bear
For the complete layered look, dress the bear in this order:
- Pale blush apron dress
- Light olive open-front vest
- Dark olive capelet
- Berry-pink babushka bonnet
Adjust each layer so:
- The apron skirt peeks out below the vest.
- The olive front panels frame the center of the dress.
- The capelet rests over the shoulders.
- The button sits at the center front.
- The bonnet frames the face.
- Both ears remain visible through the bonnet openings.
Final Finishing
Check the entire bear carefully.
Make sure:
- Both legs are evenly positioned.
- The arms hang at the same height.
- The eyes are secure.
- The muzzle is centered.
- The nose and mouth are symmetrical.
- The ears fit through the bonnet openings.
- The clothing can be removed without stretching.
- All ties are secure.
- The capelet button and loop align.
- No loose yarn ends remain.
Gently shape the bear and clothes with your fingers.
Lightly block the removable clothing if needed, keeping the pieces flat until completely dry.
Tips & Variations
Use cotton or a cotton-acrylic blend for crisp stitches and clothing that holds its shape.
Use a slightly smaller hook for the bear than for the clothes if your tension is tight.
Try every piece on before weaving in the final ends. Small differences in yarn thickness can change the clothing fit.
For a softer bonnet, use a wool-blend or brushed acrylic yarn.
Replace the berry bonnet with rust, mustard, cream, or dusty blue for a seasonal variation.
Add a tiny embroidered flower to the apron dress for a different woodland look.
For a child-safe version:
- Embroider the eyes.
- Embroider the cape closure instead of using a button.
- Secure every tie firmly.
- Avoid loose decorative pieces.
For an even lower-sew bear, omit the optional tail and embroider the muzzle directly onto the face.
FAQ
Is this pattern suitable for beginners?
The individual stitches are simple, but the project includes shaping, joined legs, crocheted-in arms, fitted removable clothes, and several assembly steps. It is best for a confident beginner or intermediate crocheter.
How do I make sure the clothes fit?
Use the same yarn weight and hook size throughout the project. Try each item on the bear before fastening off, and add or remove a row when necessary.
Can the bear be made without safety eyes?
Yes. Embroider the eyes with black yarn or embroidery floss before stuffing and closing the head. This is recommended when the toy will be handled by a young child.
Conclusion
This low-sew babushka bear crochet pattern creates a complete dress-up amigurumi with a softly shaped teddy bear and four removable clothing layers. The berry bonnet, dark olive capelet, light olive vest, and blush apron dress combine to create a cozy woodland character with plenty of handmade personality.
Make the outfit in the colors shown here or choose your own seasonal palette. The finished bear makes a charming nursery decoration, collectible amigurumi, pretend-play companion, or thoughtful handmade crochet gift.



