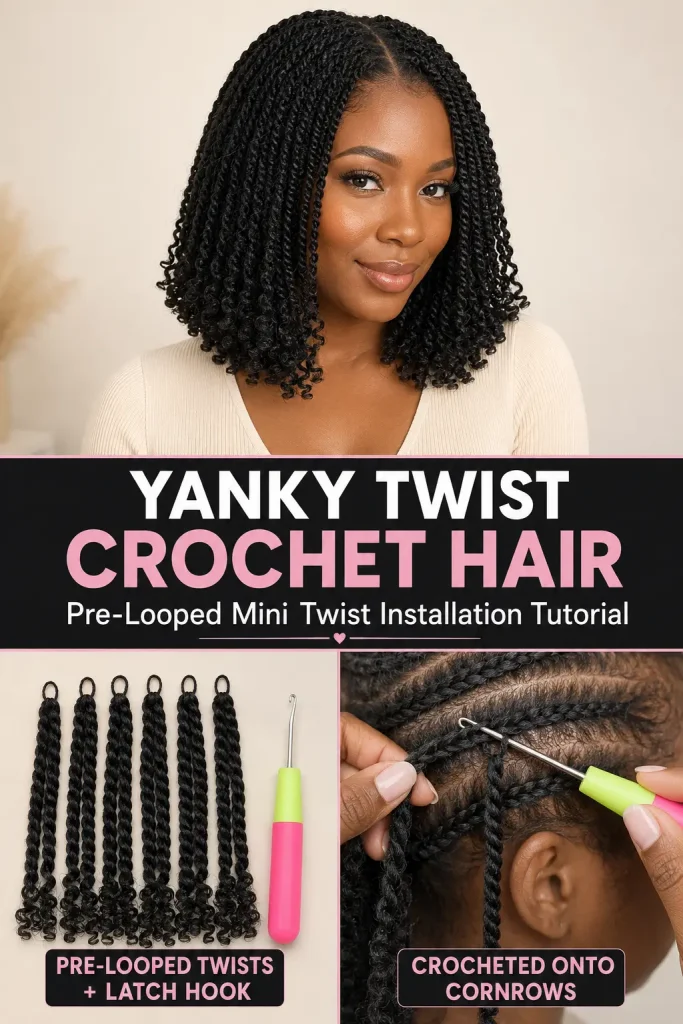
Yanky Twist crochet hair creates the look of small hand-twisted braids without requiring every twist to be formed directly on the natural hair. The pre-twisted, pre-looped extensions attach to a flat cornrow base with a crochet latch hook, making this protective hairstyle faster to install than individual twists.
This tutorial creates a natural-looking shoulder-length mini twist bob in one consistent natural-black shade. The finished style has lightweight volume, soft movement, gently curled ends, and enough flexibility for center-parted, side-parted, half-up, and low-ponytail styles.
Finished Hairstyle Description
The finished Yanky Twist crochet hairstyle features approximately 210–240 small pre-looped twists in natural black 1B. Each twist measures 12 inches and has a softly textured rope shape with a light curl at the end.
The style sits around shoulder length with medium-full density. The lower back remains slightly lighter to prevent excess weight, while the crown, sides, and front are filled more closely to hide the cornrow base. Small twists are placed carefully around the front so the hairline looks natural without pulling on fragile edges.
Current Yanky Twist products are available as pre-twisted, pre-looped extensions in multiple lengths and colors. Some eight-pack sets contain 30 strands per pack, or 240 strands total, with seven to eight packs recommended for a full installation.
Hair and Tools
- Eight packs of 12-inch Yanky Twist crochet hair
- Natural black color 1B
- Approximately 210–240 pre-looped twists
- Crochet latch hook
- Rat-tail comb
- Wide-tooth comb or detangling brush
- Sectioning clips
- Small elastic bands, optional
- Gentle shampoo
- Moisturizing conditioner
- Lightweight leave-in conditioner
- Water-based braiding gel or edge control, optional
- Lightweight scalp moisturizer
- Satin scarf or bonnet
- Small scissors for loose synthetic fibers only
Exact Design Notes
This tutorial is designed around one locked finished style:
- 12-inch shoulder-length mini twist bob
- Natural black 1B throughout
- Small uniform rope twists
- Soft curled ends left intact
- Medium-full but lightweight density
- Flat cornrow foundation
- Approximately 12–14 cornrows
- Slightly wider spacing at the nape
- Closer placement at the crown and front
- Natural-looking hairline
- Flexible center or side part
- No loose bohemian curls added
- No oversized passion twists
- No beads, cuffs, rings, or decorative accessories
The installation plan below is an original layout developed for this specific finished design. Head size, natural-hair density, twist thickness, and preferred fullness may require small placement adjustments.
Prepare the Natural Hair
Begin with clean, conditioned hair.
Wash and Condition
Wash the scalp and hair thoroughly to remove oil, gel, and product buildup.
Apply a moisturizing conditioner and detangle gently from the ends upward.
Rinse completely.
Dry the Hair
Allow the hair to dry fully before braiding.
You may stretch the hair using:
- Banding
- Large twists
- African threading
- Low-tension blow-drying on a low or cool setting
The hair does not need to be completely straight. It only needs to be stretched enough to create smooth, flat cornrows.
Do not braid damp hair beneath synthetic extensions. Trapped moisture can make the foundation uncomfortable and difficult to maintain.
Moisturize Lightly
Apply a small amount of lightweight leave-in conditioner.
Distribute it evenly through the hair, paying attention to the ends.
Avoid coating the scalp with heavy oil, thick butter, or excessive braiding gel. Too much product can create buildup beneath the installed twists.
Create the Cornrow Foundation
The foundation must lie flat while providing enough support for approximately 210–240 twists.
Divide the Hair
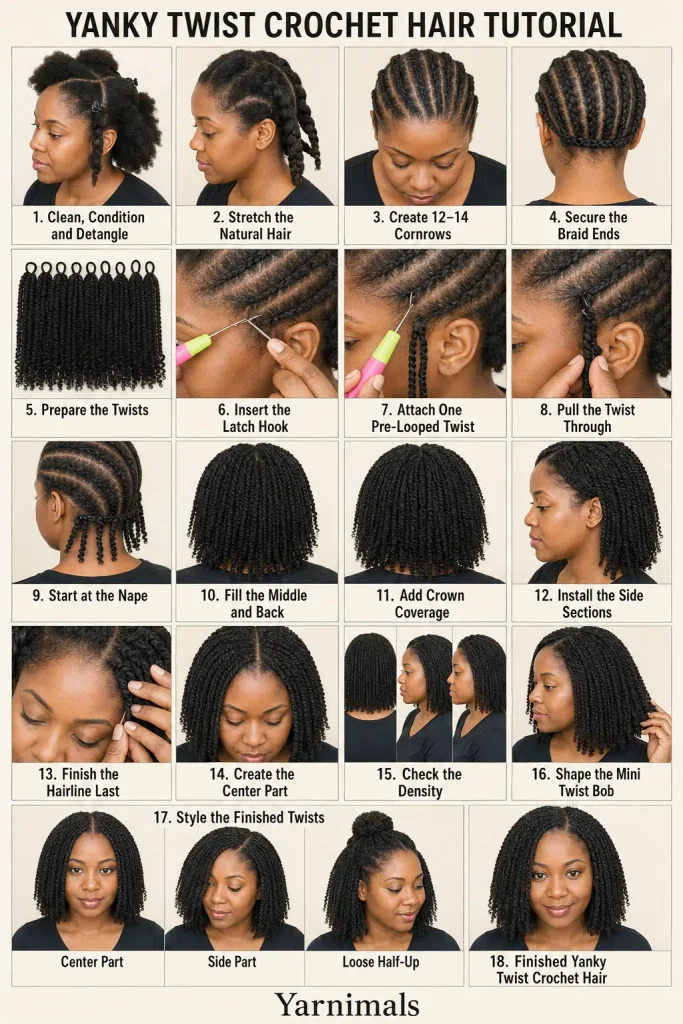
Create 12–14 cornrows running from the front toward the nape.
For the most natural result:
- Make the front cornrows approximately ¼–⅜ inch wide.
- Make the middle and back cornrows approximately ½–¾ inch wide.
- Keep the front braids smaller than the rear braids.
- Begin the first row of cornrows slightly behind the natural hairline.
- Keep all braid intersections flat.
Smaller front cornrows provide more attachment points where coverage matters most. Slightly wider rear cornrows prevent the back of the hairstyle from becoming unnecessarily dense.
Braid the Front
Make the first six to eight cornrows narrow and evenly spaced.
Keep the tension gentle around:
- The temples
- The front hairline
- The area above the ears
Do not grip fragile baby hairs tightly into the cornrows.
The braids should feel secure but comfortable. Pain, stinging, scalp tenting, or headache are signs that the foundation is too tight. Tight cornrows and extensions can contribute to traction alopecia, especially around the hairline. (American Academy of Dermatology)
Braid the Middle and Back
Continue the remaining cornrows straight toward the nape.
Keep the rows parallel and relatively flat.
At the nape, connect the braid ends into one horizontal anchor braid.
Alternatively, braid the loose ends together and sew them flat against the foundation with braiding hair or matching thread.
Do not create a bulky knot at the back of the head.
Check the Foundation
Before installing any twists, confirm that:
- The cornrows feel comfortable.
- No area is painful.
- The front rows are smaller than the back rows.
- The braid ends are secured flat.
- There are no large raised intersections.
- The base is completely dry.
- The center and side-part areas have enough attachment points.
Prepare the Yanky Twists
Open all eight packs and separate the extensions carefully.
Do not pull the twists apart aggressively.
Sort them into four groups:
- Nape
- Middle and back
- Crown and sides
- Hairline and part
Reserve approximately 15–20 twists until the end. These can be used to fill visible gaps after the main installation is complete.
Inspect each pre-looped twist.
Set aside any piece with:
- An incomplete loop
- A loose top knot
- Severe frizz
- An uneven twist
- A damaged curled end
Do not trim the finished curled tips.
How to Attach One Pre-Looped Twist
Use the same attachment method throughout the hairstyle.
- Hold the latch hook with the latch open.
- Slide the hook underneath one cornrow.
- Place the pre-formed extension loop onto the hook.
- Close the latch completely.
- Pull the loop carefully underneath the cornrow.
- Remove the hook.
- Pass the full length of the twist through the extension loop.
- Pull gently until the loop sits securely around the braid.
- Let the twist hang naturally.
One pass through the pre-loop is usually enough.
Do not repeatedly knot the extension. Multiple knots create bulk and may place extra pressure on the cornrow.
The twist should feel secure without tightening the scalp.
Install the Nape Section
Begin at the lower back of the head.
Starting at the nape makes it easier to control fullness as you move upward.
Install the first row approximately ½ inch above the lowest edge of the cornrow base.
Use wider spacing in this area.
Place approximately one twist every ¾–1 inch.
Stagger each new twist between the pieces below it rather than placing everything in rigid vertical lines.
The nape does not need to be packed closely. Too much extension hair at the bottom can create unnecessary weight and prevent the bob from moving naturally.
Use approximately 30–40 twists in the lower-back section.
Fill the Middle and Back
Continue upward through the center-back area.
Reduce the spacing slightly to approximately ½–¾ inch.
Attach the twists in staggered rows so each new piece fills the visual space between two twists below it.
Use approximately 70–85 twists through the middle and upper back.
Pause occasionally and let the hair fall naturally.
Check that:
- The cornrows are covered.
- The twists are not stacked in bulky clusters.
- The left and right sides have similar fullness.
- The back remains light enough to move.
Install the Crown
The crown requires closer placement because it is visible from several angles.
Attach one twist approximately every ⅜–½ inch.
Alternate the placement from one cornrow to the next.
Avoid attaching multiple twists through the same small area of a braid.
Use approximately 45–55 twists around the crown.
After completing this section, lift the hair into a loose half-up style. Check whether the cornrow base is visible.
Fill only the obvious gaps.
Install the Side Sections
Work above and behind each ear.
Use medium-close spacing of approximately ½ inch.
Keep the number of twists balanced on both sides.
Use approximately 20–25 twists on each side.
Avoid attaching heavy clusters directly above the ears. This area should remain flexible enough for the twists to move backward into a ponytail.
Check the silhouette from the front and back before moving to the hairline.
Create the Natural Hairline
The hairline should be completed last so you can control the final density.
Use the smallest and neatest twists from the packs.
Install the first visible row slightly behind the natural hairline rather than directly on fragile edge hairs.
Place the twists approximately ¼–½ inch apart.
Use closer placement near:
- The center part
- The chosen side part
- The front crown
- The upper temple area
Use wider placement at the lowest temple points to reduce tension.
Do not pull the loops tightly.
Do not install twists on loose baby hairs.
Use approximately 30–40 twists across the front and parting area.
Create a Flexible Part
For a center part, separate the installed twists along the center of the head.
Move one twist gently to the left and the next to the right, alternating the direction so the cornrow line remains covered.
For a side part, repeat the same process along the preferred side.
Do not overfill the part. A natural part should show a small amount of scalp rather than appearing packed and bulky.
Test both parts before adding the reserved twists.
Final Density Check
Allow all the twists to fall freely.
Examine the hairstyle from:
- Front
- Both sides
- Back
- Crown
- Half-up position
- Low ponytail position
Use the reserved twists only where the cornrow base is clearly visible.
Do not add hair simply because twists remain in the pack.
A medium-full installation should look complete without feeling heavy.
The final hairstyle will usually contain approximately 210–240 twists, depending on head size and preferred density.
Shape the Shoulder-Length Bob
The 12-inch twists should naturally sit around the shoulders.
Arrange the curls with your fingers.
Separate any twists that have become tangled together during installation.
Do not comb the extensions.
Do not cut through the curled ends.
If one piece is noticeably longer because of its placement, reposition or replace that individual twist rather than trimming the entire hairstyle unevenly.
Style the Finished Twists
Center Part
Divide the twists evenly through the center.
Let both sides fall naturally around the face.
Keep the front density balanced.
Side Part
Move the front twists gently toward one side.
Do not pull the hair tightly across the temples.
Half-Up Style
Gather the upper crown section loosely.
Secure it with a soft fabric-covered elastic.
Leave the lower twists free.
Low Ponytail
Gather the hair at the nape without pulling the hairline backward.
Use a soft elastic or satin scrunchie.
Side-Swept Style
Move most of the twists over one shoulder.
Use one hidden pin behind the ear if needed.
Maintenance
Protect the Hair at Night
Gather the twists loosely toward the crown or divide them into two low sections.
Cover the hair with a large satin bonnet or satin scarf.
Do not secure the twists in a tight nightly ponytail.
Keep the Scalp Clean
Clean the scalp as often as needed for your hair and scalp type.
Apply diluted gentle shampoo directly between the cornrows.
Massage gently with the fingertips rather than scratching with the nails.
Rinse thoroughly.
Blot with a clean towel and allow both the cornrow base and extensions to dry completely.
The American Academy of Dermatology recommends keeping extension styles clean and using gentle, moisturizing hair care while protecting fragile hair around the edges. (American Academy of Dermatology)
Moisturize Lightly
Apply a lightweight water-based moisturizer to the visible natural hair and cornrow base.
Use only a small amount.
Avoid heavy oils that may collect lint or create buildup inside the pre-looped knots.
Refresh the Twists
Remove visible lint gently with your fingers.
Smooth light frizz with a small amount of mousse only when it is suitable for the extension fiber.
Do not use high heat.
Do not dip the pre-curled ends in boiling water unless the extension manufacturer specifically approves that method.
When to Remove the Style
Remove the twists when:
- The cornrow base has loosened significantly.
- New growth makes the style difficult to clean.
- The roots begin to mat.
- The hairline feels strained.
- The scalp remains itchy after cleansing.
- The twists feel heavy.
- The installation becomes painful.
Extensions should never remain installed simply because the synthetic twists still look presentable.
Dermatologists advise taking breaks from extension styles and not wearing them continuously for longer than two or three months. Any painful or excessively tight style should be loosened or removed sooner. (American Academy of Dermatology)
Safe Removal Instructions
Work slowly in good lighting.
Remove Each Twist
Locate the loop where the extension is attached to the cornrow.
Use your fingers, a rat-tail comb, or the crochet hook to loosen the loop.
Pull the twist backward through its own loop.
Slide it carefully away from the cornrow.
Repeat until every extension has been removed.
Do not cut close to the scalp.
If cutting is necessary for faster removal, cut only well below the point where natural hair could be present, then remove every remaining loop individually.
Take Down the Cornrows
After removing all extensions, undo the cornrows carefully from the ends upward.
Do not comb immediately.
Natural shed hair may remain trapped inside the braids and must be loosened gently.
Detangle
Divide the hair into sections.
Apply conditioner or detangling product.
Finger-detangle first, then use a wide-tooth comb from the ends upward.
Clean and Condition
Shampoo the scalp and hair thoroughly.
Follow with a moisturizing conditioner.
Allow the natural hair and scalp to rest before beginning another tight or extension-based style.
Common Mistakes to Avoid
Braiding the Foundation Too Tightly
A crochet style should not hurt.
Loosen any painful braid before installing the extensions.
Overfilling the Nape
Dense installation at the lower back makes the style heavy and bulky.
Use wider spacing at the nape.
Double-Knotting Every Twist
Pre-looped twists usually require only one pass through the loop.
Repeated knots create unnecessary bulk.
Installing Large Twists Directly on the Edges
Keep fragile hairline areas lightly filled.
Begin slightly behind the natural hairline.
Making Every Section Equally Dense
The crown and part need closer placement than the nape.
Adjust the spacing by zone.
Using Too Much Product
Heavy oils, wax, and thick gel can collect inside the cornrows and extension loops.
Use lightweight products sparingly.
Cutting the Curled Ends
The softly curled tips are part of the finished Yanky Twist design.
Do not trim them unless one piece is damaged and being replaced.
Ignoring Pain or Scalp Tenting
Pain is not a normal part of a protective style.
Loosen or remove any area that pulls the scalp upward or causes persistent discomfort.
Tips and Variations
Use eight packs even when you expect to install only seven. The extra pieces allow you to replace damaged twists and correct small gaps.
For a lighter result, use approximately 190–210 twists and keep the back spacing wider.
For a fuller result, install closer at the crown rather than overloading the hairline.
A 10-inch length creates a short bob, while 14 inches produces a longer shoulder-skimming style. Current synthetic Yanky Twist listings include lengths ranging from short bob options through longer versions.
Natural black 1B gives the most versatile finish. Warm brown or ombré colors can be used for another version, but keep one consistent color throughout the installation when recreating this exact design.
Frequently Asked Questions
How many packs of Yanky Twist crochet hair do I need?
Prepare eight packs. Many current eight-pack sets contain 240 strands, and seven to eight packs are commonly recommended for a full installation. The exact amount depends on head size, cornrow spacing, and preferred fullness. (Toyotress)
Can a beginner install pre-looped Yanky twists?
Yes. Pre-looped twists simplify the attachment process because the extension is already twisted and has a prepared loop. The most important beginner skills are creating a comfortable cornrow foundation, controlling density, and using the latch hook gently.
How do I prevent the hairline from looking bulky?
Use smaller front cornrows, begin slightly behind the natural hairline, install the neatest twists at the front, and leave a small amount of visible scalp around the part.
Can I wash Yanky Twist crochet hair?
You can cleanse the scalp and natural-hair foundation gently while wearing the style. Avoid rough rubbing, rinse thoroughly, and allow the cornrows and extensions to dry completely.
Conclusion
This Yanky Twist crochet hair tutorial creates a natural shoulder-length mini twist bob using 12-inch pre-looped extensions in natural black. The flat 12–14 cornrow foundation, lighter nape placement, balanced crown density, carefully finished hairline, and preserved curled ends all work together to create a polished protective style.
Take your time with the foundation and avoid excessive tension. A comfortable installation with thoughtful spacing will look more natural, move more easily, and be kinder to the hairline than an overfilled or tightly braided style.



