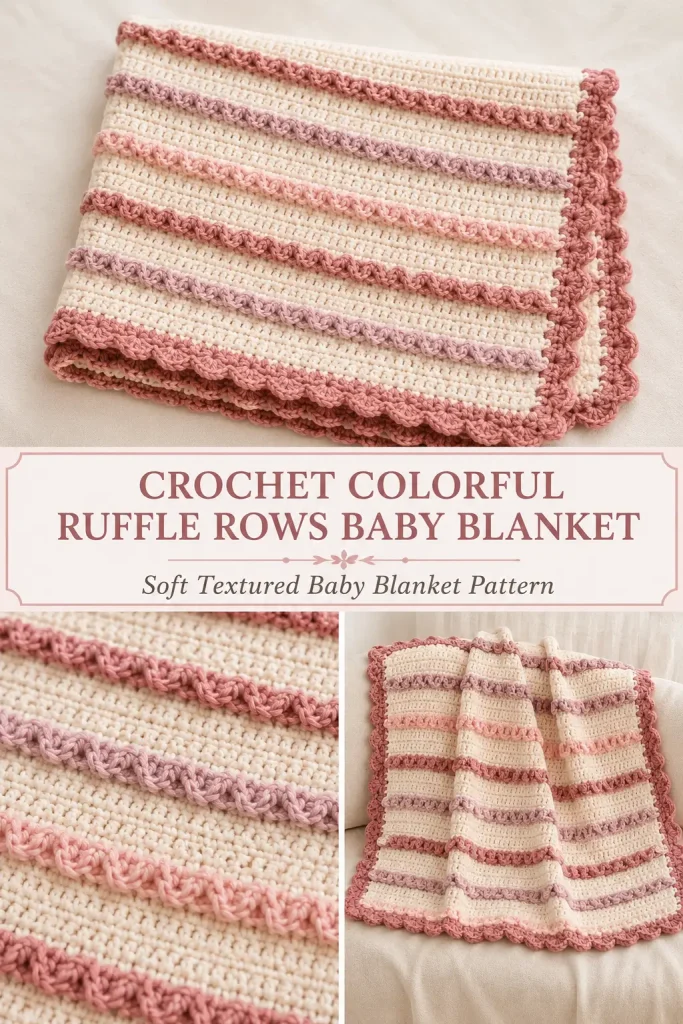
This colorful crochet ruffle baby blanket combines a soft cream background with delicate rows of blush, dusty rose, and pale plum. The narrow ruffles add just enough texture to make the blanket feel special without creating a heavy or overly bulky finish.
The simple rectangular body uses an easy crochet mesh stitch, while the decorative ruffle bands are made separately and sewn onto marked rows. This construction keeps every ruffle straight, makes the color placement easy to control, and allows the blanket to remain soft and flexible.
Description
The finished baby blanket has a warm cream mesh-stitch body with seven narrow horizontal ruffle bands arranged evenly from top to bottom. Three muted pink and mauve shades alternate across the blanket, creating a soft cottage-inspired palette. A matching scalloped border frames all four sides and completes the delicate layered look.
The linked reference uses a washable cotton-blend yarn and pastel ruffle rows. The pattern below uses a new, original construction with separate ruffle strips so the full project is clear and easy to assemble without reproducing the source instructions. (Daisy Farm Crafts)
Materials
- 1,050–1,200 yards of DK or light worsted-weight yarn in cream
- 140–170 yards of dusty rose
- 140–170 yards of pale mauve
- 140–170 yards of blush pink
- 4 mm crochet hook
- Yarn needle
- Scissors
- Stitch markers or removable yarn markers
- Measuring tape
- Blocking mats and rustproof pins, optional
Abbreviations
- ch: chain
- dc: double crochet
- sc: single crochet
- sl st: slip stitch
- sp: space
- st: stitch
- sts: stitches
Finished Size
Approximately 27 inches wide by 30 inches long, including the border.
Gauge
In the cream mesh pattern:
- 16 stitches measure approximately 4 inches
- 18 rows measure approximately 4 inches
Exact gauge is not essential, but it will affect the finished size and yarn requirements.
Pattern Notes
- This pattern uses US crochet terminology.
- Ch 1 at the beginning of a row does not count as a stitch.
- The blanket body is worked first in one rectangular piece.
- Seven separate ruffle strips are crocheted and sewn across the front.
- The ruffle strips have a straight foundation edge and a scalloped lower edge.
- Each body row contains 111 stitches.
- The body is worked for 128 rows.
- Mark Rows 16, 32, 48, 64, 80, 96, and 112 for ruffle placement.
- Keep the first and final 16 rows free from horizontal ruffles.
- Difficulty level: confident beginner.
Special Stitch Pattern
Mesh Stitch
Work:
- 1 sc in the first stitch
- Ch 1
- Skip the next stitch
- 1 sc in the following stitch
Repeat the ch-1, skip-1, sc sequence across.
The next row is worked with each sc placed into the sc below and each ch-1 positioned over the previous ch-1 space.
Step-by-Step Instructions
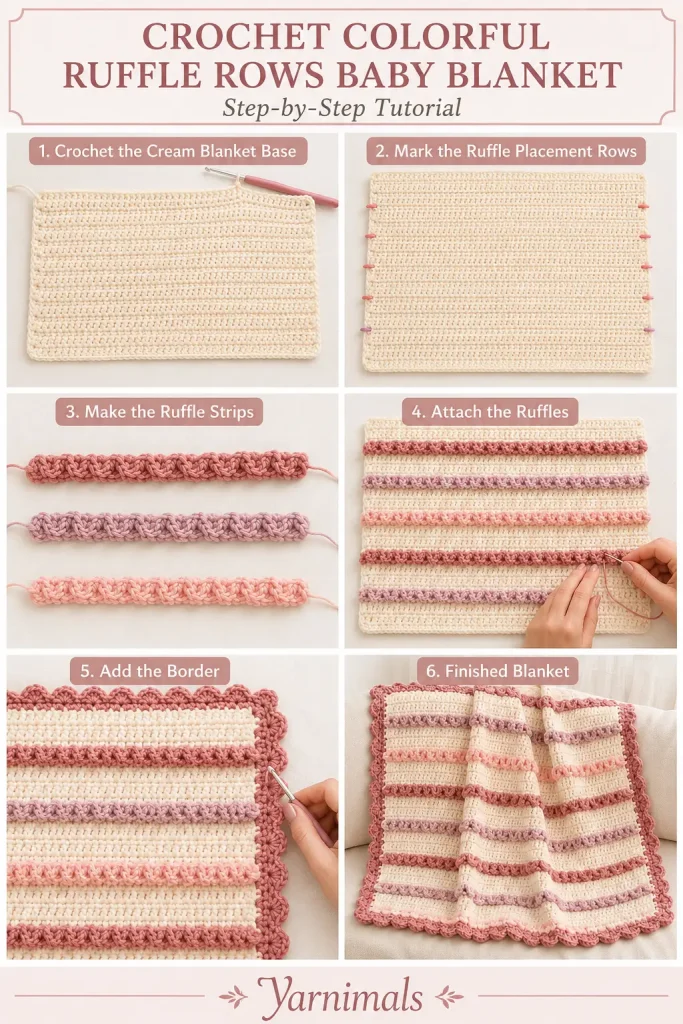
Crochet the Cream Blanket Body
Using cream yarn:
Foundation
Ch 112.
Row 1
Beginning in the second ch from the hook, work 1 sc in every ch across.
Ch 1 and turn.
111 sc
Row 2
Work 1 sc in the first st.
Repeat across:
- Ch 1
- Skip the next st
- Work 1 sc in the following st
Ch 1 and turn.
The row ends with 1 sc.
Row 3
Work 1 sc in the first sc.
Repeat across:
- Ch 1
- Skip the ch-1 sp
- Work 1 sc in the next sc
Ch 1 and turn.
Rows 4–128
Repeat Row 3.
Do not fasten off after Row 128.
The body should measure approximately 27 inches wide and 28–29 inches long before the border.
Mark the Ruffle Positions
Lay the cream rectangle flat with the right side facing upward.
Place removable markers across these rows:
- Row 16
- Row 32
- Row 48
- Row 64
- Row 80
- Row 96
- Row 112
Place one marker at each side edge of every selected row.
For additional guidance, thread a temporary length of contrasting yarn loosely through the stitches of each marked row. Remove these guide strands after attaching the ruffles.
Crochet the Ruffle Strips
Make seven strips.
Use this color sequence:
- Dusty rose
- Pale mauve
- Blush pink
- Dusty rose
- Pale mauve
- Blush pink
- Dusty rose
Ruffle Strip Foundation
Using the selected accent color:
Ch 112.
Ruffle Row 1
Beginning in the second ch from the hook, work 1 sc in every ch across.
Turn.
111 sc
Ruffle Row 2
Do not chain.
Work 1 sl st in the first st.
Repeat across:
- Work 4 dc in the next st
- Work 1 sl st in the following st
Fasten off after the final sl st, leaving a long sewing tail at both ends.
The strip should contain 55 small rounded ruffles.
Check the Ruffle Length
Place the straight foundation edge of the strip across the blanket.
The strip should match the blanket width without stretching.
When necessary:
- Add two foundation chains for a longer strip.
- Remove two foundation chains for a shorter strip.
- Keep an odd number of Row 1 stitches so the shell repeat ends correctly.
Make all seven strips the same length.
Attach the First Ruffle
Place the first dusty-rose strip across marked Row 16.
The straight single-crochet foundation edge should rest directly over the marked blanket row.
The scalloped edge should hang downward toward the foundation edge of the blanket.
Pin the following points first:
- Left edge
- Right edge
- Center
- Quarter points
Thread the long accent-color tail onto a yarn needle.
Sew the strip to the blanket using small whip stitches.
Pass the needle through:
- The straight foundation edge of the ruffle strip
- A small horizontal bar or stitch section in the marked blanket row
Do not sew through the scalloped dc shells.
Keep the blanket flat while sewing. The strip should not gather or pull the body inward.
Secure the yarn at both ends and weave the tails into the back.
Attach the Remaining Ruffles
Attach each strip to its corresponding marked row:
- Dusty rose at Row 16
- Pale mauve at Row 32
- Blush pink at Row 48
- Dusty rose at Row 64
- Pale mauve at Row 80
- Blush pink at Row 96
- Dusty rose at Row 112
Keep every strip facing in the same direction.
After attaching each band:
- Lay the blanket flat.
- Check that the strip remains horizontal.
- Confirm that the mesh body is not puckering.
- Adjust the sewing tension before attaching the next strip.
Crochet the Border
Continue with the cream yarn remaining from the final body row.
Border Round 1
Ch 1.
Work sc evenly around the entire blanket.
First Side
Work approximately 1 sc into each row end.
Because the body contains 128 rows, aim for approximately 128 sc along the side.
Adjust slightly if necessary so the edge lies flat.
First Corner
Work 3 sc in the corner.
Foundation Edge
Work 1 sc in each unused foundation loop across.
Second Corner
Work 3 sc in the corner.
Second Side
Work approximately 1 sc into each row end.
Third Corner
Work 3 sc in the corner.
Top Edge
Work 1 sc in each stitch or mesh position across.
Final Corner
Work 3 sc in the corner.
Join with a sl st to the first sc.
Fasten off the cream yarn.
Scalloped Ruffle Border
Choose dusty rose for a strong frame, or use pale mauve or blush pink.
Join the accent yarn in any corner stitch.
Before beginning, count the stitches around the perimeter.
The total should be even. If it is odd, add one extra sc discreetly near a corner.
Repeat around:
- Work 1 sl st in the next st
- Work 4 dc in the following st
Continue the repeat around all four sides.
At each corner, keep following the same repeat. Arrange one 4-dc shell near the center of each corner when possible.
Join with a sl st.
Fasten off and weave in the yarn tail.
The finished edge should resemble a continuous row of small rounded ruffles.
Finishing
Weave in every remaining yarn end.
Check the back of the blanket carefully and secure any loose sewing tails.
Gently arrange the horizontal ruffles so they all face downward.
Lightly mist the blanket or wash it according to the yarn label.
Lay it flat on blocking mats or clean towels.
Shape the blanket into an even rectangle.
Pin the outer corners and border without stretching the mesh.
Arrange each ruffle strip with your fingers.
Allow the blanket to dry completely.
Tips & Variations
Use a cotton-acrylic blend for a soft blanket with good stitch definition and easy care.
Cotton creates crisp ruffles, while acrylic produces a lighter and softer result.
For a warmer blanket, use worsted-weight yarn and a 5 mm hook. The finished dimensions will be larger.
Use one accent color for all seven bands to create a quieter, more traditional design.
For a rainbow version, make every ruffle strip in a different soft shade.
To reduce the amount of sewing, make five ruffle rows instead of seven and position them at Rows 20, 42, 64, 86, and 108.
For fuller ruffles, work 5 dc instead of 4 dc in every shell.
For a more delicate edge, work 3 dc in each shell.
Keep the ruffle strips relaxed during attachment. Stretching them while sewing can cause the blanket sides to pull inward.
FAQ
Can the ruffles be crocheted directly onto the blanket?
Yes, but separate strips make it easier to keep the rows straight, change colors cleanly, and correct the fullness before permanently attaching them.
How can I make the blanket wider?
Begin with a longer even-numbered foundation chain. Row 1 will then contain an odd number of stitches, which keeps the mesh pattern balanced.
Are the raised ruffles suitable for a baby blanket?
The ruffles are securely sewn along their full foundation edges. Check every attachment and yarn tail carefully before gifting the blanket, and follow appropriate safe-sleep guidance when using handmade blankets around infants.
Conclusion
This colorful crochet ruffle rows baby blanket combines a soft cream mesh background with delicate bands of dusty rose, pale mauve, and blush pink. The separate ruffle construction makes the pattern easy to customize while keeping each decorative row neat and even.
Make it in the gentle pastel palette shown here or choose colors that match your favorite nursery. The finished blanket is a lovely handmade gift with a cozy texture and a sweet cottage-inspired finish.



