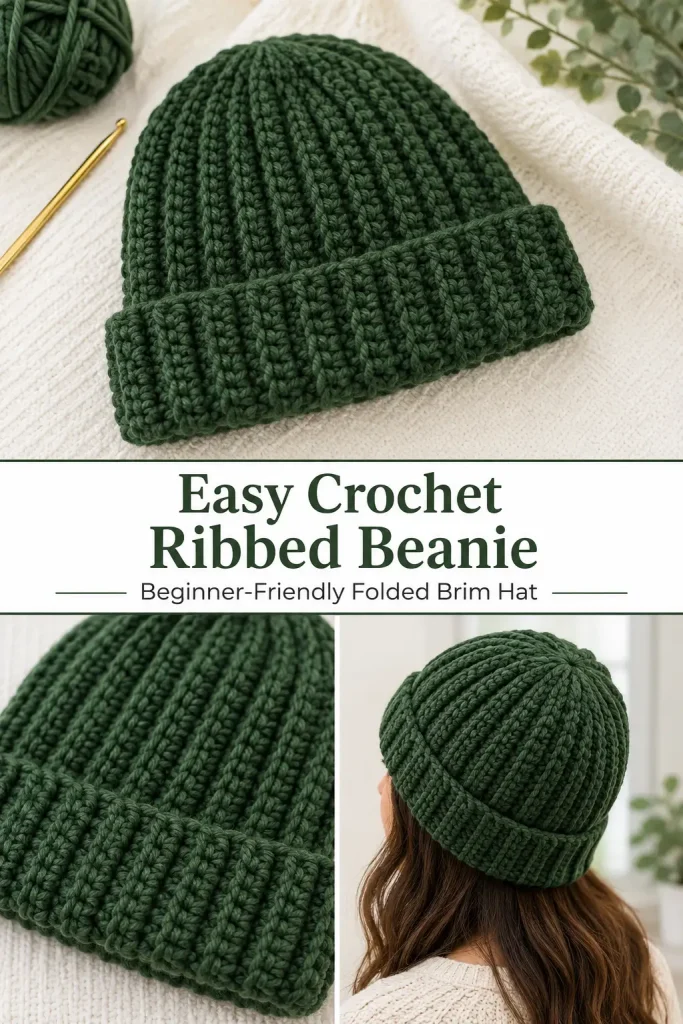
This easy crochet ribbed beanie has a classic folded brim, stretchy vertical ribbing, and a neatly gathered crown with very little extra fabric. The clever shaping comes from using shorter single crochet stitches at the crown edge and half double crochet through the rest of each row.
The beanie is made as one flat rectangle, joined into a tube, and gathered at the top. There are no complicated decreases, separate crown pieces, or rounds to count, making this a practical beginner crochet project that is easy to adjust for different sizes.
Description
The finished beanie has dense vertical ribs created by working every stitch through the back loop only. One end of each row uses five single crochet stitches, creating a slightly shorter crown edge that reduces bulky bunching when the top is gathered. The opposite end stays wider and becomes the folded brim. The sample is made in a deep grass green worsted-weight alpaca-blend yarn for a soft, warm, everyday winter hat.
Sample Finished Measurements
- Vertical length before folding: approximately 25–26 cm
- Width at the brim edge: approximately 34.5 cm when laid flat
- Width at the crown edge: approximately 25 cm when laid flat
- Sample row count: 54 rows
- Folded brim depth: adjustable
The beanie is stretchy, so the flat width will be smaller than the wearer’s actual head circumference.
Materials
- Approximately 90 g worsted-weight yarn
- 5.5 mm crochet hook
- Yarn needle
- Scissors
- Stitch marker, optional
- Safety pin or bobby pin as a marker alternative
The sample uses about 90 g of worsted-weight alpaca-blend yarn and a 5.5 mm hook. The amount of yarn may change depending on the desired size and brim width.
Abbreviations
- BLO – back loop only
- ch – chain
- hdc – half double crochet
- sc – single crochet
- sl st – slip stitch
- st – stitch
- sts – stitches
Pattern Notes
- This pattern uses US crochet terminology.
- The beanie is worked flat in rows.
- The starting chain determines the vertical height of the hat, not its circumference.
- Include the desired folded brim width when measuring the starting chain.
- The first 45 stitches in the sample are hdc.
- The final 5 stitches at the crown edge are sc.
- Work all stitches in BLO beginning with Row 2.
- Ch 1 at the beginning of each row does not count as a stitch.
- Keep exactly 50 stitches in every row.
- The crown edge must always contain 5 sc.
- The brim section must always contain 45 hdc in the sample size.
- Finish after an even-numbered row so the ends align correctly for joining.
- Adjust the beanie circumference by adding or removing an even number of rows.
- The sample uses 54 rows.
Sizing the Beanie
Measure from the crown of the head to the eyebrows or preferred lower edge of the hat.
Add the depth of the folded brim.
For example, the sample begins with a chain measuring approximately 26 cm. This includes the full height of the hat plus enough length to fold the lower section upward.
The row count determines the circumference. Continue adding rows until the rectangle stretches comfortably around the head.
The fabric should feel snug but not excessively tight. Ribbed crochet stretches with wear, so avoid making the rectangle loose enough to slip down over the eyes.
Step-by-Step Instructions
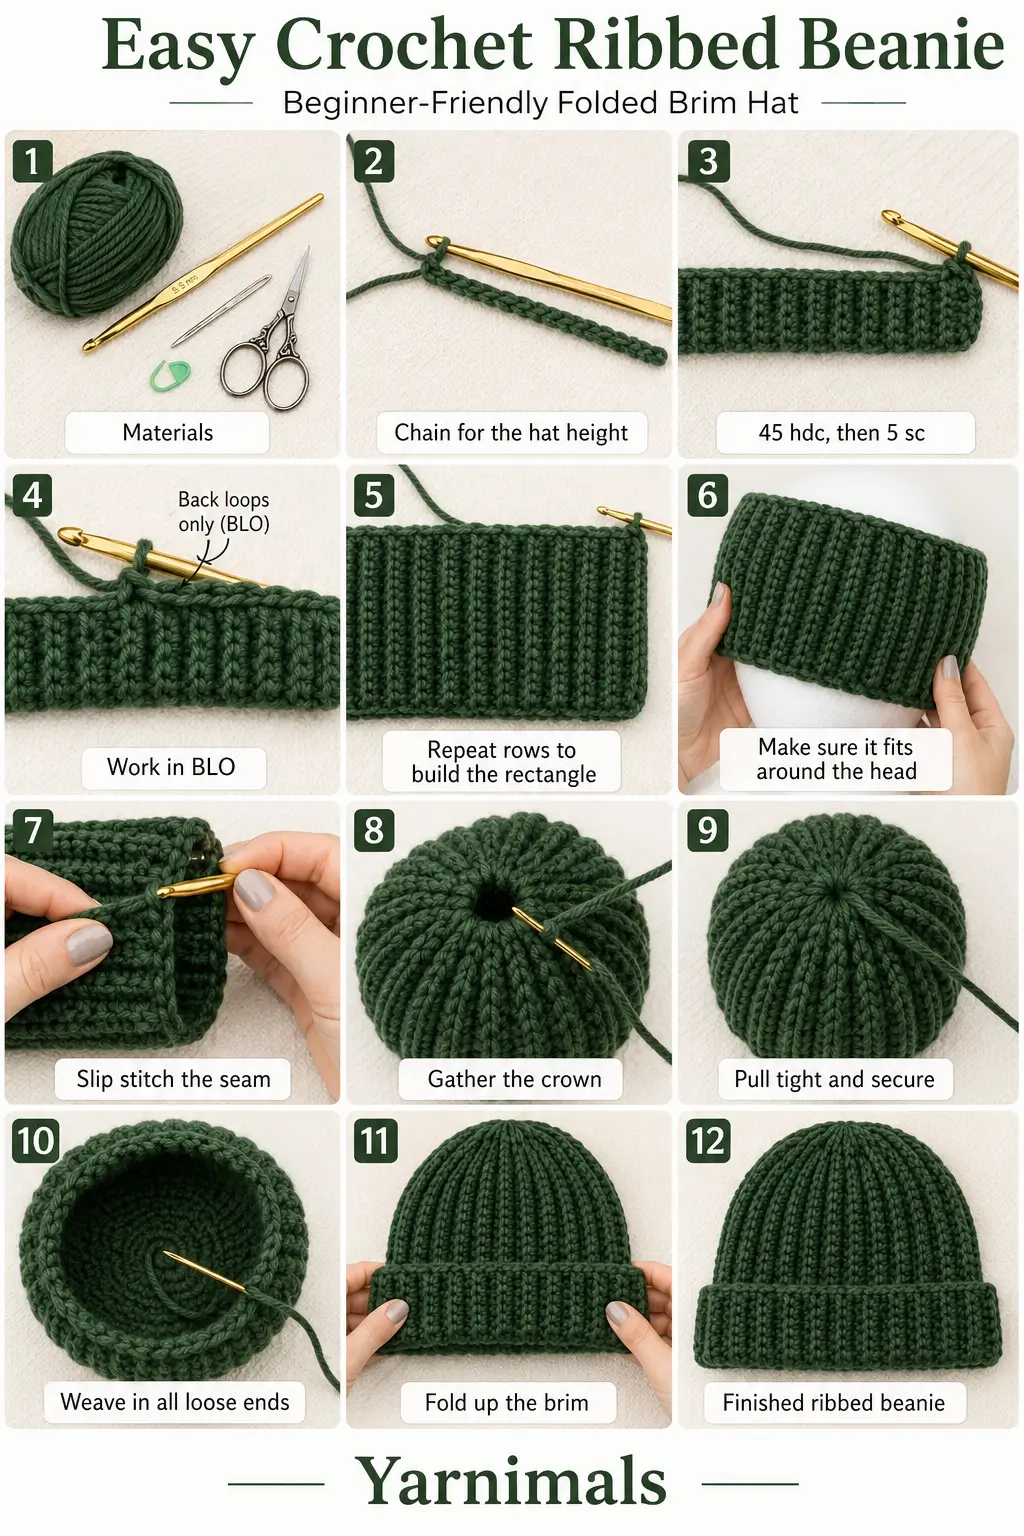
Foundation Chain
Make a slip knot, leaving a beginning tail long enough to weave in later.
Ch 50 for the required beanie height.
Ch 1 more for turning.
You should have 51 chains in total.
The sample chain measures approximately 26 cm.
Row 1
Hdc in the second ch from the hook.
Hdc in each of the next 44 chains.
You should now have 45 hdc.
Place a stitch marker in the final hdc if desired. This marks the point where the crown stitches begin.
Sc in each of the final 5 chains.
You should have:
- 45 hdc
- 5 sc
- 50 sts total
The five single crochet stitches form the crown edge.
Row 2
Ch 1 and turn.
Working in BLO, sc in each of the first 5 sts.
Remove the marker if you are using one.
Working in BLO, hdc in each of the remaining 45 sts.
Place the marker in the first hdc near the transition point if this helps you identify the crown section on the next row.
Be careful not to miss the final stitch at the brim edge.
You should have 50 sts.
Row 3
Ch 1 and turn.
Working in BLO, hdc in each of the first 45 sts.
Work the final hdc in the marked stitch.
Move the marker into the hdc just completed if desired.
Working in BLO, sc in each of the final 5 sts.
You should have 50 sts.
Remaining Rows
Repeat Rows 2 and 3 until the rectangle wraps comfortably around the head.
The sample uses 54 rows.
Always maintain:
- 45 hdc at the brim end
- 5 sc at the crown end
- 50 total stitches
Finish after completing an even-numbered row.
Check the Fit
Fold the wider hdc edge upward to represent the finished brim.
Wrap the rectangle around the head.
Stretch it gently as you test the fit.
The two short ends should meet comfortably without needing to be pulled excessively. The fabric should not be so loose that the finished beanie falls off.
Add more rows when the rectangle feels too tight.
Remove rows when it feels too loose.
Always adjust by an even number of rows so the joining edges align correctly.
Join the Short Ends
After completing the final even-numbered row, ch 1 and turn.
Bring the first and final rows together with the right sides aligned.
Make sure:
- The five-sc crown sections match.
- The hdc brim sections match.
- The ribbing is not twisted.
Slip-Stitch Seam
Insert the hook into the front loop only of the first stitch on the final row.
On the foundation edge, locate the top of the corresponding first stitch.
Insert the hook through that foundation-edge space.
Yarn over and pull through both layers and through the loop on the hook to make a sl st.
Continue across:
- Insert the hook through the front loop of the next stitch on the final row.
- Insert the hook through the top of the corresponding stitch on the foundation edge.
- Yarn over.
- Pull through both layers and the loop on the hook.
Work one sl st for every matched stitch.
Do not skip stitches, or the edges may not align at the opposite end.
Using the front loops helps the seam blend with the surrounding ribbing.
Alternative Sewn Seam
The two short edges may also be sewn together with a yarn needle.
Match every stitch carefully and keep the seam flexible so it stretches with the hat.
Fasten Off for Crown Gathering
After completing the seam, ch 1.
Cut the yarn, leaving a tail approximately 25 cm long.
Pull the yarn tail through the final loop and tighten.
Do not weave in this tail yet. It will be used to close the top.
Gather the Crown
The narrow edge containing the five-sc sections forms the crown.
Thread the long finishing tail through a yarn needle.
Working around the crown opening, insert the needle through one loop at the peak of each raised rib.
Continue passing the yarn through every rib peak around the opening.
You may pick up several rib loops at a time, but do not skip any ridges.
When you have worked halfway around, pull the yarn gently to begin gathering the opening.
Continue sewing through the remaining rib peaks until you return to the seam.
Pull the yarn firmly until the crown closes.
Secure the Crown
Tie the long gathering tail to the beginning yarn tail with a tight double knot.
When a small hole remains, reinforce it with additional stitches.
Pass the yarn needle down through one side of the crown opening.
Bring the needle back out through the opposite side.
Pull the yarn snugly.
Repeat across the opening in several directions until the hole is fully closed.
Tie another secure double knot using the two available tails.
This reinforcement helps prevent the crown from reopening during wear.
Weave In the Ends
Push both crown tails through the center opening to the inside of the beanie.
Turn the beanie inside out.
Thread one tail through the yarn needle.
Weave it beneath several nearby stitch loops.
Change direction and weave through another row of stitches.
Avoid pulling the tail so tightly that the crown puckers.
Trim the remaining yarn.
Repeat with the second tail.
Weave in any remaining seam or foundation tails on the inside of the beanie.
Turn the hat right side out.
Form the Brim
Fold the wider half double crochet edge upward.
Adjust the brim until it reaches the preferred depth.
The folded section should lie smoothly around the hat without twisting.
The beanie is now ready to wear.
Tips and Variations
Use a soft worsted-weight yarn with good elasticity. Wool, alpaca blends, acrylic, and soft wool blends all work well.
A smooth yarn will make the vertical ribbing more visible. Very fuzzy yarn may soften the appearance of the ribs.
Measure the starting chain against the intended wearer. Add more chains for a taller hat or a deeper folded brim.
Keep the five single crochet stitches at the crown consistent in every row. Changing this number can make the crown edge uneven.
Mark the transition stitch between the hdc and sc sections if you find the stitch changes difficult to count.
Place another marker in the final brim stitch if you frequently miss the last stitch of a row.
Missing stitches gradually shortens the rows and creates an uneven rectangle.
Add or remove rows in pairs when changing the circumference.
For a child-sized beanie, begin with a shorter chain and work fewer rows until the rectangle fits comfortably around the head.
For a slouchier hat, add more stitches to the hdc section of the foundation chain while keeping the five crown stitches as sc.
For a fitted beanie without a folded brim, make the starting chain only long enough to reach from the crown to the desired lower edge.
A pom-pom may be added after closing the crown, although the simple version has no extra decoration.
Frequently Asked Questions
Why are five stitches worked in single crochet?
Single crochet is shorter than half double crochet. Using five sc at the crown edge makes that side of the rectangle narrower, reducing the amount of fabric that must be gathered at the top.
How do I make the beanie larger?
Increase the number of rows until the rectangle wraps around the head comfortably. For extra height or a wider brim, increase the starting-chain length.
Why must I finish on an even-numbered row?
Ending on an even row places the crown and brim sections in the correct orientation so the two short ends align neatly when joined.
Can I sew the side seam instead of slip stitching?
Yes. Sew the edges together with matching yarn, taking care to match all 50 stitches and keep the seam flexible.
Conclusion
This easy crochet ribbed beanie creates a warm, stretchy hat from one simple rectangle. The combination of back-loop ribbing and a shorter single crochet crown edge gives the beanie its classic texture while reducing bulky gathering at the top. Make it in deep green for a timeless winter accessory, or choose a favorite yarn color and adjust the height, brim, and circumference for a custom fit.



