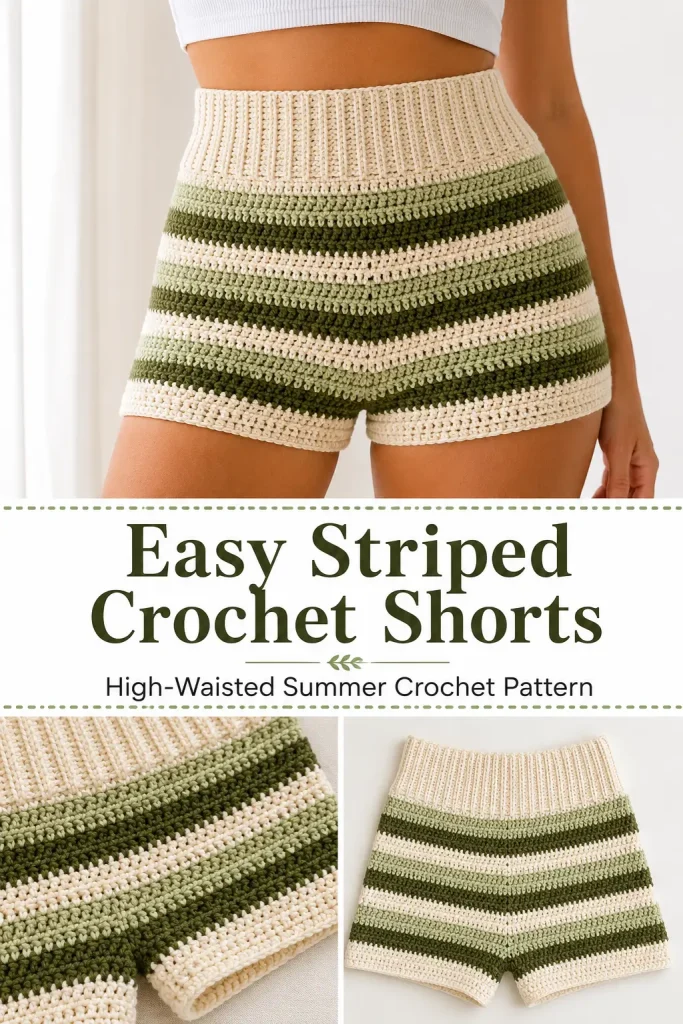
These high-waisted crochet shorts have a comfortable ribbed waistband, softly fitted hips, and simple horizontal stripes in pearl, light sage, and deep moss green. The body is worked from the top down, making it easy to try the shorts on and adjust the shaping as you crochet.
This made-to-measure crochet shorts pattern is ideal for confident beginners who know single crochet and half double crochet. The construction avoids complicated garment seaming: first make the waistband, crochet the body in joined rounds, add a small crotch bridge, and finish each leg separately.
Description
The finished crochet shorts have a wide cream ribbed waistband, a close but comfortable fit through the hips, and short fitted legs. Alternating one-round stripes create the clean horizontal pattern seen in the reference design. The waistband is worked as a narrow strip and joined into a ring, while the shorts body is crocheted directly from its lower edge. Strategic increases at the sides and back provide room for the hips and seat without changing the simple half double crochet texture.
This is a made-to-measure pattern, so the final stitch count depends on your waist, hips, yarn, hook, and preferred fit.
Materials
- Medium-weight yarn in three colors:
- Color A: pearl or warm cream
- Color B: pale matcha or light sage green
- Color C: deep moss or olive green
- Crochet hook suitable for your yarn
- Yarn needle
- Scissors
- Measuring tape
- Six locking stitch markers or safety pins
The original tutorial uses three shades of Yarn Bee Pearlspun Low Fiber yarn but does not specify an exact hook size or yarn quantity. Choose a hook that creates a fabric that is firm enough to hold its shape but flexible enough to wear comfortably.
Abbreviations
- BLO – back loop only
- ch – chain
- hdc – half double crochet
- inc – work 2 hdc in the same stitch
- sc – single crochet
- sl st – slip stitch
- st – stitch
- sts – stitches
Pattern Notes
- This pattern uses US crochet terminology.
- The shorts are made from the top down.
- The waistband is worked in rows, then joined into a ring.
- The body and legs are worked in joined rounds.
- Ch 1 at the beginning of a round does not count as a stitch.
- Join every round with a sl st in the first stitch.
- Fasten off after each stripe round and join the next color at the center back.
- The waistband should fit the waist snugly but still stretch over the hips.
- Try the shorts on regularly. The exact number of body and leg rounds may need to change.
- An increase means working 2 hdc in one marked stitch.
- Place the waistband seam at the center back.
- Keep the color-change seam at the center back throughout the project.
The sample construction uses a ch-7 waistband strip with six stitches per row, two rounds with side increases, two even rounds, twelve rounds with four increases, eleven additional even body rounds, a ch-9 crotch bridge, and three rounds on each leg.
Before You Begin
Take these measurements:
- Natural or high waist circumference
- Full hip circumference
- Waist-to-crotch length
- Desired finished shorts length
- Upper thigh circumference
The waistband should fit comfortably around your chosen waist position when lightly stretched.
Because it must pass over the hips when the shorts are pulled on, test the waistband before beginning the body. If the yarn has limited stretch, make the band slightly longer or plan to add a hidden elastic later.
Step-by-Step Instructions
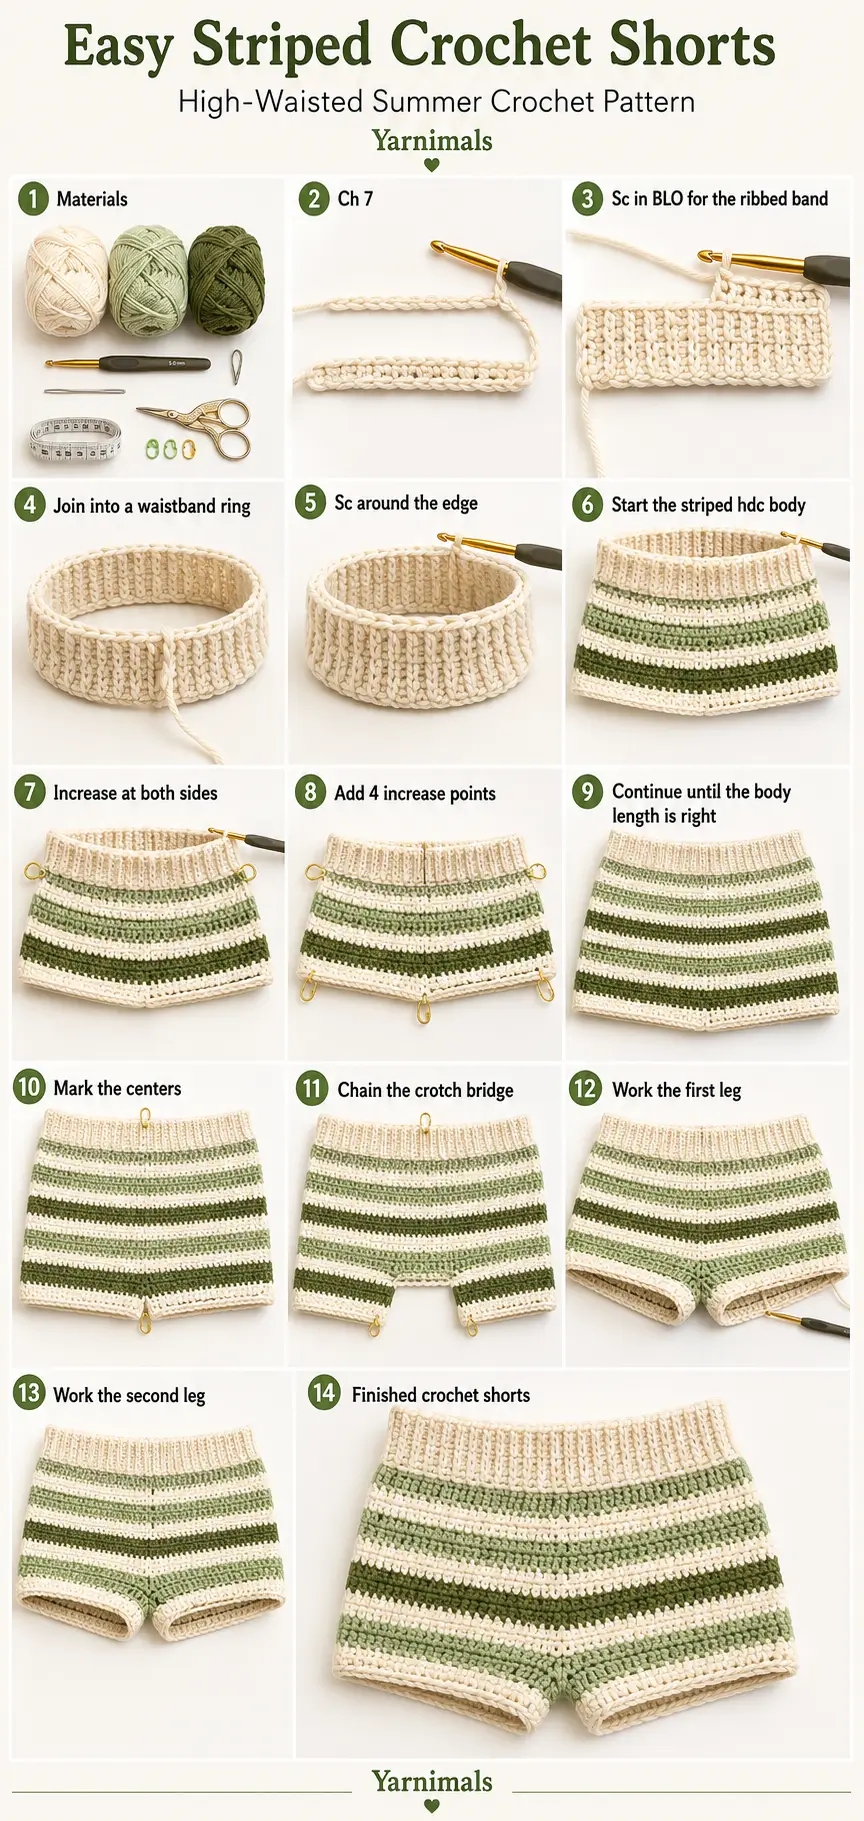
Part One: Crochet the Ribbed Waistband
Using Color A, make a slip knot.
Foundation
Ch 7.
Row 1
Skip the first ch.
Sc in each of the remaining 6 chains.
You should have 6 sc.
Ch 1 and turn.
Row 2
Working in the BLO, sc in each of the 6 sts.
Ch 1 and turn.
Remaining Waistband Rows
Repeat Row 2 until the strip wraps comfortably around your waist.
Check the fit every few rows.
The strip should:
- Sit snugly at the chosen waist position
- Stretch without feeling restrictive
- Meet at the ends without being pulled excessively
- Remain wide enough to create the visible cream waistband
Do not fasten off.
Join the Waistband
Bring the short ends together without twisting the strip.
Match the six stitches at the first end with the six stitches at the final end.
Insert the hook through the corresponding loops of both ends.
Work a sl st through both layers in each of the 6 matched stitches.
You now have a continuous waistband ring.
Position this seam at the center back.
Finish the Top of the Waistband
Continue with Color A.
Ch 1.
Work sc evenly around one long edge of the waistband.
Place the stitches evenly so the edge lies flat without rippling or pulling inward.
Join with a sl st in the first sc.
Second Top-Edge Round
Ch 1.
Sc in every st around.
Join with a sl st.
Fasten off Color A.
The two single crochet rounds form the upper edge of the waistband.
Part Two: Begin the Shorts Body
Turn the waistband so the unfinished long edge is facing downward.
Keep the waistband seam at the center back.
Lower Waistband Round
Join Color B at the center-back seam.
Ch 1.
Work sc evenly around the unfinished lower edge of the waistband.
Join with a sl st.
Fasten off Color B.
Try the waistband on again.
It must now pass comfortably over the fullest part of the hips. Add evenly spaced stitches to this round when more room is needed.
First Half Double Crochet Round
Join Color C at the center back.
Ch 1.
Hdc in every st around.
Join with a sl st in the first hdc.
Fasten off Color C.
Use ch 1 rather than ch 2 at the beginning of the hdc rounds. This creates a neater join without adding unnecessary height.
Part Three: Mark the Side Increase Points
Lay the waistband flat with the center-back seam aligned.
Place one marker at the left side.
Place one marker directly opposite it at the right side.
These two markers divide the shorts into front and back sections.
Move each marker upward into the increase stitch as new rounds are completed.
Part Four: Shape the Upper Hips
Continue changing colors after every round. A simple stripe sequence is:
Color A, Color B, Color C, then repeat.
Increase Round 1
Join the next color at the center back.
Ch 1.
Hdc around until you reach the first side marker.
Work 2 hdc in the marked st.
Move the marker into the second stitch of the increase.
Hdc around to the second side marker.
Work 2 hdc in the marked st.
Move the marker into the second stitch of the increase.
Hdc in the remaining sts.
Join and fasten off.
Two stitches have been added.
Increase Round 2
Repeat Increase Round 1.
Increase once at each side marker.
Fasten off.
Even Rounds 1–2
Work 2 rounds without increases.
For each round:
Ch 1, hdc in every st around, join, and fasten off.
Try the shorts on after these rounds.
The fabric should begin widening below the waist without becoming loose at the front.
Part Five: Add Extra Back and Hip Shaping
The next section adds room at both sides and across the back.
Keep the two side markers in place.
Lay the shorts flat with the center-back seam visible.
Place two additional markers across the back section:
- One approximately halfway between the center-back seam and the left side marker
- One approximately halfway between the center-back seam and the right side marker
You should now have four increase markers:
- Left side
- Left back
- Right back
- Right side
Do not place extra increase markers across the front. The additional shaping is intended to create room for the seat.
Four-Point Increase Round
Join the next stripe color at the center back.
Ch 1.
Hdc around, working 2 hdc in each marked stitch.
Move every marker into the second stitch of its increase.
Work 1 hdc in every unmarked stitch.
Join and fasten off.
Four stitches have been added.
Repeat the Four-Point Increase Round
Repeat this increase round until the body comfortably reaches the fullest part of the hips and seat.
The sample uses 12 four-point increase rounds.
Try the shorts on every two or three rounds.
Stop increasing when:
- The fabric reaches the widest part of the hips
- The front lies smoothly without sagging
- The back has enough room without stretching the stitches open
- The side seams hang vertically
- The shorts can be pulled on comfortably
Larger hips or a fuller seat may require more increase rounds.
Fewer rounds may be sufficient for a smaller or straighter fit.
Part Six: Work the Body Even
Remove the four increase markers or leave them only as reference points.
Continue working joined hdc rounds without increases.
For every round:
- Join the next stripe color at the center back.
- Ch 1.
- Hdc in every st around.
- Join with a sl st.
- Fasten off.
The sample uses 11 even rounds after completing the increase section.
Continue until the body reaches the desired crotch depth.
When tried on, the lower edge should reach slightly below the point where the legs separate. Do not make this section too short or the finished shorts may pull upward while being worn.
Part Seven: Secure the Stripe Ends
Before dividing the legs, weave in the color-change ends.
For each stripe:
- Pull the outside yarn tail to the inside.
- Tie it securely to the matching beginning or ending tail.
- Thread the tails through nearby stitches of the same color.
- Trim only after the ends are firmly secured.
Keeping the ends inside the shorts creates a cleaner exterior.
Part Eight: Mark the Front and Back Centers
Lay the shorts flat with the waistband seam centered at the back.
Mark the center-back stitch along the lower body edge.
Locate the stitch directly opposite it at the center front.
Place a marker in the center-front stitch.
These two marked points will be connected with a short chain to create the crotch bridge and divide the garment into two leg openings.
Check that each side contains approximately the same number of body stitches.
Part Nine: Crochet the Crotch Bridge
Join yarn to the marked center-back stitch.
Ch 9 for the sample size.
The chain length is adjustable. Use enough chains to create a comfortable crotch width without leaving a large gap.
Bring the chain between the legs toward the center-front marker.
Join it to the marked center-front stitch with a sc or sl st.
Ch 1 to secure.
The body is now divided into two leg openings.
Before continuing, try the shorts on carefully.
The crotch bridge should:
- Sit comfortably without pulling
- Keep the two leg openings approximately equal
- Provide enough width for movement
- Lie flat rather than twisting
Add chains if the bridge feels too narrow. Remove chains if it hangs loosely.
Part Ten: Crochet the First Leg
Choose one leg opening.
Join the next stripe color at the crotch bridge.
Ch 1.
Hdc in every body stitch around the first leg opening.
When you reach the bridge, hdc into each chain along the side facing this leg.
Join with a sl st in the first hdc.
Fasten off.
Additional Leg Rounds
Continue working one hdc in every stitch around.
Change color after every round to maintain the stripe pattern.
The sample uses 3 rounds for each leg.
Add more rounds for longer shorts.
For a slightly wider leg opening, work the rounds evenly.
For a closer fit, try the shorts on before adding any decreases. The visible design has straight fitted legs without a shaped cuff.
Part Eleven: Crochet the Second Leg
Join the next stripe color at the crotch area of the second leg opening.
Ch 1.
Hdc in every body stitch around the second leg.
Work into the unused loops on the opposite side of each crotch-chain stitch.
Join with a sl st.
Fasten off.
Work the same number of rounds used for the first leg.
Count the stitches and compare the two legs so they remain even.
Finishing
Weave in all remaining yarn ends securely on the inside.
Check the crotch bridge and reinforce its front and back connections if needed.
Gently shape the waistband and leg openings.
Lightly steam or wet block the shorts according to the yarn-care instructions.
Do not stretch the waistband excessively while blocking.
Try the finished shorts on and check that:
- The waistband sits flat
- The body fits smoothly over the hips
- The back has enough depth
- The crotch bridge is comfortable
- Both legs are equal in length
- The stripes align neatly at the center-back seam
Tips and Variations
Use a smooth medium-weight yarn with enough softness for clothing. Very stiff yarn may make the shorts bulky, while loose or slippery yarn may stretch during wear.
Make a small half double crochet swatch before beginning. Wash and dry it as you plan to care for the shorts. This helps you see whether the yarn grows after washing.
For a more secure waistband, thread a length of soft elastic through the inside of the cream band and sew the ends together.
To make the shorts higher waisted, increase the waistband width by beginning with more than seven chains.
For a wider waistband using the same construction, remember that the foundation chain determines its height. The number of rows determines its circumference.
Add more even body rounds before creating the crotch bridge for a longer rise.
Add additional leg rounds for mid-thigh shorts.
Use three colors for the striped version or work the entire project in one color for a simple crochet summer short.
When alternating colors, join every round at the center back so the color changes stay in one vertical line.
Avoid pulling the yarn tightly when joining a new color. Tight joins can create a gathered center-back seam.
Frequently Asked Questions
How do I choose the correct waistband length?
Crochet the ribbed strip until it fits snugly around your waist when lightly stretched. Join it temporarily or hold the ends together and confirm that it can still pass over the fullest part of your hips.
How many increase rounds do I need?
The number depends on the difference between your waist and hip measurements. Continue increasing until the body reaches the widest part of your hips without stretching the stitches. The sample uses two side-increase rounds followed later by twelve four-point increase rounds.
Why are two extra increase points placed at the back?
The additional back increases create more room for the seat while keeping the front smoother. This helps the shorts fit the body more naturally.
How many chains should I use for the crotch bridge?
The sample uses nine chains, but the correct number depends on your size and preferred fit. Use enough chains to connect the front and back centers comfortably without pulling or leaving a loose gap.
Can I make the legs longer?
Yes. Continue adding identical half double crochet rounds to both legs. Try the shorts on regularly and stop when they reach the preferred length.
Conclusion
These striped crochet shorts are an approachable made-to-measure garment that can be adjusted as you work. The ribbed waistband provides a comfortable foundation, the carefully placed increases shape the hips and back, and the simple half double crochet stripes make the body easy to customize. Save this free crochet pattern and try it in soft sage, moss, and pearl or choose a favorite color combination for your own handmade summer shorts.



