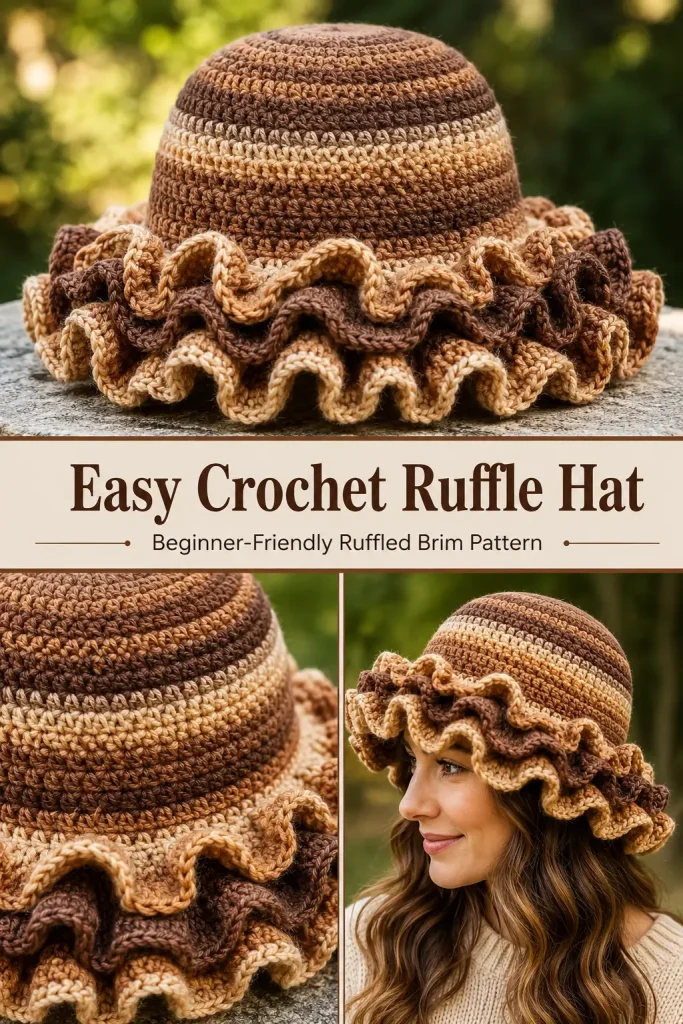
This crochet ruffle hat combines a simple top-down bucket-hat shape with an oversized, playful brim. The crown and body use basic double crochet stitches, while two rounds of treble crochet create the dramatic layered ruffles.
The pattern is easy to customize with solid yarn, self-striping yarn, or planned color changes. Adjust the crown for a different head size, change the body length, or add more or fewer stitches to control how full the ruffled brim becomes.
Description
The finished crochet ruffle hat has a smooth rounded crown, a softly fitted body, and a wide two-layer ruffled brim. The sample is made with medium-weight self-striping yarn in warm brown, caramel, cream, and dark coffee shades. A special joined-round seam helps prevent the noticeable holes that can appear beside ordinary turning chains.
The sample construction includes seven increasing crown rounds, seven even body rounds, one decrease round, and two ruffle rounds. It uses medium weight 4 yarn with a 4.5 mm crochet hook.
Materials
- Medium weight 4 yarn
- 4.5 mm crochet hook
- Scissors
- Yarn needle or smaller crochet hook for weaving in ends
- Stitch marker, optional
The sample uses a self-striping acrylic yarn, but a smooth cotton, cotton-blend, or acrylic yarn can also be used.
Abbreviations
- ch – chain
- dc – double crochet
- dc2tog – double crochet two stitches together
- MR – magic ring
- rnd – round
- sl st – slip stitch
- st – stitch
- sts – stitches
- tr – treble crochet
Pattern Notes
- This pattern uses US crochet terminology.
- The hat is worked from the crown downward in joined rounds.
- Ch 2 does not count as a regular double crochet stitch.
- Ch 3 does not count as a regular treble crochet stitch.
- The seam stitch is not included in the listed main stitch counts.
- Keep the second chain of each beginning ch 2 slightly loose. This makes the final slip-stitch join easier.
- Use a stitch marker to mark the joining space when learning the seam method.
- The sample has 70 main stitches after Crown Round 7.
- The decrease round finishes with 48 stitches, including the seam stitch.
- Four treble crochet stitches in each stitch create a very full first ruffle round.
- Two treble crochet stitches in each stitch create the second ruffle layer.
- Try the hat on after the crown and body sections so you can adjust the size before making the brim.
Special Seam Method
The special seam closes the small gap beside the turning chain without adding an extra stitch to the round.
Beginning Seam Stitch for Double Crochet Rounds
Ch 2, making the second chain slightly loose.
Yarn over and insert the hook into the joining space where the previous round’s slip stitch was made.
Yarn over and pull up a loop.
Yarn over and pull through 2 loops. Stop with the unfinished dc on the hook.
Yarn over and insert the hook into the seam stitch from the previous round.
Yarn over and pull up a loop.
Yarn over and pull through 2 loops.
Yarn over and pull through the remaining 3 loops.
The two partial double crochets have been joined into one seam stitch.
Ending Seam Stitch for Double Crochet Rounds
After completing the main stitches, begin a dc in the seam stitch from the previous round:
Yarn over, insert the hook, pull up a loop, then yarn over and pull through 2 loops.
Do not finish the stitch.
Yarn over and insert the hook into the joining space between the seam stitch and the beginning chain.
Pull up a loop.
Yarn over and pull through 2 loops.
Yarn over and pull through the remaining 3 loops.
Join with a sl st in the second chain of the beginning ch 2.
Step-by-Step Instructions
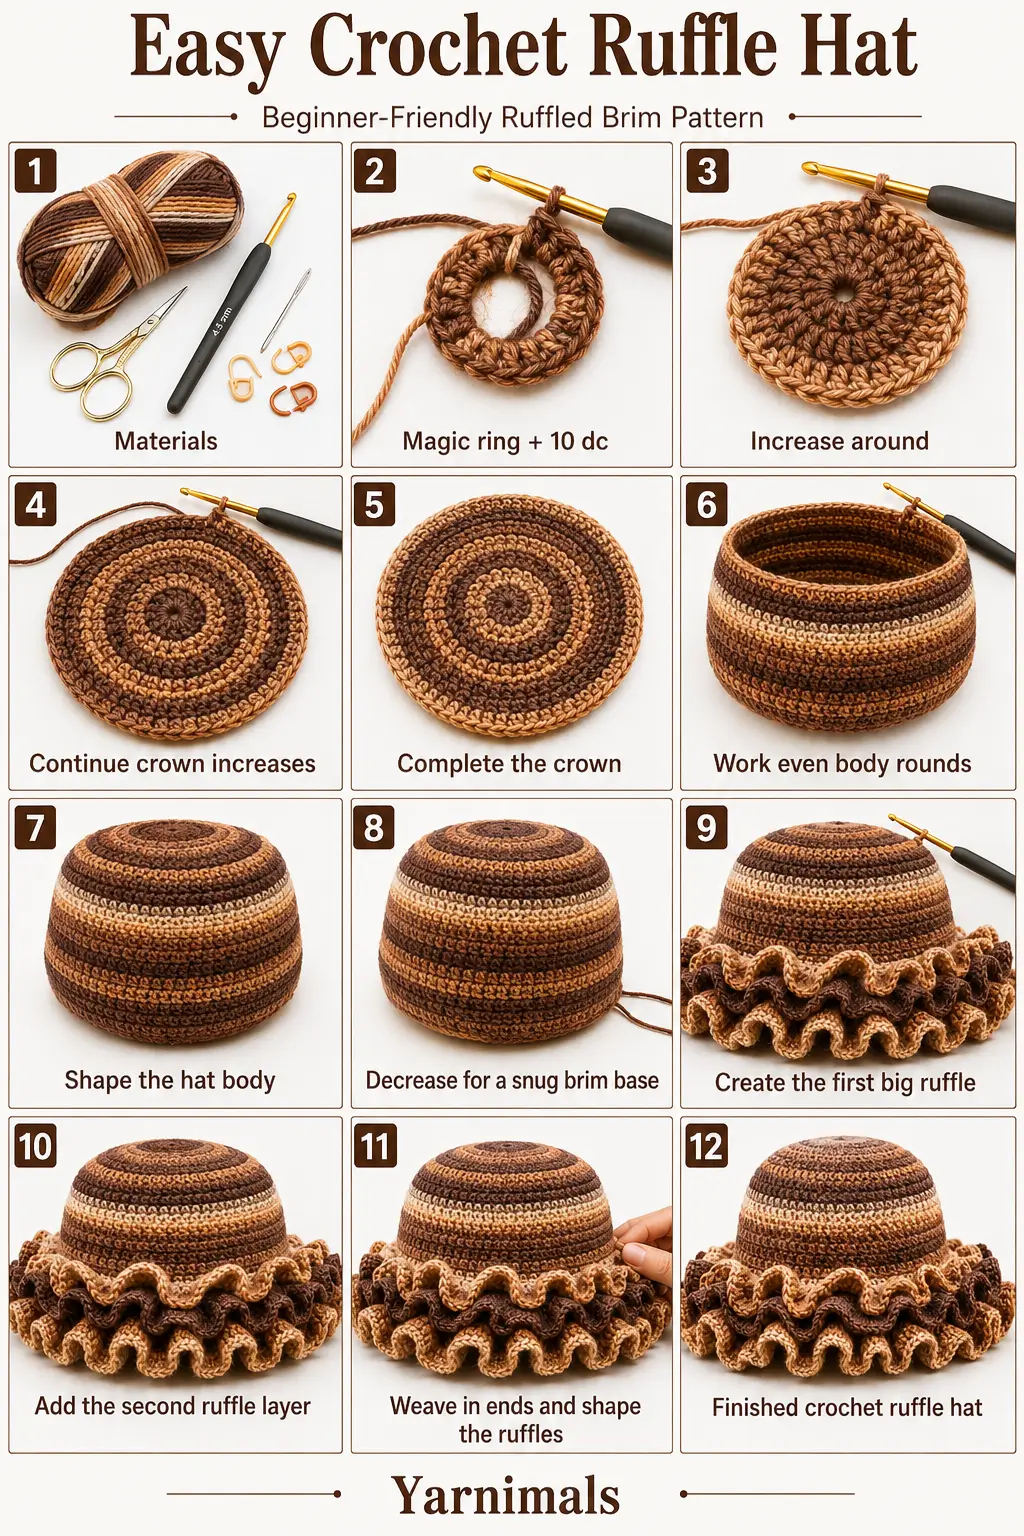
Crown Round 1
Make an MR.
Ch 2.
Work 10 dc into the ring.
Pull the yarn tail to close the ring.
Join with a sl st in the second chain of the beginning ch 2.
You should have 10 dc.
Crown Round 2
Ch 2.
Work 1 dc in the same joining space where the previous sl st was made.
Work 2 dc in every main stitch around.
Before joining, work 1 dc in the joining space at the end of the round.
Join with a sl st in the second chain.
You should have 20 main dc, not including the seam.
Crown Round 3
Use the special beginning seam stitch.
Repeat around:
- 1 dc in the next st
- 2 dc in the next st
Use the special ending seam stitch.
Join with a sl st in the second chain.
You should have 30 main dc.
Crown Round 4
Use the special beginning seam stitch.
Repeat around:
- 1 dc in each of the next 2 sts
- 2 dc in the next st
Use the special ending seam stitch.
Join.
You should have 40 main dc.
Crown Round 5
Use the special beginning seam stitch.
Repeat around:
- 1 dc in each of the next 3 sts
- 2 dc in the next st
Use the special ending seam stitch.
Join.
You should have 50 main dc.
Crown Round 6
Use the special beginning seam stitch.
Repeat around:
- 1 dc in each of the next 4 sts
- 2 dc in the next st
Use the special ending seam stitch.
Join.
You should have 60 main dc.
Crown Round 7
Use the special beginning seam stitch.
Repeat around:
- 1 dc in each of the next 5 sts
- 2 dc in the next st
Use the special ending seam stitch.
Join.
You should have 70 main dc.
Flatten the crown gently. It should form an even circle without strong rippling or cupping.
Adjusting the Crown Size
The number of crown rounds determines the hat circumference.
For a smaller hat, stop after an earlier increase round.
For a larger hat, continue with another increase round:
- Work 1 dc in each of the next 6 sts.
- Work 2 dc in the next st.
- Repeat around.
This would create 80 main stitches.
For an in-between size, skip some increases evenly. For example, when moving from 70 toward 80 stitches, work some seven-stitch sections without increasing and increase in the following sections.
The crown should be close to the required diameter before beginning the body.
Crochet the Hat Body
The body is worked without increases.
Body Round 1
Use the special beginning seam stitch.
Work 1 dc in each main st around.
Use the special ending seam stitch.
Join with a sl st in the second chain.
Keep 70 main stitches.
Body Rounds 2–7
Repeat Body Round 1.
After completing seven body rounds, the hat should begin to form a deep bowl shape.
Try it on before continuing. The ruffled brim will add more length, so stop earlier when you prefer a shallower hat.
Decrease Round
The decrease round pulls the lower body inward before the ruffles are added. This helps prevent the finished opening from becoming too loose.
Use the special beginning seam stitch.
Repeat around:
- Dc2tog over the next 2 sts
- 1 dc in the next st
Continue the sequence around.
When four main stitches remain, work dc2tog twice.
Complete the special ending seam stitch and join.
You should have approximately 48 stitches around, including the seam stitch.
The hat should narrow slightly at the lower edge.
First Ruffle Round
The brim is worked with treble crochet.
Treble Seam Stitch
Ch 3.
Yarn over twice and insert the hook into the joining space.
Pull up a loop.
Yarn over and pull through 2 loops twice, leaving the first partial tr unfinished.
Yarn over twice and insert the hook into the previous seam stitch.
Pull up a loop.
Yarn over and pull through 2 loops twice.
Yarn over and pull through the remaining loops to join the two partial treble stitches into one seam stitch.
Ruffle Round 1
After completing the seam stitch, work 3 more tr in the same first stitch so that this stitch contains 4 tr in total.
Work 4 tr in every remaining stitch around.
At the final stitch, work the last treble as part of the ending seam method.
Join with a sl st in the third chain of the beginning ch 3.
This round creates the dramatic first layer of ruffles.
Second Ruffle Round
Ch 3.
Work the treble seam stitch as described above.
Work 1 additional tr in the first stitch so that it contains 2 tr in total.
Work 2 tr in every remaining stitch around.
Complete the ending seam stitch.
Join with a sl st in the third chain of the beginning ch 3.
Ch 1.
Cut the yarn and pull the tail through the final loop.
Finishing
Thread the yarn tail through a yarn needle.
Pass it beneath several stitches near the joining seam.
Change direction and weave through another group of stitches.
Turn to the inside of the brim and weave the tail beneath the lower parts of several treble stitches.
Pull the fabric gently before trimming so the woven tail does not restrict the ruffle.
Trim the remaining yarn.
Arrange the ruffles evenly around the entire brim.
Tips and Variations
Use self-striping yarn to create changing color bands without fastening off between rounds. Solid yarn gives the hat a cleaner, more graphic appearance.
Four treble crochet stitches in each stitch create very dramatic ruffles. For a softer brim, work 3 tr in each stitch during the first ruffle round.
For extremely full ruffles, increase to 5 tr in each stitch. Keep in mind that this will require considerably more yarn.
Use double crochet instead of treble crochet for shorter, firmer ruffles.
Add another ruffle round for a wider brim, but remember that every increase round adds weight.
Check the crown diameter before beginning the body. Once the body rounds are worked, the hat circumference becomes more difficult to change.
If the crown ripples strongly, the increases may be too frequent for your yarn and tension. Use a smaller hook or skip some increases.
If the crown cups too early, loosen your tension, use a larger hook, or add more increases.
Cotton yarn creates defined ruffles, while acrylic yarn produces a lighter and softer brim.
For planned color blocking, use one color for the crown, another for the body, and a contrasting color for the ruffles.
Frequently Asked Questions
How can I make the hat smaller?
Work fewer crown increase rounds. The sample stops after seven crown rounds with 70 main stitches. Stopping after six rounds produces 60 main stitches.
Why is there a decrease round before the brim?
The ruffle rounds place several treble crochet stitches into every stitch, which greatly widens the opening. The decrease round brings the lower edge inward first so the finished hat stays secure.
How can I make the ruffles less dramatic?
Work fewer treble crochet stitches in each stitch. Try 3 tr per stitch in the first ruffle round and 1 or 2 tr per stitch in the second round.
Can I make the hat longer?
Yes. Add more even body rounds before the decrease round. Remember that the ruffled brim will also add length.
Do I have to use the special seam?
No. You can use a standard joined-round seam, but it may leave a more noticeable gap beside the turning chain. The special seam creates a smoother transition.
Conclusion
This easy crochet ruffle hat is a fun way to turn basic double crochet and treble crochet stitches into a bold handmade accessory. The top-down construction makes the size easy to adjust, while the decrease round and layered brim create the distinctive fitted shape and flowing ruffles. Save the pattern and make it in warm neutrals, bright rainbow stripes, or your favorite solid color.



