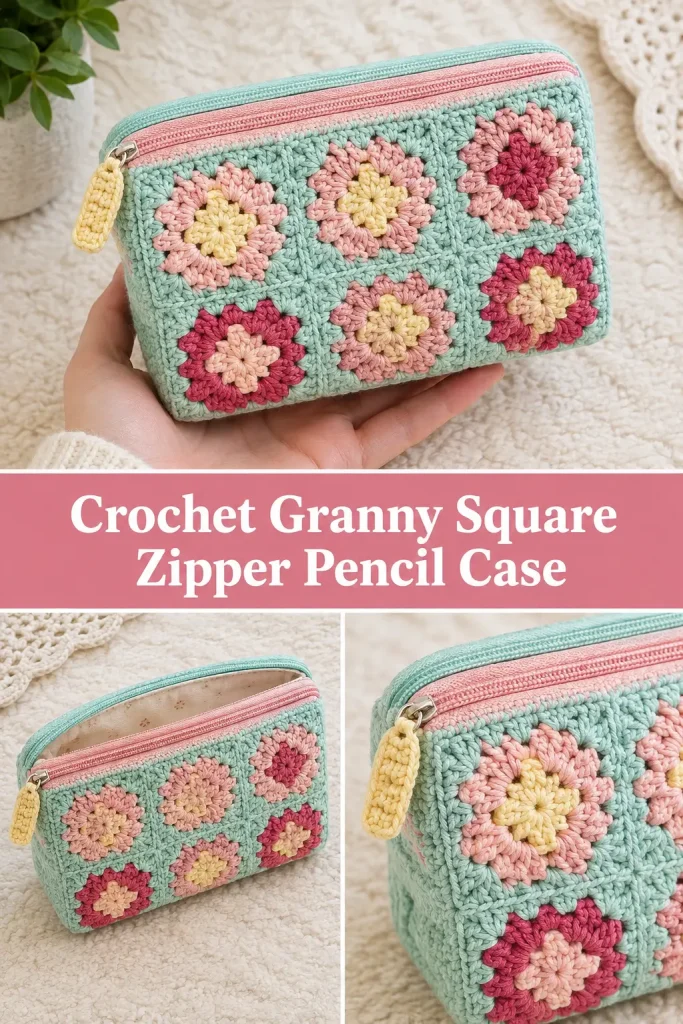
This colorful crochet granny square pencil case has a cheerful vintage look with soft mint, blush pink, raspberry, and pale yellow yarn. The classic granny squares create the decorative body, while solid crochet bands around the zipper give the pouch enough structure for pencils, crochet hooks, makeup, or small craft supplies.
For this pattern, the design and colors stay consistent with the reference. The pouch uses nine small granny squares arranged in a 3-by-3 panel, solid pink and mint zipper bands, contrasting end sections, a zipper, and a simple pale-yellow zipper pull. The finished pouch is softly rectangular and slightly boxy rather than completely flat.
Description
The finished crochet pencil case has three granny squares visible across the front, with the remaining squares continuing underneath and around the back. The granny motifs use the same palette throughout:
- soft mint/aqua
- blush pink
- deep raspberry pink
- pale buttery yellow
The top opening is finished with two solid crochet bands: one blush pink and one mint. A zipper runs between them. Small contrasting end sections close the two sides and help create the softly box-shaped pencil-case form.
For the closest finished look, add a simple fabric lining inside.
Materials
- DK or light worsted yarn in soft mint/aqua
- DK or light worsted yarn in blush pink
- DK or light worsted yarn in raspberry pink
- DK or light worsted yarn in pale yellow
- 3.5 mm or 4 mm crochet hook
- Zipper approximately 8–9 in / 20–23 cm long
- Yarn needle
- Scissors
- Stitch markers
- Sewing needle and matching thread for zipper
- Lightweight cotton fabric for lining
- Sewing pins or clips
- Measuring tape
Abbreviations
- ch – chain
- sl st – slip stitch
- sc – single crochet
- hdc – half double crochet
- dc – double crochet
- st – stitch
- sts – stitches
- sp – space
Pattern Notes
US crochet terminology is used.
The pouch is made from:
- 9 classic granny squares
- 1 blush-pink zipper band
- 1 mint zipper band
- 2 small end sections
- zipper
- optional but recommended fabric lining
- small pale-yellow zipper pull
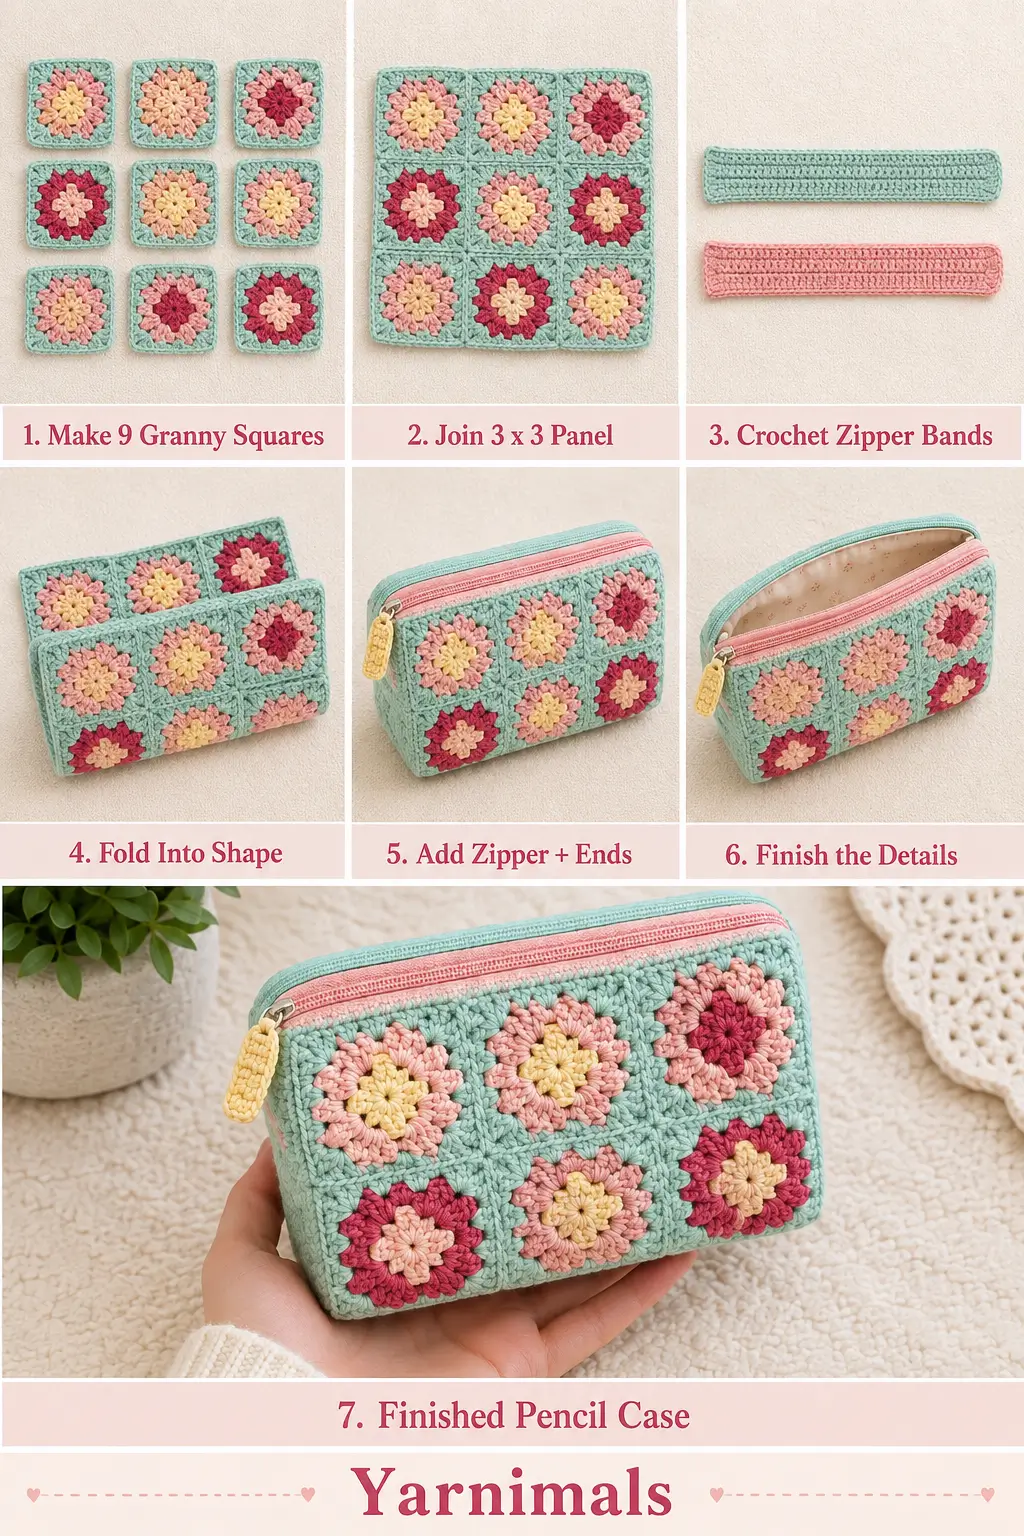
The nine granny squares are joined into a 3 x 3 panel.
That panel is then folded so:
- one row of 3 squares becomes the front
- the middle row becomes the bottom
- the final row becomes the back
This is an important construction detail because it keeps the finished pouch looking like the reference instead of creating separate front and back panels.
Approximate Finished Size
Using DK yarn:
- length: 8–9 in / 20–23 cm
- height: 3.5–4 in / 9–10 cm
- depth: approximately 2–2.5 in / 5–6.5 cm
Gauge is less important than making all nine granny squares exactly the same size.
Step-by-Step Instructions
Part 1 – Granny Squares
Make 9 granny squares.
Each square is worked in multiple colors using the same mint, blush, raspberry, and pale-yellow palette.
The color order can vary from square to square, just as it does in the reference, but do not introduce any additional colors.
Round 1
Using your first color, make a magic ring.
Ch 3.
Work:
2 dc, ch 2
into the ring.
Then work:
3 dc, ch 2
3 more times.
You should have 4 groups of 3 dc.
Join with sl st to the top of beginning ch-3.
Fasten off.
Round 2
Join the second color in any ch-2 corner.
Ch 3.
Work:
2 dc, ch 2, 3 dc
into the same corner.
Ch 1.
In the next corner work:
3 dc, ch 2, 3 dc
Ch 1.
Repeat around.
Join and fasten off.
Round 3
Join the third color in any corner.
In each corner work:
3 dc, ch 2, 3 dc
In each side ch-1 sp work:
3 dc
Ch 1 between granny clusters.
Continue around.
Join and fasten off.
Round 4
Join the fourth color.
Continue the established granny-square pattern:
Corners
3 dc, ch 2, 3 dc
Side spaces
3 dc
Ch 1 between groups.
Join and fasten off.
Your square should now be approximately 2.5–3 in / 6.5–7.5 cm.
Make all nine squares the same size.
Color Arrangement
Keep the mixed pastel arrangement of the inspiration.
Use combinations such as:
Square 1
Mint center
Blush
Raspberry
Blush
Square 2
Raspberry center
Mint
Blush
Pale yellow
Square 3
Mint center
Pale yellow
Raspberry
Blush
Square 4
Blush center
Raspberry
Pale yellow
Mint
Square 5
Pale yellow center
Blush
Mint
Mint
Square 6
Pale yellow center
Mint
Raspberry
Raspberry
Square 7
Mint center
Blush
Mint
Pale yellow
Square 8
Raspberry center
Mint
Pale yellow
Blush
Square 9
Blush center
Mint
Raspberry
Mint
The precise order can vary slightly, but keep the overall palette balanced.
Part 2 – Block the Squares
Lightly block all nine motifs before joining.
Make sure every square has:
- equal dimensions
- straight sides
- four defined corners
Allow them to dry completely.
Part 3 – Join the 3 x 3 Panel
Arrange the squares:
3 across x 3 down
Use a layout with mixed colors so identical outer colors are not clustered together excessively.
Using matching yarn or one of the existing colors, join the squares.
A flat slip-stitch join or whip-stitch join works particularly well because it keeps the pencil case from becoming too bulky.
Join the squares into three horizontal rows.
Then join the three rows together.
You now have one large square-shaped 3 x 3 granny panel.
Part 4 – Fold the Pouch Body
Lay the 3 x 3 panel flat.
Think of the panel as three horizontal sections:
Top row
Future back of pencil case
Middle row
Future bottom
Bottom row
Future front
Fold the top and bottom rows upward around the middle row.
The pouch should now form a long U-shaped body.
You should see three granny squares across the front.
The bottom should also consist of three granny squares.
The remaining three squares form the back.
Do not join the short side ends yet.
Part 5 – Mint Zipper Band
Using mint yarn.
This strip runs along one long upper edge of the pouch.
Ch until the chain measures the same length as the three-square edge.
For most DK versions, approximately 55–65 chains may be appropriate, but measure against your finished panel.
Row 1
Sc in second ch from hook.
Sc across.
Ch 1 and turn.
Rows 2–6
Sc in every st across.
Ch 1 and turn.
Fasten off after Row 6.
The strip should be approximately 1–1.25 in / 2.5–3 cm wide.
Part 6 – Pink Zipper Band
Repeat exactly the same instructions using blush pink yarn.
Make sure the pink and mint strips are identical in length and width.
Attach the Zipper Bands
Attach the mint band along one long upper edge of the granny-square body.
Attach the blush-pink band along the opposite upper edge.
Use whip stitch or mattress stitch.
Keep the attachment straight.
The two solid strips should now face each other across the top opening.
These bands create the neat solid-colored zipper area visible in the finished pouch.
Part 7 – Insert the Zipper
Place the zipper underneath the mint and pink bands.
Center it carefully.
The zipper teeth should remain completely visible and should open freely.
Pin or clip the zipper in place.
Using a sewing needle and matching thread, stitch the zipper securely to the underside of both crochet bands.
Use small even stitches.
Do not sew too close to the zipper teeth.
Test the zipper several times before continuing.
Part 8 – End Sections
Make 2.
For the same color arrangement as the design:
- make one end section in mint
- make the second end section in raspberry pink
These sections close the two short sides while preserving the boxy pencil-case shape.
Foundation
Ch until the chain measures approximately the depth of the pouch from the front upper edge, around the bottom curve, to the back upper edge.
For many DK versions, approximately 18–22 chains works well.
Row 1
Sc in second ch from hook.
Sc across.
Ch 1 and turn.
Following Rows
Sc across.
Continue until the rectangle is wide enough to fill the short side opening.
Usually 5–7 rows will be enough.
Fasten off, leaving a long tail.
Make the second section.
Attach the End Sections
With the pouch right side facing outward, position one end section over one open short end.
Begin near the zipper.
Using the long yarn tail, sew or slip stitch the end section:
- down the front side
- around the bottom
- up the back side
Leave the zipper itself unobstructed.
Repeat at the opposite end.
This produces the softly rectangular, slightly rounded box shape.
Part 9 – Fabric Lining
For the closest match to the finished design, add a simple fabric lining.
Cut a rectangle of lightweight cotton fabric slightly larger than the interior dimensions.
Fold it so it follows the pouch shape:
- front
- bottom
- back
Sew the two short side seams.
Turn the raw upper edges inward approximately 1/4 in / 6 mm.
Place the lining inside the crochet pouch.
The folded fabric edge should sit just beneath the zipper.
Hand stitch the lining around the zipper tape using small stitches.
Do not stitch through the visible outer crochet if possible.
The lining protects the granny-square openings and prevents pens or small objects from poking through the crochet fabric.
Part 10 – Yellow Zipper Pull
Using pale-yellow yarn.
Ch 10.
Sl st into the first ch to make a small loop.
Ch 1.
Fasten off.
Secure the loop firmly through the zipper pull opening.
Weave the yarn ends back through the crochet loop.
This creates the small yellow accent at the zipper end while keeping the same palette as the granny squares.
Finishing
Weave in every yarn tail.
Gently shape the pouch with your fingers.
Check that:
- there are exactly 9 granny squares
- 3 squares appear across the front
- 3 form the bottom
- 3 form the back
- one zipper band is blush pink
- one zipper band is mint
- the colors remain mint, blush pink, raspberry and pale yellow
- the end sections are neat
- zipper opens fully
- lining sits flat
- yellow zipper pull is secure
Design Consistency Lock
Keep these details unchanged for the finished design:
- 9 granny squares
- 3 x 3 starting panel
- classic granny-square texture
- mint/aqua
- blush pink
- deep raspberry pink
- pale buttery yellow
- pink solid crochet zipper band
- mint solid crochet zipper band
- rectangular pencil-case shape
- zipper closure
- fabric-lined interior
- small yellow zipper pull
Do not change the pouch into a drawstring bag.
Do not remove the zipper.
Do not replace the granny squares with solid crochet panels.
Do not change the palette to neutrals or different colors.
Do not add flowers, bows, tassels, beads, appliques, or handles.
Tips & Variations
Cotton or cotton-acrylic yarn is especially good for this project because it gives the granny squares enough structure for a pencil case.
Keep your granny-square tension fairly firm. Loose granny squares can stretch too much after the pouch is filled.
Blocking the nine squares before joining makes a major difference in the final shape.
Choose a zipper close to the finished three-square width rather than forcing the crochet to fit an incorrect zipper length.
If your zipper is slightly shorter than the opening, add a few extra solid crochet rows at both zipper ends.
The fabric lining is especially useful if the pouch will hold pencils, pens, crochet hooks, scissors, or makeup brushes.
FAQ
Is this made from separate front and back granny-square panels?
No. The nine squares are first joined into one 3 x 3 panel. That panel folds so one row forms the front, one forms the bottom, and one forms the back.
How many granny squares do I need?
You need 9 small granny squares for the main pouch body.
Is the lining necessary?
The pouch can technically be made without lining, but lining is recommended because the granny-square fabric contains small openings. It also gives the finished zipper pouch a cleaner and more durable interior.
Conclusion
This crochet granny square zipper pencil case turns nine small colorful motifs into a practical boxy accessory without changing the cheerful vintage design. The combination of mint, blush pink, raspberry, and pale yellow keeps the same playful palette, while the solid zipper bands, structured ends, lining, and little yellow zipper pull give the finished pouch a polished look. It is a lovely project for storing pencils, crochet hooks, makeup, or small craft supplies while using one of crochet’s most recognizable motifs.




Thank you for the pattern. Can’t wait to try it out.
I am a beginner and I don’t understand because the instructions say one row of 3’granny squares for the front but in your image there are 2?
Could you please help me understand? Thank You!