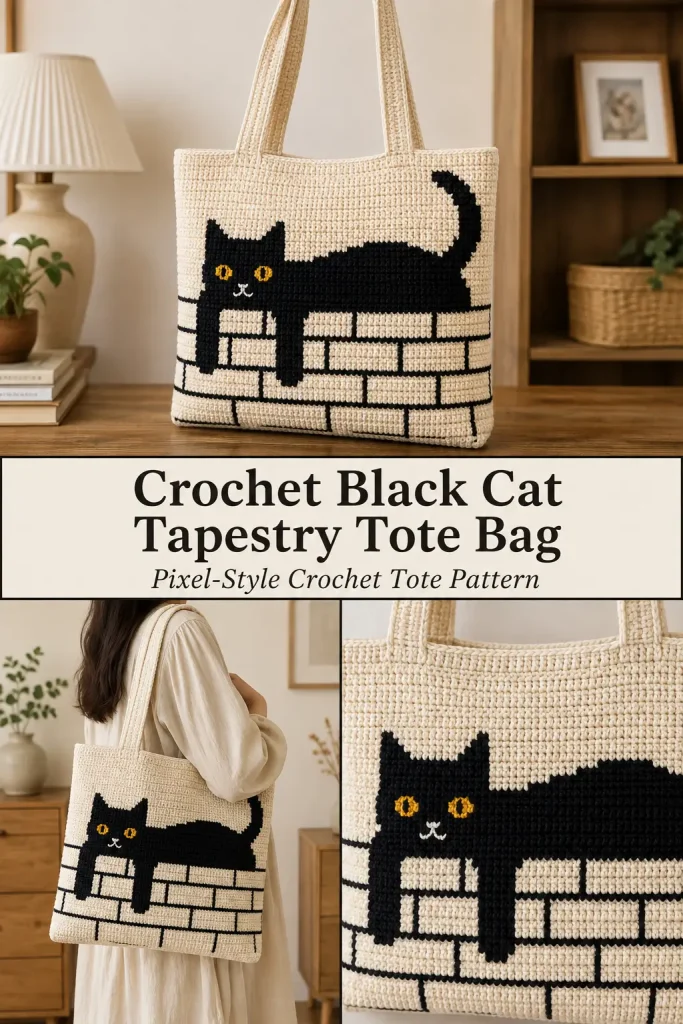
This crochet black cat tote bag combines a simple cream everyday bag with a playful tapestry crochet cat stretched across a black brick wall. The graphic design gives the tote a pixel-art feel, while the cream body and matching long handles keep the finished bag clean and wearable.
This version is an original crochet pattern inspired by the general black-cat tote concept. The construction, stitch counts, cat placement, and written tapestry rows below are designed specifically for this pattern, so you can make the bag directly from the instructions without needing a separate paid chart.
Description
The finished crochet tote is a structured rectangular shoulder bag with a warm cream background, a solid black cat worked directly into the front using tapestry crochet, golden-yellow eyes, a tiny white mouth detail, and simple black brick lines across the lower section.
The cat stretches horizontally across the front with pointed ears, dangling front and back legs, a long body, and a raised curved tail. Two long cream crochet handles are attached securely to the front and back so the bag can be carried comfortably over the shoulder.
The back is kept plain cream for a cleaner finish.
Finished Size
Approximately:
- Width: 40 cm / 15.75 in
- Height: 34 cm / 13.5 in
- Bottom depth: 8 cm / 3 in
- Handle length: approximately 62–65 cm / 24–25.5 in above the bag
- Handle width: approximately 3 cm / 1.25 in
Materials
- Worsted or aran-weight cotton or cotton-blend yarn in warm cream
- Worsted or aran-weight yarn in black
- Small amount of golden-yellow yarn
- Tiny amount of white yarn
- 4 mm crochet hook
- Yarn needle
- Scissors
- Stitch markers
- Measuring tape
- Optional cotton fabric for lining
- Optional magnetic snap
Approximate yarn:
- Cream: 450–550 yards
- Black: 100–130 yards
- Yellow: less than 10 yards
- White: less than 5 yards
Abbreviations
- ch – chain
- sc – single crochet
- sl st – slip stitch
- st – stitch
- sts – stitches
- RS – right side
- WS – wrong side
Pattern Notes
US crochet terminology is used.
The tote is constructed from:
- Front tapestry panel
- Plain back panel
- One long bottom-and-side gusset
- Two cream handles
- Optional lining
The front and back panels are worked flat.
The black cat is worked directly into the front panel using tapestry crochet.
The brick-wall lines are added afterward using surface crochet. This keeps the tapestry chart much easier to follow.
Beginning ch 1 does not count as a stitch.
Gauge
Approximately:
16 sc x 18 rows = 10 cm / 4 in
Gauge matters because the cat design depends on the stitch proportions.
Color Key
Throughout the tapestry section:
- C = Cream
- B = Black
- Y = Golden Yellow
- W = White
Carry unused yarn inside the stitches when changing colors.
Keep the carried yarn slightly relaxed so the fabric does not pucker.
STEP-BY-STEP INSTRUCTIONS
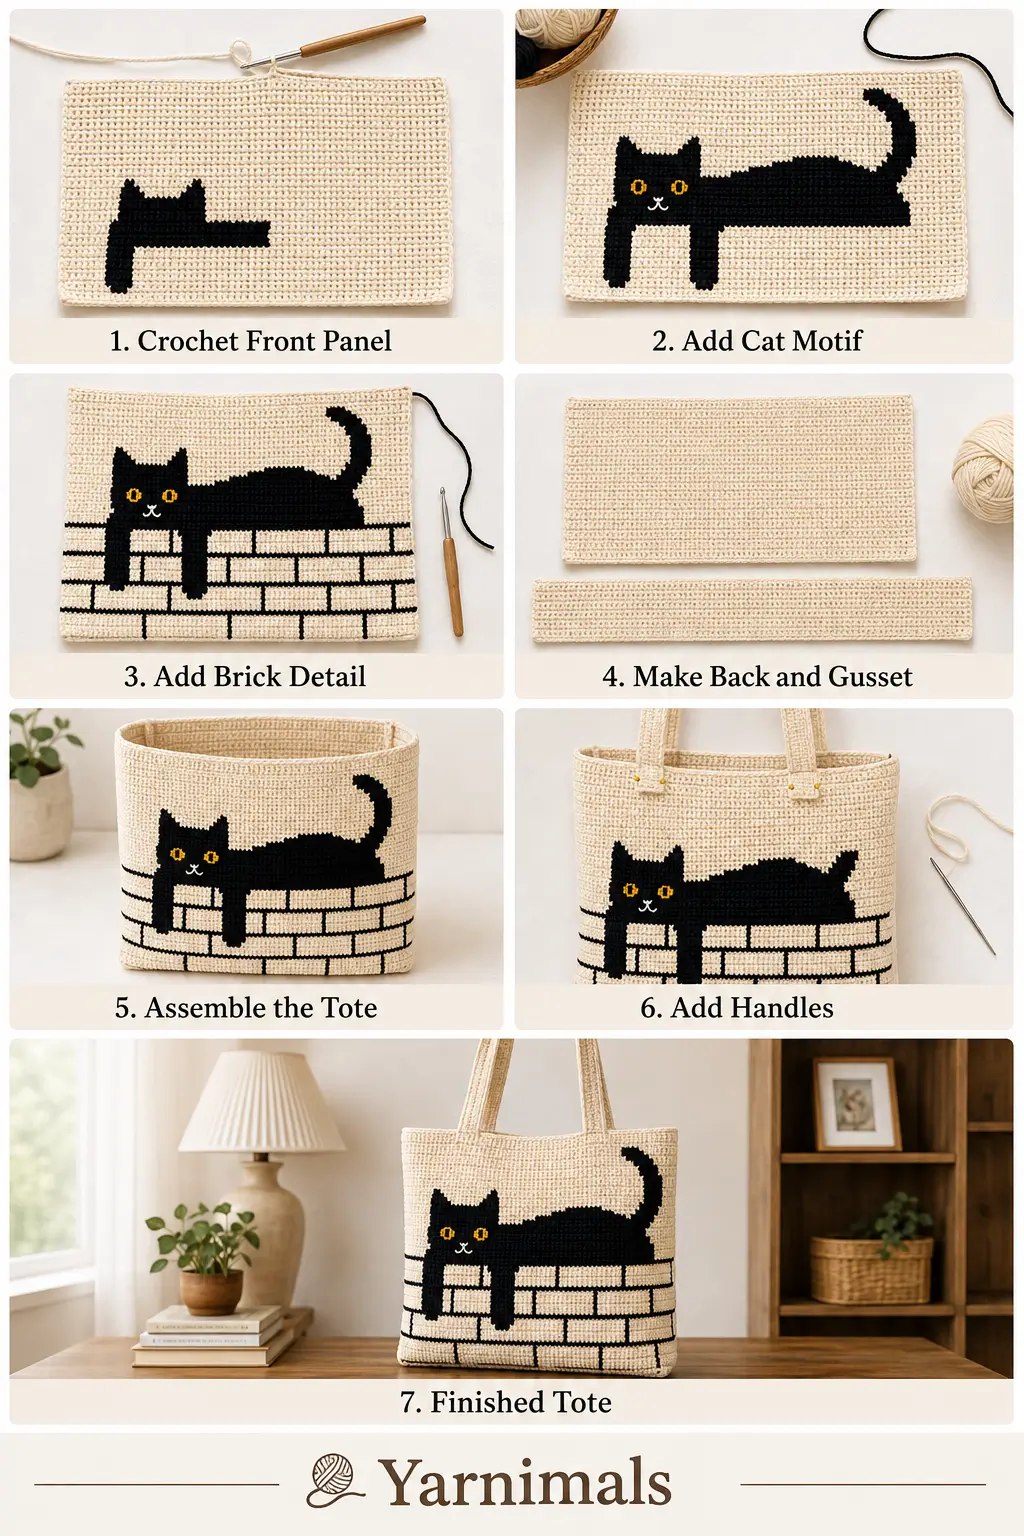
Part 1 – Front Panel
Using cream yarn.
Foundation
Ch 65.
Row 1
Sc in second ch from hook and across.
64 sc
Ch 1 and turn.
Rows 2–18
Sc across.
64 sts
Ch 1 and turn after every row.
You now have the plain lower foundation where the brick pattern will later be added.
Black Cat Tapestry Section
Begin the cat on Row 19.
Every row below totals exactly 64 stitches.
Read each row from left to right as written.
Because you turn after every row, you do not need to reverse the written instructions. Simply follow the listed color counts in the order shown for each row.
Row 19
C18, B6, C15, B5, C20.
Row 20
C17, B8, C13, B7, C19.
Row 21
C16, B10, C11, B9, C18.
Row 22
C15, B12, C9, B11, C17.
These first rows create the two dangling leg areas.
Row 23
C12, B40, C12.
Row 24
C11, B42, C11.
Row 25
C10, B44, C10.
Row 26
C9, B46, C9.
Row 27
C8, B47, C9.
These rows create the long stretched body.
Row 28 – First Eye Row
C8, B6, Y2, B3, Y2, B28, C15.
Check:
8 + 6 + 2 + 3 + 2 + 28 + 15 = 64.
Row 29 – Eyes
C8, B5, Y3, B3, Y3, B27, C15.
Row 30 – Lower Eye Detail
C8, B6, Y2, B3, Y2, B28, C15.
Row 31 – Tiny Mouth
C8, B8, W2, B2, W1, B27, C16.
The white stitches create a tiny playful muzzle detail.
Row 32
C8, B39, C4, B5, C8.
This begins separating the raised tail from the main body.
Row 33
C8, B38, C5, B5, C8.
Row 34
C8, B36, C7, B5, C8.
Row 35
C9, B34, C8, B5, C8.
Row 36
C10, B32, C9, B5, C8.
The right-hand black section begins forming the upright tail.
Cat Ear and Tail Shaping
Row 37
C10, B5, C2, B5, C17, B8, C17.
This begins defining the two pointed ears while keeping the tail separate.
Row 38
C11, B4, C3, B4, C16, B8, C18.
Row 39
C12, B3, C4, B3, C15, B8, C19.
Row 40
C13, B2, C5, B2, C14, B8, C20.
These narrow black sections finish the ear tips.
Row 41
C38, B7, C19.
Tail only.
Row 42
C39, B7, C18.
Row 43
C40, B6, C18.
Row 44
C41, B5, C18.
Row 45
C42, B4, C18.
The raised tail now tapers toward the top.
Row 46
C43, B3, C18.
Fasten off the black, yellow, and white yarns.
Continue in cream only.
Finish Front Panel
Rows 47–60
Sc across in cream.
64 sts.
Fasten off after Row 60.
The front panel should measure approximately:
40 cm wide x 33–34 cm high
Part 2 – Black Brick Wall Detail
The wall is added using black surface crochet.
This gives the bag the graphic brick effect without forcing you to manage many tiny tapestry color changes.
Lay the front panel flat with the cat facing upward.
Horizontal Brick Line 1
Join black yarn near the left edge approximately between Rows 8 and 9.
Surface sl st horizontally across the full panel.
Keep every surface stitch relaxed.
Fasten off.
Horizontal Brick Line 2
Repeat approximately between Rows 16 and 17.
You now have two long black horizontal brick lines.
Vertical Brick Lines
Create short vertical surface-crochet lines between the horizontal rows.
For the lowest brick row, add vertical lines approximately at:
- 12 stitches from left edge
- 32 stitches from left edge
- 52 stitches from left edge
For the next brick row, stagger them approximately at:
- 22 stitches from left edge
- 42 stitches from left edge
Work each vertical line from the lower horizontal line toward the upper line.
This creates the classic staggered brick pattern.
Do not run the lines through the cat motif.
Where the cat overlaps the wall, stop the surface crochet at the black cat edge and resume on the other side.
Part 3 – Back Panel
Using cream yarn.
Ch 65.
Row 1
Sc in second ch from hook and across.
64 sts.
Rows 2–60
Sc across.
64 sts.
Fasten off.
The back panel is intentionally plain cream.
Part 4 – Bottom and Side Gusset
The gusset creates the bag’s depth.
Using cream yarn.
Foundation
Ch 14.
Row 1
Sc in second ch from hook.
Sc across.
13 sts.
Ch 1 and turn.
Continue
Sc across every row.
Continue until the strip is long enough to travel:
- down one side of the front panel
- across the bottom
- up the other side
For this bag, aim for approximately:
88–90 cm / 34.5–35.5 in
Do not stretch while measuring.
Fasten off, leaving a long sewing tail if desired.
Part 5 – Join Gusset to Front
Place the front panel and gusset with wrong sides together if you want the joining seam visible as a neat crochet ridge.
Start at the upper left corner.
Using cream yarn:
Sc through both layers evenly down the side.
Continue around the lower corner.
Sc across the bottom.
Continue around the next corner.
Sc upward along the opposite side.
Stop at the upper edge.
Fasten off.
Join Back Panel
Repeat the same process with the back panel.
You now have a structured rectangular tote body with an open top.
Top Edge
Join cream yarn at one side seam.
Round 1
Sc evenly around the entire top opening.
Join with sl st.
Round 2
Ch 1.
Sc around.
Join.
Round 3
Repeat Round 2.
Fasten off.
These extra rounds help strengthen the opening before adding the handles.
Part 6 – Crochet Handles
Make 2.
Using cream yarn.
The handles in this design are long, narrow, and sturdy.
Foundation
Ch 111.
This should produce a strip approximately 68–70 cm long before attachment.
Row 1
Sc in second ch from hook.
Sc across.
110 sts.
Ch 1 and turn.
Rows 2–5
Sc in every st across.
Ch 1 and turn.
Fasten off after Row 5.
The strap should measure approximately:
- 68–70 cm total length
- 2.5–3 cm wide
Make the second handle identically.
Optional Stronger Handle
If you expect to carry heavier items, work 6–7 rows instead of 5.
You can also slip stitch around the entire strap edge for extra structure.
Part 7 – Handle Placement
Lay the tote flat.
On the front panel, measure approximately:
9–10 cm / 3.5–4 in inward from each side seam.
Pin one end of the first handle at each marked position.
Approximately 5 cm / 2 in of each strap end should overlap the inside of the bag.
Repeat on the back with the second handle.
Check that all four handle ends are positioned equally.
Sew Handles Securely
Using cream yarn and a yarn needle:
Sew around all four sides of each handle end.
Then sew an X across the center of each attachment area.
Repeat for all four handle ends.
This reinforcement is important because tapestry tote bags become fairly heavy after use.
Part 8 – Optional Magnetic Snap
If adding a magnetic closure, install it at the center of the top opening before adding the lining.
Position one half approximately:
2 cm / 3/4 in below the top edge
on the front.
Place the second half directly opposite it on the back.
Part 9 – Optional Fabric Lining
A lining is highly recommended for this bag because it prevents stretching and hides the carried tapestry yarn.
Measure the finished interior.
Cut two cotton rectangles approximately:
1.5 cm / 5/8 in larger on all sides
than the front and back interior measurements.
Place the fabric right sides together.
Sew:
- both sides
- bottom
Leave the top open.
Box the lower corners approximately 4 cm / 1.5 in deep if you want the lining to match the crochet gusset.
Fold the upper raw edge inward.
Insert the lining into the bag.
Hand stitch around the upper edge using small hidden stitches.
Tapestry Crochet Technique
When switching colors:
Work the final yarn-over of the previous stitch with the new color.
Carry the unused color horizontally inside the stitches.
Keep the carried yarn:
- flat
- relaxed
- hidden inside the stitch body
Do not pull tightly.
When working yellow or white details inside a black section, carry black behind those stitches.
For very short color sections, you can use separate small bobbins instead of carrying yarn across a long distance.
Keeping the Cat Design Clean
Because tapestry crochet naturally leans slightly, keep your tension consistent.
If the cat looks compressed vertically:
- use a slightly taller sc
- loosen your row tension
If it looks stretched:
- tighten row tension slightly
Do not aggressively block the tapestry panel because this may distort the pixel design.
Design Consistency Lock
For this exact version, keep:
- warm cream bag body
- solid black stretched cat
- two golden-yellow eyes
- tiny white muzzle detail
- raised black tail
- dangling black legs
- black staggered brick wall
- plain cream back
- rectangular tote shape
- narrow bottom gusset
- two long cream handles
- no zipper
- no granny squares
- no appliqué cat
- no embroidered full cat outline
- no extra flowers
- no bows
- no tassels
The cat must be crocheted directly into the front panel using tapestry crochet rather than sewn on afterward.
Tips & Variations
Cotton yarn is the best choice for this crochet tote because it holds the pixel design and bag shape much better than very soft acrylic.
Wind small bobbins of black, yellow, and white before beginning the tapestry section.
Count every row carefully. One missed stitch can shift the entire cat design.
Place stitch markers every 8 or 16 stitches across the panel while working the tapestry section. This makes it much easier to check your totals.
Photograph the panel every few rows. Viewing it from a distance can help you spot a misplaced color section quickly.
For a smaller bag, use sport or DK yarn and a smaller hook while keeping the same stitch counts.
For a larger tote, do not simply enlarge the cat chart. Instead, work additional cream stitches around the existing motif so the cat proportions remain intact.
FAQ
Can I make this bag without reading a crochet chart?
Yes. The cat motif is written row by row using exact stitch counts, so you can follow the written color instructions directly.
Is the cat sewn onto the bag?
No. The black cat, yellow eyes, and white muzzle are worked directly into the front panel using tapestry crochet.
Why are the brick lines added afterward?
Surface crochet keeps the main tapestry section manageable and produces cleaner straight brick lines than changing between cream and black repeatedly across every row.
Conclusion
This crochet black cat tapestry tote combines a simple cream everyday bag with a playful graphic cat and brick-wall design. Once you work through the written color rows carefully, the cat gradually appears directly in the crochet fabric without needing a separate chart or appliqué. Finish it with the structured gusset and long cream handles, and you have a practical handmade tote with a bold, recognizable black-cat personality.




I wish I could get the Tapestry Cat tote pattern without all the PDF popup ads!