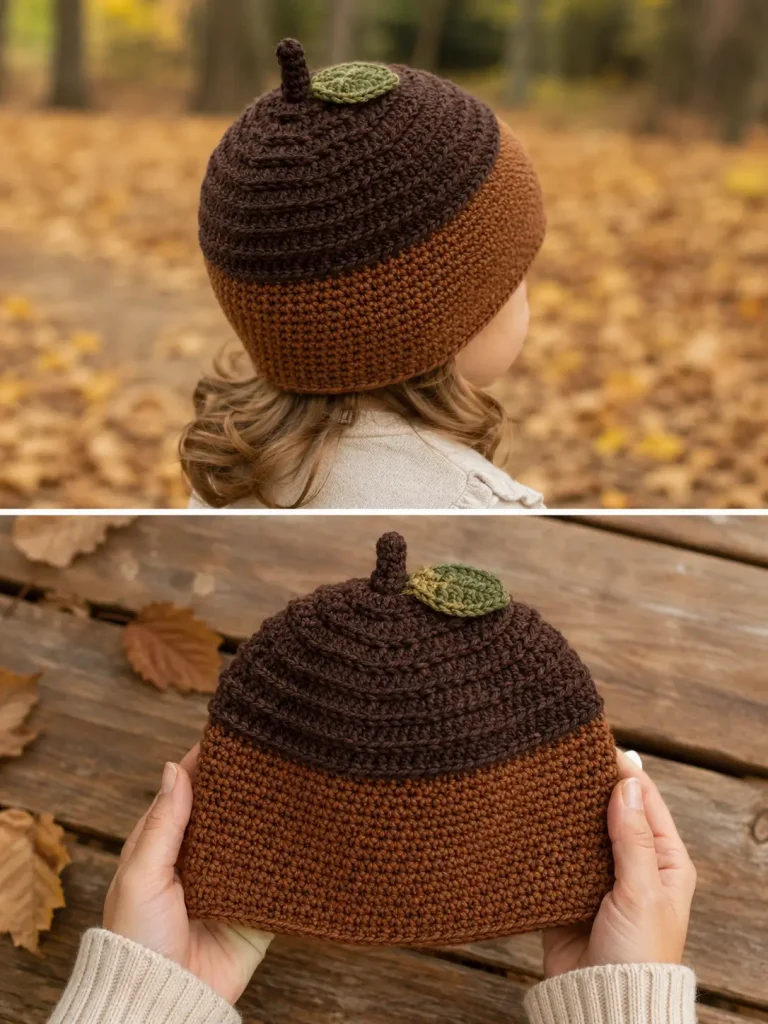
I wanted to make a fall hat for kids that felt seasonal without making another pumpkin.
Then I thought about all the little acorns scattered under the trees this time of year.
And suddenly the hat made sense.
This easy crochet acorn hat starts with a dark cocoa textured crown that looks like an acorn cap, then changes to warm chestnut brown for the smooth lower part of the hat.
Add one tiny crochet stem on top and, if you want, a small olive-green leaf.
That is it.
No complicated colorwork.
No face.
No giant appliqués.
Just a cozy little fall beanie that happens to look like an acorn.
Crochet Acorn Hat at a Glance
Skill level: Confident beginner
Construction: Top-down, worked in joined rounds
Main stitch: Half double crochet
Texture: Back-loop-only half double crochet on the dark acorn-cap section
Sizes: Toddler, Child, Older Child
Terminology: US crochet terms
The pattern is easy to adjust because you can stop increasing when the crown reaches the diameter needed for the child’s head.
Why I Like This Hat
The best part is that it still looks like a wearable hat.
The acorn theme comes from only three details:
- dark textured upper section
- warm brown lower section
- tiny stem
That keeps it cute instead of costume-like.
It also makes this a much easier fall crochet project than a hat covered in appliqués or complicated tapestry work.
Suggested Colors
For a softer natural fall palette, use:
Main Hat
Warm chestnut brown
Acorn Cap
Deep cocoa brown
Optional Leaf
Soft olive green
Optional Accent
A tiny amount of mushroom beige
I would avoid bright orange here.
The brown-and-olive palette makes the hat feel more woodland-inspired and gives us a very different visual from pumpkin crochet.
Materials
You will need:
- Worsted-weight / Category 4 yarn in warm chestnut brown
- Worsted-weight / Category 4 yarn in deep cocoa brown
- Small amount of soft olive yarn for optional leaf
- 5 mm crochet hook, or size needed for your desired gauge
- Yarn needle
- Scissors
- Stitch marker
- Measuring tape
For a children’s hat, choose yarn that feels soft against the forehead and follow the yarn manufacturer’s care instructions.
A Note About Children’s Hat Safety
Keep the design simple.
Do not add:
- long cords
- dangling ties
- loose beads
- buttons that can come off
- heavy decorations
Sew the stem and optional leaf securely.
For very young children, I would keep the hat especially plain and skip any unnecessary embellishment.
Abbreviations
- ch = chain
- hdc = half double crochet
- hdc inc = 2 half double crochet in the same stitch
- sl st = slip stitch
- sc = single crochet
- st = stitch
- sts = stitches
- BLO = back loop only
The beginning chain does not count as a stitch unless you personally prefer that method.
Choosing the Hat Size
Measure around the child’s head where the hat will sit:
- across the forehead
- above the ears
- around the widest part of the back of the head
Crochet hats usually fit best with a little negative ease, meaning the finished hat circumference is slightly smaller than the actual head circumference so it stretches gently into place.
A useful starting point is approximately 1–2 inches of negative ease, depending on the yarn and stretch of your fabric.
Approximate Size Guide
These are starting ranges only.
Toddler
Head circumference: approximately 18–20 inches
Child
Head circumference: approximately 20–21 inches
Older Child
Head circumference: approximately 21–22 inches
Children vary, so measuring the actual head is always better than relying only on age.
Crown Diameter Guide
For a top-down hat, the flat crown circle controls the final circumference.
A useful estimate is:
desired finished hat circumference ÷ 3.14 = approximate crown diameter
For example, if you want a finished circumference of about 19 inches:
19 ÷ 3.14 ≈ 6 inches
Use this as a guide rather than an absolute rule.
Your yarn, hook, and stitch tension matter.
PART 1: CROCHET THE DARK ACORN CROWN
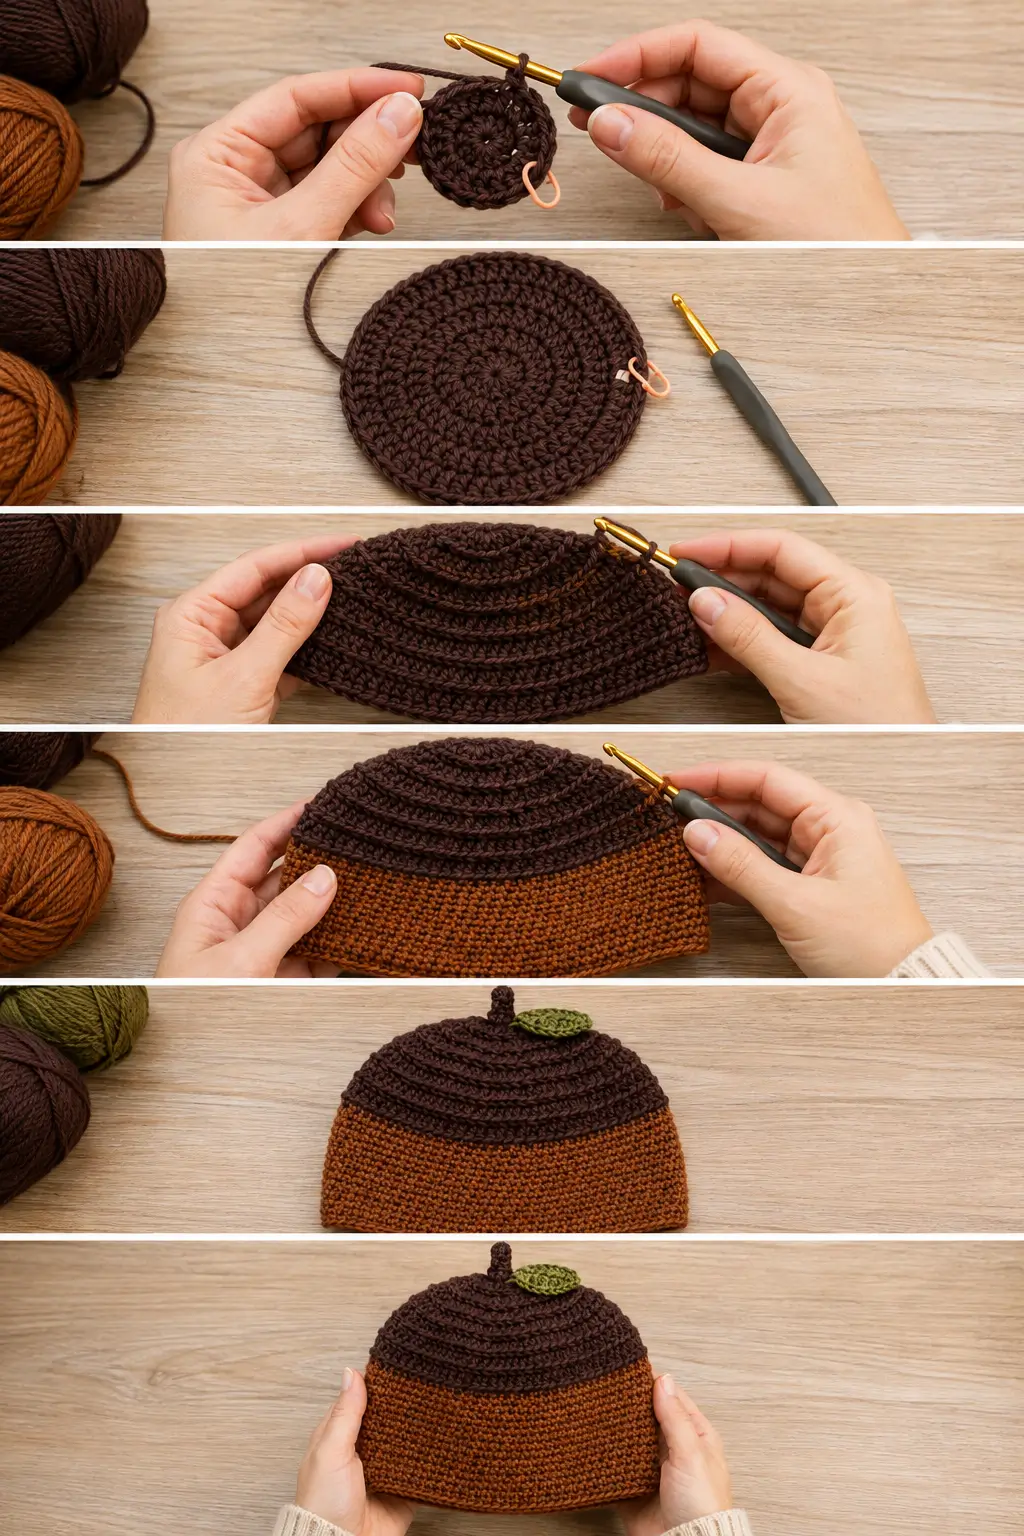
Start with deep cocoa brown.
Make a magic ring.
If you prefer, chain 4 and join into a ring.
Round 1
Ch 1.
Work:
8 hdc into the ring
Join with a slip stitch to the first hdc.
8 stitches
Round 2
Ch 1.
Work:
2 hdc in every stitch around
Join.
16 stitches
Round 3
Ch 1.
Repeat:
1 hdc, hdc inc
around.
Join.
24 stitches
Round 4
Ch 1.
Repeat:
2 hdc, hdc inc
around.
Join.
32 stitches
Round 5
Ch 1.
Repeat:
3 hdc, hdc inc
around.
Join.
40 stitches
Continue Increasing
Continue the same pattern.
Each new round adds one extra half double crochet between increases.
For example:
Round 6
4 hdc, hdc inc
Round 7
5 hdc, hdc inc
Continue until the crown is close to the diameter you need.
Do not rely only on the round number.
Measure the actual circle.
When to Stop Increasing
Lay the crown flat and measure straight across the center.
Stop increasing when the diameter is approximately right for your target hat circumference.
The hat will begin forming its sides once you stop adding stitches.
PART 2: MAKE THE ACORN CAP TEXTURE
Keep using deep cocoa brown.
Now stop increasing.
For the next rounds:
Ch 1, hdc in BLO of every stitch around, join.
Working in the back loop only creates visible horizontal ridges.
Those ridges give the upper section more texture and help it resemble the rough cap of an acorn.
How Deep Should the Dark Section Be?
For most children’s sizes, work approximately 1½–2½ inches of straight textured rounds after the crown is complete.
You want the cocoa section to cover roughly the upper third of the finished hat.
Don’t make it so deep that the whole hat becomes dark brown.
The contrast between the upper and lower sections is what creates the acorn effect.
PART 3: SWITCH TO CHESTNUT
At the end of the final cocoa round, switch to warm chestnut brown.
Now return to normal half double crochet through both loops.
Work:
Ch 1, hdc in every stitch around, join.
Repeat.
The hat will continue straight downward.
No more increases are needed unless the hat is clearly too narrow.
How Long Should the Hat Be?
Try the hat on whenever possible.
Measure from the top center of the crown down toward the lower edge.
Approximate finished lengths can vary, but a useful starting range is:
Toddler
about 7–7½ inches
Child
about 7½–8 inches
Older Child
about 8–8½ inches
These are only starting points.
Actual head measurements are more reliable.
Check the Ear Coverage
Before finishing the lower edge, make sure the hat covers the ears comfortably.
A fall hat should feel cozy without dropping so low that it covers the child’s eyes.
PART 4: FINISH THE LOWER EDGE
You can keep this extremely simple.
Work one final round:
Ch 1, sc in every stitch around.
Join.
Fasten off.
This creates a neat, slightly firmer lower edge.
Optional Ribbed-Look Edge
If you want a little more texture around the bottom, you can work the final 2–3 rounds in:
hdc BLO
instead of regular half double crochet.
That creates subtle horizontal ridges.
Keep the edge stretchy enough to fit comfortably over the head.
PART 5: CROCHET THE ACORN STEM
Use deep cocoa brown or an even darker brown.
Ch 6.
Starting in the second chain from the hook:
Sc in each chain across.
You should have:
5 sc
Fasten off, leaving a long sewing tail.
This creates a small flat stem.
Attach the Stem
Fold the stem slightly if you want it to stand with a gentle curve.
Position one end at the center top of the hat.
Using the yarn tail and a yarn needle, sew the lower portion firmly to the crown.
Sew through several stitches.
The stem should be:
- short
- soft
- securely attached
Do not leave a long floppy piece on a child’s hat.
PART 6: OPTIONAL LITTLE LEAF
The hat already looks like an acorn without a leaf.
But one small olive-green leaf can make it especially cute.
Using soft olive yarn:
Ch 6.
Starting in the second chain from the hook:
- sl st in first chain
- sc in next chain
- hdc in next chain
- sc in next chain
- sl st in final chain
Fasten off, leaving a sewing tail.
This creates a small tapered leaf.
Attach the Leaf
Place the leaf beside the stem.
Sew it flat against the top of the hat.
Do not leave the leaf dangling.
For a children’s wearable, I prefer the leaf to lie almost completely flat against the crochet fabric.
How to Make the Acorn Cap Look More Textured
The BLO ridges may be enough.
If you want a little more texture without making the pattern difficult, alternate:
1 round regular hdc
with
1 round hdc BLO
through the dark cocoa section.
That creates a subtle textured band without bobbles or complicated stitches.
What If the Crown Starts Ruffling?
If your crown begins looking wavy while you’re still increasing, you may have:
- too many increases
- loose tension
- a hook that is too large
Check the stitch count.
The crown should lie mostly flat before you begin the straight rounds.
What If the Crown Starts Cupping Too Early?
If the crown forms a bowl long before it reaches the correct diameter, you may have:
- missed an increase
- tight tension
- a smaller-than-needed hook
Check your stitch count first.
What If the Hat Is Too Tight?
If you are only a few rounds into the side section, you may want to undo those rounds and add another increase round.
You can also test a slightly larger hook.
Don’t rely on aggressive blocking to fix a hat that is significantly too small.
What If the Hat Is Too Loose?
A hat that is much too large will tend to slide down.
If you’re still early in the pattern, stop the crown increases sooner.
Remember that many crochet fabrics stretch with wear.
Why Measuring Matters More Than Age
Two children of the same age can have very different head sizes.
That is why I would rather make a hat from:
head measurement + crown diameter + actual fit
than say every 4-year-old needs exactly the same number of stitches.
This also makes the pattern much easier to customize.
Easy Toddler Version
For a particularly simple toddler hat:
- Crochet the crown to the measured diameter.
- Work about 1½–2 inches of cocoa textured rounds.
- Switch to chestnut.
- Continue until the hat covers the ears.
- Add one simple single-crochet finishing round.
- Add the short stem.
- Skip the leaf if you want the cleanest possible design.
That is the entire hat.
Easy Older-Child Version
Use the same construction.
The only major differences are:
- larger crown diameter
- slightly more length
There is no need to redesign the whole pattern.
That is one reason top-down hats are so useful.
Can Adults Wear This Too?
Absolutely.
Continue increasing the crown until it reaches the appropriate adult diameter, then work the same dark textured section and chestnut lower body.
A subtle acorn beanie can actually look surprisingly stylish in adult sizing.
Best Yarn for a Kids’ Fall Hat
For children’s wearables, I would prioritize:
- softness
- washability
- durability
- comfortable stretch
A smooth acrylic, acrylic blend, or soft wool blend can work well depending on the wearer.
If the child has sensitive skin, check the yarn against the skin before committing to the entire hat.
Don’t Make the Fabric Too Stiff
A very tight crochet fabric can make a hat feel rigid.
The stitches should be firm enough to hold the acorn shape, but still flexible enough to:
- stretch over the head
- sit comfortably around the ears
- move naturally
If your fabric feels board-like, try a slightly larger hook.
Can I Use Chunky Yarn?
Yes, but the stitch counts and dimensions will change significantly.
With chunky yarn:
- the hat will grow much faster
- fewer increase rounds may be needed
- the finished texture will be more dramatic
Use measurements rather than copying the worsted-weight round counts exactly.
Can I Make the Hat in One Color?
Yes.
A single-color brown hat can still work if you use texture to define the cap.
For example:
- textured BLO upper section
- smooth lower section
But the two-tone version makes the acorn shape much easier to recognize instantly.
More Color Ideas
If you want to make several hats, try:
Woodland Acorn
Cocoa + chestnut + olive
Soft Neutral Acorn
Espresso + mushroom beige
Golden Fall Acorn
Dark brown + warm caramel
Dusty Autumn Acorn
Mocha + muted mauve-brown
Pale Woodland Acorn
Walnut + oatmeal
The design doesn’t need bright colors to be cute.
Would This Make a Good Fall Gift?
Yes.
This would be especially sweet for:
- autumn birthdays
- family photos
- pumpkin-patch visits
- orchard trips
- woodland-themed gifts
- fall baby gifts
- siblings wearing coordinating colors
And because the construction is simple, making two in different sizes is much less intimidating than making two complicated character hats.
Make a Matching Adult Hat
One of the cutest possibilities is making:
child acorn hat + matching adult acorn hat
Use the same colors but adjust the crown and length.
You could also make the adult version simpler by skipping the leaf.
Make a Matching Scarf
Use warm chestnut yarn for a simple scarf.
Then add a few rows of dark cocoa texture at each end.
You don’t even need acorn appliqués.
Repeating the two colors is enough to make the pieces feel coordinated.
Frequently Asked Questions
Is this hat worked from the top down?
Yes.
You first increase a flat crown, then stop increasing and work the sides downward.
What creates the acorn texture?
The dark cocoa upper section is worked in back-loop-only half double crochet, which creates visible horizontal ridges.
Does the hat need an appliqué?
No.
The acorn look comes mainly from the two-tone construction and tiny stem.
The leaf is optional.
Can a beginner make this?
Yes, especially if you already know:
- half double crochet
- increases
- working in rounds
- slip stitch joins
The only sewing involves the tiny stem and optional leaf.
How do I make another size?
Change the crown diameter and total hat length.
The basic construction stays the same.
Should the hat be smaller than the child’s head?
Usually slightly smaller.
Crochet hats often use some negative ease so they stretch gently into place.
Exactly how much depends on the yarn and stitch fabric.
Can I make it without the textured upper section?
Yes.
You can work the entire hat in regular half double crochet and simply change from cocoa to chestnut.
The texture just helps the upper section resemble an acorn cap more clearly.
Final Thoughts
This might be one of my favorite kinds of seasonal crochet.
It clearly says fall without requiring a bright orange pumpkin or a complicated costume.
The dark textured crown looks like an acorn cap.
The warm chestnut body keeps it cozy and wearable.
Then one tiny stem finishes the whole idea.
That’s it.
Sometimes the projects that get the biggest reaction aren’t the complicated ones.
They’re the ones where somebody looks at the finished hat for a second and suddenly says:
“Wait—is that an acorn?”
And for a fall kids’ hat, that is exactly the reaction I wanted.




Your written instructions are to make HDC for the increase rounds, then switch to BLO for the straight rounds before switching yarn colors. Yet the photo clearly shows HBC in BLO for the entire top ((dark brown) rounds before switching yarn colors. Which is correct?