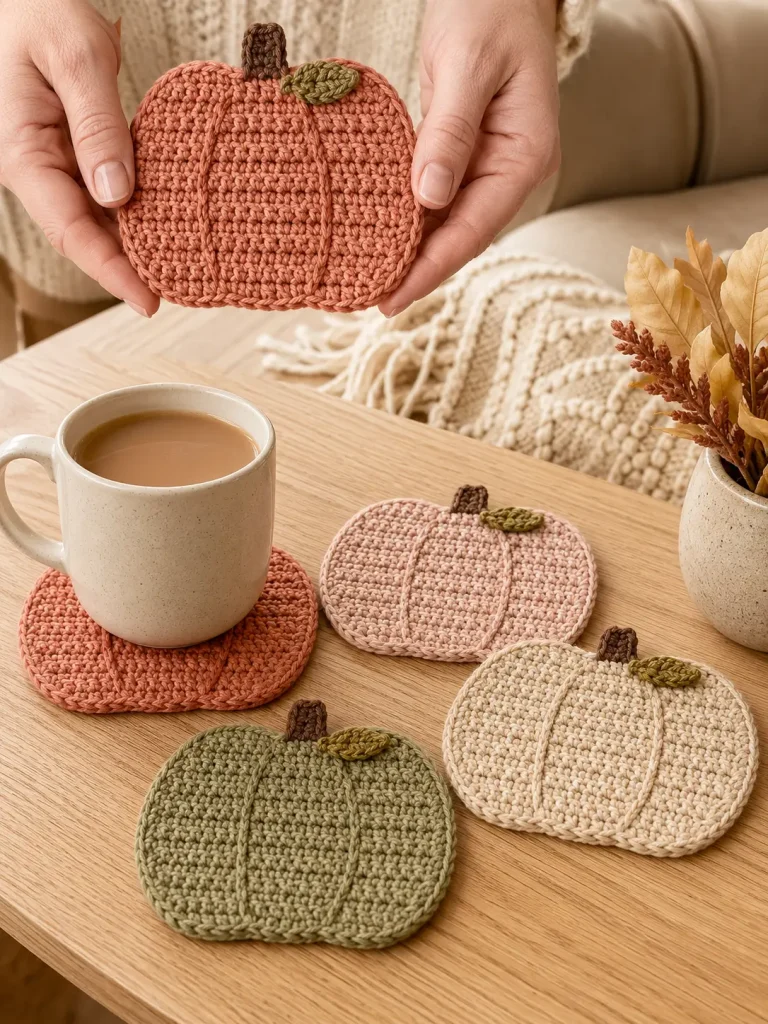
I wanted one of those little fall crochet projects that feels satisfying almost immediately.
Not a blanket that takes weeks.
Not a complicated amigurumi pumpkin with twenty pieces to sew together.
Just something simple, useful, and cute enough to leave on the table all season.
These easy crochet pumpkin coasters were exactly what I wanted.
They are worked flat in simple rows, gently shaped into a pumpkin silhouette, and finished with two subtle stitched ridges, a tiny stem, and an optional leaf.
Make one for your morning coffee—or make a whole set in soft fall colors.
The finished coasters look especially pretty in shades like:
- soft clay
- dusty blush
- oatmeal
- muted olive
- warm mocha
And because the pattern is mostly basic half double crochet, it is very approachable for newer crocheters.
Crochet Pumpkin Coasters at a Glance
Skill level: Beginner-friendly
Construction: Worked flat in rows
Finished size: Approximately 4½–5 inches wide and about 4 inches tall, excluding the stem
Main stitch: Half double crochet
Crochet terms: US terminology
The exact finished size will vary with your yarn, hook, and tension.
Why I Like This Pumpkin Pattern
There are lots of ways to crochet a pumpkin.
For a coaster, though, I wanted something that would:
- lie flat
- have enough surface area for a mug
- avoid bulky stuffing
- use very little yarn
- be easy to repeat
- still clearly look like a pumpkin
So instead of making a 3D pumpkin and flattening it, this pattern builds the pumpkin shape directly in rows.
The first few rows increase at both ends.
The middle stays straight.
Then the final rows decrease again.
That creates a simple rounded pumpkin body.
Materials
You will need:
- Worsted-weight cotton yarn
- 4.5 mm crochet hook, or size needed for a firm flat fabric
- Small amount of warm mocha or brown yarn for the stem
- Optional muted olive yarn for the leaf
- Yarn needle
- Scissors
- Stitch markers, optional
Why I Recommend Cotton for Crochet Coasters
For coasters, I prefer cotton because it creates a sturdy fabric and can absorb small amounts of condensation.
It also holds its shape nicely.
If you plan to place warm mugs on the finished coaster, choose yarn that is suitable for the intended use and follow the manufacturer’s washing and care instructions.
A smooth worsted-weight cotton is an easy choice for this project.
The Fall Color Palette
Instead of using the usual bright pumpkin-orange color for every coaster, I would make the set in softer fall shades.
Try:
Coaster 1
Soft clay
Coaster 2
Dusty blush
Coaster 3
Oatmeal
Coaster 4
Muted olive
Use warm mocha for all of the stems.
You can also use muted olive only for the leaves and make the fourth pumpkin another soft neutral.
The identical construction keeps the set coordinated even when every pumpkin is a different color.
Abbreviations
- ch = chain
- hdc = half double crochet
- hdc2tog = half double crochet 2 stitches together
- sc = single crochet
- sl st = slip stitch
- st = stitch
- sts = stitches
Turning chains do not count as stitches in this pattern.
Pumpkin Body
Choose your pumpkin color.
Foundation
Ch 11.
Row 1
Starting in the second chain from the hook:
Hdc in each chain across.
You should have:
10 hdc
Turn.
Row 2
Ch 1.
Work:
2 hdc in the first stitch.
Hdc in each of the next 8 stitches.
Work:
2 hdc in the last stitch.
You now have:
12 stitches
Turn.
Row 3
Ch 1.
Work:
2 hdc in the first stitch.
Hdc in each of the next 10 stitches.
Work:
2 hdc in the final stitch.
You now have:
14 stitches
Turn.
This creates the fuller lower curve of the pumpkin.
Rows 4–8
Ch 1.
Hdc in each of the 14 stitches across.
Turn.
Keep the stitch count at:
14 stitches
These straight rows create the widest middle section of the pumpkin.
Row 9
Ch 1.
Work:
Hdc2tog over the first 2 stitches.
Hdc in each of the next 10 stitches.
Work:
Hdc2tog over the final 2 stitches.
You now have:
12 stitches
Turn.
Row 10
Ch 1.
Work:
Hdc2tog over the first 2 stitches.
Hdc in each of the next 8 stitches.
Work:
Hdc2tog over the final 2 stitches.
You now have:
10 stitches
Fasten off, leaving a tail to weave in.
You now have a simple flat oval pumpkin body with a wider center and slightly narrower top and bottom.
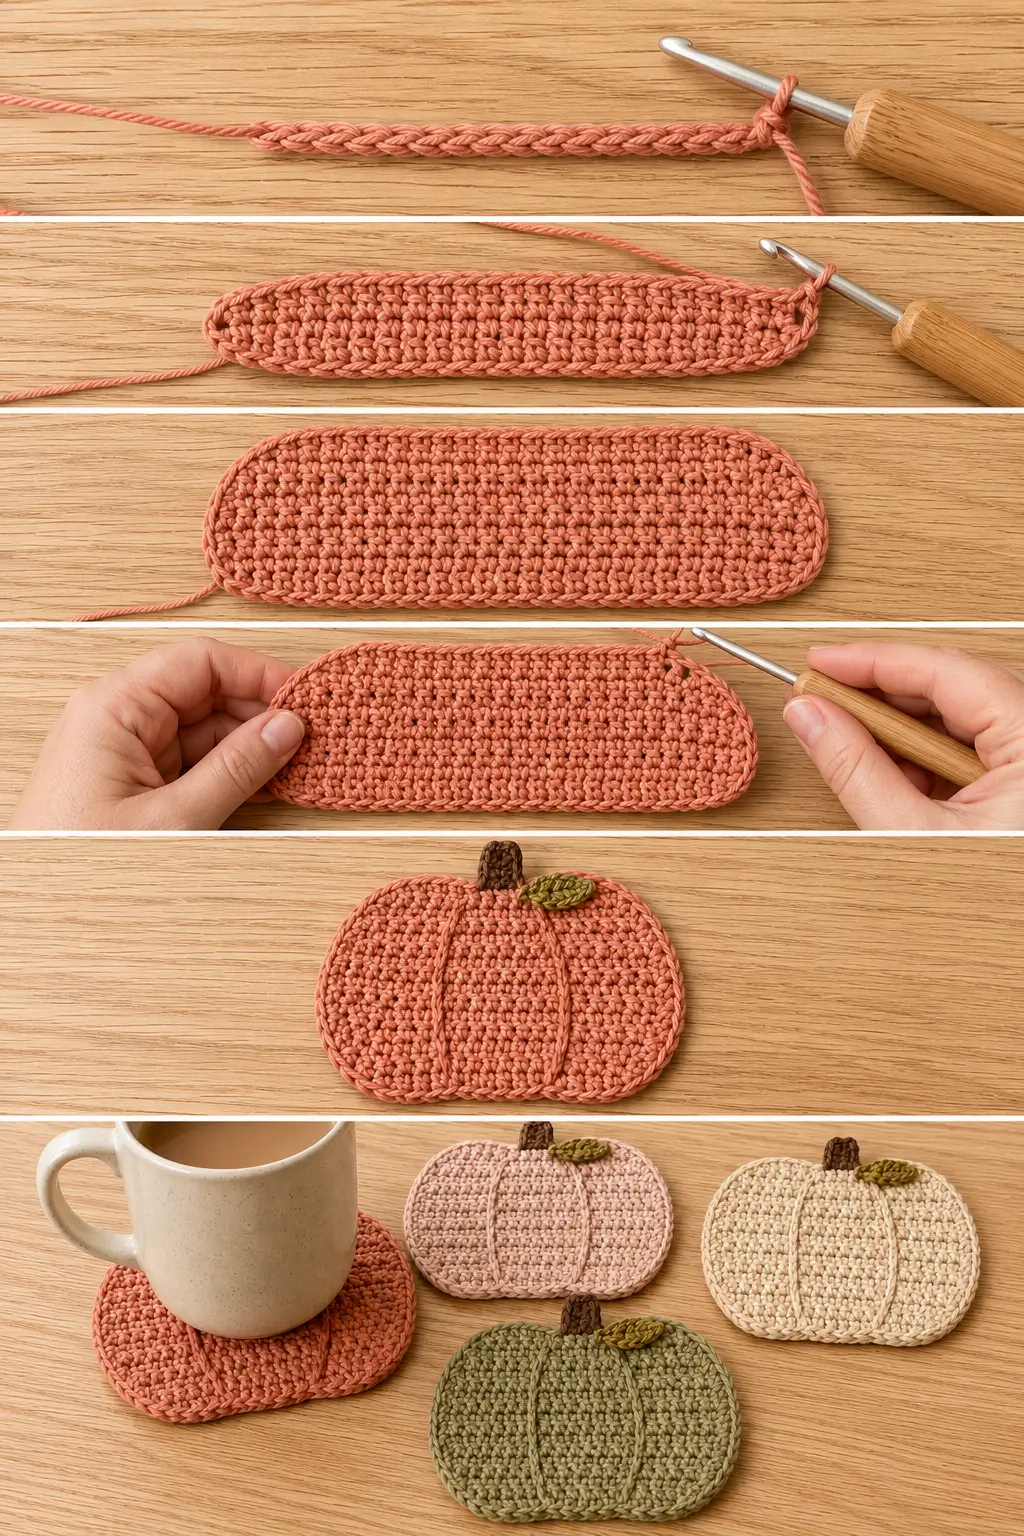
Make the Pumpkin Look More Like a Pumpkin
The body will already have a rounded pumpkin shape, but two simple ridge lines make a big difference.
Thread a yarn needle with:
- a slightly darker shade of the pumpkin color, or
- the same yarn color
Place one vertical stitched line approximately one-third of the way across the pumpkin.
Add another approximately one-third of the way in from the opposite side.
Run each line from near the top edge toward the bottom.
Use loose running stitches or backstitches.
Important
Do not pull the ridge yarn tightly.
The coaster should remain completely flat.
You are adding visual definition—not cinching the pumpkin into a 3D shape.
Make the Stem
Using warm mocha or brown yarn:
Ch 5.
Starting in the second chain from the hook:
Sc in each of the next 4 chains.
Fasten off, leaving a sewing tail.
The stem should be a small flat strip.
Attach the Stem
Position the stem behind the center of the pumpkin’s top edge.
Let approximately half of the stem extend above the pumpkin.
Using the yarn tail and a yarn needle, sew the lower part securely to the back of the coaster.
Weave in the end.
Keep the stem small so it doesn’t make the coaster awkward to use.
Optional Tiny Leaf
The coaster is cute without a leaf, but a small muted-olive leaf gives it an extra fall detail.
Using muted olive yarn:
Ch 5.
Starting in the second chain from the hook:
- sl st in first chain
- sc in next chain
- hdc in next chain
- sc in final chain
Fasten off.
This creates a tiny tapered leaf.
Sew the wider end beside the pumpkin stem.
Make sure the leaf lies fairly flat.
Optional Finishing Edge
If the sides of your pumpkin look tidy, you can leave them exactly as they are.
If you prefer a more defined outline, join the pumpkin color anywhere along the edge and work a loose round of single crochet around the entire pumpkin body.
Because the edge contains both row ends and stitches, there isn’t one universal stitch count that will suit every crocheter.
The important thing is to space the stitches evenly.
Watch the fabric as you work.
If the edge begins to:
ruffle: you are probably adding too many stitches.
If it begins to:
curl or pull inward: you may need slightly more spacing.
Keep the edging relaxed so the coaster stays flat.
Make a Set of Four
Once you’ve made the first coaster, the rest go surprisingly quickly.
For a coordinated set, make:
- 1 soft clay pumpkin
- 1 dusty blush pumpkin
- 1 oatmeal pumpkin
- 1 muted olive pumpkin
Use warm mocha stems on all four.
If you want an even softer look, replace the olive pumpkin with:
- mushroom beige
- pale caramel
- muted mauve
Then use olive only for the leaves.
Make a Set of Six
For a larger table set, make six pumpkins.
A beautiful combination would be:
- 2 oatmeal
- 1 dusty blush
- 1 soft clay
- 1 muted olive
- 1 warm caramel
Use the same stem color throughout.
Repeating at least one color helps the set look intentional rather than random.
How to Make the Coaster Larger
If you use a very large mug, you may want a wider pumpkin.
The easiest method is to use:
- slightly thicker yarn
- a slightly larger hook
while keeping the same pattern.
Alternatively, you can add another increase row before the straight middle section.
If you do that, increase once at each end again, then keep the new stitch count consistent through the middle before decreasing symmetrically at the top.
Whatever adjustment you make, keep the pumpkin wide enough for the base of your mug.
How to Make the Coaster Smaller
Use:
- lighter yarn
- smaller hook
or begin with fewer foundation chains.
If changing the stitch count, keep the shaping symmetrical:
increase at both ends → work straight → decrease at both ends
That is the basic construction that creates the pumpkin silhouette.
Check the Size With Your Mug
Before making an entire set, place the mug you plan to use on top of your first finished pumpkin.
The base of the mug should sit comfortably on the crocheted fabric.
Ideally, you should still see some pumpkin around the mug.
If the mug completely covers the coaster, make the next pumpkin slightly larger.
What If My Pumpkin Is Curling?
A little curling while you’re crocheting can often settle after finishing.
If it curls significantly, check:
- hook size
- tension
- whether your edge stitches are too tight
You can gently wet-block the finished coaster if the yarn is suitable for wet blocking.
Shape it flat and let it dry completely.
Follow your yarn’s care instructions.
What If the Sides Look Uneven?
The first and last stitches of each row are easy to miss.
Count the stitches after every increase and decrease row.
Your counts should be:
- Row 1: 10
- Row 2: 12
- Row 3: 14
- Rows 4–8: 14
- Row 9: 12
- Row 10: 10
Keeping those counts correct will make both sides of the pumpkin symmetrical.
What If the Pumpkin Looks More Like an Oval?
Add the two vertical ridge lines.
It sounds almost too simple, but they make a huge visual difference.
The stem also immediately signals that the shape is a pumpkin.
If you want even more definition, gently shape the upper corners inward with your fingers while blocking.
Do not aggressively stretch the piece.
Want More Visible Pumpkin Sections?
Instead of two ridge lines, add four.
Place them evenly across the pumpkin.
Keep them subtle and loose.
Too many dark lines can make a small coaster look busy.
For this soft fall version, I prefer two simple ridges.
Can I Crochet the Ridgelines Instead of Sewing Them?
Yes.
Surface slip stitch can create beautiful raised pumpkin lines.
Insert your hook through the fabric from front to back, bring up your ridge yarn, and work a loose line of surface slip stitches.
However, sewn running stitches are simpler for beginners and keep the coaster flatter.
Can I Use Single Crochet Instead?
Yes.
Single crochet will create a denser, shorter fabric.
The finished proportions may change because single crochet rows are shorter than half double crochet rows.
If switching stitches, make one complete test pumpkin before making the entire set.
Can I Use Acrylic Yarn?
You can use other fibers, but for a practical coaster I prefer cotton.
If you substitute another yarn, consider:
- absorbency
- heat sensitivity
- washability
- how flat the fabric remains
Always choose material appropriate for how you intend to use the coaster.
Are These Good for Beginners?
Yes.
This project uses only a few basic techniques:
- chains
- half double crochet
- increases
- decreases
- simple sewing
There is:
- no working in the round
- no complicated colorwork
- no stuffing
- no joining dozens of pieces
If you’ve already learned half double crochet, this is a nice next project.
The Best Part: They Don’t Have to Match Perfectly
Pumpkins in real life aren’t perfectly identical.
Your crochet ones don’t need to be either.
One might be:
- slightly wider
- slightly taller
- more rounded
And once all four are sitting together on the table, those small differences actually make the set feel more handmade.
Easy Ways to Use Them for Fall Decor
Obviously, you can put mugs on them.
But they also look cute:
- under a small candle jar
- beneath a little vase
- stacked in a basket
- arranged on a coffee station
- tied together as a handmade hostess gift
- placed at each setting on a fall table
If using them under anything warm, make sure your chosen yarn is appropriate for that use.
Make a Matching Pumpkin Mug Rug
Once you’ve made a few coasters, you can use the same colors to crochet a simple rectangular mug rug.
Place one small pumpkin appliqué in the corner.
Now you have a coordinated little fall coffee set.
Make a Pumpkin Garland From the Same Shape
The flat pumpkin body also works as a decorative motif.
Instead of using it as a coaster:
- Make several smaller pumpkins.
- Add stems.
- Attach them to a crochet chain.
That gives you a simple fall garland.
For a garland, you can use almost any yarn because the pieces don’t need to function as coasters.
Make Them as Small Fall Gifts
A set of four doesn’t require a huge amount of yarn, which makes this a nice handmade gift project.
Stack the finished coasters.
Tie them together with cotton ribbon or a length of yarn.
They could make an easy gift for:
- teachers
- neighbors
- coworkers
- hosts
- coffee lovers
- fall birthdays
And because they’re flat, they’re much easier to store than 3D crochet pumpkins.
Frequently Asked Questions
How big should a crochet coaster be?
There isn’t one required measurement.
For an everyday mug, approximately 4–5 inches across works well for many coaster designs.
Always compare your finished coaster with the actual mug or glass you plan to use.
What yarn should I use for pumpkin coasters?
A smooth cotton yarn is a practical choice because it creates sturdy, washable fabric and can absorb condensation.
Follow the care instructions for the specific yarn you choose.
Is the pumpkin made in the round?
No.
This version is worked flat in rows.
That is one reason the pattern is so beginner-friendly.
Is the stem crocheted separately?
Yes.
The tiny stem is made as a short strip and sewn behind the top edge of the pumpkin.
Do I have to make the leaf?
No.
The leaf is completely optional.
The pumpkin is recognizable with just the body, ridges, and stem.
Can I make these in orange?
Absolutely.
Classic pumpkin orange works beautifully.
I chose softer colors for this set simply because I wanted a different fall look.
Try anything from deep rust to pale cream.
How many should I make?
Four is a nice everyday set.
Six works well for a larger table.
They’re quick enough that you can also make extras for gifts.
Final Thoughts
I love a big fall crochet project.
But sometimes the project I actually need is the one I can finish before the season is over.
These little pumpkin coasters hit that sweet spot.
They’re:
easy enough for a relaxed evening
small enough for leftover yarn
useful enough to leave out every day
and still cute enough to make the whole coffee table feel like fall.
Make one in soft clay.
Then another in oatmeal.
Then dusty blush.
Before long, you’ve got an entire little pumpkin patch sitting on the table—and unlike the real ones, these will still look good next fall.




Hello,
I am trying to make your ridge pumpkin coaster. The pictures show way more than 14 stitches. I am counting about 24-25 stitches. Is the picture for the pattern? Mine is not coming out right.
I agree that the pictures show way more than 14 stitches. Also, I made one pumpkin following the pattern exactly and my rows look vertical, not horizontal, as the picture shows. Are you going through both loops or just the front.