But It Starts With One Simple Shape
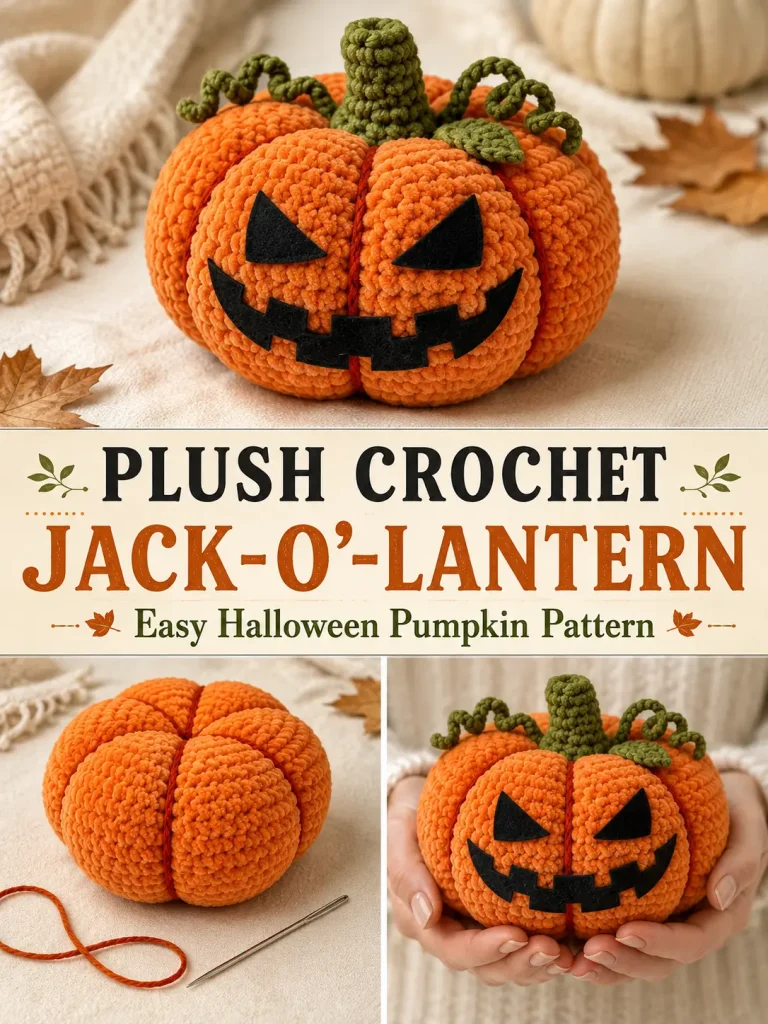
There is something about a plush crochet pumpkin that makes Halloween decor feel instantly cozier.
But this one has a little more personality.
Instead of a plain fall pumpkin, this version has deep sculpted ribs, curly green vines, slanted black eyes, and a big mischievous jack-o’-lantern grin.
And the fun part is that the pumpkin itself is surprisingly simple.
You don’t crochet six separate sections.
You don’t need complicated colorwork.
The main body is worked as one simple stuffed crochet shape. After stuffing, strong yarn is wrapped around the outside to create the deep pumpkin grooves.
Add a short green stem, a couple of curly vines, and the face—and suddenly that simple orange shape becomes a Halloween jack-o’-lantern.
Plush Jack-O’-Lantern Pattern at a Glance
Skill level: Confident beginner
Crochet terminology: US terms
Construction: Worked in continuous rounds
Approximate finished width: 5½–6 inches
Approximate body height: 4–4½ inches, excluding stem and vines
Main yarn: Orange chenille or velvet yarn
Shaping: Dark burnt-orange cotton yarn
Stem and vines: Moss or olive green
Face: Black felt or black yarn embroidery
Exact finished measurements will vary depending on yarn, hook, tension, and stuffing.
Materials
You will need:
- 4 mm chenille or velvet yarn in pumpkin orange
- Small amount of 4 mm chenille yarn in moss or olive green
- Strong 4-ply cotton yarn in dark burnt orange
- 3.5 mm crochet hook for the pumpkin
- 2–2.5 mm hook if needed for thinner detail yarn
- Polyester fiberfill
- Black felt
- Black sewing thread and needle, or fabric-safe adhesive
- Long yarn needle
- Stitch marker
- Scissors
- Straight pins, optional
For a tighter plush fabric, adjust your hook if necessary so the stuffing does not show between stitches.
Abbreviations
- MR = magic ring
- sc = single crochet
- inc = 2 sc in the same stitch
- dec = invisible single crochet decrease
- sl st = slip stitch
- ch = chain
- st = stitch
- sts = stitches
The pumpkin body is worked in a continuous spiral.
Do not join at the end of each round.
Move the stitch marker up as you work.
PART 1: CROCHET THE PUMPKIN BODY
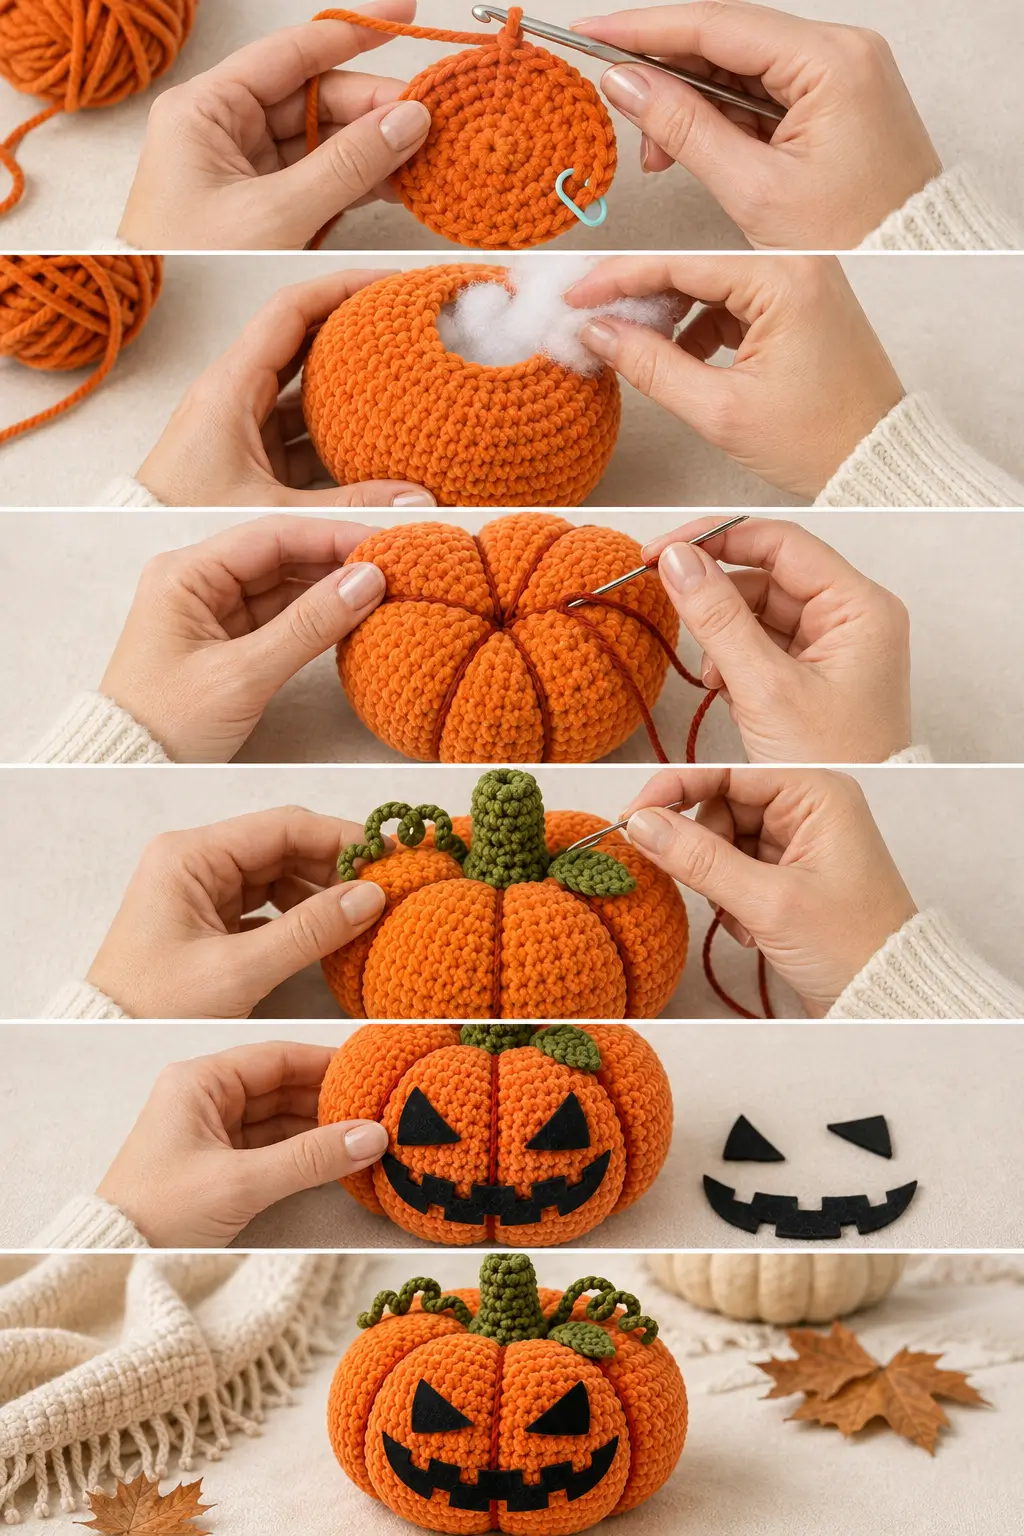
Using pumpkin-orange chenille yarn and a 3.5 mm hook, make a magic ring.
Round 1
Work:
6 sc into MR
You now have:
6 sts
Round 2
Inc in each stitch around.
12 sts
Round 3
Repeat:
1 sc, inc
around.
18 sts
Round 4
Repeat:
2 sc, inc
around.
24 sts
Round 5
Repeat:
3 sc, inc
around.
30 sts
Round 6
Repeat:
4 sc, inc
around.
36 sts
Round 7
Repeat:
5 sc, inc
around.
42 sts
Round 8
Repeat:
6 sc, inc
around.
48 sts
This is the widest part of the pumpkin.
Rounds 9–15
Work:
1 sc in each stitch around
Keep:
48 sts
for all 7 rounds.
At this stage, the piece should begin looking like a short rounded bowl or cylinder.
We deliberately avoid making the body too tall because the finished pumpkin should be wide and squat.
Begin the Decreases
Round 16
Repeat:
6 sc, dec
around.
42 sts
Round 17
Repeat:
5 sc, dec
around.
36 sts
Round 18
Repeat:
4 sc, dec
around.
30 sts
Start Stuffing
Begin adding polyester fiberfill.
Use small pieces rather than one large lump.
Push the stuffing evenly into the:
- bottom
- sides
- center
Do not overstuff yet.
The pumpkin still needs enough softness for the shaping yarn to create deep grooves.
Round 19
Repeat:
3 sc, dec
around.
24 sts
Round 20
Repeat:
2 sc, dec
around.
18 sts
Add more stuffing.
Gently shape the body with your hands as you work.
Round 21
Repeat:
1 sc, dec
around.
12 sts
Add the final stuffing.
The pumpkin should feel full but still compress slightly when squeezed.
Round 22
Dec around.
6 sts
Fasten off, leaving a tail.
Thread the tail through the front loops of the remaining 6 stitches.
Pull firmly to close.
Secure the yarn and hide the tail inside the pumpkin.
Shape the Body Before Adding the Ribs
At this point, your crochet piece may still look more like an orange ball than a pumpkin.
That is normal.
Press gently downward on the top.
Then push the sides outward with your hands.
You want the body to become:
shorter + wider + slightly flattened
The shaping yarn will create the final pumpkin form.
PART 2: CREATE THE PUMPKIN RIBS
Use strong dark burnt-orange cotton yarn for this section.
The thinner dark yarn creates the beautiful recessed lines between the plush orange sections.
Cut a long piece approximately:
6–7 feet
Thread it onto a long yarn needle.
Anchor the Shaping Yarn
Insert the needle into the bottom center of the pumpkin.
Bring it through the entire stuffed body and out through the top center.
Leave enough yarn at the bottom to secure later.
Take a small anchoring stitch.
Make the First Groove
Bring the yarn down the outside of the pumpkin.
Run it from:
top center → around the outside → bottom center
Insert the needle into the bottom center.
Bring it back through the pumpkin and out at the top center.
Pull gradually.
As the yarn tightens, it will sink into the chenille and form a deep pumpkin groove.
Do not pull so aggressively that the yarn damages the crochet fabric.
Divide the Pumpkin Into Six Sections
Rotate the pumpkin approximately one-sixth of a turn.
Repeat the same process.
Continue until you have:
6 evenly spaced grooves
and therefore:
6 rounded pumpkin lobes
The dark burnt-orange shaping yarn should remain visible inside each groove.
Check the Front
Before securing the yarn completely, decide which lobe will become the front of the pumpkin.
Choose one of the broadest, neatest sections.
Adjust the groove spacing slightly if necessary so there is enough room for the eyes and mouth.
When everything looks balanced, secure the shaping yarn firmly and hide the ends inside the pumpkin.
PART 3: CROCHET THE GREEN STEM
Use moss or olive-green chenille yarn.
Make a magic ring.
Stem Round 1
Work:
6 sc into MR
6 sts
Stem Rounds 2–5
Work:
1 sc in each stitch around
Keep:
6 sts
Fasten off, leaving a long tail for sewing.
Stuff the Stem
Use only a tiny amount of fiberfill.
The stem should remain:
- short
- soft
- slightly chunky
You can bend it gently with your fingers so it doesn’t look perfectly straight.
Attach the Stem
Place the stem over the top center of the pumpkin.
Using the long green tail, sew around the stem base several times.
Catch sturdy stitches from both:
- stem
- pumpkin body
Pull securely.
The stem should remain firmly attached when gently tugged.
Weave in the remaining tail.
PART 4: CROCHET THE CURLY VINES
The green curls add a lot of personality with very little work.
Vine 1
Using olive-green yarn:
Ch 18
Starting in the second chain from the hook:
Work:
2 sc in every chain across
The strip will naturally curl.
Fasten off, leaving a sewing tail.
Vine 2
Ch:
22
Again work:
2 sc in every chain across
Fasten off.
The different lengths make the top look more natural.
Optional Vine 3
For a fuller top:
Ch 12
Work:
2 sc in every chain
Fasten off.
Attach the Vines
Position the vine bases beside the stem.
Sew only the first small section of each vine to the pumpkin.
Leave the remaining curl loose.
Arrange the curls in slightly different directions.
PART 5: OPTIONAL GREEN LEAF
If you want one small leaf beside the stem, use olive-green yarn.
Ch 7
Starting in the second chain from the hook, work:
- sl st
- sc
- hdc
- dc
- hdc
- sc
Now continue along the opposite side of the foundation chain:
- sc
- hdc
- dc
- hdc
- sc
- sl st
Fasten off, leaving a sewing tail.
Sew only the base of the leaf beside the stem.
Allow the tip to remain slightly raised.
PART 6: MAKE THE JACK-O’-LANTERN EYES
Finish shaping the pumpkin before cutting the felt pieces.
That way, you can size the face to the actual finished pumpkin.
Use black felt.
Cut:
2 slanted triangular eye shapes
For a pumpkin approximately 6 inches wide, start with each eye around:
1¼ inches wide × ¾ inch tall
The triangles do not need to be perfectly symmetrical.
In fact, slightly irregular eyes make the pumpkin look more expressive.
Position the Eyes
Place both eyes on the selected front lobe.
Angle them slightly downward toward the center.
Leave approximately:
¾–1 inch
between the inner edges.
Pin them temporarily.
Do not attach them yet.
PART 7: MAKE THE JACK-O’-LANTERN MOUTH
Cut one wide curved mouth from black felt.
For a 6-inch pumpkin, begin around:
3–3½ inches wide
and approximately:
1 inch tall
Curve the mouth upward slightly at both ends.
Add the Teeth
Cut a few rectangular notches into the mouth.
A simple arrangement is:
Upper edge
2 small notches
Lower edge
3 small notches
This creates the classic jagged jack-o’-lantern grin.
Keep the teeth fairly large.
Tiny details can disappear against fluffy chenille yarn.
Test the Entire Face
Place:
- both eyes
- mouth
onto the front.
Step back and look at the pumpkin.
Check:
- eye height
- eye angle
- spacing
- mouth position
- overall expression
This is much easier to correct before attaching anything permanently.
Attach the Felt
For a decoration that may be handled regularly, sewing is the most secure method.
Using black sewing thread, make small stitches around the outer edges of each felt piece.
Avoid pulling so tightly that the pumpkin fabric puckers.
If the project is intended only as adult seasonal decor, fabric-safe adhesive may also be used according to the manufacturer’s directions.
Alternative: Embroidered Face
You do not have to use felt.
For a fully yarn-based pumpkin, embroider the facial features with black yarn.
Use surface stitches to create:
- slanted triangular eyes
- broad zigzag mouth
- small blocky teeth
The expression will be softer than felt, but the finished pumpkin will remain completely textile-based.
FINAL SHAPING
Place the pumpkin on a flat surface.
Adjust each lobe with your fingers.
Push the top down slightly.
Spread the bottom outward.
The pumpkin should sit without rolling.
Arrange the green vines around the stem.
Make sure the face is facing directly forward.
Finished Size
With 4 mm chenille yarn and approximately a 3.5 mm hook, the pumpkin should finish around:
5½–6 inches wide
and approximately:
4–4½ inches tall
before counting the stem and vines.
Your actual measurements may vary.
What If My Pumpkin Looks Too Round?
First try pressing the top downward and pushing the sides outward.
If that is not enough, gently tighten the shaping strands.
If you’re making another pumpkin, reduce the number of straight body rounds slightly.
What If the Pumpkin Is Too Flat?
The ribbing yarn may be too tight.
Loosen the shaping slightly if possible.
You can also redistribute the stuffing toward the center.
What If One Pumpkin Section Is Smaller?
Before completely securing the ribbing yarn, slide the nearby groove slightly left or right.
Try to divide the body into six reasonably equal sections.
Perfect mathematical symmetry is not necessary.
Real pumpkins aren’t perfect either.
What If the Stuffing Shows Through?
Your crochet gauge may be too loose.
For the next pumpkin:
- use a slightly smaller hook
- maintain firmer tension
- avoid excessive stuffing
The chenille stitches should sit closely together.
Don’t Overstuff the Pumpkin
This is particularly important.
If the body becomes extremely firm, the shaping yarn will struggle to create deep grooves.
The pumpkin should be:
full but compressible
before shaping.
Why Use Cotton for the Ribbing?
Chenille yarn looks beautiful, but it can shed or snap under strong tension.
A thinner, stronger cotton yarn works better for sculpting.
It also creates the attractive dark outline visible between each orange pumpkin section.
Make a Smaller Jack-O’-Lantern
For a smaller version, stop increasing after:
36 stitches
Work approximately:
5 straight rounds
Then decrease using the same reverse sequence.
Stuff.
Shape into six lobes.
Make the face only after the finished pumpkin has been shaped.
Make a Larger Pumpkin
Continue increasing beyond 48 stitches.
After Round 8, work:
7 sc, inc
around.
You will have:
54 sts
Work approximately:
8–9 straight rounds
before decreasing symmetrically.
A larger pumpkin may require:
- more fiberfill
- longer shaping yarn
- slightly larger felt facial pieces
Make a Non-Halloween Version
Leave the face off completely.
The same construction becomes a beautiful fall pumpkin.
Try colors like:
- oatmeal
- dusty rose
- sage
- caramel
- rust
- muted mustard
You can keep the same green stem and vines.
Make a Pumpkin Family
This is an especially fun project to make in several sizes.
Try:
Large
6–7 inches wide
Medium
5–6 inches
Small
3–4 inches
Give each jack-o’-lantern a slightly different face.
One could be:
- spooky
- surprised
- silly
- sleepy
The basic pumpkin pattern can remain the same.
Display Ideas
The finished pumpkin works beautifully:
- beside a candy bowl
- on a mantel
- on a bookshelf
- in an entryway
- in a Halloween centerpiece
- on an office desk
- mixed with plain crochet pumpkins
The black face gives it enough contrast to stand out even in a larger fall display.
Frequently Asked Questions
Is the pumpkin made from separate sections?
No.
The orange body is crocheted as one continuous piece.
The sections are created afterward using strong shaping yarn.
How many pumpkin lobes are there?
This version uses:
6 sections
Is the pumpkin worked in joined rounds?
No.
The body is worked continuously in a spiral.
Use a stitch marker to keep track of the beginning of each round.
What yarn is used for the body?
A soft chenille or velvet-style yarn produces the plush appearance.
Do I need chenille?
No.
You can use another yarn, but the size and appearance will change.
With thinner yarn, use a hook suitable for that yarn and expect a smaller pumpkin.
Why is the shaping yarn a different color?
The dark burnt-orange yarn does two things:
- It physically creates the pumpkin grooves.
- It visually emphasizes each lobe.
Are the eyes safety eyes?
No.
The face uses large black felt shapes because they create the graphic jack-o’-lantern expression.
Can I crochet the face?
You could create separate black crochet appliqués, but for a pumpkin this size, felt or embroidery produces a cleaner recognizable face.
Are the green curls difficult?
No.
They’re simply chains with:
2 sc in every chain
The increases automatically make the strip curl.
Final Thoughts
This pumpkin looks like it requires complicated sculpting, but the actual crochet is very approachable.
You make one orange body.
Stuff it.
Wrap six dark lines around it.
Add the little green top.
Then the face completely changes the personality.
That final transformation is my favorite part.
Before the eyes and mouth, it is a cozy fall pumpkin.
Afterward?
It’s a mischievous little jack-o’-lantern ready for Halloween.