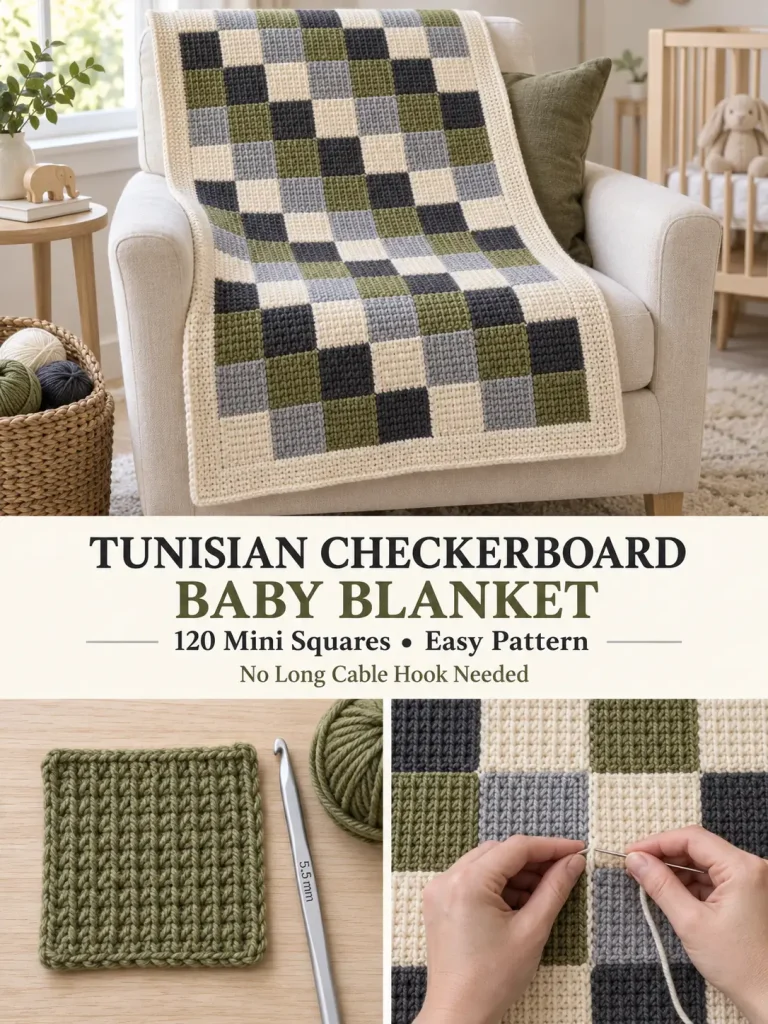
This cozy baby blanket creates the woven checkerboard look of the reference image using an original modular Tunisian crochet construction.
Each small square is worked in Tunisian simple stitch, giving the fabric that distinctive vertical woven texture. Four coordinating colors are arranged in a repeating diagonal sequence, then the squares are joined into one soft patchwork blanket.
The advantage of this version is that you only hold a small number of loops at a time, so you do not need a long Tunisian cable hook. A regular crochet hook with a straight enough shaft can work for the individual squares.
Pattern at a Glance
Skill level: Advanced beginner / intermediate
Terminology: US crochet terms
Technique: Tunisian simple stitch
Construction: Individual mini squares joined into a rectangle
Finished size: Approximately 37 × 45 inches
Blanket body: 10 squares across × 12 squares down
Total squares: 120
Square size: Approximately 3¼ inches
Yarn weight: Worsted / Category 4
Hook: 5.5 mm
Colors: Cream, mist gray, olive, charcoal
Border: 3 rounds
Materials
You will need approximately:
Color A — Warm Cream
650–700 yards
Color B — Soft Mist Gray
400–450 yards
Color C — Heathered Olive Green
400–450 yards
Color D — Charcoal Gray
400–450 yards
Also:
- 5.5 mm crochet hook with a straight shaft
- yarn needle
- scissors
- stitch markers
- measuring tape
- blocking mats and pins, recommended
Total yarn requirement is approximately:
1,850–2,050 yards
Tunisian crochet can use more yarn than ordinary flat crochet, so having a little extra is useful.
Suggested Color Palette
For the earthy version:
A — Warm Cream
B — Pale Silver Gray
C — Moss / Olive Marl
D — Deep Charcoal
The four colors should have enough contrast that the individual checkerboard blocks remain obvious.
Other combinations that would work beautifully include:
- ivory + blush + sage + charcoal
- cream + mustard + rust + brown
- white + pale blue + navy + gray
- oatmeal + terracotta + olive + espresso
- cream + lavender + plum + gray
Finished Measurements
Each blocked square:
Approximately 3¼ × 3¼ inches
Joined body:
Approximately 32½ × 39 inches
After joining and border:
Approximately 37 × 45 inches
Exact measurements will depend on your yarn, hook, joining tension, and blocking.
Gauge
One completed and blocked square should measure approximately:
3¼ inches square.
For this blanket, square size is more important than a specific stitch gauge.
Make one test square before crocheting all 120.
If your square is too small:
- use a 6 mm hook
- or work an additional Tunisian row
If your square is too large:
- use a 5 mm hook
- or remove one row
Once you are happy with the sample, make every remaining square exactly the same way.
Abbreviations
- ch = chain
- sc = single crochet
- hdc = half double crochet
- sl st = slip stitch
- Tss = Tunisian simple stitch
- Tslst = Tunisian slip stitch
- st = stitch
- sts = stitches
- yo = yarn over
- lp = loop
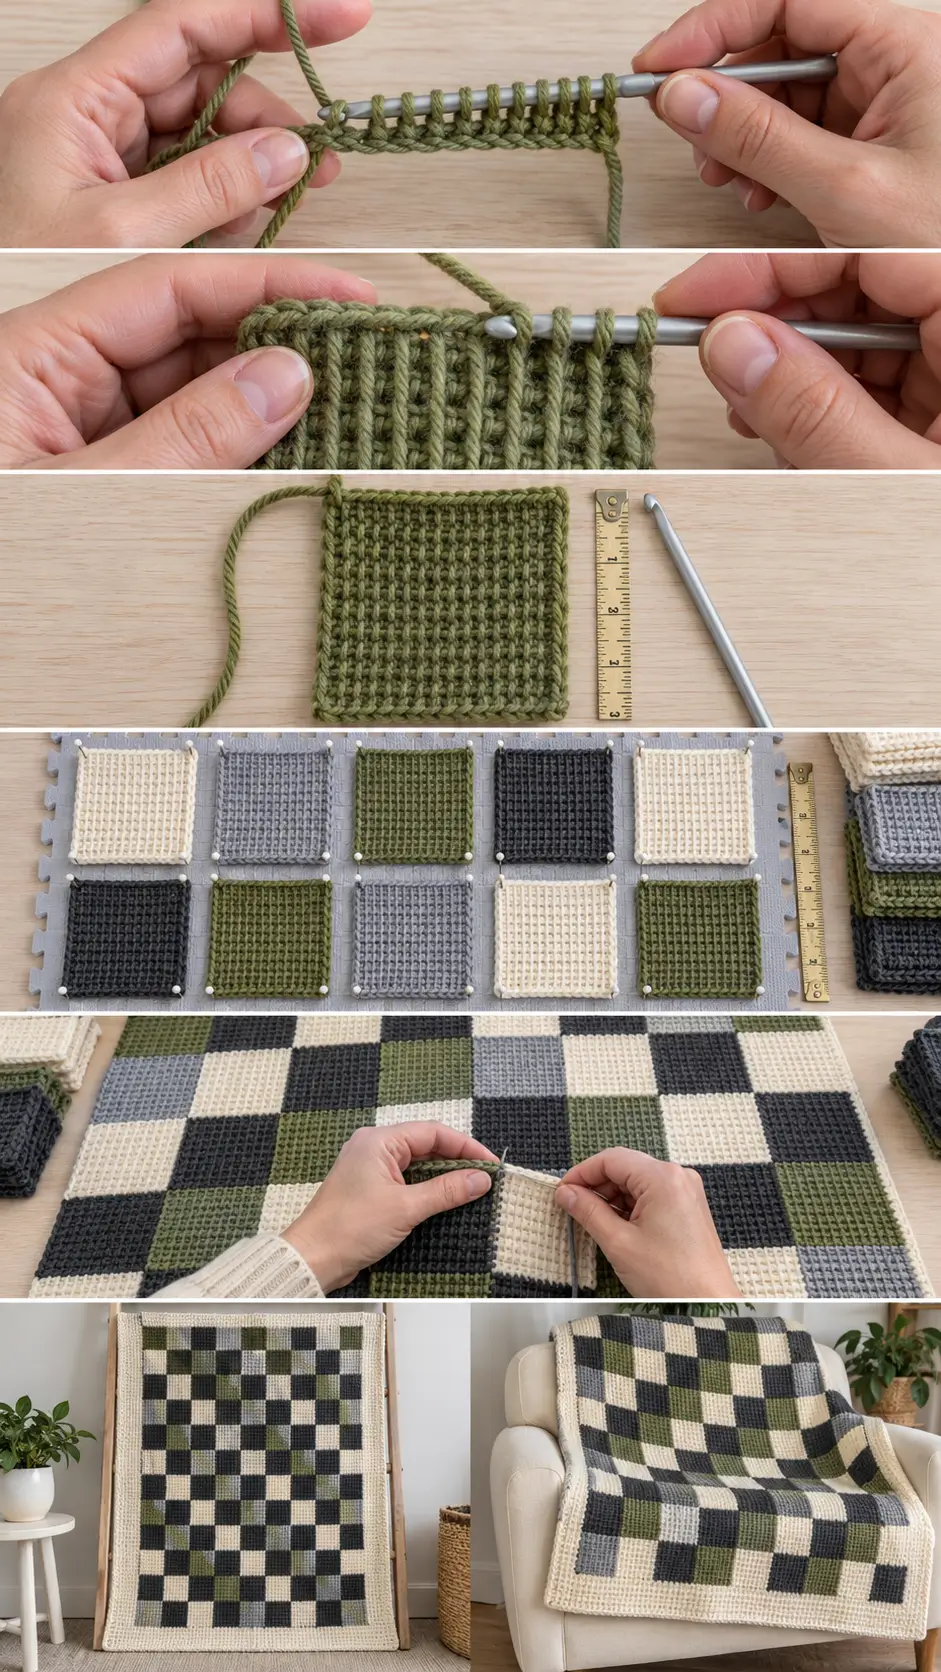
Tunisian Crochet Basics
Unlike ordinary crochet, each Tunisian row has two parts:
Forward Pass
You collect loops onto the hook.
Return Pass
You work those loops back off the hook.
Do not turn the work between the forward and return passes.
The right side stays facing you while each square is being crocheted.
Standard Tunisian Return Pass
After completing the forward pass:
Ch 1.
Then repeat:
Yo, pull through 2 loops
until only one loop remains on the hook.
That single remaining loop becomes the first loop of the next row.
Tunisian Simple Stitch — Tss
Skip the first vertical bar directly underneath the loop already on your hook.
Insert the hook from:
right to left
under the next front vertical bar.
Yarn over.
Pull up a loop.
Leave that loop on the hook.
Repeat across.
Final Edge Stitch
For a neat outer edge, work the final stitch differently.
At the final stitch of the row:
Insert the hook underneath both outer vertical strands of the last stitch.
Yarn over.
Pull up one loop.
This makes the edge firmer and easier to seam later.
Tunisian Slip Stitch Bind-Off
Insert the hook as you would for Tunisian simple stitch.
Yarn over.
Pull the yarn through:
- the vertical bar
- and the loop already on your hook
in one movement.
Continue across.
This creates a clean finished upper edge.
PART 1 — MAKE ONE TUNISIAN SQUARE
Every square is made exactly the same way.
Only the yarn color changes.
Using the 5.5 mm hook:
Ch 13.
Foundation Forward Pass
Skip the first chain closest to your hook.
Beginning in the second chain from the hook:
Insert hook into the back bump of each chain and pull up one loop.
Continue across.
You should finish with:
13 loops on the hook
including the original loop.
Foundation Return Pass
Ch 1.
Then:
Yo, pull through 2 loops
repeatedly until:
1 loop remains.
Row 2 — Tunisian Simple Stitch
Skip the first vertical bar.
Tss under each vertical bar across.
Work the final edge stitch under both outer strands.
You should again have:
13 loops.
Work the standard return pass.
Rows 3–10
Repeat Row 2.
For every row:
- skip first vertical bar
- Tss across
- work final edge stitch
- complete standard return pass
Keep your tension relaxed.
Check the Shape
After Row 10, the square should be close to square.
Depending on your yarn, you may need:
One additional row
if the piece is too wide and short.
Or you may stop one row earlier if it is already square.
The goal before blocking is approximately:
3–3¼ inches
in each direction.
Bind-Off Row
Work loosely.
Skip the first vertical bar.
Tslst across each vertical bar.
Work the final edge stitch as a slip stitch.
Fasten off, leaving approximately:
8–10 inches of yarn
if you want to use the tail for joining.
Why Tunisian Squares Curl
Tunisian simple stitch naturally tends to curl toward the front.
That is normal.
Do not compensate by making the stitches extremely loose.
Blocking will relax the individual squares, and joining them together further stabilizes the fabric.
PART 2 — MAKE ALL 120 SQUARES
Make:
Color A — Cream
30 squares
Color B — Mist Gray
30 squares
Color C — Olive
30 squares
Color D — Charcoal
30 squares
Total:
120 squares.
Block the Squares Before Joining
This step makes a major difference.
Pin every square to approximately:
3¼ × 3¼ inches.
Make sure:
- all four corners are square
- upper and lower edges are straight
- vertical sides are equal
- Tunisian texture remains visible
Allow the squares to dry completely before removing the pins.
A blocking board is especially useful here because you will be making many identical pieces.
PART 3 — COLOR LAYOUT
Arrange the blanket:
10 squares across × 12 rows down.
Use this repeating diagonal sequence.
Row 1
A – B – C – D – A – B – C – D – A – B
Row 2
B – C – D – A – B – C – D – A – B – C
Row 3
C – D – A – B – C – D – A – B – C – D
Row 4
D – A – B – C – D – A – B – C – D – A
Rows 5–8
Repeat Rows 1–4.
Rows 9–12
Repeat Rows 1–4 again.
This produces a diagonal checkerboard effect rather than simple vertical stripes.
The arrangement should look like little colored blocks moving diagonally across the blanket.
Take a Photo Before Joining
Once you are happy with the layout, photograph the entire arrangement.
This makes it much easier to reconstruct the color sequence if the squares get moved while you are joining.
PART 4 — JOIN THE SQUARES
A nearly invisible mattress-style seam keeps the checkerboard effect clean.
Use cream yarn or a neutral shade.
Join Squares Into Rows
Place two neighboring squares side by side with right sides facing upward.
Thread approximately:
24 inches of yarn
onto your yarn needle.
Beginning at one corner, pass the needle through the corresponding edge loops of both squares.
Alternate:
- right square
- left square
- right square
- left square
Pull the yarn gently every few stitches.
Do not pull tightly enough to gather the squares.
The seam should close neatly between them.
Complete Each Horizontal Strip
Join:
10 squares
to make the first row.
Repeat until you have:
12 strips.
Each strip contains 10 squares.
Join the Rows
Arrange the strips according to your original color-layout photograph.
Join Row 1 to Row 2.
Then:
Row 2 to Row 3.
Continue until all:
12 rows
are connected.
Align Every Intersection
Where four squares meet, take extra care to line up all four corners.
Pass your joining yarn securely through the intersection.
This prevents small holes from appearing where the seams cross.
Alternative — Visible Crochet Join
If you prefer a more graphic look, you can join the squares with slip stitches.
Place two squares wrong sides together.
Using cream:
Sl st through corresponding outer loops across the edge.
Keep the slip stitches loose.
This creates a subtle raised cream grid around the checkerboard blocks.
PART 5 — CHECK THE BLANKET BODY
Lay the assembled blanket flat.
You should see:
- 10 blocks across
- 12 blocks down
- four repeating colors
- diagonal color movement
- consistent little Tunisian squares
- a woven pixel-like texture
The body should measure approximately:
32½ × 39 inches
before the border.
Minor differences are fine.
PART 6 — BORDER
Use Color A — Cream and the 5.5 mm hook.
The border helps stabilize the many small squares and gives the checkerboard a clean outer frame.
Border Round 1
Join cream at any corner.
Ch 1.
Work sc evenly around the entire blanket.
Along each individual square edge, aim for approximately:
11 sc.
At each blanket corner:
3 sc.
Continue around.
Join with sl st to first sc.
Check Round 1
Lay the blanket flat.
If the edge is:
Ruffling
You have too many stitches.
Remove a few evenly along that side.
Pulling inward
Add a few stitches.
Getting Round 1 flat is more important than forcing an exact border stitch count.
Border Round 2
Ch 2.
Hdc in every stitch around.
At each corner work:
3 hdc
into the center corner stitch.
Join.
Border Round 3
Ch 1.
Working in the back loop only:
Sc in every stitch around.
At each corner:
3 BLO sc.
Join.
Fasten off.
Optional Fourth Round
For a slightly wider cream frame:
Work one final round of regular sc.
At every corner:
3 sc
in the center corner stitch.
Fasten off.
Finished Border
The completed border should measure approximately:
1½–2 inches
depending on tension.
This gives the final blanket dimensions of roughly:
37 × 45 inches.
Finishing
Weave in all remaining tails.
Because the blanket contains many small motifs, secure each tail carefully.
Weave:
- several stitches in one direction
- change direction
- weave through several more stitches
Then trim.
Do not rely on simply cutting tails close to the joining seams.
Final Blocking
Lightly block the completed blanket.
Shape to approximately:
37 × 45 inches.
Straighten:
- top
- bottom
- both side edges
- all four corners
Use your fingers to flatten any square intersections that became slightly raised during joining.
Allow the blanket to dry completely.
Why the Blanket Looks Woven
Tunisian simple stitch creates a row of prominent vertical bars.
When many tiny squares are rotated through a strong checkerboard color arrangement, those vertical textures make each colored block look almost like a tiny piece of woven fabric.
The effect becomes especially striking when the blanket is folded because the small squares create a dense field of color instead of obvious large motifs.
How to Make a Smaller Baby Blanket
Use:
8 squares across × 10 squares down.
You will need:
80 squares.
Make:
- 20 cream
- 20 gray
- 20 olive
- 20 charcoal
The body will measure approximately:
26 × 32½ inches
before border.
After border:
approximately:
30 × 36 inches.
Larger Baby Blanket
Use:
10 × 12 squares
as written.
Total:
120 squares.
Finished:
approximately:
37 × 45 inches.
Toddler Blanket
Use:
12 squares across × 15 squares down.
Total:
180 squares.
Body approximately:
39 × 48¾ inches
before border.
Finished approximately:
43 × 53 inches.
Lap Blanket
Use:
14 squares across × 16 squares down.
Total:
224 squares.
Finished size will be approximately:
49 × 56 inches
depending on border and blocking.
How to Change the Square Size
You do not have to use 3¼-inch blocks.
For larger squares, begin with:
Ch 17.
Work Tunisian simple stitch until the piece is square.
Larger squares mean:
- fewer motifs
- faster assembly
- bolder checkerboard effect
Smaller squares give the blanket the detailed pixel appearance seen here.
Three-Color Version
If you want fewer yarn colors, use:
- cream
- sage
- charcoal
Arrange:
A – B – C – A – B – C
and offset each row by one color.
The result remains visually interesting but requires fewer yarn changes.
Two-Color Checkerboard
For a classic checkerboard, make equal amounts of:
A
Cream
B
Olive
Alternate:
A – B – A – B
then begin the next row:
B – A – B – A
This creates a bold graphic blanket.
Scrappy Version
This construction is excellent for leftover worsted yarn.
Keep one color consistent—such as cream—and fill the remaining squares with:
- sage
- rust
- mustard
- charcoal
- taupe
- dusty blue
- terracotta
To keep the finished blanket cohesive, choose colors with similar saturation.
What If My Squares Curl Badly?
Some curl is expected with Tunisian simple stitch.
Try:
- slightly larger hook
- relaxed return passes
- blocking before joining
Do not pull the first or last stitches excessively tight.
Once joined and bordered, the fabric usually becomes much flatter.
Why Are My Square Edges Loose?
The last stitch of each Tunisian row should be worked beneath:
both outer vertical strands.
This creates a more substantial side edge.
Also avoid making your return pass chains unusually loose.
Why Do My Squares Have Different Sizes?
The most common causes are:
- changing tension
- changing hooks
- inconsistent row counts
- different yarn thicknesses
Even yarns labeled as the same weight can behave differently.
Make a sample in each yarn color before producing dozens of squares.
What If One Yarn Color Makes a Smaller Square?
Use a slightly larger hook for that color.
For example:
- 5.5 mm for most colors
- 6 mm for a particularly thin yarn
The important result is that every blocked square reaches approximately:
3¼ inches.
Can I Use DK Yarn?
Yes.
Try a:
4.5–5 mm hook
and expect smaller blocks.
Either make more blocks or increase the foundation chain so each square still reaches your preferred size.
Can I Use Cotton?
Yes.
Cotton gives exceptionally crisp Tunisian stitch definition.
It works beautifully for this checkerboard style.
For a full blanket, however, pure cotton can become fairly heavy.
A cotton/acrylic blend is a useful alternative.
Can I Use a Regular Crochet Hook?
Yes, for these small squares.
Only a limited number of loops are held on the hook at one time.
Choose a hook with:
- a reasonably straight shaft
- no oversized ergonomic grip immediately behind the hook head
A short Tunisian crochet hook is even more comfortable if you already own one.
Do I Need a Tunisian Crochet Hook Set?
Not for this particular blanket.
However, if you enjoy the technique and later want to crochet:
- full-width Tunisian blankets
- shawls
- large panels
- sweaters
an interchangeable Tunisian hook set with cables makes larger projects much easier.
Using a Blocking Board
Because this pattern contains 120 identical squares, a blocking board can save considerable time.
Set the pegs once to:
3¼ × 3¼ inches.
Then block several squares to exactly the same measurement.
This helps create:
- cleaner seams
- straighter blanket edges
- matching intersections
- more professional-looking checkerboard blocks
Baby Blanket Safety
For baby use, keep the finished blanket free from:
- buttons
- beads
- loose tassels
- long fringe
- detachable decorations
Secure all yarn ends carefully.
For infants, use handmade blankets for supervised cuddling, stroller time, floor play, or decoration rather than loose unattended sleep bedding.
Other Projects From the Same Squares
Once you know how to make the mini Tunisian block, the same construction can become:
Checkerboard Pillow
Make two:
5 × 5-square panels
and join around an insert.
Crochet Tote
Make two:
4 × 5-square panels
and add a firm bottom and handles.
Table Runner
Arrange:
3 squares across × 12–16 squares long.
Scarf
Use:
2 or 3 squares across
and continue to your preferred length.
Crochet Hook Case
Use smaller blocks to create a textured rectangular outer panel, then add a lining and zipper.
Final Thoughts
The visual impact comes from repeating one very simple idea:
tiny Tunisian square + four earthy colors + diagonal checkerboard layout.
You do not need to work an entire blanket with hundreds of loops sitting on one long hook.
Instead, each little block is manageable on its own.
Make the cream, gray, olive, and charcoal squares.
Block every one to the same size.
Arrange them in the diagonal four-color sequence.
Join them into a rectangle.
Then add a clean cream border.
The finished blanket has the woven, pixel-like appearance of a much more complicated technique while relying almost entirely on one stitch: Tunisian simple stitch.